看完這一篇,再也不怕面試官問到IntentService的原理
阿新 • • 發佈:2020-07-28
### IntentService是什麼
在內部封裝了 Handler、訊息佇列的一個Service子類,適合在後臺執行一系列序列依次執行的耗時非同步任務,方便了我們的日常coding(普通的Service則是需要另外建立子執行緒和控制任務執行順序)

### IntentService的缺點
- IntentService,一次只可處理一個任務請求,不可並行,接受到的所有任務請求都會在同一個工作執行緒執行
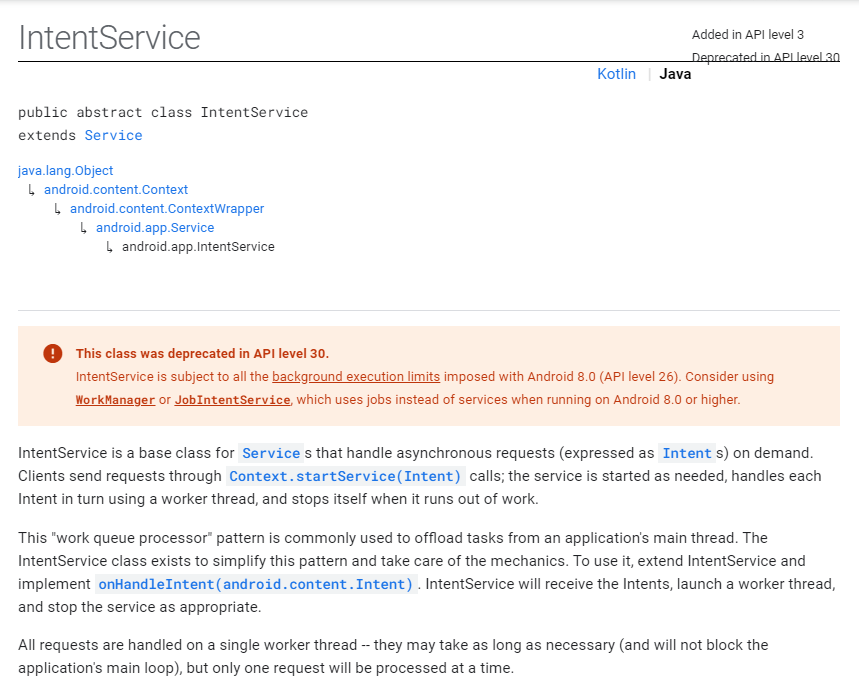
- IntentService is subject to all the [background execution limits](https://developer.android.google.cn/preview/features/background) imposed with Android 8.0 (API level 26).
翻譯:IntentService受到Android 8.0(API級別26)施加的所有[後臺執行限制]的約束。
### IntentService的未來
```
!This class was deprecated in API level 30.
IntentService is subject to all the background execution limits imposed with Android 8.0 (API level 26).
Consider using WorkManager or JobIntentService, which uses jobs instead of services when running on Android 8.0 or higher.
```
官方在最新說明中,提到 IntentService 類將會在API Level 30,也即Android 11中,被廢棄掉。作為一個從API Level 3就加入的非同步工具,如今官方建議使用JetPack元件中的WorkManager或者JobIntentService類代替它。
### IntentService怎麼用
IntentService的使用,一般都需要子類繼承IntentService,然後重寫onHandleIntent()內部邏輯
因為IntentService本質上還是一個Service,所以需要先在註冊清單中註冊上Service以及需要外部手動開啟。
```xml
```
AndroidStudio可以通過File-new-Service(IntentService),建立IntentService,IDE會幫我們自動在註冊清單註冊這個IntentService,為我們的IntentService子類提供了模板實現方法,我們可以在上面省事地修改。
下面為了方便演示,我使用官方提供的IntentService程式碼模板進行修改和操作:(程式碼有點長有點渣,請見諒)
```java
//MyIntentService.java
public class MyIntentService extends IntentService {
//用以區分 Intent 的Action名
private static final String ACTION_FOO = "action.FOO";
private static final String ACTION_BAZ = "action.BAZ";
//給Intent傳遞引數取參的常量值
private static final String EXTRA_PARAM1 = "extra.PARAM1";
private static final String EXTRA_PARAM2 = "extra.PARAM2";
/**
* IntentService構造方法:傳入的引數name是作為內部的工作執行緒名的組成部分
*/
public MyIntentService() {
super("MyIntentService");
Log.i("MyIntentService" , "===created===");
}
@Override
public int onStartCommand(@Nullable Intent intent, int flags, int startId) {
if(intent != null){
Log.i("MyIntentService","Action "+intent.getAction()+" startId: "+startId);
}
return super.onStartCommand(intent, flags, startId);
}
@Override
public void onDestroy() {
super.onDestroy();
Log.i("MyIntentService","===onDestroyed===");
}
/**
* 提供給外界呼叫,啟動任務Foo的方法
* 如果IntentService已經在執行,任務將會進入任務(訊息)佇列等待排隊
* @param context 呼叫者Context
* @param param1 任務引數1
* @param param2 任務引數2
*/
public static void startActionFoo(Context context, String param1, String param2) {
Intent intent = new Intent(context, MyIntentService.class);
intent.setAction(ACTION_FOO);
intent.putExtra(EXTRA_PARAM1, param1);
intent.putExtra(EXTRA_PARAM2, param2);
context.startService(intent);
}
/**
* 提供給外界呼叫,啟動任務Baz的方法
* 如果IntentService已經在執行,任務將會進入任務(訊息)佇列等待排隊
* @param context 呼叫者Context
* @param param1 任務引數1
* @param param2 任務引數2
*/
public static void startActionBaz(Context context, String param1, String param2) {
Intent intent = new Intent(context, MyIntentService.class);
intent.setAction(ACTION_BAZ);
intent.putExtra(EXTRA_PARAM1, param1);
intent.putExtra(EXTRA_PARAM2, param2);
context.startService(intent);
}
/**
* IntentService被啟動後,會回撥此方法
* onHandleIntent內部根據收到的不同Intent執行不同的操作
* @param intent 任務意圖
*/
@Override
protected void onHandleIntent(Intent intent) {
if (intent != null) {
final String action = intent.getAction();
if (ACTION_FOO.equals(action)) {
final String param1 = intent.getStringExtra(EXTRA_PARAM1);
final String param2 = intent.getStringExtra(EXTRA_PARAM2);
handleActionFoo(param1, param2);
} else if (ACTION_BAZ.equals(action)) {
final String param1 = intent.getStringExtra(EXTRA_PARAM1);
final String param2 = intent.getStringExtra(EXTRA_PARAM2);
handleActionBaz(param1, param2);
}
Log.i("MyIntentService","Action "+action+" completed");
}
}
/**
* 會在後臺的工作執行緒上執行(耗時)任務Foo
* @param param1 任務引數1
* @param param2 任務引數2
*/
private void handleActionFoo(String param1, String param2) {
Log.i("MyIntentService","handleActionFoo : "+ Thread.currentThread().getName() +
" " + param1 + " "+ param2 );
}
/**
* 會在後臺的工作執行緒上執行(耗時)任務Baz
* @param param1 任務引數1
* @param param2 任務引數2
*/
private void handleActionBaz(String param1, String param2) {
Log.i("MyIntentService","handleActionBaz : "+ Thread.currentThread().getName() +
" " + param1 + " "+ param2 );
}
}
```
#### 外部如何啟用IntentService
可以通過呼叫`context.startService(new Intent(context, MyIntentService.class))`
或者呼叫`MyIntentService`的靜態方法`startActionFoo`/`startActionBaz`啟動,如果你仔細看其實這兩種方式本質上都是相同的程式碼邏輯。
你可能會問:我平時最常用的`bindService()`哪去了?這個問題,請接著往下看。
#### DEMO執行結果
在Activity裡,連續呼叫開啟了Intentservice,特別地前兩次是相同的Intent和引數
```java
MyIntentService.startActionFoo(this,"DMingO's" ,"blog");
MyIntentService.startActionFoo(this,"DMingO's" ,"blog");
MyIntentService.startActionBaz(this,"DMingO's" ,"Github");
```

從執行結果可以看出:
- IntentService會按照先後順序給Action編號遞增的startId,從1開始。
- 每啟動一次IntentService,`onStartCommand()`,`onHandleIntent()`就會被回撥一次,但IntentService構造方法只會被呼叫一次
- IntentService主要的操作邏輯都在 `onHandleIntent()` 中
- 在主執行緒啟動的IntentService,而onHandleIntent的操作是在指定了執行緒名的工作執行緒上執行的
- IntentService在所有的任務完成後會自動執行銷燬回撥onDestroyed,而不用我們手動停止
IntentService的使用場景,很適合需要在後臺執行一系列序列執行的**耗時**任務,不會影響到UI執行緒,且任務全部完成後會自動銷燬。
下面開始探究IntentService這種可以依次執行任務,任務完畢即銷燬的背後原理,
