K8S(11)配置中心實戰-單環境交付apollo三元件
阿新 • • 發佈:2020-08-14
# k8s配置中心實戰-交付apollo三元件
[TOC]
## 1 apollo簡單說明
[官方地址](https://github.com/ctripcorp/apollo)
[概念請參考:](http://www.liuhaihua.cn/archives/522960.html)
### 1.1 apollo最簡架構圖:

### 1.2 apollo元件部署關係
1. configservice自帶eureka註冊中心、配置寫入configDB資料庫、優先部署、為client提供服務
2. adminservice向eureka註冊服務、與configservice共用資料庫、為portal提供服務
3. configservice和adminservice組成一套環境、多個環境就得部署多套config和admin
4. portal是web端、各環境共用、只需部署一套、有自己單獨的資料庫
## 2 為appllo準備資料庫
apollo需要使用資料庫,如果是mysql,需要版本在5.6以上:
本次環境mysql部署在10.4.7.11上,使用mysql5.7,為測試簡單起見,各環境資料庫使用同一個,不做隔離
### 2.1 下載安裝mysql
#### 2.1.1 yum安裝mysql
```sh
rpm -Uvh https://dev.mysql.com/get/mysql80-community-release-el7-1.noarch.rpm
yum -y install yum-utils
yum-config-manager --disable mysql80-community
yum-config-manager --enable mysql57-community
yum install mysql-server -y
```
#### 2.1.2 建立簡單配置檔案
```sh
cat >/etc/my.cnf <<'EOF'
[mysqld]
character_set_server = utf8mb4
collation_server = utf8mb4_general_ci
init_connect = "SET NAMES 'utf8mb4'"
[mysql]
default-character-set = utf8mb4
EOF
```
#### 2.1.2 啟動mysql並初始設定
```sh
systemctl start mysqld
systemctl enable mysqld
mysql -u root -p`grep password /var/log/messages|awk '{print $NF}'`
# 修改密碼
> set global validate_password_policy=0;
> set global validate_password_length=1;
> set password=password('123456');
> flush privileges;
# 檢查字符集:需要四個都是utf8mb4
> \s
```
## 3 初始化appllo資料庫
[configdb初始化指令碼](https://github.com/ctripcorp/apollo/blob/1.5.1/scripts/db/migration/configdb/V1.0.0__initialization.sql)
[portal初始化指令碼](https://github.com/ctripcorp/apollo/blob/master/scripts/db/migration/portaldb/V1.0.0__initialization.sql)
### 3.1 configdb資料庫
#### 3.1.1下載指令碼並執行:
```sh
wget -O apolloconfig.sql https://raw.githubusercontent.com/ctripcorp/apollo/1.5.1/scripts/db/migration/configdb/V1.0.0__initialization.sql
# 匯入sql檔案
mysql -uroot -p123456 < apolloconfig.sql
# 檢查是否匯入成功
mysql -uroot -p123456 -e "show databases;"|grep ApolloConfigDB
```
#### 3.1.2 授權並修改初始資料:
```sh
mysql -uroot -p123456
> grant INSERT,DELETE,UPDATE,SELECT on ApolloConfigDB.* to 'apollo'@'10.4.7.%' identified by "123456";
# 修改資料
> use ApolloConfigDB
> update ServerConfig set Value='http://apollo-config.zq.com/eureka' where Id=1;
```
#### 3.1.3 新增config域名解析:
```sh
vi /var/named/zq.com.zone
mysql A 10.4.7.11
apollo-config A 10.4.7.10
apollo-admin A 10.4.7.10
apollo-portal A 10.4.7.10
# 重啟並驗證
systemctl restart named
dig -t A apollo-config.zq.com @10.4.7.11 +short
```
### 3.2 portal資料庫
由於portal使用的是另一個portaldb,我們需要在資料庫中新建portdb,並初始化
#### 3.2.1 下載並執行
```sh
wget -O apollo-portal.sql https://raw.githubusercontent.com/ctripcorp/apollo/1.5.1/scripts/db/migration/portaldb/V1.0.0__initialization.sql
# 匯入sql檔案
mysql -uroot -p123456 < apollo-portal.sql
# 檢查是否匯入成功
mysql -uroot -p123456 -e "show databases;"|grep ApolloPortalDB
```
#### 3.2.2 授權使用者並更新初始資料
都使用`apollo`使用者來管理資料庫是為了方便,如果有相關的安全考慮可以給config和portal分別使用不同的資料庫賬號
```sql
mysql -uroot -p123456
> grant INSERT,DELETE,UPDATE,SELECT on ApolloPortalDB.* to "apollo"@"10.4.7.%" identified by "123456";
# 更新部門名
> update ApolloPortalDB.ServerConfig set Value='[{"orgId":"zq01","orgName":"研發部"},{"orgId":"zq02","orgName":"運維部"}]' where Id=2;
```
## 4 部署configservice
### 4.1 製作docker映象
操作在`7.200`上完成
#### 4.1.1 下載程式包
```sh
wget https://github.com/ctripcorp/apollo/releases/download/v1.5.1/apollo-configservice-1.5.1-github.zip
mkdir /data/dockerfile/apollo-configservice
unzip -o apollo-configservice-1.5.1-github.zip -d /data/dockerfile/apollo-configservice/
```
#### 4.1.2 修改連線資料庫配置:
```sh
cd /data/dockerfile/apollo-configservice/config
# 修改資料庫連線地址
sed -i 's#fill-in-the-correct-server#mysql.zq.com#g' application-github.properties
# 修改資料庫連線使用者和密碼
sed -i 's#FillInCorrectUser#apollo#g' application-github.properties
sed -i 's#FillInCorrectPassword#123456#g' application-github.properties
# 檢視結果
config]# egrep -v "^#|$^" application-github.properties
spring.datasource.url = jdbc:mysql://mysql.zq.com:3306/ApolloConfigDB?characterEncoding=utf8
spring.datasource.username = apollo
spring.datasource.password = 123456
```
#### 4.1.3 建立啟動指令碼:
程式中自帶的`start.sh`啟動指令碼時不適用與K8S執行,因此需要專門下載他們提供的K8S內使用的指令碼
```sh
# 1.從官網下載啟動指令碼
cd /data/dockerfile/apollo-configservice/scripts/
wget https://raw.githubusercontent.com/ctripcorp/apollo/1.5.1/scripts/apollo-on-kubernetes/apollo-config-server/scripts/startup-kubernetes.sh
# 2. 新增一行使用主機名的變數
sed -i '5i APOLLO_CONFIG_SERVICE_NAME=$(hostname -i)' startup-kubernetes.sh
# 3.根據需要修改下jvm限制
```
#### 4.1.4 編寫dockerfile
[ dockerfile官方地址](https://github.com/ctripcorp/apollo/blob/1.5.1/scripts/apollo-on-kubernetes/apollo-config-server/Dockerfile)
```sh
cd ..
cat >Dockerfile <<'EOF'
FROM harbor.zq.com/base/jre8:8u112
ENV VERSION 1.5.1
RUN ln -sf /usr/share/zoneinfo/Asia/Shanghai /etc/localtime &&\
echo "Asia/Shanghai" > /etc/timezone
ADD apollo-configservice-${VERSION}.jar /apollo-configservice/apollo-configservice.jar
ADD config/ /apollo-configservice/config
ADD scripts/ /apollo-configservice/scripts
CMD ["sh","/apollo-configservice/scripts/startup-kubernetes.sh"]
EOF
```
#### 4.1.5 構建docker映象
```sh
docker build . -t harbor.zq.com/infra/apollo-configservice:v1.5.1
docker push harbor.zq.com/infra/apollo-configservice:v1.5.1
```
### 4.2 編寫資源配置清單:
```sh
mkdir /data/k8s-yaml/apollo-configservice
cd /data/k8s-yaml/apollo-configservice
```
#### 4.2.1 建立config的configmap資源清單
給configservice建立cm資源的清單的目的是方便修改
其實裡面的內容就是前面修改的`application-github.properties`檔案
如果確定不會修改,可以不建立此cm,直接寫死配置到docker映象中
```sh
cat >cm.yaml <<'EOF'
apiVersion: v1
kind: ConfigMap
metadata:
name: apollo-configservice-cm
namespace: infra
data:
application-github.properties: |
# DataSource
spring.datasource.url = jdbc:mysql://mysql.zq.com:3306/ApolloConfigDB?characterEncoding=utf8
spring.datasource.username = apollo
spring.datasource.password = 123456
eureka.service.url = http://apollo-config.zq.com/eureka
app.properties: |
appId=100003171
EOF
```
> 在同一個configmap資源中,可以新增多個配置檔案,上述配置就有兩個,分別是:
> `application-github.properties`和`app.properties`
#### 4.2.2 建立Deployment資源清單
```sh
cat >dp.yaml <<'EOF'
kind: Deployment
apiVersion: extensions/v1beta1
metadata:
name: apollo-configservice
namespace: infra
labels:
name: apollo-configservice
spec:
replicas: 1
selector:
matchLabels:
name: apollo-configservice
template:
metadata:
labels:
app: apollo-configservice
name: apollo-configservice
spec:
volumes:
- name: configmap-volume
configMap:
name: apollo-configservice-cm
containers:
- name: apollo-configservice
image: harbor.zq.com/infra/apollo-configservice:v1.5.1
ports:
- containerPort: 8080
protocol: TCP
volumeMounts:
- name: configmap-volume
mountPath: /apollo-configservice/config
terminationMessagePath: /dev/termination-log
terminationMessagePolicy: File
imagePullPolicy: IfNotPresent
imagePullSecrets:
- name: harbor
restartPolicy: Always
terminationGracePeriodSeconds: 30
securityContext:
runAsUser: 0
schedulerName: default-scheduler
strategy:
type: RollingUpdate
rollingUpdate:
maxUnavailable: 1
maxSurge: 1
revisionHistoryLimit: 7
progressDeadlineSeconds: 600
EOF
```
#### 4.2.3 建立service資源清單
```sh
cat >svc.yaml <<'EOF'
kind: Service
apiVersion: v1
metadata:
name: apollo-configservice
namespace: infra
spec:
ports:
- protocol: TCP
port: 8080
targetPort: 8080
selector:
app: apollo-configservice
EOF
```
#### 4.2.4 建立ingress資源清單
```sh
cat >ingress.yaml <<'EOF'
kind: Ingress
apiVersion: extensions/v1beta1
metadata:
name: apollo-configservice
namespace: infra
spec:
rules:
- host: apollo-config.zq.com
http:
paths:
- path: /
backend:
serviceName: apollo-configservice
servicePort: 8080
EOF
```
> service中不一定必須暴露8080,分配的clusterIP中所有的埠都可以
> 但ingress中的servicePort一定要與service中暴露的埠匹配
### 4.3 應用資源配置清單:
#### 4.3.1 任意node執行
```sh
kubectl create -f http://k8s-yaml.zq.com/apollo-configservice/cm.yaml
kubectl create -f http://k8s-yaml.zq.com/apollo-configservice/dp.yaml
kubectl create -f http://k8s-yaml.zq.com/apollo-configservice/svc.yaml
kubectl create -f http://k8s-yaml.zq.com/apollo-configservice/ingress.yaml
```
#### 4.3.2 檢查啟動情況:
```sh
kubectl -n infra get pod|grep apollo-config
# 檢查命令
kubectl -n infra logs apollo-configservice-64fc749978-9nz5h --tail=4
```


需要等到eureka啟動以後才可以,接下來使用瀏覽器訪問`apollo-config.zq.com`

## 5 部署adminservice
[官方地址 ](https://github.com/ctripcorp/apollo/releases/download/v1.5.1/apollo-adminservice-1.5.1-github.zip)
### 5.1 製作docker映象
操作在`7.200`上完成
#### 5.1.1 下載程式包
```sh
wget https://github.com/ctripcorp/apollo/releases/download/v1.5.1/apollo-adminservice-1.5.1-github.zip
mkdir /data/dockerfile/apollo-adminservice
unzip -o apollo-adminservice-1.5.1-github.zip -d /data/dockerfile/apollo-adminservice/
```
#### 5.1.2 修改連線資料庫配置:
由於使用了configmap資源將配置檔案掛載出來了,所以不在修改配置檔案,如需修改配置檔案,請參考部署apollo-configservice時候的修改方法:
#### 5.1.3 建立啟動指令碼:
程式中自帶的`start.sh`啟動指令碼時不適用與K8S執行,因此需要專門下載他們提供的K8S內使用的指令碼
```sh
# 1.從官網下載啟動指令碼
cd /data/dockerfile/apollo-adminservice/scripts/
wget https://raw.githubusercontent.com/ctripcorp/apollo/1.5.1/scripts/apollo-on-kubernetes/apollo-admin-server/scripts/startup-kubernetes.sh
# 2. 新增一行使用主機名的變數
sed -i '5i APOLLO_CONFIG_SERVICE_NAME=$(hostname -i)' startup-kubernetes.sh
# 3.修改埠為8080
sed -i 's#8090#8080#g' startup-kubernetes.sh
```
> 官方配置檔案埠改為8090的目的是虛擬機器部署的時候埠不衝突
> 但我們用K8S部署,會給他單獨的clusterIP,所以不用擔心埠重複
#### 5.1.4 編寫dockerfile
```sh
cd ..
cat >Dockerfile <<'EOF'
FROM stanleyws/jre8:8u112
ENV VERSION 1.5.1
RUN ln -sf /usr/share/zoneinfo/Asia/Shanghai /etc/localtime &&\
echo "Asia/Shanghai" > /etc/timezone
ADD apollo-adminservice-${VERSION}.jar /apollo-adminservice/apollo-adminservice.jar
ADD config/ /apollo-adminservice/config
ADD scripts/ /apollo-adminservice/scripts
CMD ["/bin/bash","/apollo-adminservice/scripts/startup-kubernetes.sh"]
EOF
```
> 由於要使用cm配置資源,因此就不改config中的配置了
#### 5.1.5 構建docker映象
```sh
docker build . -t harbor.zq.com/infra/apollo-adminservice:v1.5.1
docker push harbor.zq.com/infra/apollo-adminservice:v1.5.1
```
### 5.2 製作資源配置清單:
adminservice向註冊中心註冊服務,不直接對外提供服務,因此不需要暴露埠,只需要cm資源和dp資源
```sh
mkdir /data/k8s-yaml/apollo-adminservice
cd /data/k8s-yaml/apollo-adminservice
```
#### 5.2.1 建立configmap資源清單
```
cat >cm.yaml <<'EOF'
apiVersion: v1
kind: ConfigMap
metadata:
name: apollo-adminservice-cm
namespace: infra
data:
application-github.properties: |
# DataSource
spring.datasource.url = jdbc:mysql://mysql.zq.com:3306/ApolloConfigDB?characterEncoding=utf8
spring.datasource.username = apollo
spring.datasource.password = 123456
eureka.service.url = http://apollo-config.zq.com/eureka
app.properties: |
appId=100003172
EOF
```
> 注意每個服務的appId都不會一樣哦
#### 5.2.2 建立Deployment資源清單
```sh
cat >dp.yaml <<'EOF'
kind: Deployment
apiVersion: extensions/v1beta1
metadata:
name: apollo-adminservice
namespace: infra
labels:
name: apollo-adminservice
spec:
replicas: 1
selector:
matchLabels:
name: apollo-adminservice
template:
metadata:
labels:
app: apollo-adminservice
name: apollo-adminservice
spec:
volumes:
- name: configmap-volume
configMap:
name: apollo-adminservice-cm
containers:
- name: apollo-adminservice
image: harbor.zq.com/infra/apollo-adminservice:v1.5.1
ports:
- containerPort: 8080
protocol: TCP
volumeMounts:
- name: configmap-volume
mountPath: /apollo-adminservice/config
terminationMessagePath: /dev/termination-log
terminationMessagePolicy: File
imagePullPolicy: IfNotPresent
imagePullSecrets:
- name: harbor
restartPolicy: Always
terminationGracePeriodSeconds: 30
securityContext:
runAsUser: 0
schedulerName: default-scheduler
strategy:
type: RollingUpdate
rollingUpdate:
maxUnavailable: 1
maxSurge: 1
revisionHistoryLimit: 7
progressDeadlineSeconds: 600
EOF
```
### 5.3 應用資源配置清單
#### 5.3.1 任意node執行
```sh
kubectl create -f http://k8s-yaml.zq.com/apollo-adminservice/cm.yaml
kubectl create -f http://k8s-yaml.zq.com/apollo-adminservice/dp.yaml
```
#### 5.3.2 檢查啟動情況
```sh
~]# kubectl -n infra get pod|grep apollo-admin
apollo-adminservice-6cd4fcfdc8-2drnq 1/1 Running 0 9s
# 檢查命令
kubectl -n infra logs apollo-configservice-6cd4fcfdc8-2drnq --tail=4
```
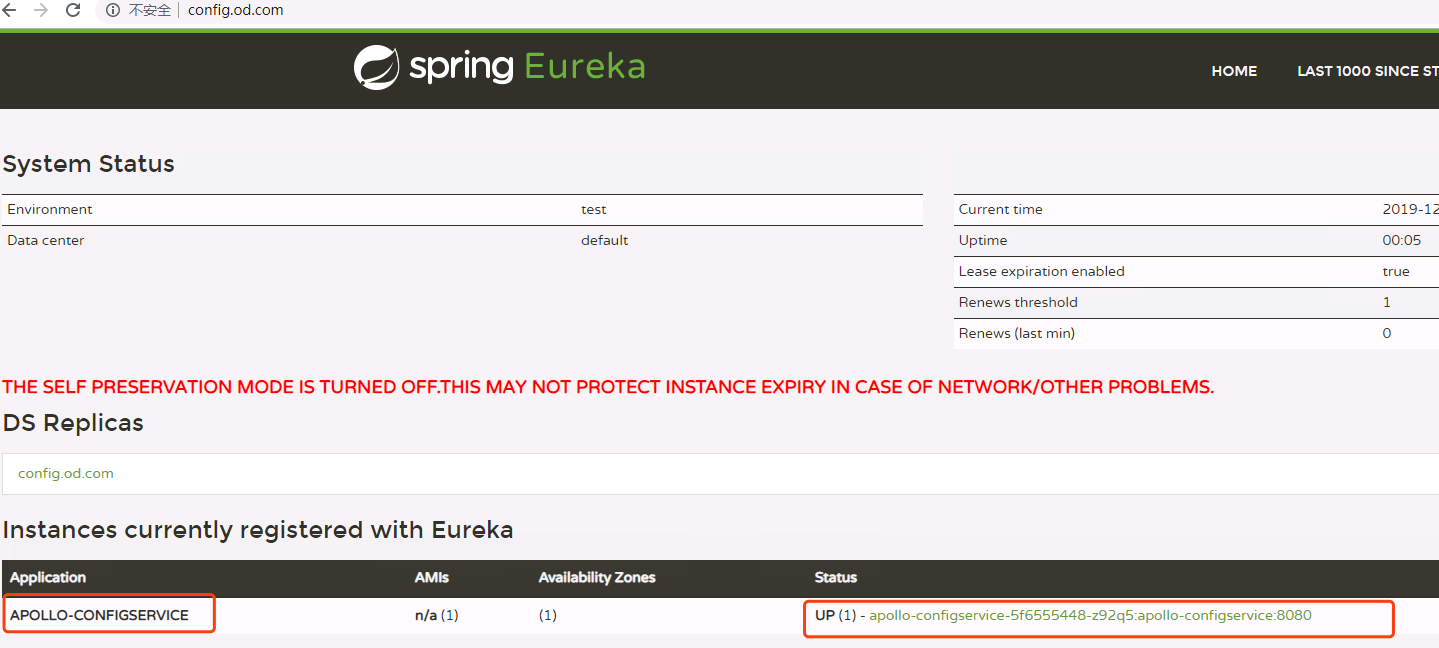
通過 apollo-config.zq.com 檢查是否註冊到了eureka:

已經順利的註冊到了註冊中心中。
## 6 部署portal
### 6.1 製作docker映象
[portal官方地址](https://github.com/ctripcorp/apollo/releases/download/v1.5.1/apollo-portal-1.5.1-github.zip)
#### 6.1.1 下載程式包
```sh
wget https://github.com/ctripcorp/apollo/releases/download/v1.5.1/apollo-portal-1.5.1-github.zip
mkdir /data/dockerfile/apollo-portal
unzip -o apollo-portal-1.5.1-github.zip -d /data/dockerfile/apollo-portal/
```
#### 6.1.2 修改配置檔案
由於使用concigmap資源,故不在這裡修改
注意如果要修改的話,要分別修改兩個檔案
1. `apollo-env.properties`修改資料庫配置
2. `apollo-env.properties`修改支援的環境列表
#### 6.1.3 建立啟動指令碼
[指令碼官方地址](https://raw.githubusercontent.com/ctripcorp/apollo/1.5.1/scripts/apollo-on-kubernetes/apollo-portal-server/scripts/startup-kubernetes.sh)
```sh
# 1.從官網下載啟動指令碼
cd /data/dockerfile/apollo-portal/scripts/
wget https://raw.githubusercontent.com/ctripcorp/apollo/1.5.1/scripts/apollo-on-kubernetes/apollo-portal-server/scripts/startup-kubernetes.sh
# 2. 新增一行使用主機名的變數
sed -i '5i APOLLO_CONFIG_SERVICE_NAME=$(hostname -i)' startup-kubernetes.sh
# 3.修改埠為8080
sed -i 's#8070#8080#g' startup-kubernetes.sh
```
#### 6.1.4 製作dockerfile:
```sh
cd /data/dockerfile/apollo-portal/
cat >Dockerfile <<'EOF'
FROM stanleyws/jre8:8u112
ENV VERSION 1.5.1
RUN ln -sf /usr/share/zoneinfo/Asia/Shanghai /etc/localtime &&\
echo "Asia/Shanghai" > /etc/timezone
ADD apollo-portal-${VERSION}.jar /apollo-portal/apollo-portal.jar
ADD config/ /apollo-portal/config
ADD scripts/ /apollo-portal/scripts
CMD ["/bin/bash","/apollo-portal/scripts/startup-kubernetes.sh"]
EOF
```
#### 6.1.5 構建docker映象
```sh
docker build . -t harbor.zq.com/infra/apollo-portal:v1.5.1
docker push harbor.zq.com/infra/apollo-portal:v1.5.1
```
### 6.2 編寫資源配置清單:
```sh
mkdir /data/k8s-yaml/apollo-portal
cd /data/k8s-yaml/apollo-portal
```
#### 6.2.1 建立configmap資源清單
```sh
cat >cm.yaml <<'EOF'
apiVersion: v1
kind: ConfigMap
metadata:
name: apollo-portal-cm
namespace: infra
data:
application-github.properties: |
# DataSource
spring.datasource.url = jdbc:mysql://mysql.zq.com:3306/ApolloPortalDB?characterEncoding=utf8
spring.datasource.username = apollo
spring.datasource.password = 123456
app.properties: |
appId=100003173
apollo-env.properties: |
dev.meta=http://apollo-config.zq.com
EOF
```
> 這裡暫時只管理一個環境,等跑通了以後,再演示多環境問題
#### 6.2.2 建立Deployment資源清單
```sh
cat >dp.yaml <<'EOF'
kind: Deployment
apiVersion: extensions/v1beta1
metadata:
name: apollo-portal
namespace: infra
labels:
name: apollo-portal
spec:
replicas: 1
selector:
matchLabels:
name: apollo-portal
template:
metadata:
labels:
app: apollo-portal
name: apollo-portal
spec:
volumes:
- name: configmap-volume
configMap:
name: apollo-portal-cm
containers:
- name: apollo-portal
image: harbor.zq.com/infra/apollo-portal:v1.5.1
ports:
- containerPort: 8080
protocol: TCP
volumeMounts:
- name: configmap-volume
mountPath: /apollo-portal/config
terminationMessagePath: /dev/termination-log
terminationMessagePolicy: File
imagePullPolicy: IfNotPresent
imagePullSecrets:
- name: harbor
restartPolicy: Always
terminationGracePeriodSeconds: 30
securityContext:
runAsUser: 0
schedulerName: default-scheduler
strategy:
type: RollingUpdate
rollingUpdate:
maxUnavailable: 1
maxSurge: 1
revisionHistoryLimit: 7
progressDeadlineSeconds: 600
EOF
```
#### 6.2.3 建立service資源清單
```sh
cat >svc.yaml <<'EOF'
kind: Service
apiVersion: v1
metadata:
name: apollo-portal
namespace: infra
spec:
ports:
- protocol: TCP
port: 8080
targetPort: 8080
selector:
app: apollo-portal
EOF
```
#### 6.2.4 建立ingress資源清單
```sh
cat >ingress.yaml <<'EOF'
kind: Ingress
apiVersion: extensions/v1beta1
metadata:
name: apollo-portal
namespace: infra
spec:
rules:
- host: apollo-portal.zq.com
http:
paths:
- path: /
backend:
serviceName: apollo-portal
servicePort: 8080
EOF
```
### 6.3 應用資源配置清單
#### 6.3.1 在任意node執行
```sh
kubectl create -f http://k8s-yaml.zq.com/apollo-portal/cm.yaml
kubectl create -f http://k8s-yaml.zq.com/apollo-portal/dp.yaml
kubectl create -f http://k8s-yaml.zq.com/apollo-portal/svc.yaml
kubectl create -f http://k8s-yaml.zq.com/apollo-portal/ingress.yaml
```
#### 6.3.2 檢查啟動情況

#### 6.3.3 網頁驗證
由於前面已經一起添加了域名解析,因此portal建立好後不需要在新增域名解析,直接瀏覽器登入驗證
網頁:apollo-portal.zq.com
預設使用者名稱:apollo
預設密碼:admin
登入成功後,立馬修改密碼為`apollo123`
到此,apollo的三個元件都已經交付到k8s裡了。
## 7 配置服務使用apollo配置中心
使用配置中心,需要開發對程式碼進行調整,將一些配置,通過變數的形式配置到apollo中,服務通過配置中心來獲取具體的配置
### 7.1 新建dubbo-service專案配置
#### 7.1.1 在配置中心修改新增專案:
**專案屬性:**
AppId:dubbo-demo-service
應用名稱:dubbo服務提供者
部門:研發部
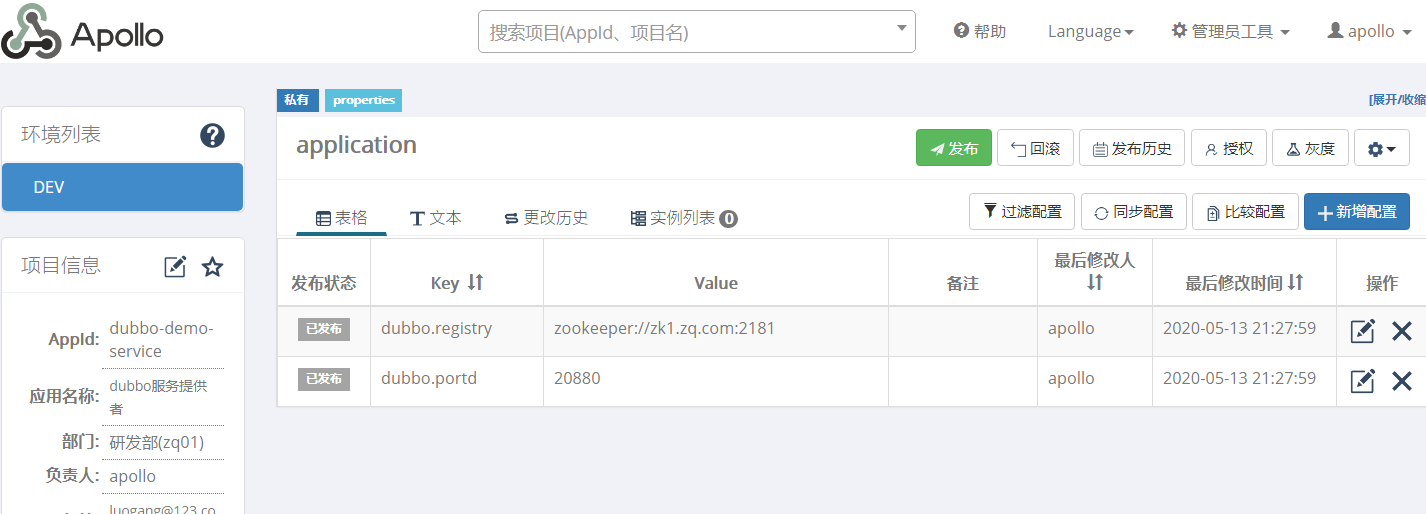
**為新專案新增配置如下:**
| key | value | 備註 |
| -------------- | --------------------------- | ----------------- |
| dubbo.registry | zookeeper://zk1.zq.com:2181 | 註冊中心地址 |
| dubbo.port | 20880 | dubbo服務監聽埠 |
**釋出後效果圖如下:**

#### 7.1.2 重新打包service映象
還是使用之前的流水線,但是使用分支為apollo的程式碼進行打包,引數如下:
| 引數名 | 引數值 |
| ---------- | ------------------------------------------------- |
| app_name | dubbo-demo-service |
| image_name | app/dubbo-demo-service |
| git_repo | https://gitee.com/noah-luo/dubbo-demo-service.git |
| git_ver | apollo |
| add_tag | 200512_0746 |
| mvn_dir | ./ |
| target_dir | ./dubbo-server/target |
| mvn_cmd | mvn clean package -Dmaven.test.skip=true |
| base_image | base/jre8:8u112 |
| maven | 3.6.1 |
#### 7.1.3 重新應用資源配置清單
修改dp.yaml資源配置清單
1. 將映象改為剛剛打包的映象名:
2. 新增環境變數`C_OPTS`,以便指定配置中心
```sh
vim /data/k8s-yaml/dubbo-server/dp.yaml
#----------原內容----------
spec:
containers:
- name: dubbo-demo-service
image: harbor.zq.com/app/dubbo-demo-service:master_200509_0800
ports:
- containerPort: 20880
protocol: TCP
env:
- name: JAR_BALL
value: dubbo-server.jar
#----------新內容----------
spec:
containers:
- name: dubbo-demo-service
image: harbor.zq.com/app/dubbo-demo-service:apollo_200512_0746
ports:
- containerPort: 20880
protocol: TCP
env:
- name: JAR_BALL
value: dubbo-server.jar
- name: C_OPTS
value: -Denv=dev -Dapollo.meta=http://apollo-config.zq.com
```
**應用資源配置清單:**
```sh
kubectl apply -f http://k8s-yaml.zq.com/dubbo-server/dp.yaml
```
### 7.2 新建dubbo-web專案配置
#### 7.2.1 在配置中心修改新增專案:
**專案屬性:**
AppId:dubbo-demo-web
應用名稱:dubbo服務消費者
部門:運維部
**為新專案新增配置如下:**
| key | value | 備註 |
| -------------- | --------------------------- | ------------ |
| dubbo.registry | zookeeper://zk1.zq.com:2181 | 註冊中心地址 |
**釋出後效果圖如下:**
略
#### 7.1.2 重新打包service映象
還是使用之前的流水線,但是使用分支為apollo的程式碼進行打包,引數如下:
| 引數名 | 引數值 |
| ---------- | ----------------------------------------- |
| app_name | dubbo-demo-consumer |
| image_name | app/dubbo-demo-consumer |
| git_repo | [email protected]:noah-luo/dubbo-demo-web.git |
| git_ver | apollo |
| add_tag | 200512_0801 |
| mvn_dir | ./ |
| target_dir | ./dubbo-client/target |
| mvn_cmd | mvn clean package -Dmaven.test.skip=true |
| base_image | base/jre8:8u112 |
| maven | 3.6.1 |
構建完成後,修改資源配置清單並應用:
#### 7.1.3 重新應用資源配置清單
修改dp.yaml資源配置清單
1. 將映象改為剛剛打包的映象名:
2. 新增環境變數`C_OPTS`,以便指定配置中心
```sh
vim /data/k8s-yaml/dubbo-consumer/dp.yaml
#----------原內容----------
spec:
containers:
- name: dubbo-demo-consumer
image: harbor.zq.com/app/dubbo-demo-consumer:master_200506_1430
ports:
- containerPort: 8080
protocol: TCP
- containerPort: 20880
protocol: TCP
env:
- name: JAR_BALL
value: dubbo-client.jar
#----------新內容----------
spec:
containers:
- name: dubbo-demo-consumer
image: harbor.zq.com/app/dubbo-demo-consumer:apollo_200512_0801
ports:
- containerPort: 8080
protocol: TCP
- containerPort: 20880
protocol: TCP
env:
- name: JAR_BALL
value: dubbo-client.jar
- name: C_OPTS
value: -Denv=dev -Dapollo.meta=http://apollo-config.zq.com
```
**應用資源配置清單:**
```sh
kubectl apply -f http://k8s-yaml.zq.com/dubbo-consumer/dp.yaml
```
### 7.3 驗證結果
#### 7.3.1 修改dubbo-monitor資源
管理機上,修改dubbo-monitor的dp資源的使用的cm資源
```sh
set -i 's#dubbo-monitor-cm-pro#dubbo-monitor-cm#g' /data/k8s-yaml/dubbo-monitor/dp-cm.yaml
```
**任意node節點應用資源**
```sh
kubectl apply -f http://k8s-yaml.zq.com/dubbo-monitor/dp.yaml
```
**登入dubbo-monitor檢視**
訪問http://dubbo-monitor.zq.com/

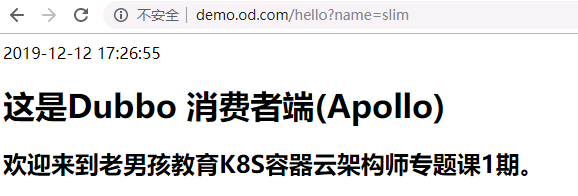
**瀏覽器檢視**
訪問http://dubbo-demo.zq.com/hello?name=lg

**apollo中看例項列表**
