
SpringBoot--- 使用SpringSecurity進行授權認證
阿新 • • 發佈:2020-08-19
## SpringBoot--- 使用SpringSecurity進行授權認證
### 前言
在未接觸 SpringSecurity 、Shiro 等安全認證框架之前,如果有頁面許可權需求需要滿足,通常可以用攔截器,過濾器來實現。
但是,這需要大量配置類去完成,程式碼編寫工作量是巨大的。**為提高工作效率,學習SpringSecurity 等框架變得十分必要。**
### 環境
IDEA :2020.1
Maven:3.5.6
SpringBoot: 2.3.2
### 1、匯入正確的依賴
==重要依賴==
~~~xml
org.springframework.boot
spring-boot-starter-security
~~~
也可以在構建工程師勾選

另外,筆者使用的模板引擎是 Thymeleaf ,因此也需要匯入該依賴,不適用該模板引擎的不需要匯入該依賴。
```xml
org.thymeleaf
thymeleaf-spring5
org.thymeleaf.extras
```
### 2、編寫或匯入頁面素材,HTML頁面等
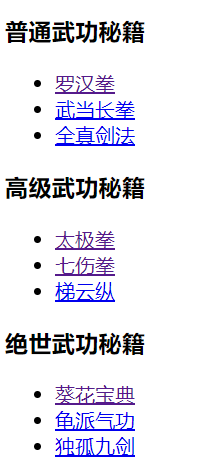
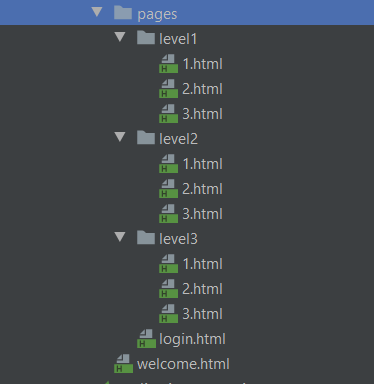 讀者可以自行編寫,除了login 頁面必須要有 form 表單提交,以便處理登入請求外,其他頁面可根據需要編寫。
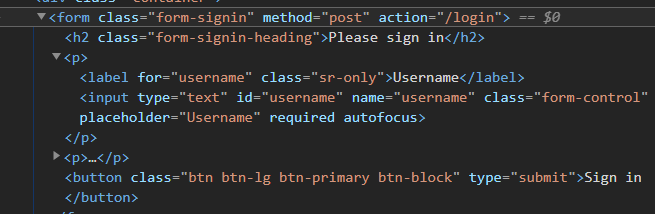
==關於頁面,登入提交表單有一個注意事項==
~~~HTML
~~~
一般提交表單,這樣寫是沒有問題的,但是,我們添加了 spring-boot-starter-security 依賴,使用了SpringSecurity ,提交所有表單(包括這次的登入表單),都會交由SpringSecurity 處理。
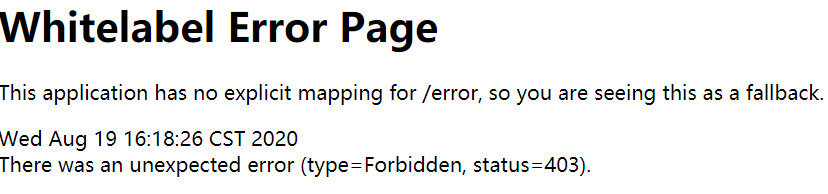
SpringSecurity 預設開啟了防止跨域攻擊的功能,任何 POST 提交到後臺的表單都要驗證是否帶有 _csrf 引數,一旦傳來的 _csrf 引數不正確,伺服器便返回 403 錯誤;
上述寫法,我們可以訪問後,在除錯模式檢視元素。
是沒有 _csrf 引數的,這樣提交的時候將會被攔截。
#### 提交表單403解決方法
##### 1、直接關閉防止域攻擊功能。(可以在下面介紹到的配置類中使用)
~~~java
http.csrf().disable()
~~~
這樣的做法是不建議的,安全級別會降低。有違使用 SpringSecurity 的初衷。
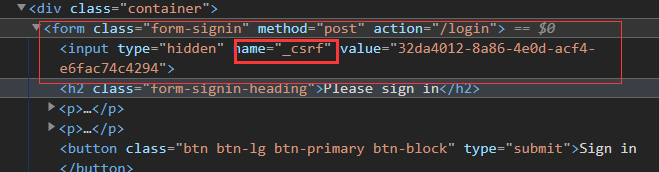
##### 2、使用 Thymeleaf 在 form 表單新增 th:action 元素,Thymeleaf 會自動為我們新增 _csrf 元素。
~~~HTML
~~~
##### 3、在 form 表單中手動新增隱藏 _csrf
在 form 表單中手動新增隱藏 _csrf,比較麻煩,這裡不做過多介紹。都用SpringBoot 了,還手動配置這麼多,這不有違初衷了嗎?當然,感興趣的可以自己摸索。
### 3、測試環境,保證頁面訪問成功
這裡要做的是編寫一個 Controller 類
~~~java
@Controller
public class RouterController {
@RequestMapping( {"/","/index"} )
public String index(){
return "welcome";
}
@RequestMapping("/toLogin")
public String toLogin(){
return "pages/login";
}
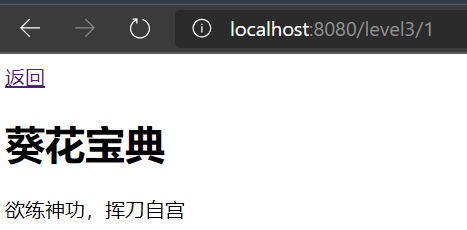
@RequestMapping("/level1/{id}")
public String toLevel1(@PathVariable("id") int id){
return "pages/level1/"+ id;
}
@RequestMapping("/level2/{id}")
public String toLevel2(@PathVariable("id") int id){
return "pages/level2/"+ id;
}
@RequestMapping("/level3/{id}")
public String toLevel3(@PathVariable("id") int id){
return "pages/level3/"+ id;
}
}
~~~
啟動程式,訪問頁面。當然,測試之前,我們需要把 SpringSecurity 的依賴匯入暫時註釋掉,否則,SpringSecurity 將會攔截下我們的請求。

讀者可以自行編寫,除了login 頁面必須要有 form 表單提交,以便處理登入請求外,其他頁面可根據需要編寫。
==關於頁面,登入提交表單有一個注意事項==
~~~HTML
~~~
一般提交表單,這樣寫是沒有問題的,但是,我們添加了 spring-boot-starter-security 依賴,使用了SpringSecurity ,提交所有表單(包括這次的登入表單),都會交由SpringSecurity 處理。
SpringSecurity 預設開啟了防止跨域攻擊的功能,任何 POST 提交到後臺的表單都要驗證是否帶有 _csrf 引數,一旦傳來的 _csrf 引數不正確,伺服器便返回 403 錯誤;
上述寫法,我們可以訪問後,在除錯模式檢視元素。

是沒有 _csrf 引數的,這樣提交的時候將會被攔截。

#### 提交表單403解決方法
##### 1、直接關閉防止域攻擊功能。(可以在下面介紹到的配置類中使用)
~~~java
http.csrf().disable()
~~~
這樣的做法是不建議的,安全級別會降低。有違使用 SpringSecurity 的初衷。
##### 2、使用 Thymeleaf 在 form 表單新增 th:action 元素,Thymeleaf 會自動為我們新增 _csrf 元素。
~~~HTML
~~~

##### 3、在 form 表單中手動新增隱藏 _csrf
在 form 表單中手動新增隱藏 _csrf,比較麻煩,這裡不做過多介紹。都用SpringBoot 了,還手動配置這麼多,這不有違初衷了嗎?當然,感興趣的可以自己摸索。
### 3、測試環境,保證頁面訪問成功
這裡要做的是編寫一個 Controller 類
~~~java
@Controller
public class RouterController {
@RequestMapping( {"/","/index"} )
public String index(){
return "welcome";
}
@RequestMapping("/toLogin")
public String toLogin(){
return "pages/login";
}
@RequestMapping("/level1/{id}")
public String toLevel1(@PathVariable("id") int id){
return "pages/level1/"+ id;
}
@RequestMapping("/level2/{id}")
public String toLevel2(@PathVariable("id") int id){
return "pages/level2/"+ id;
}
@RequestMapping("/level3/{id}")
public String toLevel3(@PathVariable("id") int id){
return "pages/level3/"+ id;
}
}
~~~
啟動程式,訪問頁面。當然,測試之前,我們需要把 SpringSecurity 的依賴匯入暫時註釋掉,否則,SpringSecurity 將會攔截下我們的請求。

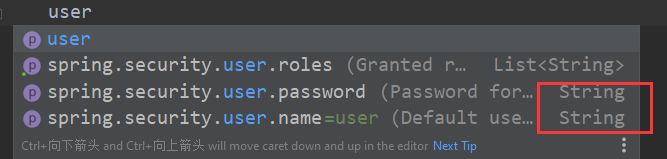 但是,卻只能新增一個使用者,因為user,password 等屬性都只是String型別的,只有roles 才是List 型別的。筆者內問百度部落格,外問谷歌,Stack Overflow 都沒有找到SpringSecurity可以在yml配置檔案下配置多使用者的方法。如果你知道,請評論留言告訴我,小弟謝過了。
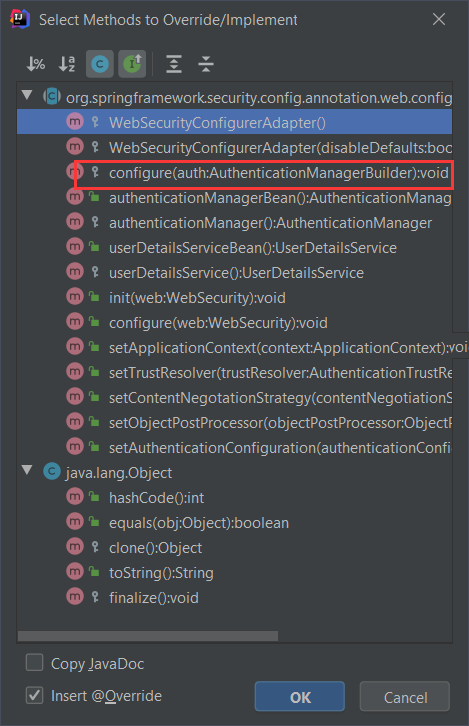
#### 2、配置類
所以最後還是回到配置類上來吧,很多問題還可以從官方和原始碼中找到正確的配置方法。(雖然不能用 yml 提【tou】高【gong】效【jian】率【liao】了 T_T )
~~~java
@EnableWebSecurity
public class SecurityConfig extends WebSecurityConfigurerAdapter {
@Override
protected void configure(HttpSecurity http) throws Exception {
//定義訪問許可權規則
http.authorizeRequests()
.antMatchers("/").permitAll()
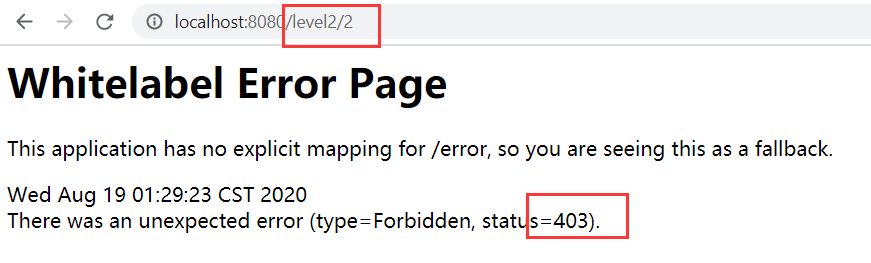
.antMatchers("/level1/**").hasRole("level1")
.antMatchers("/level2/**").hasRole("level2")
.antMatchers("/level3/**").hasRole("level3");
//沒有許可權將跳轉到登入頁面
http.formLogin();
}
}
~~~
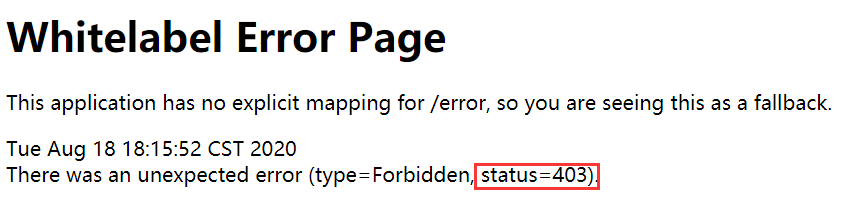
很遺憾,主頁依然可以訪問,在訪問需要許可權的頁面時候,被伺服器拒絕訪問(403 表示伺服器拒絕該訪問請求)。
~~~java
http.formLogin();
~~~
上面這個方法值得我們來分析一下,因為我們 Controller 配置的並沒有 login 而是 toLogin 。
~~~java
@RequestMapping("/toLogin")
public String toLogin(){
return "pages/login";
}
~~~
SpringSecurity 是如何幫我們自動配置的呢?
我們去到 formLogin() 方法即可一探究竟。
~~~java
* Specifies to support form based authentication. If
* {@link FormLoginConfigurer#loginPage(String)} is not specified a default login page
* will be generated.
*
*
但是,卻只能新增一個使用者,因為user,password 等屬性都只是String型別的,只有roles 才是List 型別的。筆者內問百度部落格,外問谷歌,Stack Overflow 都沒有找到SpringSecurity可以在yml配置檔案下配置多使用者的方法。如果你知道,請評論留言告訴我,小弟謝過了。
#### 2、配置類
所以最後還是回到配置類上來吧,很多問題還可以從官方和原始碼中找到正確的配置方法。(雖然不能用 yml 提【tou】高【gong】效【jian】率【liao】了 T_T )
~~~java
@EnableWebSecurity
public class SecurityConfig extends WebSecurityConfigurerAdapter {
@Override
protected void configure(HttpSecurity http) throws Exception {
//定義訪問許可權規則
http.authorizeRequests()
.antMatchers("/").permitAll()
.antMatchers("/level1/**").hasRole("level1")
.antMatchers("/level2/**").hasRole("level2")
.antMatchers("/level3/**").hasRole("level3");
//沒有許可權將跳轉到登入頁面
http.formLogin();
}
}
~~~

很遺憾,主頁依然可以訪問,在訪問需要許可權的頁面時候,被伺服器拒絕訪問(403 表示伺服器拒絕該訪問請求)。
~~~java
http.formLogin();
~~~
上面這個方法值得我們來分析一下,因為我們 Controller 配置的並沒有 login 而是 toLogin 。
~~~java
@RequestMapping("/toLogin")
public String toLogin(){
return "pages/login";
}
~~~
SpringSecurity 是如何幫我們自動配置的呢?
我們去到 formLogin() 方法即可一探究竟。
~~~java
* Specifies to support form based authentication. If
* {@link FormLoginConfigurer#loginPage(String)} is not specified a default login page
* will be generated.
*
*  在原始碼,我們發現框架開發者在方法的註釋上,貼心地為我們寫好了配置示例。
~~~java
* @Override
* protected void configure(AuthenticationManagerBuilder auth) {
* auth
* // enable in memory based authentication with a user named
* // "user" and "admin"
* .inMemoryAuthentication().withUser("user").password("password").roles("USER").and()
* .withUser("admin").password("password").roles("USER", "ADMIN");
* }
~~~
我們按照他說要求的配置如下:
~~~java
//認證
@Override
protected void configure(AuthenticationManagerBuilder auth) throws Exception {
auth.inMemoryAuthentication()
.withUser("tom001").password("1234").roles("level1","level3");
}
~~~
哈哈,終於要完成了,我們來驗證一下吧!
~~~
java.lang.IllegalArgumentException: There is no PasswordEncoder mapped for the id "null"
~~~
密碼沒有編碼?啥意思?
都說了是 SpringSecurity,登入密碼還是明文密碼,那還了得?人家一個反編譯,你豈不是底褲都讓人看光了?
但是官方一句提醒都沒有,啊,這......
確實有點麻煩,但是我們的目的是讓它起作用,還是找找方法吧。
~~~java
//認證
@Override
protected void configure(AuthenticationManagerBuilder auth) throws Exception {
auth.inMemoryAuthentication().passwordEncoder(new BCryptPasswordEncoder())
.withUser("tom001").password(new BCryptPasswordEncoder().encode("1234")).roles("level1","level3");
}
~~~
最後加上加密類,這次總該成了吧?
成功了!
------
**實際使用中,還是要結合資料庫獲取使用者密碼,許可權等資訊
在原始碼,我們發現框架開發者在方法的註釋上,貼心地為我們寫好了配置示例。
~~~java
* @Override
* protected void configure(AuthenticationManagerBuilder auth) {
* auth
* // enable in memory based authentication with a user named
* // "user" and "admin"
* .inMemoryAuthentication().withUser("user").password("password").roles("USER").and()
* .withUser("admin").password("password").roles("USER", "ADMIN");
* }
~~~
我們按照他說要求的配置如下:
~~~java
//認證
@Override
protected void configure(AuthenticationManagerBuilder auth) throws Exception {
auth.inMemoryAuthentication()
.withUser("tom001").password("1234").roles("level1","level3");
}
~~~
哈哈,終於要完成了,我們來驗證一下吧!

~~~
java.lang.IllegalArgumentException: There is no PasswordEncoder mapped for the id "null"
~~~
密碼沒有編碼?啥意思?
都說了是 SpringSecurity,登入密碼還是明文密碼,那還了得?人家一個反編譯,你豈不是底褲都讓人看光了?
但是官方一句提醒都沒有,啊,這......
確實有點麻煩,但是我們的目的是讓它起作用,還是找找方法吧。
~~~java
//認證
@Override
protected void configure(AuthenticationManagerBuilder auth) throws Exception {
auth.inMemoryAuthentication().passwordEncoder(new BCryptPasswordEncoder())
.withUser("tom001").password(new BCryptPasswordEncoder().encode("1234")).roles("level1","level3");
}
~~~
最後加上加密類,這次總該成了吧?


成功了!
------
**實際使用中,還是要結合資料庫獲取使用者密碼,許可權等資訊
讀者可以自行編寫,除了login 頁面必須要有 form 表單提交,以便處理登入請求外,其他頁面可根據需要編寫。
==關於頁面,登入提交表單有一個注意事項==
~~~HTML
~~~
一般提交表單,這樣寫是沒有問題的,但是,我們添加了 spring-boot-starter-security 依賴,使用了SpringSecurity ,提交所有表單(包括這次的登入表單),都會交由SpringSecurity 處理。
SpringSecurity 預設開啟了防止跨域攻擊的功能,任何 POST 提交到後臺的表單都要驗證是否帶有 _csrf 引數,一旦傳來的 _csrf 引數不正確,伺服器便返回 403 錯誤;
上述寫法,我們可以訪問後,在除錯模式檢視元素。

是沒有 _csrf 引數的,這樣提交的時候將會被攔截。

#### 提交表單403解決方法
##### 1、直接關閉防止域攻擊功能。(可以在下面介紹到的配置類中使用)
~~~java
http.csrf().disable()
~~~
這樣的做法是不建議的,安全級別會降低。有違使用 SpringSecurity 的初衷。
##### 2、使用 Thymeleaf 在 form 表單新增 th:action 元素,Thymeleaf 會自動為我們新增 _csrf 元素。
~~~HTML
~~~

##### 3、在 form 表單中手動新增隱藏 _csrf
在 form 表單中手動新增隱藏 _csrf,比較麻煩,這裡不做過多介紹。都用SpringBoot 了,還手動配置這麼多,這不有違初衷了嗎?當然,感興趣的可以自己摸索。
### 3、測試環境,保證頁面訪問成功
這裡要做的是編寫一個 Controller 類
~~~java
@Controller
public class RouterController {
@RequestMapping( {"/","/index"} )
public String index(){
return "welcome";
}
@RequestMapping("/toLogin")
public String toLogin(){
return "pages/login";
}
@RequestMapping("/level1/{id}")
public String toLevel1(@PathVariable("id") int id){
return "pages/level1/"+ id;
}
@RequestMapping("/level2/{id}")
public String toLevel2(@PathVariable("id") int id){
return "pages/level2/"+ id;
}
@RequestMapping("/level3/{id}")
public String toLevel3(@PathVariable("id") int id){
return "pages/level3/"+ id;
}
}
~~~
啟動程式,訪問頁面。當然,測試之前,我們需要把 SpringSecurity 的依賴匯入暫時註釋掉,否則,SpringSecurity 將會攔截下我們的請求。

但是,卻只能新增一個使用者,因為user,password 等屬性都只是String型別的,只有roles 才是List 型別的。筆者內問百度部落格,外問谷歌,Stack Overflow 都沒有找到SpringSecurity可以在yml配置檔案下配置多使用者的方法。如果你知道,請評論留言告訴我,小弟謝過了。
#### 2、配置類
所以最後還是回到配置類上來吧,很多問題還可以從官方和原始碼中找到正確的配置方法。(雖然不能用 yml 提【tou】高【gong】效【jian】率【liao】了 T_T )
~~~java
@EnableWebSecurity
public class SecurityConfig extends WebSecurityConfigurerAdapter {
@Override
protected void configure(HttpSecurity http) throws Exception {
//定義訪問許可權規則
http.authorizeRequests()
.antMatchers("/").permitAll()
.antMatchers("/level1/**").hasRole("level1")
.antMatchers("/level2/**").hasRole("level2")
.antMatchers("/level3/**").hasRole("level3");
//沒有許可權將跳轉到登入頁面
http.formLogin();
}
}
~~~

很遺憾,主頁依然可以訪問,在訪問需要許可權的頁面時候,被伺服器拒絕訪問(403 表示伺服器拒絕該訪問請求)。
~~~java
http.formLogin();
~~~
上面這個方法值得我們來分析一下,因為我們 Controller 配置的並沒有 login 而是 toLogin 。
~~~java
@RequestMapping("/toLogin")
public String toLogin(){
return "pages/login";
}
~~~
SpringSecurity 是如何幫我們自動配置的呢?
我們去到 formLogin() 方法即可一探究竟。
~~~java
* Specifies to support form based authentication. If
* {@link FormLoginConfigurer#loginPage(String)} is not specified a default login page
* will be generated.
*
* Example Configurations
在原始碼,我們發現框架開發者在方法的註釋上,貼心地為我們寫好了配置示例。
~~~java
* @Override
* protected void configure(AuthenticationManagerBuilder auth) {
* auth
* // enable in memory based authentication with a user named
* // "user" and "admin"
* .inMemoryAuthentication().withUser("user").password("password").roles("USER").and()
* .withUser("admin").password("password").roles("USER", "ADMIN");
* }
~~~
我們按照他說要求的配置如下:
~~~java
//認證
@Override
protected void configure(AuthenticationManagerBuilder auth) throws Exception {
auth.inMemoryAuthentication()
.withUser("tom001").password("1234").roles("level1","level3");
}
~~~
哈哈,終於要完成了,我們來驗證一下吧!

~~~
java.lang.IllegalArgumentException: There is no PasswordEncoder mapped for the id "null"
~~~
密碼沒有編碼?啥意思?
都說了是 SpringSecurity,登入密碼還是明文密碼,那還了得?人家一個反編譯,你豈不是底褲都讓人看光了?
但是官方一句提醒都沒有,啊,這......
確實有點麻煩,但是我們的目的是讓它起作用,還是找找方法吧。
~~~java
//認證
@Override
protected void configure(AuthenticationManagerBuilder auth) throws Exception {
auth.inMemoryAuthentication().passwordEncoder(new BCryptPasswordEncoder())
.withUser("tom001").password(new BCryptPasswordEncoder().encode("1234")).roles("level1","level3");
}
~~~
最後加上加密類,這次總該成了吧?


成功了!
------
**實際使用中,還是要結合資料庫獲取使用者密碼,許可權等資訊