
OpenvSwitch系列之八 vxlan隧道
阿新 • • 發佈:2020-09-08

[Open vSwitch系列之一 Open vSwitch誕生 ](https://www.cnblogs.com/goldsunshine/p/10959199.html)
[Open vSwitch系列之二 安裝指定版本ovs](https://www.cnblogs.com/goldsunshine/p/10331606.html)
[Open vSwitch系列之三 ovs-vsctl命令使用](https://www.cnblogs.com/goldsunshine/p/11527928.html)
[Open vSwitch系列之四 ovs-ofctl命令使用](https://www.cnblogs.com/goldsunshine/p/11720310.html)
[Open vSwitch系列之五 網橋特性功能配置](https://www.cnblogs.com/goldsunshine/p/11946098.html)
[Open vSwitch系列之六 vlan隔離](https://www.cnblogs.com/goldsunshine/p/12748378.html)
[Open vSwitch系列之七 meter表限速](https://www.cnblogs.com/goldsunshine/p/13056429.html)
[OpenvSwitch系列之八 vxlan隧道](https://www.cnblogs.com/goldsunshine/p/13630767.html)
`官方介紹`:
VXLAN(Virtual eXtensible Local Area Network,虛擬擴充套件區域網),是由IETF定義的NVO3(Network Virtualization over Layer 3)標準技術之一,是對傳統VLAN協議的一種擴充套件。VXLAN的特點是將L2的以太幀封裝到UDP報文(即L2 over L4)中,並在L3網路中傳輸。VXLAN本質上是一種隧道技術,在源網路裝置與目的網路裝置之間的IP網路上,建立一條邏輯隧道,將使用者側報文經過特定的封裝後通過這條隧道轉發。
vxlan 是一種網路協議,將原始資料封裝到UDP資料包中傳輸。vxlan被廣泛應用到雲端計算網路環境中,耳熟能詳的雲端計算框架`openstack`主要的網路架構就是vxlan,`kubernetes`也有vxlan的網路外掛。vxlan 有許多優點,諸如:
1. 連線兩個區域網,可以將區域網內主機之間流量互通。就像是在區域網之間架起橋樑
2. 支援隔離。vlan最多支援4096個隔離,而vxlan支援2的次方數32即 4294967296據隔離
vxlan的封裝格式

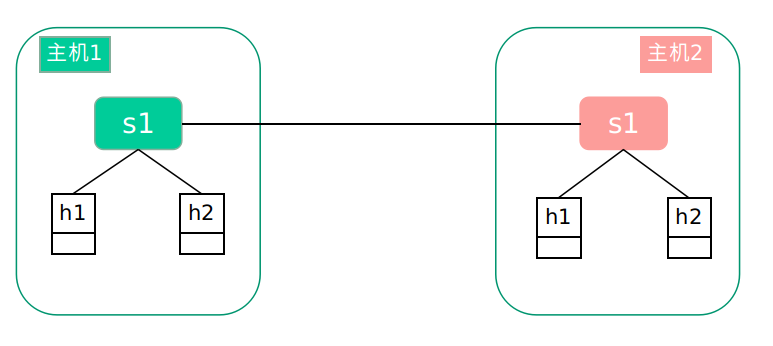
本篇文章使用ovs搭建vxlan網橋,連線兩個mininet構建的區域網。
實驗環境:兩臺虛擬機器 ubuntu1804桌面版+ubuntu1604桌面版+mininet
# 安裝mininet
分別在兩臺機器上安裝mininet
## 安裝git工具
```
root@ubuntu:~# apt install git
Reading package lists... Done
Building dependency tree
Reading state information... Done
The following additional packages will be installed:
git-man liberror-perl
Suggested packages:
git-daemon-run | git-daemon-sysvinit git-doc git-el git-email git-gui gitk gitweb git-arch git-cvs git-mediawiki git-svn
The following NEW packages will be installed:
git git-man liberror-perl
0 upgraded, 3 newly installed, 0 to remove and 406 not upgraded.
Need to get 3,932 kB of archives.
After this operation, 25.6 MB of additional disk space will be used.
Do you want to continue? [Y/n] y
```
## 從github上拉取mininet原始碼
```
root@openlab:~# git clone git://github.com/mininet/mininet
Cloning into 'mininet'...
remote: Enumerating objects: 9752, done.
remote: Total 9752 (delta 0), reused 0 (delta 0), pack-reused 9752
Receiving objects: 100% (9752/9752), 3.03 MiB | 1.35 MiB/s, done.
Resolving deltas: 100% (6472/6472), done.
```
## 安裝mininet
mininet的安裝是進入`mininet/util`目錄中,然後執行 `./install -a`。`-a`表示安裝全部的元件。mininet的安裝可以有很多備選項。
```
root@openlab:~/mininet/util# ./install.sh -a
Detected Linux distribution: Ubuntu 18.04 bionic amd64
sys.version_info(major=3, minor=6, micro=7, releaselevel='final', serial=0)
Detected Python (python3) version 3
Installing all packages except for -eix (doxypy, ivs, nox-classic)...
Install Mininet-compatible kernel if necessary
.......
.......
.......
libtool: install: /usr/bin/install -c cbench /usr/local/bin/cbench
make[2]: Nothing to be done for 'install-data-am'.
make[2]: Leaving directory '/root/oflops/cbench'
make[1]: Leaving directory '/root/oflops/cbench'
Making install in doc
make[1]: Entering directory '/root/oflops/doc'
make[1]: Nothing to be done for 'install'.
make[1]: Leaving directory '/root/oflops/doc'
Enjoy Mininet!
```
## 驗證安裝
安裝完成之後,`ovs`會安裝好,使用`ovs-vsctl show`命令,檢視ovs版本
```
root@openlab:~/mininet/util# ovs-vsctl show
58cc7b02-ef48-4de7-a96b-ee1c0259472d
ovs_version: "2.9.5"
```
使用命令 `mn` 建立一個最小拓撲的環境。包括一個控制器,一個交換機,兩個主機。

```
root@openlab:~/mininet/util# mn
*** Creating network
*** Adding controller
*** Adding hosts:
h1 h2
*** Adding switches:
s1
*** Adding links:
(h1, s1) (h2, s1)
*** Configuring hosts
h1 h2
*** Starting controller
c0
*** Starting 1 switches
s1 ...
*** Starting CLI:
mininet>
```
# 配置vxlan
## 第一臺機器配置
記錄下第一臺機器的ip地址和路由資訊,後面會使用這些資訊。
```
root@openlab:~/mininet/util# ifconfig
ens33: flags=4163 mtu 1500
inet 192.168.175.130 netmask 255.255.255.0 broadcast 192.168.175.255
inet6 fe80::20c:29ff:fe45:a8b7 prefixlen 64 scopeid 0x20
ether 00:0c:29:45:a8:b7 txqueuelen 1000 (Ethernet)
RX packets 247144 bytes 344597431 (344.5 MB)
RX errors 0 dropped 0 overruns 0 frame 0
TX packets 74937 bytes 6024181 (6.0 MB)
TX errors 0 dropped 0 overruns 0 carrier 0 collisions 0
lo: flags=73 mtu 65536
inet 127.0.0.1 netmask 255.0.0.0
inet6 ::1 prefixlen 128 scopeid 0x10
loop txqueuelen 1000 (Local Loopback)
RX packets 993 bytes 76788 (76.7 KB)
RX errors 0 dropped 0 overruns 0 frame 0
TX packets 993 bytes 76788 (76.7 KB)
TX errors 0 dropped 0 overruns 0 carrier 0 collisions 0
```
```
root@openlab:~/mininet/util# route -n
Kernel IP routing table
Destination Gateway Genmask Flags Metric Ref Use Iface
0.0.0.0 192.168.175.2 0.0.0.0 UG 100 0 0 ens33
192.168.175.0 0.0.0.0 255.255.255.0 U 0 0 0 ens33
192.168.175.2 0.0.0.0 255.255.255.255 UH 100 0 0 ens33
```
## 第二臺機器配置
同樣,記錄第二臺機器的ip地址和路由資訊。
```
ens33 Link encap:Ethernet HWaddr 00:0c:29:a6:71:34
inet addr:192.168.175.128 Bcast:192.168.175.255 Mask:255.255.255.0
inet6 addr: fe80::b933:b350:fe27:b89a/64 Scope:Link
UP BROADCAST RUNNING MULTICAST MTU:1500 Metric:1
RX packets:56351 errors:0 dropped:0 overruns:0 frame:0
TX packets:14943 errors:0 dropped:0 overruns:0 carrier:0
collisions:0 txqueuelen:1000
RX bytes:76128903 (76.1 MB) TX bytes:1464272 (1.4 MB)
lo Link encap:Local Loopback
inet addr:127.0.0.1 Mask:255.0.0.0
inet6 addr: ::1/128 Scope:Host
UP LOOPBACK RUNNING MTU:65536 Metric:1
RX packets:404 errors:0 dropped:0 overruns:0 frame:0
TX packets:404 errors:0 dropped:0 overruns:0 carrier:0
collisions:0 txqueuelen:1000
RX bytes:33728 (33.7 KB) TX bytes:33728 (33.7 KB)
```
```
root@ubuntu:~/mininet/util# route -n
Kernel IP routing table
Destination Gateway Genmask Flags Metric Ref Use Iface
0.0.0.0 192.168.175.2 0.0.0.0 UG 100 0 0 ens33
169.254.0.0 0.0.0.0 255.255.0.0 U 1000 0 0 ens33
192.168.175.0 0.0.0.0 255.255.255.0 U 100 0 0 ens33
```
## 建立隧道網橋br-tun
使用ovs建立一個網橋,叫做br-tun,該網橋後面會作為vxlan隧道的端點。兩個虛擬機器都需要建立。
```
root@openlab:~/mininet/util# ovs-vsctl add-br br-tun
root@openlab:~/mininet/util#
root@openlab:~/mininet/util# ovs-vsctl show
58cc7b02-ef48-4de7-a96b-ee1c0259472d
Bridge br-tun
Port br-tun
Interface br-tun
type: internal
ovs_version: "2.9.5"
```
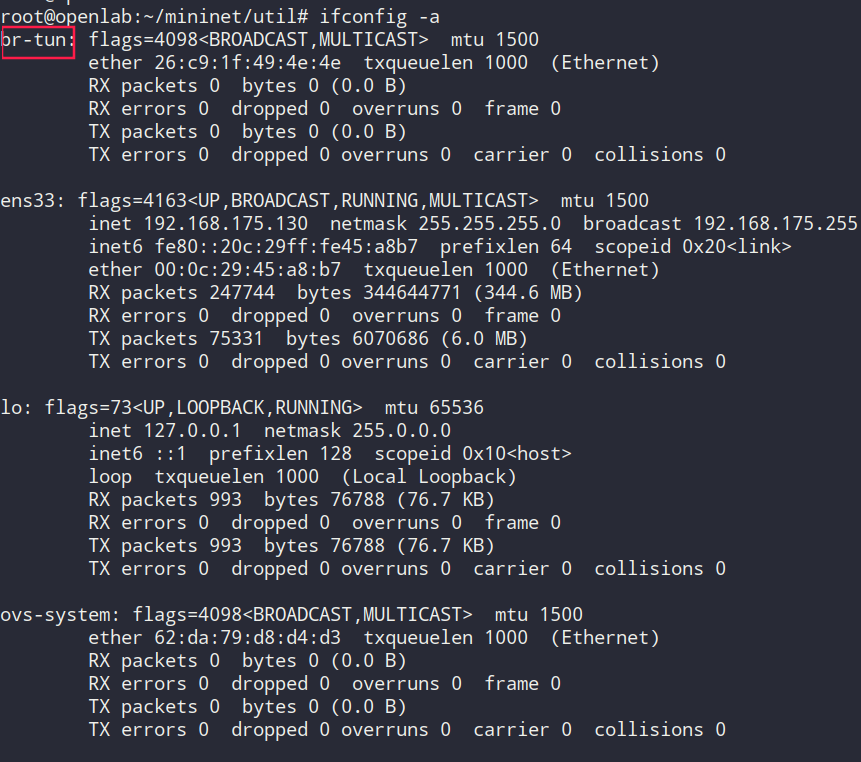
建立好br-tun之後,可以用`ifconfig -a`檢視到這個裝置
```
root@openlab:~/mininet/util# ifconfig -a
br-tun: flags=4098 mtu 1500
ether 26:c9:1f:49:4e:4e txqueuelen 1000 (Ethernet)
RX packets 0 bytes 0 (0.0 B)
RX errors 0 dropped 0 overruns 0 frame 0
TX packets 0 bytes 0 (0.0 B)
TX errors 0 dropped 0 overruns 0 carrier 0 collisions 0
ens33: flags=4163 mtu 1500
inet 192.168.175.130 netmask 255.255.255.0 broadcast 192.168.175.255
inet6 fe80::20c:29ff:fe45:a8b7 prefixlen 64 scopeid 0x20
ether 00:0c:29:45:a8:b7 txqueuelen 1000 (Ethernet)
RX packets 247744 bytes 344644771 (344.6 MB)
RX errors 0 dropped 0 overruns 0 frame 0
TX packets 75331 bytes 6070686 (6.0 MB)
TX errors 0 dropped 0 overruns 0 carrier 0 collisions 0
lo: flags=73 mtu 65536
inet 127.0.0.1 netmask 255.0.0.0
inet6 ::1 prefixlen 128 scopeid 0x10
loop txqueuelen 1000 (Local Loopback)
RX packets 993 bytes 76788 (76.7 KB)
RX errors 0 dropped 0 overruns 0 frame 0
TX packets 993 bytes 76788 (76.7 KB)
TX errors 0 dropped 0 overruns 0 carrier 0 collisions 0
ovs-system: flags=4098 mtu 1500
ether 62:da:79:d8:d4:d3 txqueuelen 1000 (Ethernet)
RX packets 0 bytes 0 (0.0 B)
RX errors 0 dropped 0 overruns 0 frame 0
TX packets 0 bytes 0 (0.0 B)
TX errors 0 dropped 0 overruns 0 carrier 0 collisions 0
```

第二臺機器建立好的裝置。
```
root@ubuntu:~/mininet/util# ifconfig -a
br-tun Link encap:Ethernet HWaddr 1e:66:43:f2:04:43
BROADCAST MULTICAST MTU:1500 Metric:1
RX packets:0 errors:0 dropped:0 overruns:0 frame:0
TX packets:0 errors:0 dropped:0 overruns:0 carrier:0
collisions:0 txqueuelen:1000
RX bytes:0 (0.0 B) TX bytes:0 (0.0 B)
ens33 Link encap:Ethernet HWaddr 00:0c:29:a6:71:34
inet addr:192.168.175.128 Bcast:192.168.175.255 Mask:255.255.255.0
inet6 addr: fe80::b933:b350:fe27:b89a/64 Scope:Link
UP BROADCAST RUNNING MULTICAST MTU:1500 Metric:1
RX packets:56569 errors:0 dropped:0 overruns:0 frame:0
TX packets:15061 errors:0 dropped:0 overruns:0 carrier:0
collisions:0 txqueuelen:1000
RX bytes:76151455 (76.1 MB) TX bytes:1479464 (1.4 MB)
lo Link encap:Local Loopback
inet addr:127.0.0.1 Mask:255.0.0.0
inet6 addr: ::1/128 Scope:Host
UP LOOPBACK RUNNING MTU:65536 Metric:1
RX packets:404 errors:0 dropped:0 overruns:0 frame:0
TX packets:404 errors:0 dropped:0 overruns:0 carrier:0
collisions:0 txqueuelen:1000
RX bytes:33728 (33.7 KB) TX bytes:33728 (33.7 KB)
ovs-system Link encap:Ethernet HWaddr 8e:fb:8e:a0:0c:e5
BROADCAST MULTICAST MTU:1500 Metric:1
RX packets:0 errors:0 dropped:0 overruns:0 frame:0
TX packets:0 errors:0 dropped:0 overruns:0 carrier:0
collisions:0 txqueuelen:1000
RX bytes:0 (0.0 B) TX bytes:0 (0.0 B)
```
## 轉移ens33 網絡卡的ip地址到br-tun上
將網絡卡上的ip地址轉交給br-tun。從上一步可以看出br-tun和網絡卡其實是非常類似的,將其賦值ip地址就可以當做網絡卡使用。現在要做的是把虛擬機器網絡卡的ip地址給br-tun。
增加路由資訊。將ip地址轉交給br-tun之後,路由資訊也需要更新。ip地址和路由資訊都要以實際的資訊,在複製實驗時不可直接使用我的。這也是為什麼在前面記錄ip資訊和路由資訊的原因。
```
ifconfig ens33 0 up
ifconfig br-tun 192.168.175.130/24 up
route add default gw 192.168.175.2
```

同樣在第二臺機器上完成同樣的操作。
```
ifconfig ens33 0 up
ifconfig br-tun 192.168.175.128/24 up
route add default gw 192.168.175.2
```

## 將網絡卡ens33作為埠新增到br-tun
因為ens33是流量出虛擬機器的介面,所以最後流量還是肯定走ens33網絡卡出去。br-tun只是一個虛擬機器的裝置,要將ens33作為埠加入br-tun中
```
ovs-vsctl add-port br-tun ens33
```
同樣在第二臺機器上完成同樣的操作。
```
ovs-vsctl add-port br-tun ens33
```

## 啟動mininet
使用命令`mn`啟動一個最小拓撲的實驗。建立的裝置包括兩個主機,h1,h2;一個交換機 s1

使用`ovs-vsctl show` 可以看到環境中新增了一個交換機s1

同樣在第二臺機器上完成同樣的操作。
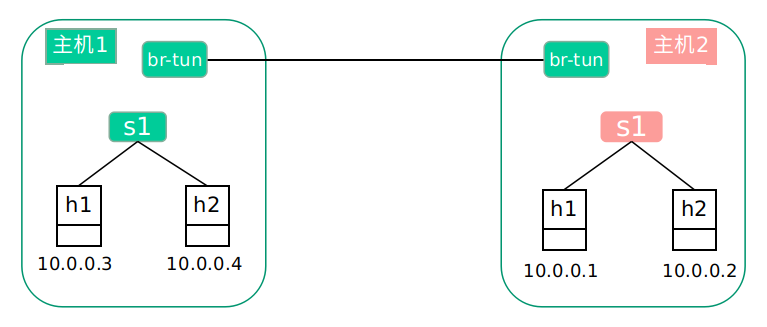
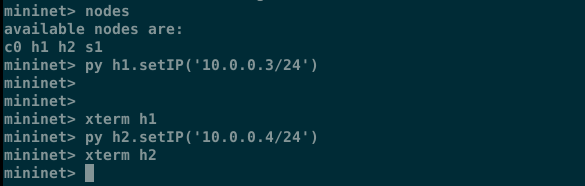
## 修改主機IP地址
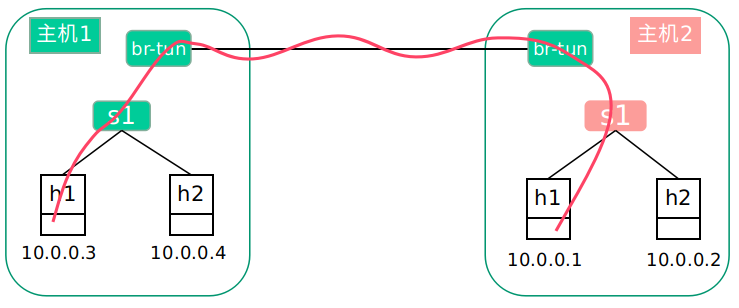
上一步建立的mininet中兩個主機的預設地址都是`10.0.0.1`和`10.0.0.2`,需要將第一臺虛擬機器中的mininet的主機的地址修改`10.0.0.3`和`10.0.0.4`。構建的環境如下:
## 建立vxlan隧道
在交換機s1建立vxlan隧道。這一步是最關鍵的一步。
```
ovs-vsctl add-port s1 vx1 -- set interface vx1 type=vxlan options:remote_ip=192.168.175.128
```
其中`s1`是建立隧道的網橋,`remote_ip`就是隧道另外一端機器的ip地址。

檢視建立好的隧道

在第二臺虛擬機器上做同樣的操作
```
ovs-vsctl add-port s1 vx1 -- set interface vx1 type=vxlan options:remote_ip=192.168.175.130
```

檢視建立好的隧道

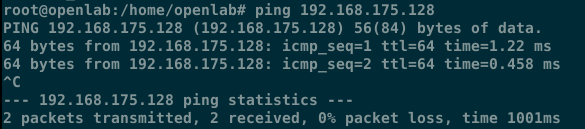
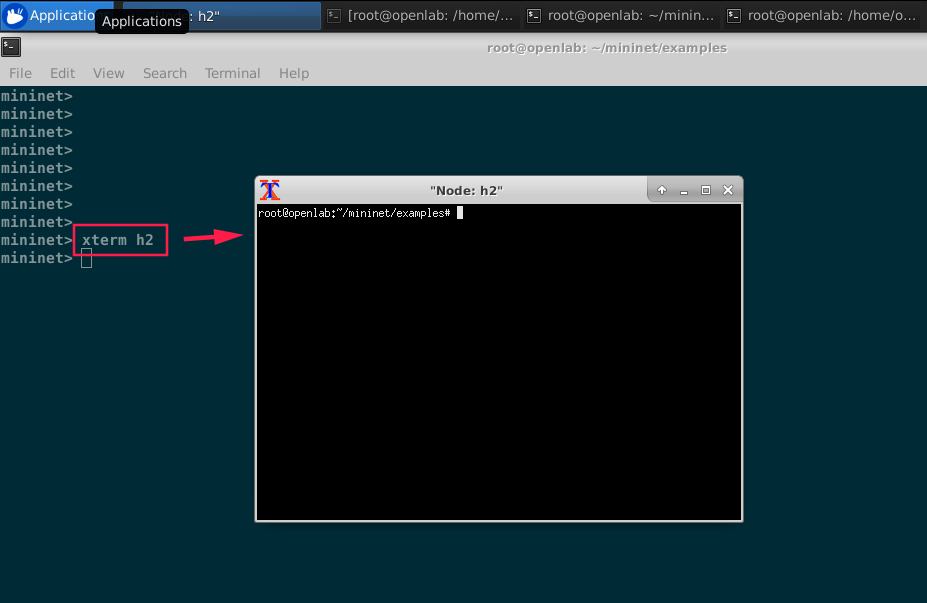
## 驗證通訊
在第一臺虛擬機器上開啟h2。使用命令`xterm h2`可以開啟mininet中h2的操作終端。
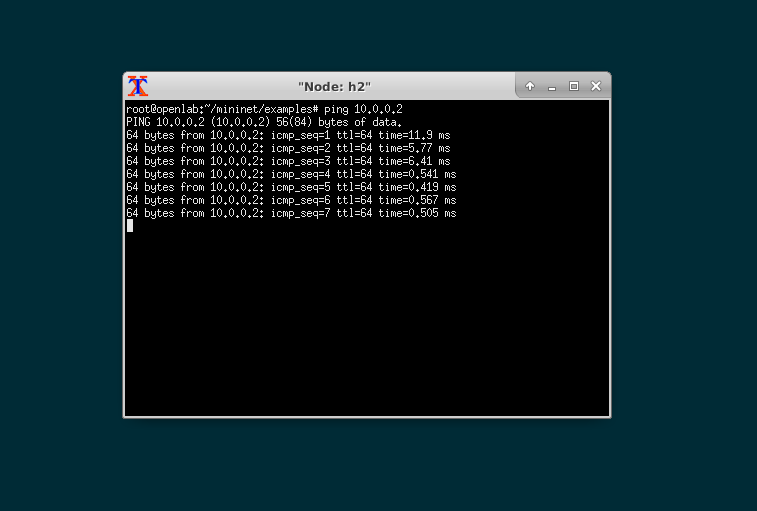
在終端中`ping 10.0.0.1`

在終端中`ping 10.0.0.2`
## 抓取vxlan資料包
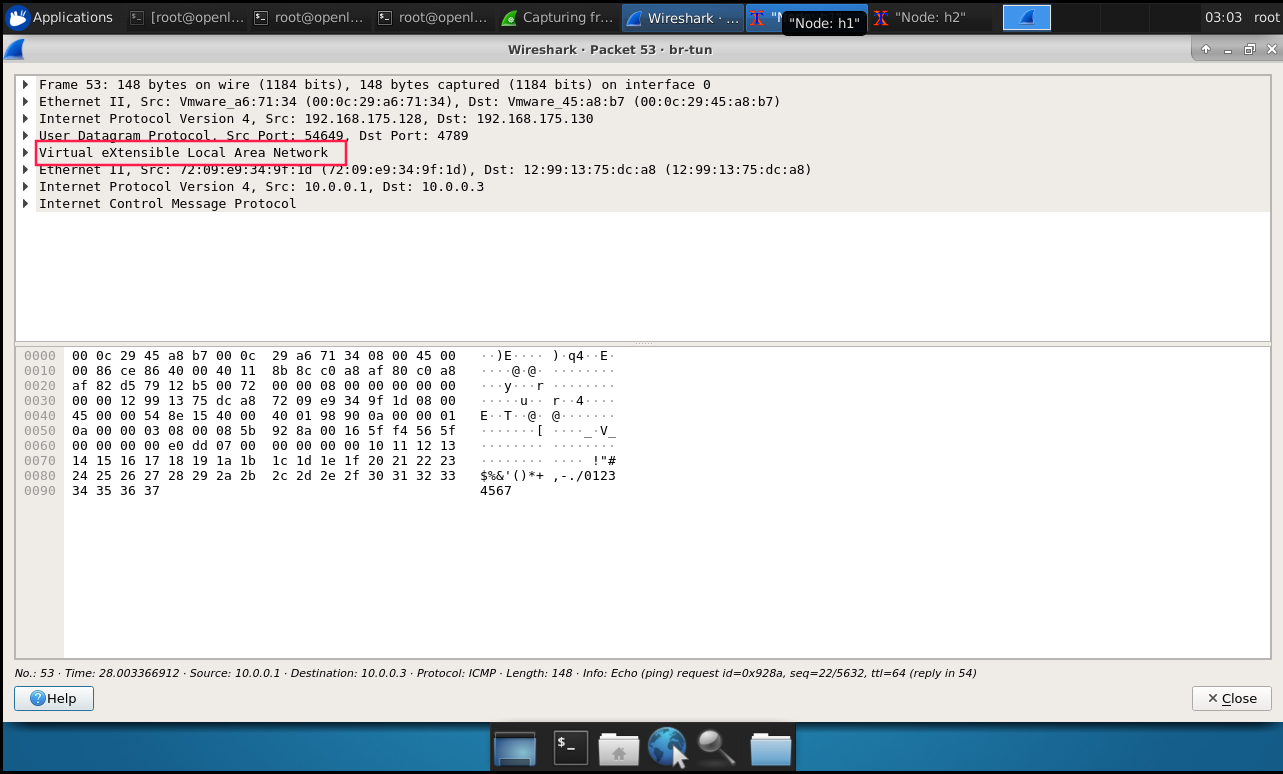
開啟`wireshark`,監聽`br-tun`隧道端點上的流量。可以看到目前流量就是`ICMP`。

開啟具體的icmp檢視,與普通icmp有什麼不同之處。正常icmp流量是`icmp+網路層+資料鏈路層`,而使用vxlan的icmp則是 `icmp + 網路層 + 資料鏈路層 + vxlan報文頭 + udp + 網路層 + 資料鏈路層`。內層是10.0.0.3 ping 10.0.0.1的流量,這些流量被vxlan封裝之後有外層包 192.168.175.130到192.168.175.128的UDP資料包。
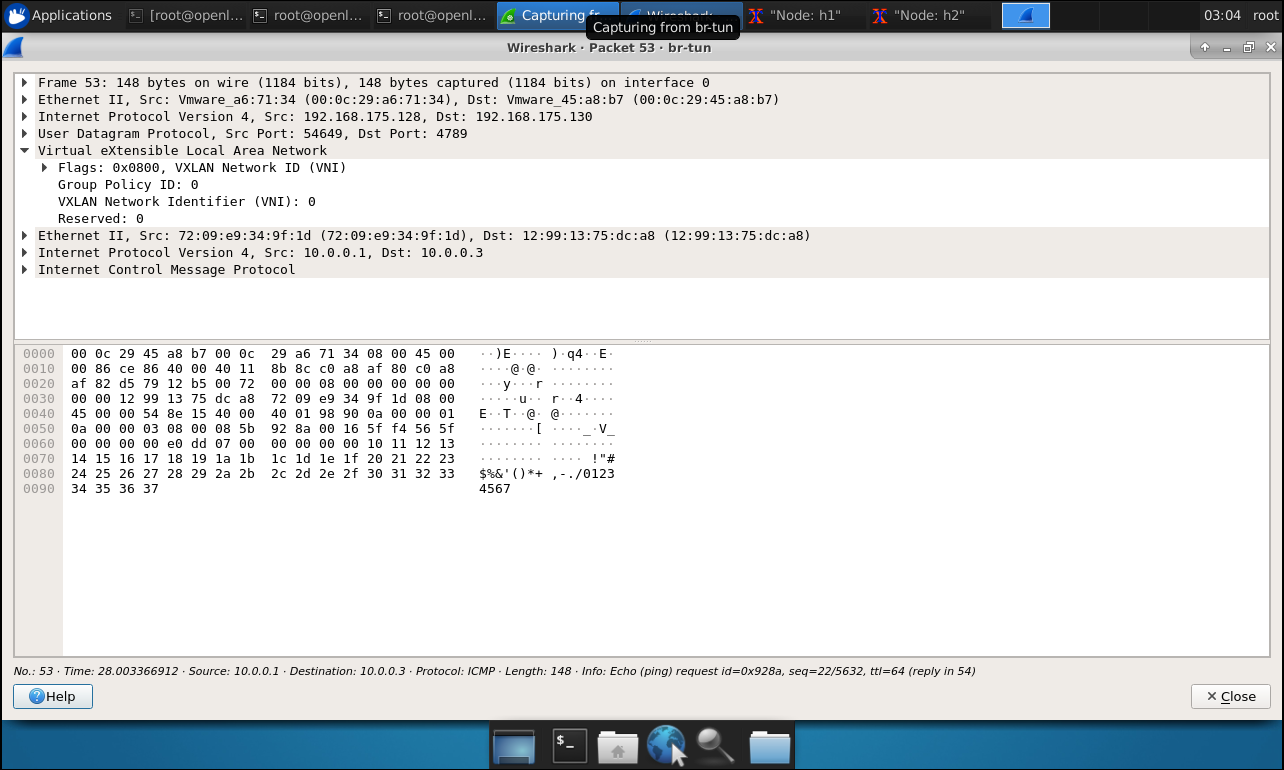
最後看一下vxlan報文頭的具體資訊。裡面包含了一個 `vxlan network identity` 即vni,就是類似與vlan tag的ID號。不同的ID號之間不可以通訊。
# 總結
在兩個交換機上配置了vxlan之後,就像是在s1和s1之間打通了隧道,跨越區域網的限制傳輸資料。邏輯上是如上,實際是流量是從 `h1 -->s1-->br-tun -->ens33 -->ens33 -->br-tun -->s1 -->h1`。
![](https://img2020.cnblogs.com/blog/1060878/202009/1060878-20200908150821852-7173081