Django之簡易使用者系統(3)
阿新 • • 發佈:2020-11-08
[toc]
# 1. 總體設計思路

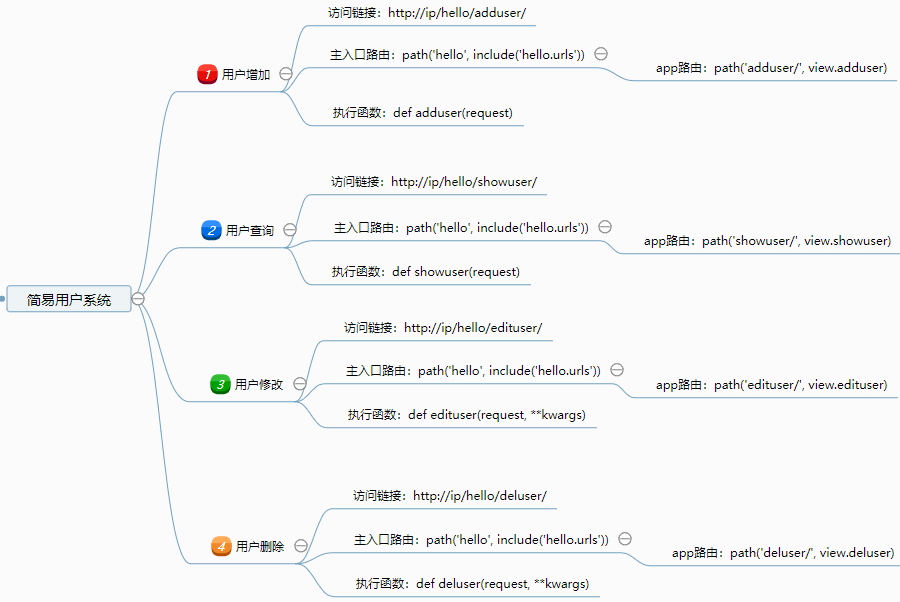
一套簡單的使用者管理系統,包含但不限如下功能:
- 使用者增加:用於新建使用者;
- 使用者查詢:用於查詢使用者資訊;
- 使用者修改:用於修改使用者資訊;
- 使用者刪除:用於刪除使用者資訊;
最基本的功能就包括增、刪、改、查了。
想要搭建好一套系統,前期肯定是要設計一套思路,大家按照上圖對號入座即可。
下面,咋就開始實戰了...
**劃重點了**,`一定要動手`、`一定要動手`、`一定要動手` ...
# 2. 搭建簡易使用者系統
如果哪位同學還沒學習過上兩篇文章的,請速速去研究下,再來看這篇文章。
## 2.1 配置模型Model
`hello\models.py`
建立一個類(class)物件,這就相當於資料中的一張表(table)。
```python
# 建立資料庫User表
class User(models.Model):
# 性別, 元組用於下拉框
sex = ((0, '男'), (1, '女'))
# 使用者名稱
username = models.CharField(max_length=20, help_text='使用者名稱')
# 使用者密碼
password = models.CharField(max_length=16, help_text='使用者密碼')
# sex中的0,1是存放在資料庫,中文男和女是在web前端展示
sex = models.IntegerField(choices=sex, null=True, blank=True)
# 手機號碼
phone = models.CharField(max_length=11, help_text='手機號碼')
# 物件獲取返回值為使用者名稱
def __str__(self):
return self.username
```
## 2. 2 寫入資料庫:
後臺會轉換成`sql`語句寫入資料庫,看起來是不是很方便,也不用太懂`sql`了,這也是`ORM `的強大之處。
```shell
(py369) [root@localhost devops]# python manage.py makemigrations hello
Migrations for 'hello':
hello/migrations/0005_auto_20201105_2336.py
- Create model User
- Alter field id on devices
(py369) [root@localhost devops]# python manage.py migrate
Operations to perform:
Apply all migrations: admin, auth, contenttypes, hello, sessions
Running migrations:
Applying hello.0005_auto_20201105_2336... OK
```
## 2.3 資料庫驗證表:
我是通過`Navicat Premium`工具連線資料庫,進行視覺化檢視,你用哪個工具都可以。

## 2.4 路由URL配置:
`hello\urls.py`
name='xxxx',這是名稱空間的用法,常在模板使用此方式:`hello:adduser`,等同於`hello/adduser.html`, 好處就是不用擔心你的`path`隨意改變。
```python
from django.urls import path
from django.urls import re_path
from hello import view
app_name = 'hello'
urlpatterns = [
# FBV,通過函式方式,實現增刪改查
# 增加
path('adduser/', view.adduser, name="adduser"),
# 查詢
path('showuser/', view.showuser, name="showuser"),
# 修改
re_path('edit
