線上電影系統設計
阿新 • • 發佈:2020-12-25
# 線上電影系統設計介紹
> 專案地址:https://github.com/qitianfeng/yiying-parent ,後續會將專案的具體功能以文件形式展示出來,各位可以點個star關注關注
## 簡介
線上電影系統是一個使用 B2C 的網站開發模式的線上視訊觀看及線上電影購票系統,主要分為前臺使用者平臺和後臺運營管理平臺。實現電影的上傳、解碼、儲存、點播
### 前後端系統的主要功能模組
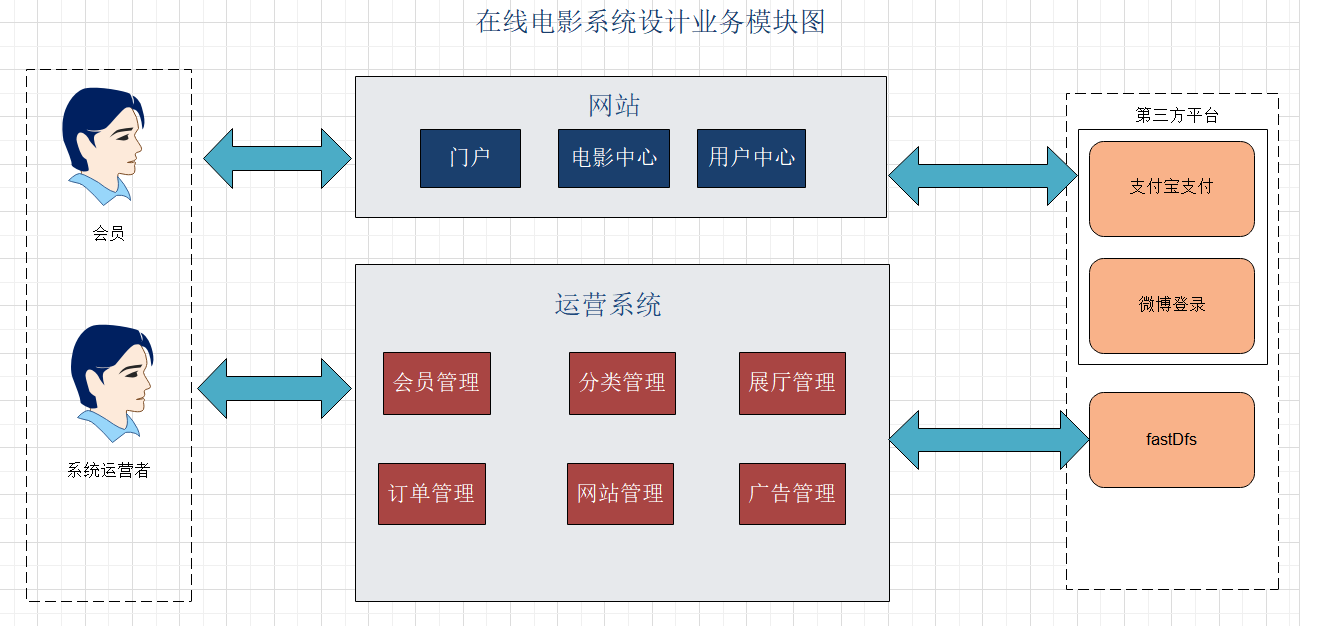
![](https://img2020.cnblogs.com/blog/1999821/202012/1999821-20201224165940888-2001386511.png)
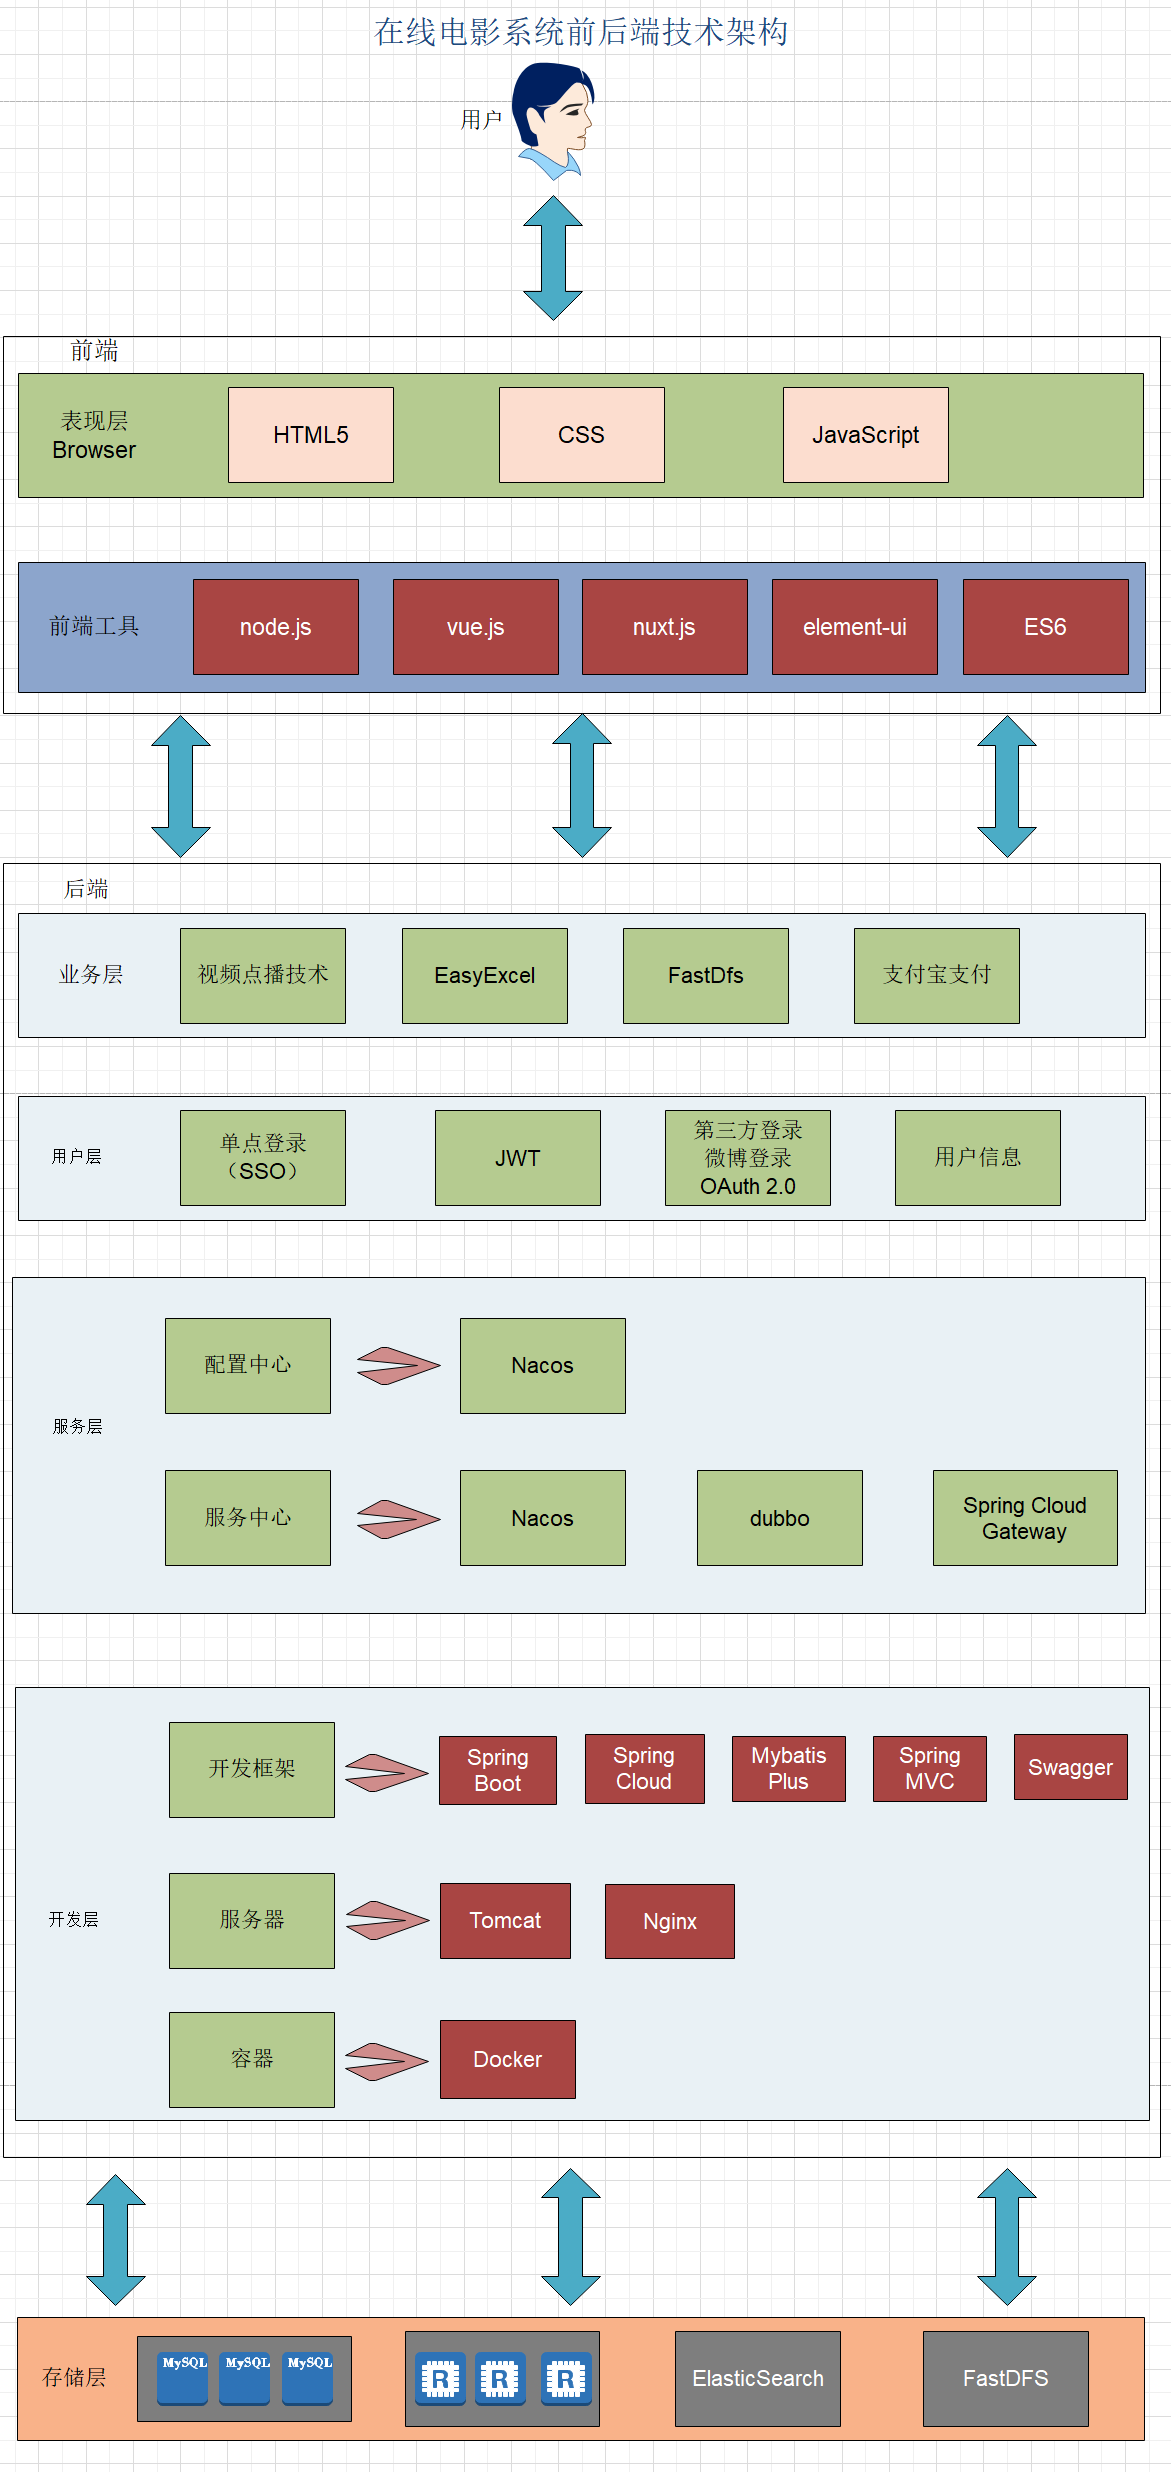
### 系統架構技術
![](https://img2020.cnblogs.com/blog/1999821/202012/1999821-20201224165940466-1077722083.png)
### 專案的具體描述
線上電影系統分為前臺門戶平臺和後臺管理平臺,使用B2C模式,微服務技術架構,前後端分離開發。
前臺的主要技術架構是:vue.js 、Nuxt.js 、Element-UI
後端的主要技術架構是:SpringBoot + SpringCloud + MyBatis-Plus + Dubbo + MySQL + Spring Cloud Getaway ;其他涉及到的中介軟體包括 Redis 、ElasticSearch 、令牌桶演算法、FFMPEG 對視訊的解碼;業務中使用 EasyExcel 完成分類批量新增、JWT 用於前臺門戶的分散式單點登入;專案前後端分離開發,後端採用 Spring Cloud 微服務架構,持久層用的是 MyBatis-Plus,服務與服務之間使用 dubbo 進行 RPC 通訊及使用 Swagger 技術生成各服務的介面文件。前端系統則分為前臺使用者系統和後臺管理系統兩部分。
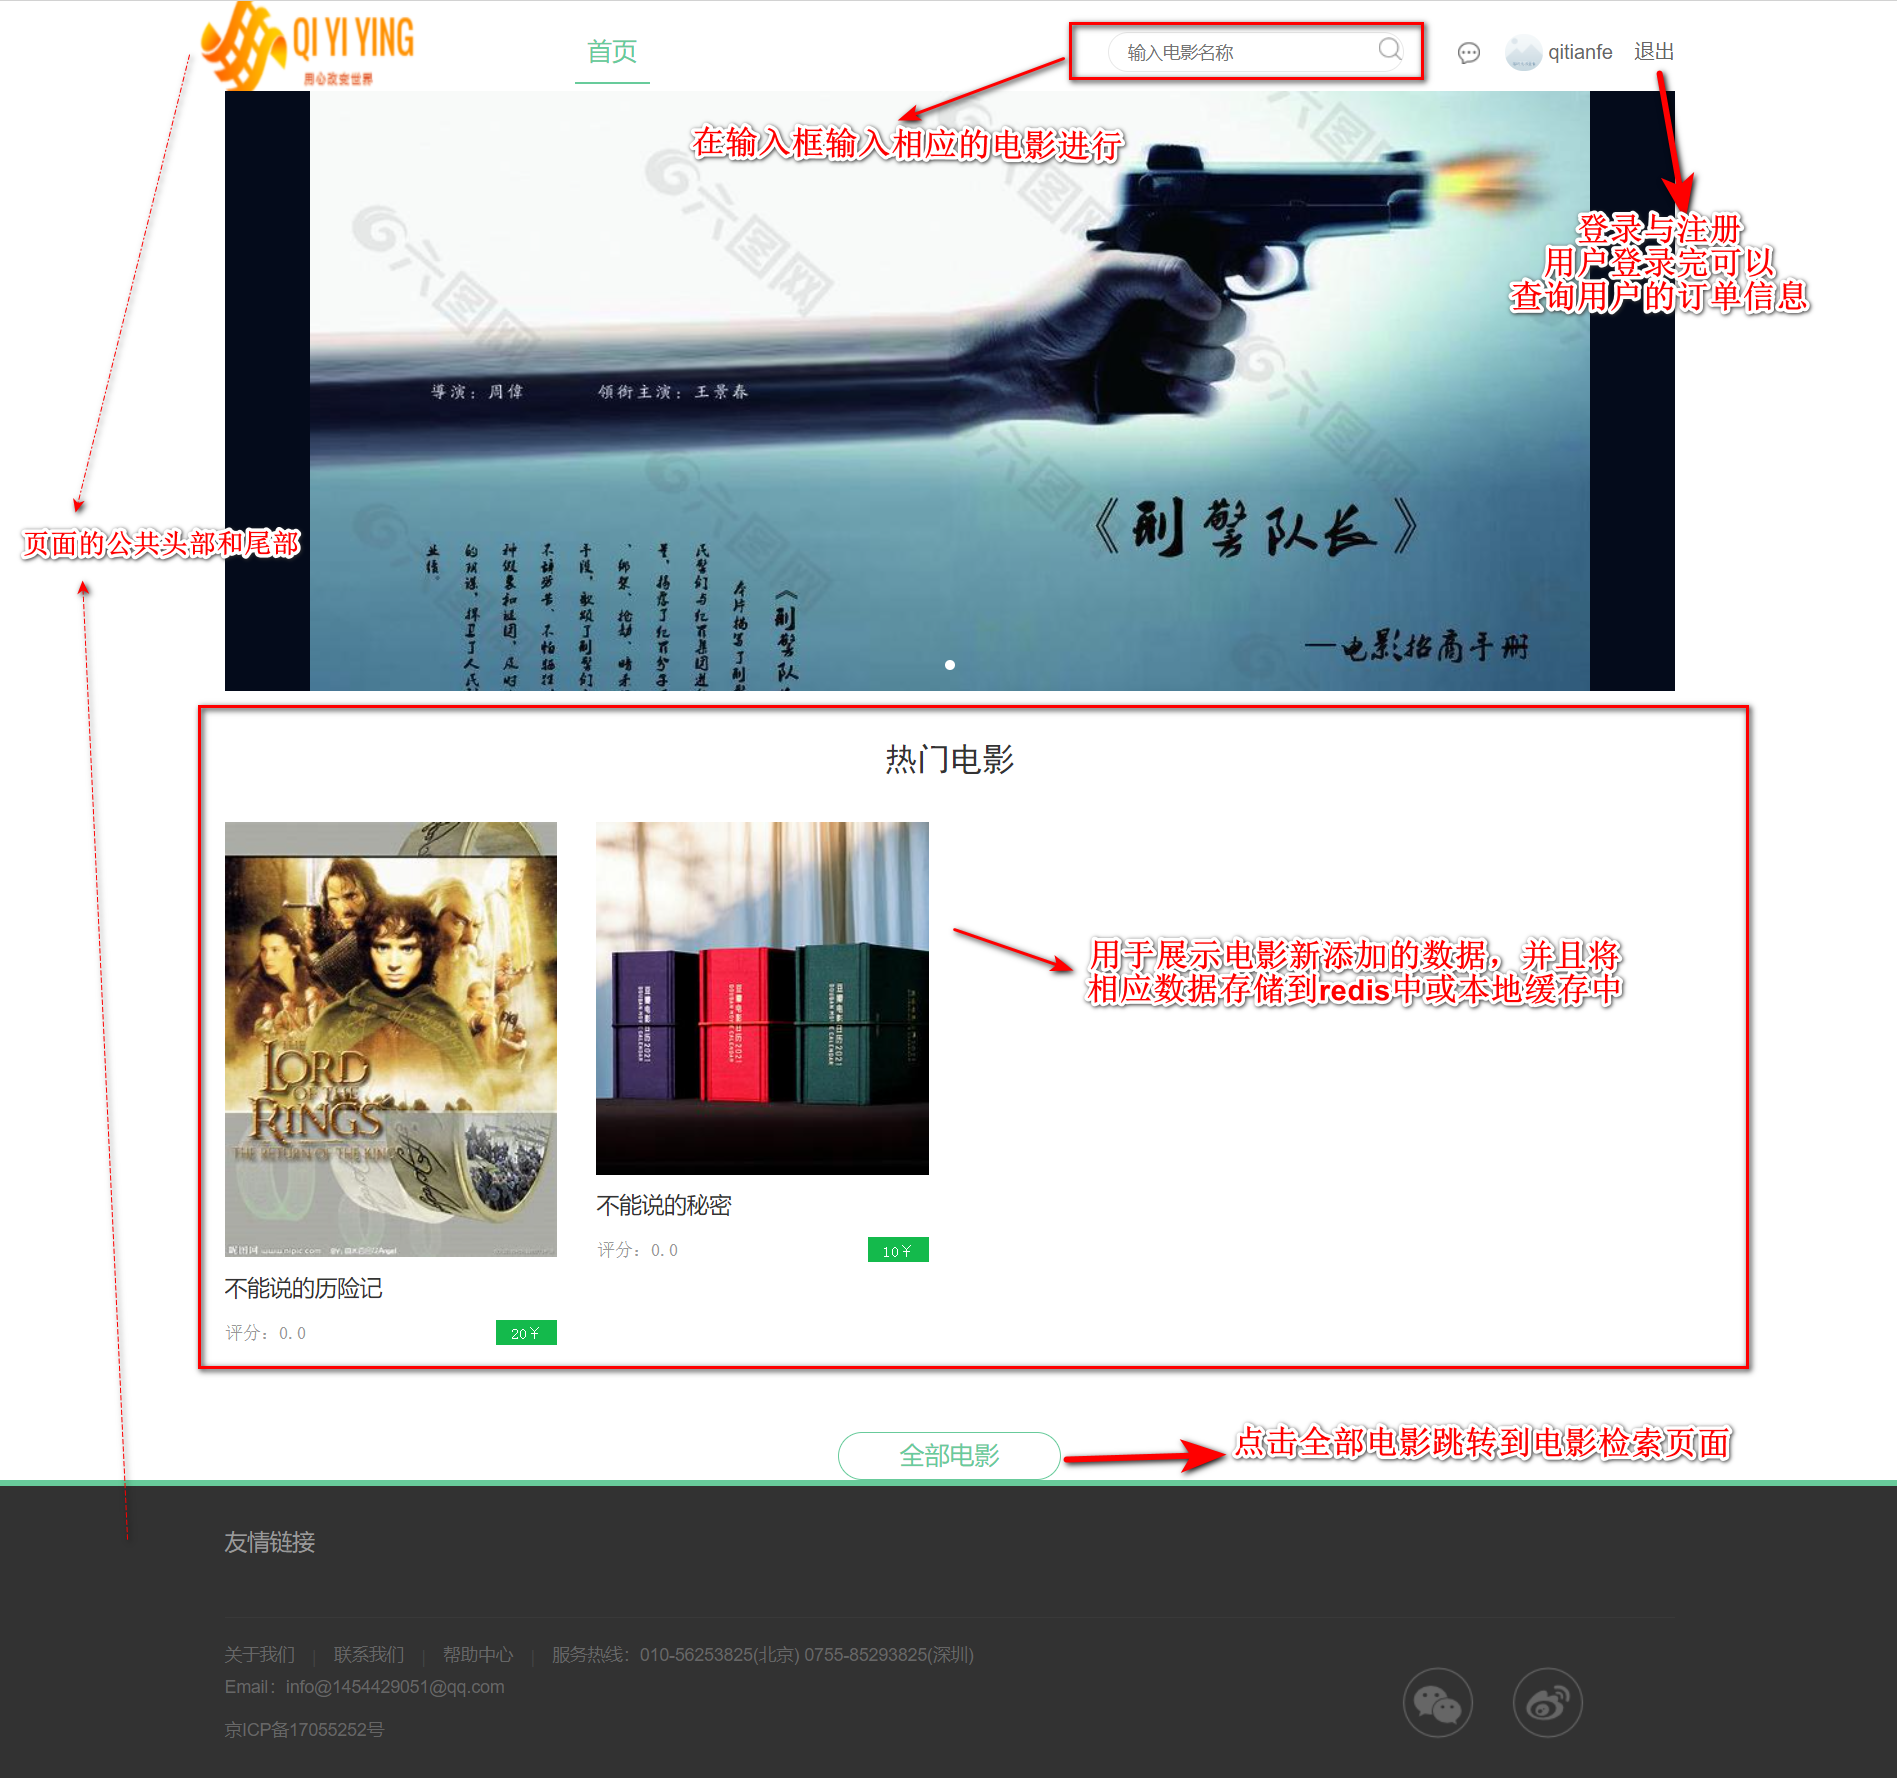
前臺系統包括:首頁、電影中心、使用者中心。
其中首頁的主要分佈為以下幾個部分
![](https://img2020.cnblogs.com/blog/1999821/202012/1999821-20201224165939018-910050414.png)
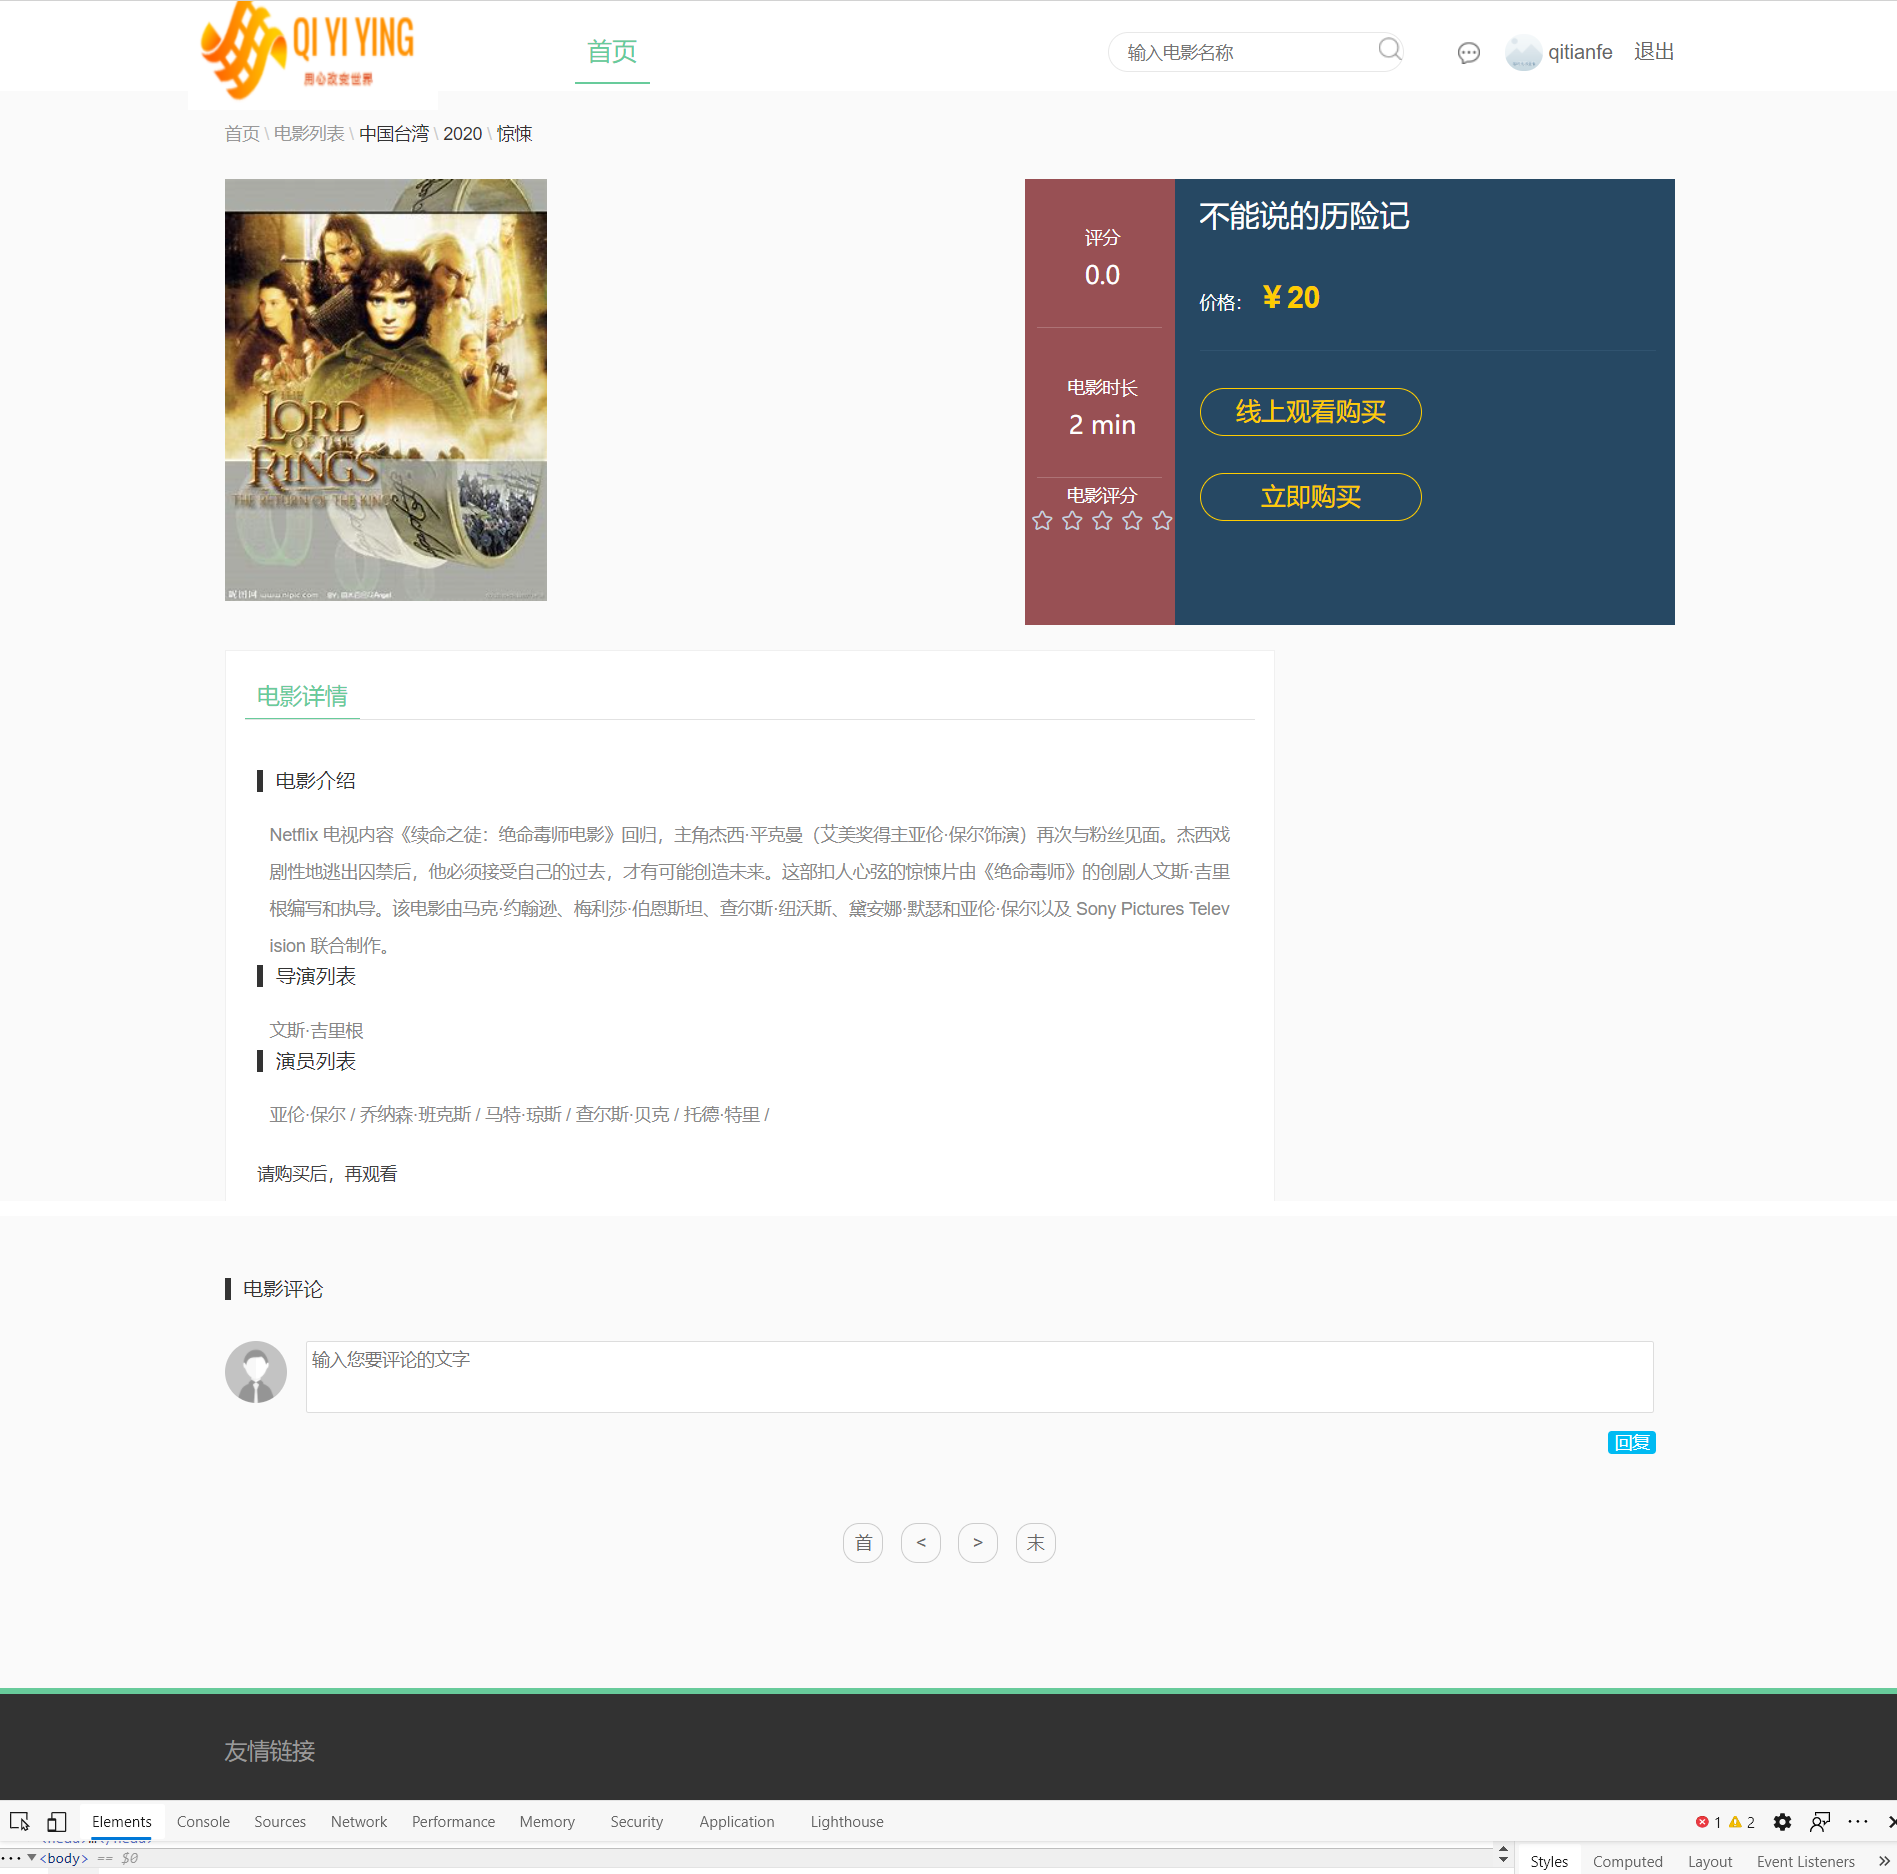
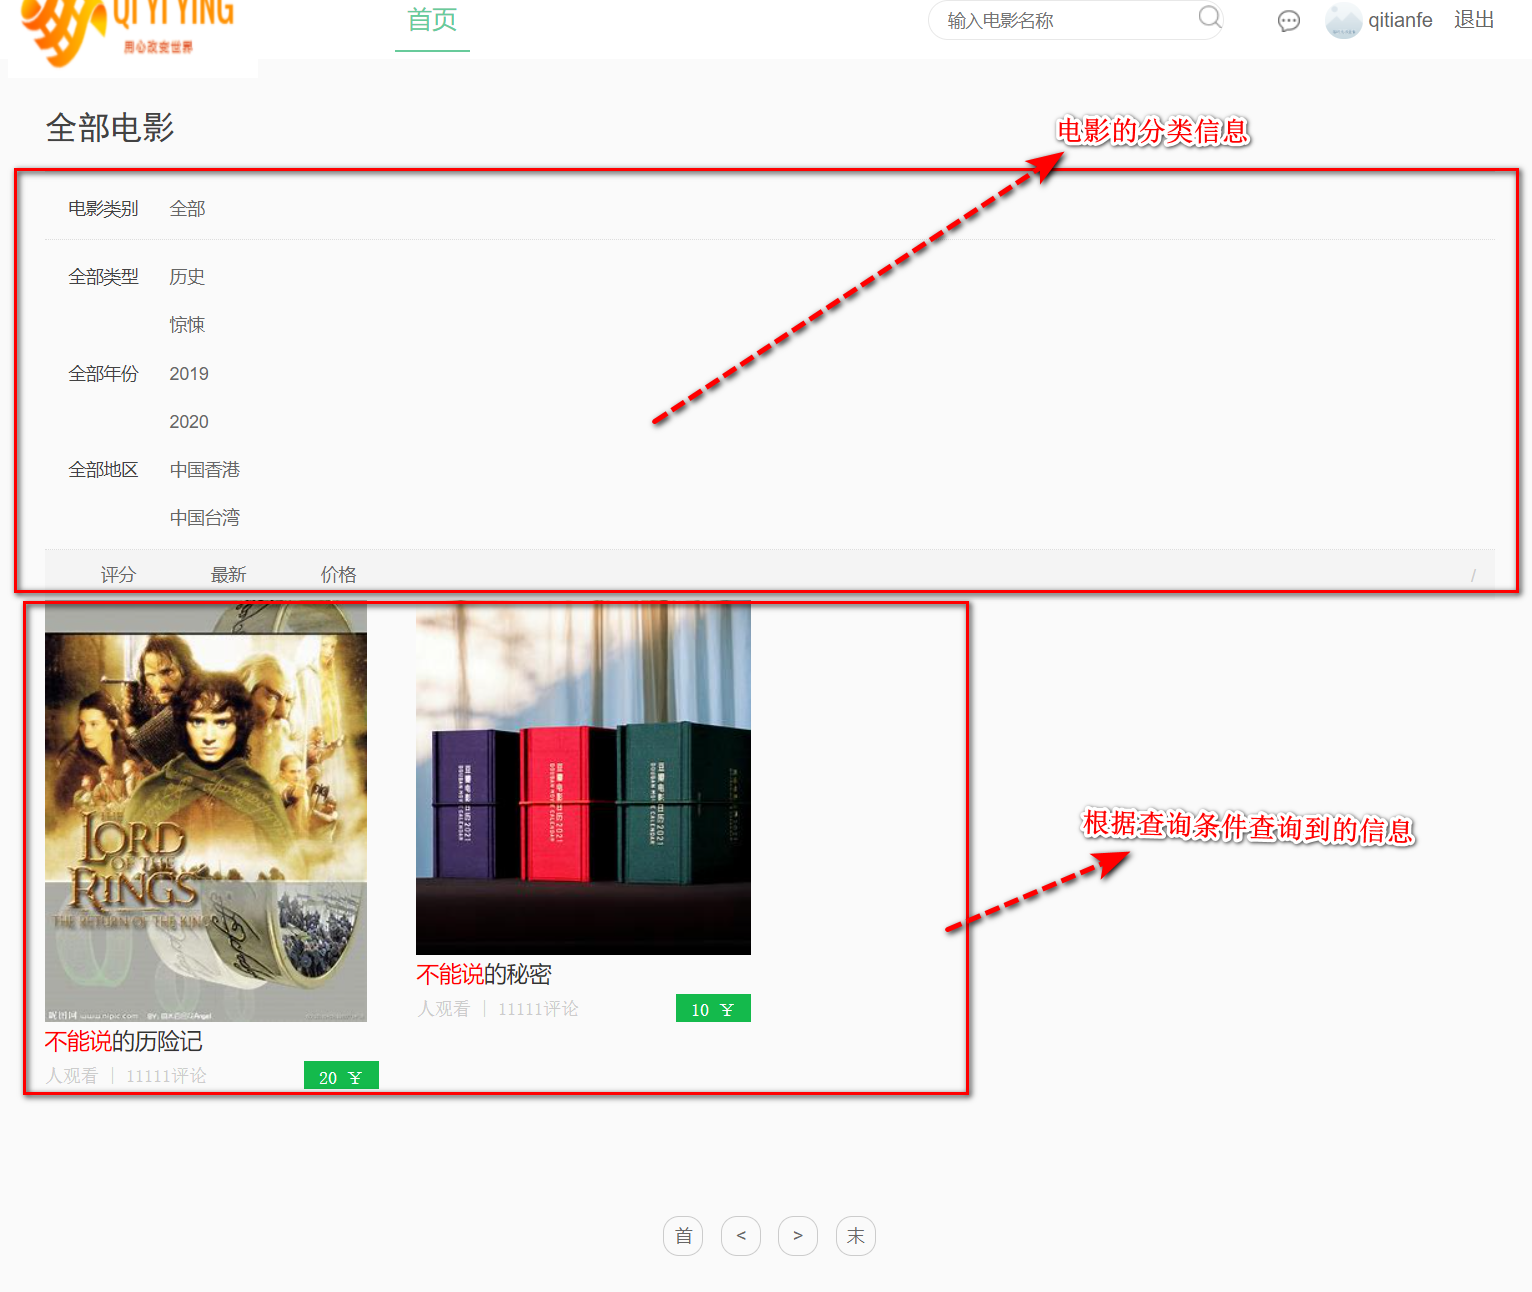
電影中心包括電影檢索頁面及電影的詳細資訊頁面
其中電影的詳情頁面主要為使用者展示電影的基本資訊:
![](https://img2020.cnblogs.com/blog/1999821/202012/1999821-20201224165938109-59665155.png)
電影的搜尋頁面會將電影的分類資訊進行展示,方便使用者對感興趣的分類資訊進行檢索檢視,並且查詢的關鍵字會進行高亮處理,給使用者帶來新的體驗效果。
![](https://img2020.cnblogs.com/blog/1999821/202012/1999821-20201224165937387-790625997.png)
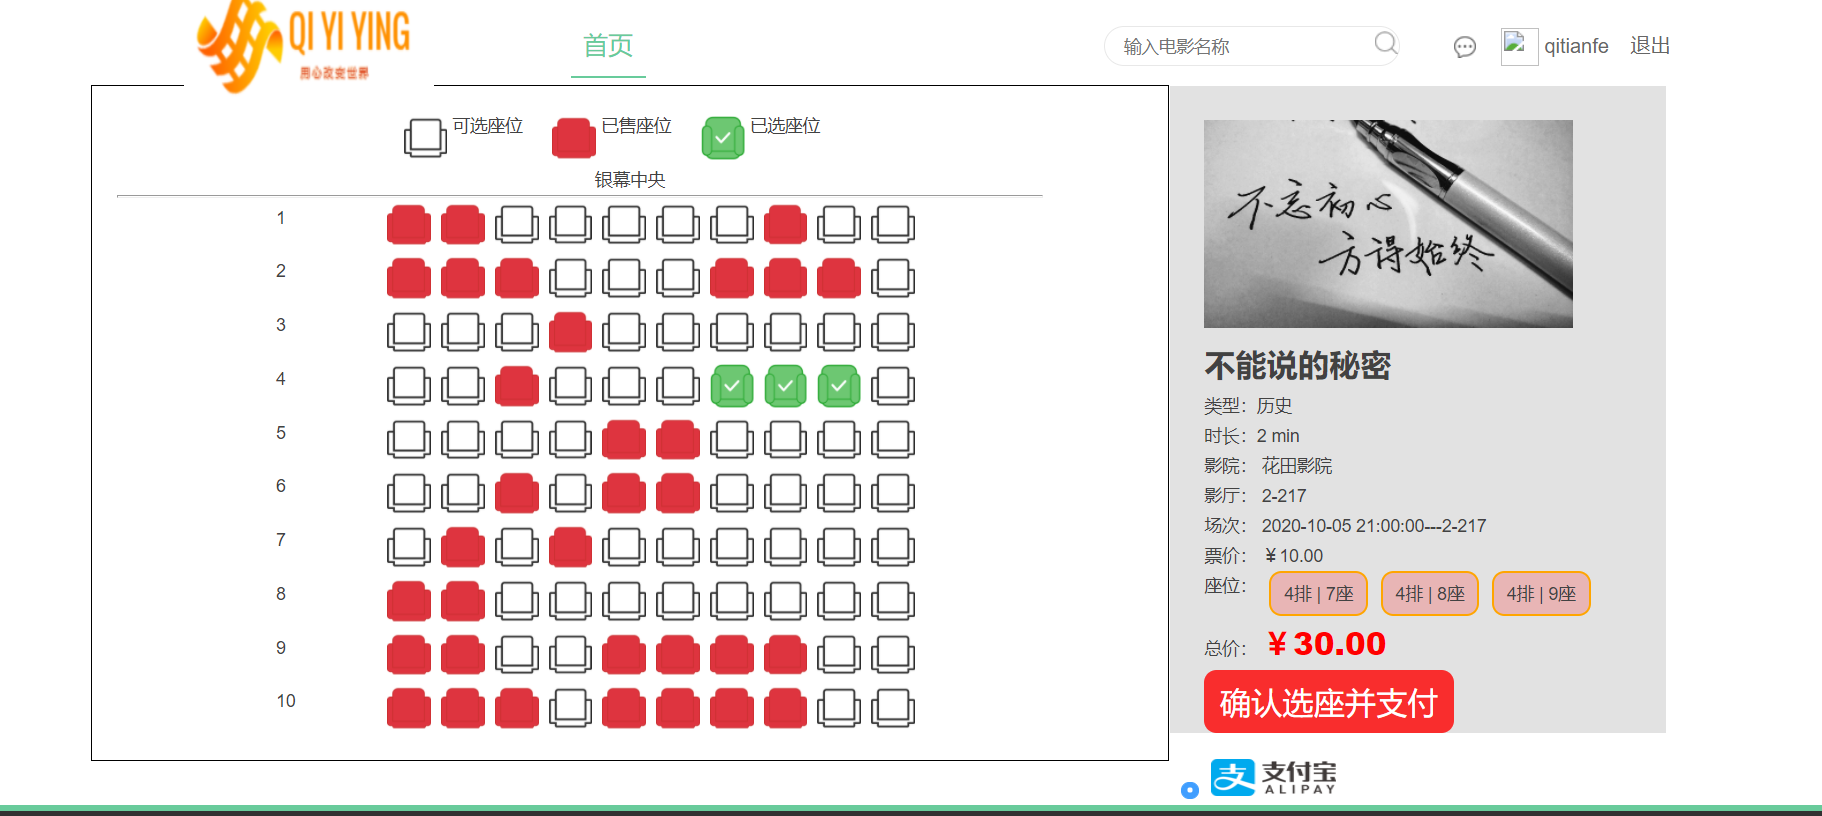
電影的下單頁面分為兩個頁面
1. 線上電影購票頁面,涉及座位的選座過程,以及動態計算選座過程的價格,實現真正的電影院選座和購買。
![](https://img2020.cnblogs.com/blog/1999821/202012/1999821-20201224165936656-1415612150.png)
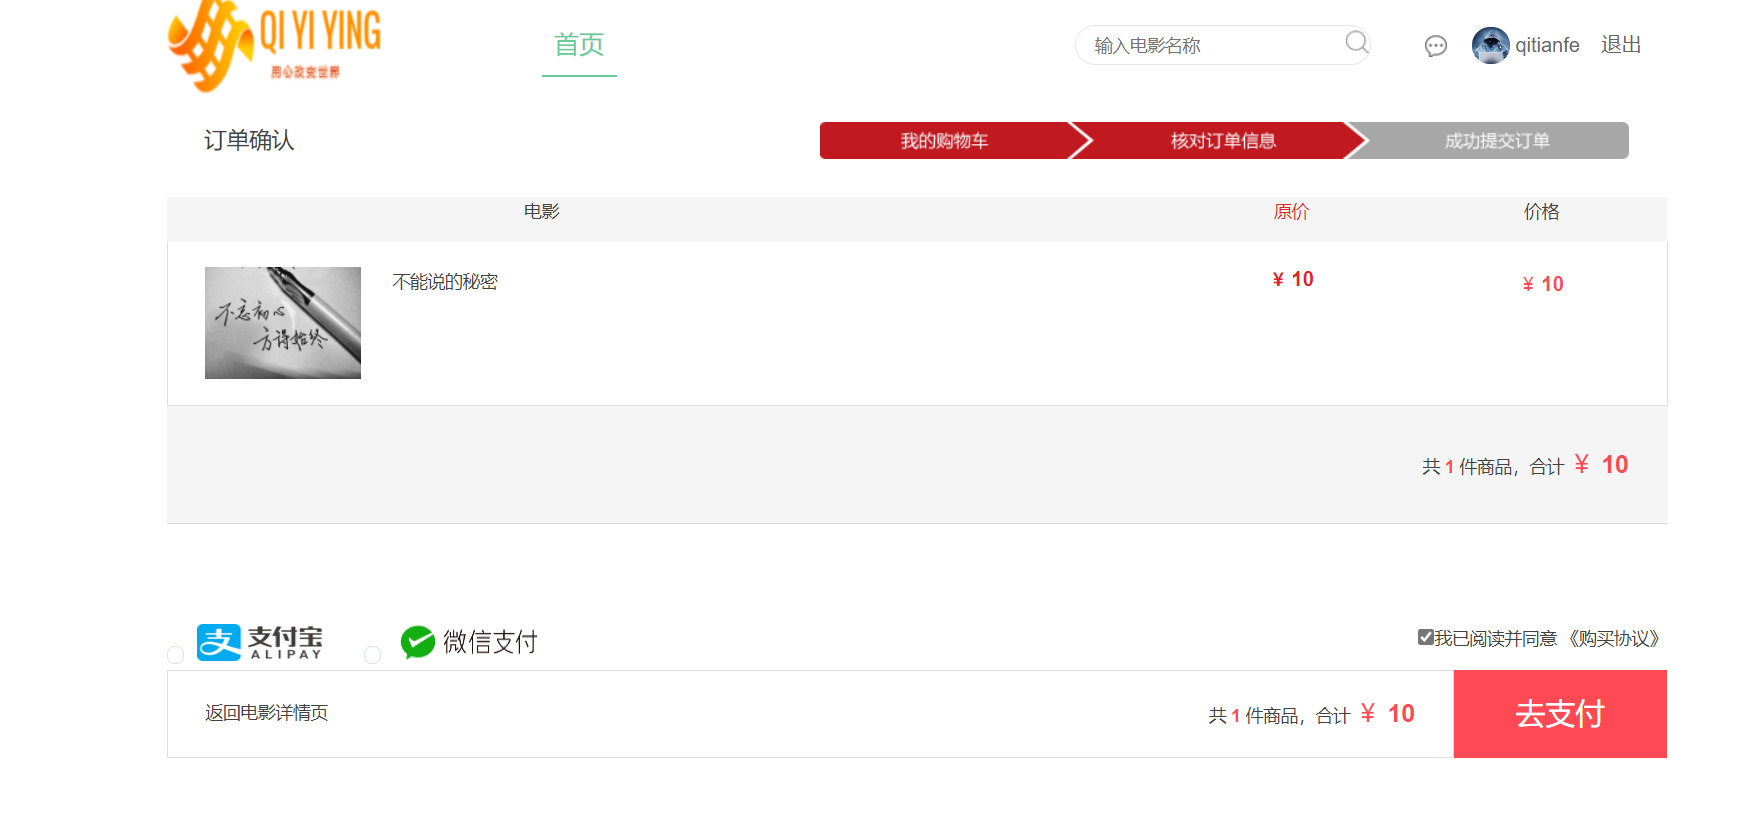
2. 線上電影觀看購買頁面
![](https://img2020.cnblogs.com/blog/1999821/202012/1999821-20201224165936115-2028912209.png)
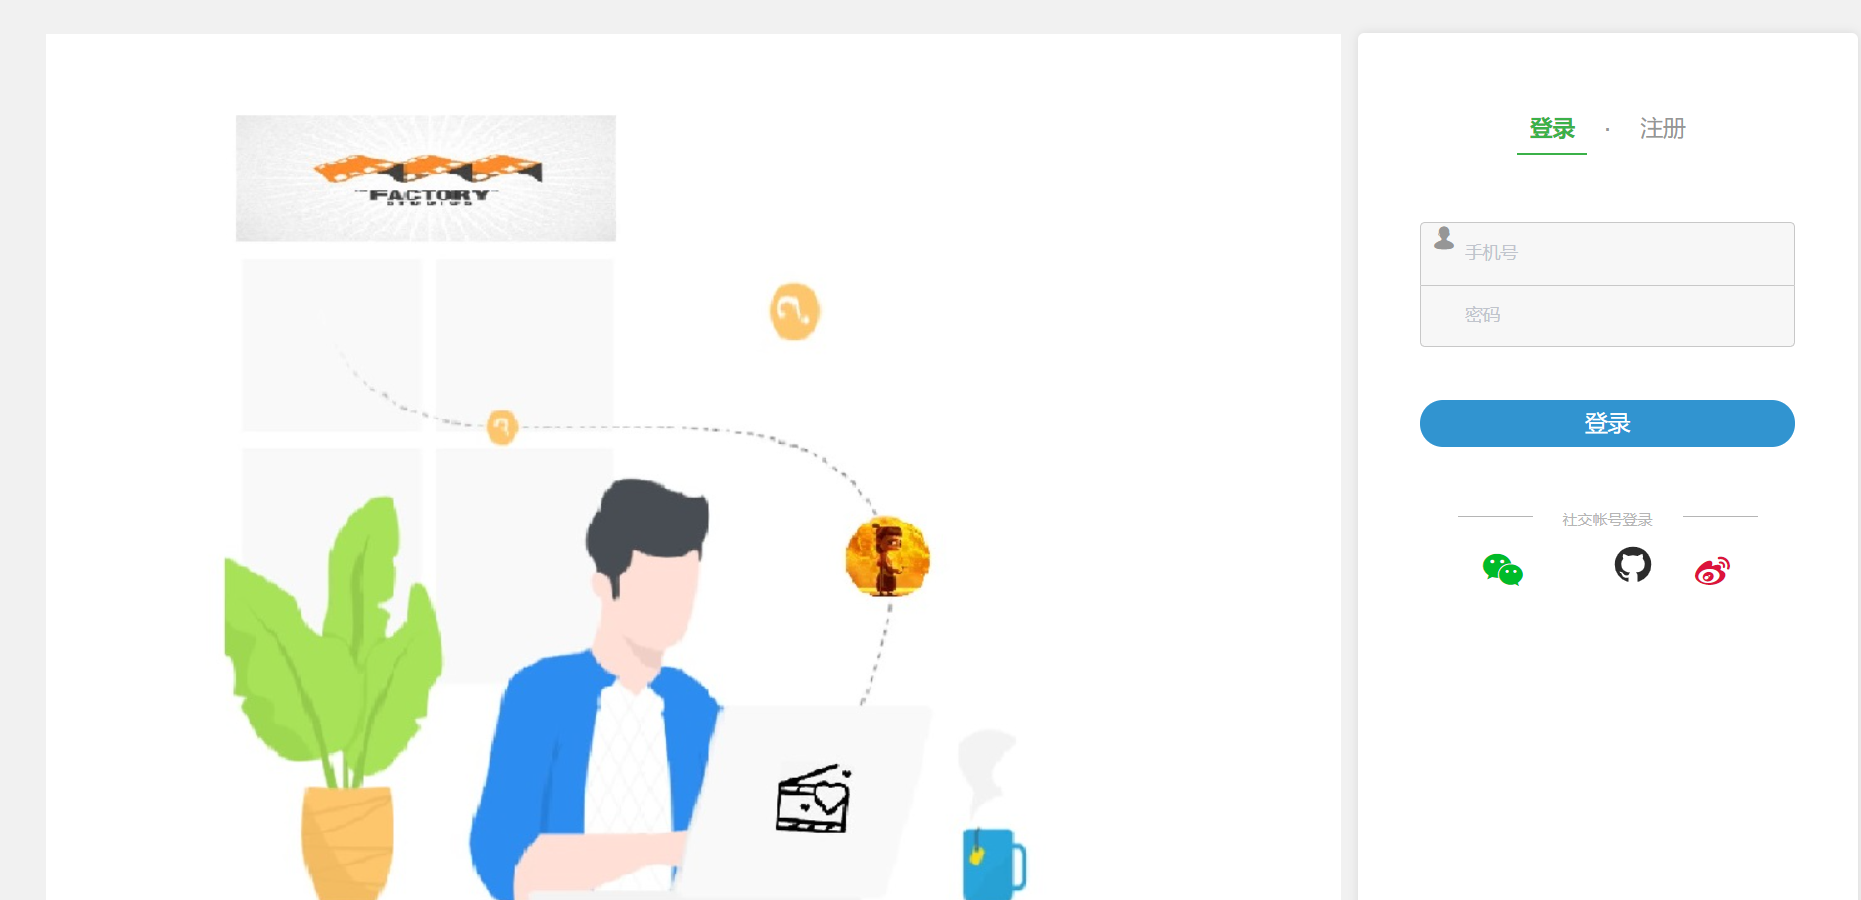
使用者中心:註冊與登入
![](https://img2020.cnblogs.com/blog/1999821/202012/1999821-20201224165935553-1224040918.png)
2. 後臺管理系統包括:電影管理、電影分類管理、電影展廳管理
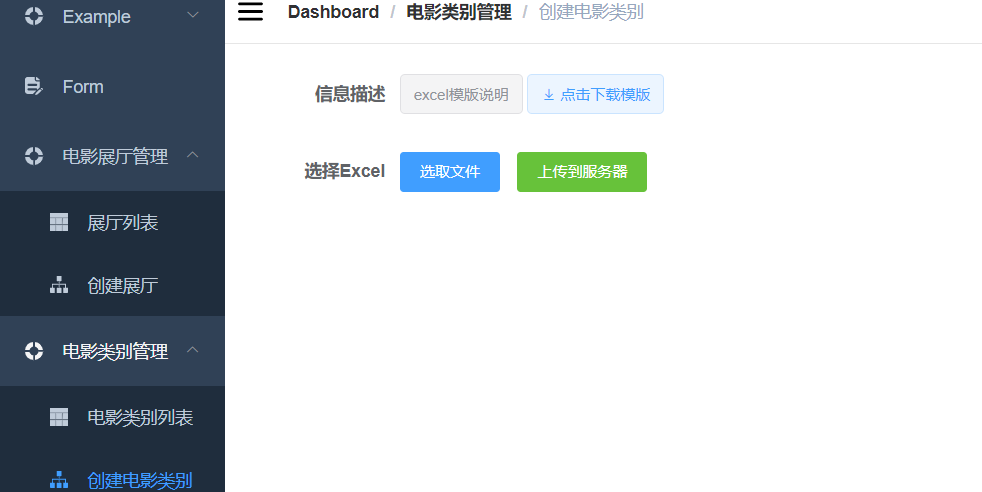
電影分類介面和電影展廳介面使用excel技術,將excel裡的資訊轉化進而儲存到資料庫中
![](https://img2020.cnblogs.com/blog/1999821/202012/1999821-20201224165935075-1060000296.png)
電影展廳展示介面
![](https://img2020.cnblogs.com/blog/1999821/202012/1999821-20201224165934731-1601360215.png)
電影管理主要用於新增新電影的基本資訊,以及使用FFMPEG技術對上傳的視訊進行進一步的操作,進而釋出完整電影資訊
![](https://img2020.cnblogs.com/blog/1999821/202012/1999821-20201224165934324-737778489.png)
電影正式釋出後的介面
![](https://img2020.cnblogs.com/blog/1999821/202012/1999821-20201224165933887-1726884630.png)
## 專案初始化
### 使用WebIDE搭建專案
1. 使用命令 mvn archetype:generate -DgroupId=com.yiying -DartifactId=yiying-parent -DarchetypeArtifactId=maven-archetype-quickstart -DinteractiveMode=false
(1)對命令相關引數的說明:
- **mvn**:maven命令
- **archetype:generate**:這是一個Maven外掛,原型 archetype 外掛是一個Maven專案模板工具包,可以用它建立基本的java專案結構。
- **-DgourpId**: 組織名,公司網址的反寫 + 專案名稱
- **-DartifactId**: 專案名(模組名)
- **-Dversion**:專案版本號
- **-DinteractiveMode**:是否使用互動模式:false不使用,直接建立;true使用,需要根據提示輸入相關資訊
(2)修改 pom 檔案
- 新增jar ,將專案打成jar包
2. 匯入 mybatis 相關依賴包,可以在https://mvnrepository.com網站中查詢 mybatis 的包版本號
```xml
org.mybatis
mybatis
3.5.3
mysql
mysql-connector-java
5.1.47
runtime
org.projectlombok
lombok
1.18.12
junit
junit
4.12
```
再使用命令 ``mvn install `` 進行依賴打包
3. 建立資料庫以及建立表
````mysql
--- 建立資料庫
CREATE DATABASE test;
--- 使用資料庫
USE test;
--- 建立相關表結構
CREATE TABLE `user` (
`id` char(19) NOT NULL COMMENT '會員id',
`name` varchar(50) DEFAULT NULL COMMENT '暱稱',
`age` tinyint(3) unsigned DEFAULT NULL COMMENT '年齡',
PRIMARY KEY (`id`)
) ENGINE=InnoDB DEFAULT CHARSET=utf8mb4 COMMENT='會員表';
使用show tables 命令查看錶是否建立成功
````
4. 在resource檔案下建立 ``mybatis-config.xml ``配置檔案
```xml
```
5. 建立 Mapper 對資料庫進行增刪改查操作
- 建立資料庫表的對映類
````java
//資料庫中有多少欄位對應類有多少屬性,不然會報錯
@Data //lombok的註解,用此註解可以不用對屬性的getter和setter方法進行重寫
public class User {
private String id;
private String name;
private String age;
}
````
- 建立 UserMapper 類
```java
@Mapper
public interface UserMapper {
//@Param 對傳入的資料進行繫結,當引數為一個時,可以選擇不加註解
//根據id查詢使用者資訊
public User getInfo(@Param("id") String id);
//查詢資料庫所有的使用者資訊
List findAll();
//增加一條使用者資訊
boolean insert(User user);
//根據使用者id更新使用者資訊
boolean updateUser(User user);
//根據使用者id刪除使用者資訊
boolean removeById(String id);
//模糊查詢
List findByName(String username);
}
```
6. 在 resource/mapper 檔案下建立 xml 檔案
```xml
insert into user(id,name,age)
values(#{id},#{name},#{age})
update user set name=#{name},age=#{age} where id = #{id}
delete
from user
where id = #{id}
```
7. 對增刪改查操作進行測試
```java
// 首先需要在 test 資料夾中建立測試類
//在處理測試時,先載入 init() 處理完測試後,載入 destory()
//在執行方法前執行
@Before
public void init() throws Exception {
//1.讀取配置檔案
in = Resources.getResourceAsStream("mybatis-config.xml");
//2.建立構建者物件
SqlSessionFactoryBuilder builder = new SqlSessionFactoryBuilder();
//3.建立 SqlSession 工廠物件
factory = builder.build(in);
//4.建立 Dao 介面的實現類
sqlSession = factory.openSession();
//5.建立代理物件
userMapper= sqlSession.getMapper(UserMapper.class);
}
/**
* 執行完方法後執行
*/
@After
public void destory(){
sqlSession.commit();
try {
sqlSession.close();
//釋放資源
in.close();
} catch (IOException e) {
e.printStackTrace();
}
}
```
````java
//查詢
public class Test {
private InputStream in;
private SqlSessionFactory factory;
SqlSession sqlSession;
private UserMapper userMapper;
//根據id查詢
@Test
public void test1(){
User user = userMapper.getInfo("1");
System.out.println(user);
}
@Test
public void test2(){
List userList = userMapper.findAll();
System.out.println("查詢的所有資料:" + userList.toString());
}
//模糊查詢
@Test
public void test3(){
List user = userMapper.findByName("張三");
System.out.println("根據名字模糊查詢結果為:"+user.toString());
}
}
````
![](https://img2020.cnblogs.com/blog/1999821/202012/1999821-20201224165933504-2111811108.png)
![](https://img2020.cnblogs.com/blog/1999821/202012/1999821-20201224165933223-985375913.png)
````java
//新增一條記錄
@Test
public void test4(){
User user = new User();
user.setId("2");
user.setName("張三四");
user.setAge(21);
boolean a = userMapper.insert(user);
if(a){
System.out.println("插入成功!!!!!!");
} else {
System.out.println("插入失敗!!!!!!");
}
}
````
![](https://img2020.cnblogs.com/blog/1999821/202012/1999821-20201224165932904-1767293423.png)
```java
//根據 id 更新使用者資訊
@Test
public void test5(){
User user = new User();
user.setId("1");
user.setName("張三四五");
user.setAge(20);
boolean a = userMapper.updateUser(user);
if(a){
System.out.println("修改成功!!!!!!");
} else {
System.out.println("修改失敗!!!!!!");
}
}
```
![](https://img2020.cnblogs.com/blog/1999821/202012/1999821-20201224165932591-1722113796.png)
````java
//根據id刪除使用者資訊
@Test
@Test
public void test6(){
boolean a = userMapper.removeById("2");
if(a){
System.out.println("插入成功!!!!!!");
} else {
System.out.println("插入失敗!!!!!!");
}
}
````
![](https://img2020.cnblogs.com/blog/1999821/202012/1999821-20201224165932285-1680185641.png)
## Mybatis的一級快取和二級快取
### 一級快取
#### 一級快取介紹
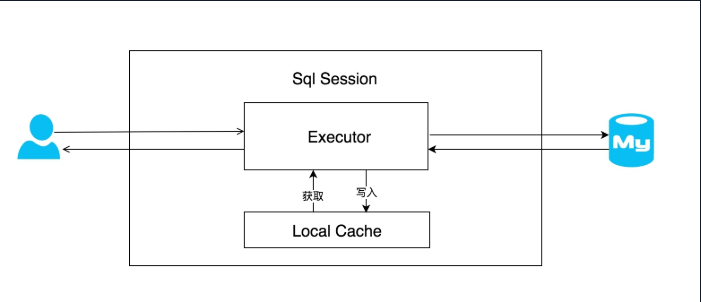
在應用執行過程中,我們有可能在一次資料庫會話中,執行多次查詢條件完全相同的 SQL,MyBatis 提供了一級快取的方案優化這部分場景,如果是相同的 SQL 語句,會優先命中一級快取,避免直接對資料庫進行查詢,提高效能。具體執行過程如下圖所示。
![img](https://img2020.cnblogs.com/blog/1999821/202012/1999821-20201224165931992-500498236.png)
每個 SqlSession 中持有了 Executor,每個 Executor 中有一個 LocalCache。當用戶發起查詢時,MyBatis 根據當前執行的語句生成 `MappedStatement`,在 Local Cache 進行查詢,如果快取命中的話,直接返回結果給使用者,如果快取沒有命中的話,查詢資料庫,結果寫入 `Local Cache`,最後返回結果給使用者。具體實現類的類關係圖如下圖所示。
![img](https://img2020.cnblogs.com/blog/1999821/202012/1999821-20201224165931575-1276449169.png)
#### 一級快取配置
我們來看看如何使用 MyBatis 一級快取。開發者只需在MyBatis的配置檔案中,新增如下語句,就可以使用一級快取。共有兩個選項,`SESSION`或者 `STATEMENT`,預設是 `SESSION` 級別,即在一個 MyBatis 會話中執行的所有語句,都會共享這一個快取。一種是 `STATEMENT` 級別,可以理解為快取只對當前執行的這一個 `Statement` 有效。
```xml
```
#### 一級快取實驗
接下來通過實驗,瞭解 MyBatis 一級快取的效果,每個單元測試後都請恢復被修改的資料。
首先是建立示例表 student,建立對應的 POJO 類和增改的方法,具體可以在 entity 包和 mapper 包中檢視。
```sql
CREATE TABLE `student` (
`id` int(11) unsigned NOT NULL AUTO_INCREMENT,
`name` varchar(200) COLLATE utf8_bin DEFAULT NULL,
`age` tinyint(3) unsigned DEFAULT NULL,
PRIMARY KEY (`id`)
) ENGINE=InnoDB AUTO_INCREMENT=4 DEFAULT CHARSET=utf8 COLLATE=utf8_bin;
```
在以下實驗中,id為1的學生名稱是凱倫。
##### 實驗1
開啟一級快取,範圍為會話級別,呼叫三次 `getStudentById`,程式碼如下所示:
```java
public void getStudentById() throws Exception {
SqlSession sqlSession = factory.openSession(true); // 自動提交事務
StudentMapper studentMapper = sqlSession.getMapper(StudentMapper.class);
System.out.println(studentMapper.getStudentById(1));
}
```
執行結果:
![img](https://img2020.cnblogs.com/blog/1999821/202012/1999821-20201224165931196-974325279.png)
我們可以看到,只有第一次真正查詢了資料庫,後續的查詢使用了一級快取。
##### 實驗2
增加了對資料庫的修改操作,驗證在一次資料庫會話中,如果對資料庫發生了修改操作,一級快取是否會失效。
```java
@Test
public void addStudent() throws Exception {
SqlSession sqlSession = factory.openSession(true); // 自動提交事務
StudentMapper studentMapper = sqlSession.getMapper(StudentMapper.class);
System.out.println(studentMapper.getStudentById(1));
System.out.println("增加了" + studentMapper.addStudent(buildStudent()) + "個學生");
System.out.println(studentMapper.getStudentById(1));
sqlSession.close();
}
```
執行結果:
![img](https://img2020.cnblogs.com/blog/1999821/202012/1999821-20201224165930688-1635529200.png)
我們可以看到,在修改操作後執行的相同查詢,查詢了資料庫,**一級快取失效**。
##### 實驗3
開啟兩個 `SqlSession`,在 `sqlSession1` 中查詢資料,使一級快取生效,在`sqlSession2 ` 中更新資料庫,驗證一級快取只在資料庫會話內部共享。
```java
@Test
public void testLocalCacheScope() throws Exception {
SqlSession sqlSession1 = factory.openSession(true);
SqlSession sqlSession2 = factory.openSession(true);
StudentMapper studentMapper = sqlSession1.getMapper(StudentMapper.class);
StudentMapper studentMapper2 = sqlSession2.getMapper(StudentMapper.class);
System.out.println("studentMapper讀取資料: " + studentMapper.getStudentById(1));
System.out.println("studentMapper2更新了" + studentMapper2.updateStudentName("小岑",1) + "個學生的資料");
System.out.println("studentMapper讀取資料: " + studentMapper.getStudentById(1));
System.out.println("studentMapper2讀取資料: " + studentMapper2.getStudentById(1));
}
```
![img](https://img2020.cnblogs.com/blog/1999821/202012/1999821-20201224165930095-2033572302.png)
`sqlSession2 `更新了id為1的學生的姓名,從凱倫改為了小岑,但 session1 之後的查詢中,id為1的學生的名字還是凱倫,出現了髒資料,也證明了之前的設想,一級快取只在資料庫會話內部共享。
### 二級快取
#### 二級快取介紹
在上文中提到的一級快取中,其最大的共享範圍就是一個 SqlSession 內部,如果多個 SqlSession之間需要共享快取,則需要使用到二級快取。開啟二級快取後,會使用 CachingExecutor 裝飾Executor,進入一級快取的查詢流程前,先在 CachingExecutor 進行二級快取的查詢,具體的工作流程如下所示。
![img](https://img2020.cnblogs.com/blog/1999821/202012/1999821-20201224165929695-1311016077.png)
二級快取開啟後,同一個 namespace 下的所有操作語句,都影響著同一個 Cache,即二級快取被多個 SqlSession 共享,是一個全域性的變數。
當開啟快取後,資料的查詢執行的流程就是 二級快取 -> 一級快取 -> 資料庫。
#### 二級快取配置
要正確的使用二級快取,需完成如下配置的。
1. 在MyBatis的配置檔案中開啟二級快取。
```xml
```
1. 在 MyBatis 的對映 XML 中配置 cache 或者 cache-ref 。
cache標籤用於宣告這個 namespace 使用二級快取,並且可以自定義配置。
```xml
```
- `type`:cache使用的型別,預設是 `PerpetualCache`,這在一級快取中提到過。
- `eviction`: 定義回收的策略,常見的有 FIFO,LRU。
- `flushInterval`: 配置一定時間自動重新整理快取,單位是毫秒。
- `size`: 最多快取物件的個數。
- `readOnly`: 是否只讀,若配置可讀寫,則需要對應的實體類能夠序列化。
- `blocking`: 若快取中找不到對應的key,是否會一直blocking,直到有對應的資料進入快取。
- `cache-ref` 代表引用別的名稱空間的Cache配置,兩個名稱空間的操作使用的是同一個 Cache。
```xml
```
#### 二級快取實驗
接下來我們通過實驗,瞭解 MyBatis 二級快取在使用上的一些特點。
在本實驗中,id 為1的學生名稱初始化為點點。
##### 實驗1
測試二級快取效果,不提交事務,`sqlSession1 `查詢完資料後,`sqlSession2` 相同的查詢是否會從快取中獲取資料。
```java
@Test
public void testCacheWithoutCommitOrClose() throws Exception {
SqlSession sqlSession1 = factory.openSession(true);
SqlSession sqlSession2 = factory.openSession(true);
StudentMapper studentMapper = sqlSession1.getMapper(StudentMapper.class);
StudentMapper studentMapper2 = sqlSession2.getMapper(StudentMapper.class);
System.out.println("studentMapper讀取資料: " + studentMapper.getStudentById(1));
System.out.println("studentMapper2讀取資料: " + studentMapper2.getStudentById(1));
}
```
執行結果:
![img](https://img2020.cnblogs.com/blog/1999821/202012/1999821-20201224165929221-314788548.png)
我們可以看到,當 `sqlsession` 沒有呼叫 `commit()` 方法時,二級快取並沒有起到作用。
##### 實驗2
測試二級快取效果,當提交事務時,`sqlSession1` 查詢完資料後,`sqlSession2 `相同的查詢是否會從快取中獲取資料。
```java
@Test
public void testCacheWithCommitOrClose() throws Exception {
SqlSession sqlSession1 = factory.openSession(true);
SqlSession sqlSession2 = factory.openSession(true);
StudentMapper studentMapper = sqlSession1.getMapper(StudentMapper.class);
StudentMapper studentMapper2 = sqlSession2.getMapper(StudentMapper.class);
System.out.println("studentMapper讀取資料: " + studentMapper.getStudentById(1));
sqlSession1.commit();
System.out.println("studentMapper2讀取資料: " + studentMapper2.getStudentById(1));
}
```
![img](https://img2020.cnblogs.com/blog/1999821/202012/1999821-20201224165928681-799190764.jpg)
從圖上可知,`sqlsession2` 的查詢,使用了快取,快取的命中率是0.5。
##### 實驗3
測試 `update `操作是否會重新整理該 `namespace `下的二級快取。
```java
@Test
public void testCacheWithUpdate() throws Exception {
SqlSession sqlSession1 = factory.openSession(true);
SqlSession sqlSession2 = factory.openSession(true);
SqlSession sqlSession3 = factory.openSession(true);
StudentMapper studentMapper = sqlSession1.getMapper(StudentMapper.class);
StudentMapper studentMapper2 = sqlSession2.getMapper(StudentMapper.class);
StudentMapper studentMapper3 = sqlSession3.getMapper(StudentMapper.class);
System.out.println("studentMapper讀取資料: " + studentMapper.getStudentById(1));
sqlSession1.commit();
System.out.println("studentMapper2讀取資料: " + studentMapper2.getStudentById(1));
studentMapper3.updateStudentName("方方",1);
sqlSession3.commit();
System.out.println("studentMapper2讀取資料: " + studentMapper2.getStudentById(1));
}
```
![img](https://img2020.cnblogs.com/blog/1999821/202012/1999821-20201224165928195-1774327233.jpg)
我們可以看到,在 `sqlSession3` 更新資料庫,並提交事務後,`sqlsession2 `的`StudentMapper namespace `下的查詢走了資料庫,沒有走Cache。
##### 實驗4
驗證MyBatis的二級快取不適應用於對映檔案中存在多表查詢的情況。
通常我們會為每個單表建立單獨的對映檔案,由於MyBatis的二級快取是基於 `namespace` 的,多表查詢語句所在的 `namspace `無法感應到其他 `namespace` 中的語句對多表查詢中涉及的表進行的修改,引發髒資料問題。
```java
@Test
public void testCacheWithDiffererntNamespace() throws Exception {
SqlSession sqlSession1 = factory.openSession(true);
SqlSession sqlSession2 = factory.openSession(true);
SqlSession sqlSession3 = factory.openSession(true);
StudentMapper studentMapper = sqlSession1.getMapper(StudentMapper.class);
StudentMapper studentMapper2 = sqlSession2.getMapper(StudentMapper.class);
ClassMapper classMapper = sqlSession3.getMapper(ClassMapper.class);
System.out.println("studentMapper讀取資料: " + studentMapper.getStudentByIdWithClassInfo(1));
sqlSession1.close();
System.out.println("studentMapper2讀取資料: " + studentMapper2.getStudentByIdWithClassInfo(1));
classMapper.updateClassName("特色一班",1);
sqlSession3.commit();
System.out.println("studentMapper2讀取資料: " + studentMapper2.getStudentByIdWithClassInfo(1));
}
```
執行結果:
![img](https://img2020.cnblogs.com/blog/1999821/202012/1999821-20201224165927619-294692391.jpg)
在這個實驗中,我們引入了兩張新的表,一張 class,一張 classroom。class 中儲存了班級的 id 和班級名,classroom中儲存了班級 id 和學生 id。我們在 StudentMapper 中增加了一個查詢方法 getStudentByIdWithClassInfo,用於查詢學生所在的班級,涉及到多表查詢。在 ClassMapper 中添加了 updateClassName,根據班級 id 更新班級名的操作。
當 sqlsession1 的 studentmapper 查詢資料後,二級快取生效。儲存在 StudentMapper的 namespace 下的 cache 中。當 sqlSession3 的 classMapper`的 updateClassName 方法對class表進行更新時,updateClassName 不屬於StudentMapper 的 namespace,所以 StudentMapper 下的cache沒有感應到變化,沒有重新整理快取。當 StudentMapper 中同樣的查詢再次發起時,從快取中讀取了髒資料。
##### 實驗5
為了解決實驗4的問題呢,可以使用 Cache ref,讓 ClassMapper 引用 StudenMapper 名稱空間,這樣兩個對映檔案對應的 SQL 操作都使用的是同一塊快取了。
執行結果:
![img](https://img2020.cnblogs.com/blog/1999821/202012/1999821-20201224165926824-1012032609.jpg)
不過這樣做的後果是,快取的粒度變粗了,多個 Mapper namespace 下的所有操作都會對快取使用造成