
卷積網路可解釋性復現 | Grad-CAM | ICCV | 2017
阿新 • • 發佈:2020-12-29
覺得本文不錯的可以點個贊。有問題聯絡作者微信cyx645016617,之後主要轉戰公眾號,不在部落格園和CSDN更新。
論文名稱:“Grad-CAM:
Visual Explanations from Deep Networks via Gradient-based Localization”
論文地址:https://openaccess.thecvf.com/content_ICCV_2017/papers/Selvaraju_Grad-CAM_Visual_Explanations_ICCV_2017_paper.pdf
論文期刊:ICCV International Conference on Computer Vision
## 1 綜述
總的來說,卷積網路的可解釋性一直是一個很重要的問題,你要用人工智慧去說服別人,但是這是一個“黑箱”問題,卷積網路執行機理是一個black box,說不清楚內在邏輯。
因此很多學者提出了各種各樣的視覺化來解釋的方法。我個人嘗試過的、可以從一定角度進行解釋的視覺化方法有:t-sne降維,attention視覺化,可變卷積的視覺化等,但是其實這些的視覺化方法,並不能直接的對模型進行解釋,只是能說明**模型分類是準確的**。
CAM的全稱是Class Activation Mapping,對於分類問題,我們可以直觀的通過這種方法,來進行解釋方向的視覺化。
grad-CAM是CAM的進階版本,更加方便實施、即插即用。
## 2 CAM
CAM的原理是實現可解釋性的根本,所以我通俗易懂的講一講。

上面是一個傳統CNN的結構,通過卷積和池化層後,把特徵圖拉平成一維,然後是全連線層進行分類。
那麼CAM的網路是什麼樣子呢?**基本和上面的結構相同**
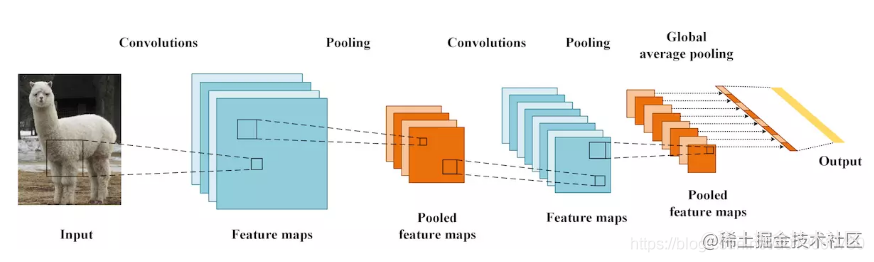
圖中有一個GAP池化層,全域性平均池化層。**這個就是求取每一個通道的均值,可以理解為核是和特徵圖一樣大的一般的平均池化層**,假如輸出特徵圖是一個8通道的,224x224的特徵圖,那麼經過GAP這個池化層,就會得到8個數字,**一個通道貢獻一個數字,這個數字是一個通道的代表**
然後經過GAP之後的一維向量,再跟上一個全連線層,得到類別的概率。
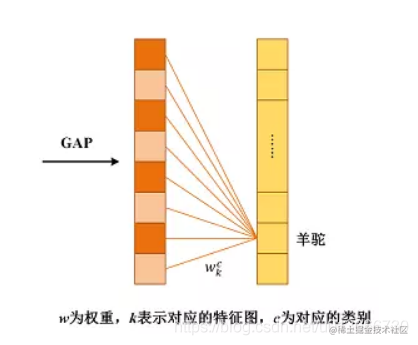
上圖中左邊就是經過GAP得到的向量,其數量就是最後一層特徵圖的通道數,右邊的向量的數量就是類別的數量。
**關鍵來了,CAM的可解釋性的邏輯在於:假設我們最終預測的類別是羊駝,也就是說,模型給羊駝的打分最高。我們可以得到,左邊向量計算出羊駝的權重值,也就是全連線層中的一部分權重值。這個權重值就是!!!就是最後一層特徵圖每一個通道的權重值。之前也提到了GAP的輸出的一個向量代表著GAP輸入的特徵圖的每一個通道嘛**
這樣我們通過最後一個全連線層獲取到最後一個特徵圖的每一個通道對於某一個類別的貢獻的權重值。我們對最後一個特徵圖的每一個通道的加權平均,就是我們得到的CAM對卷積的解釋。之後可以上取樣到整個圖片那麼大小,就像是論文給出的樣子:
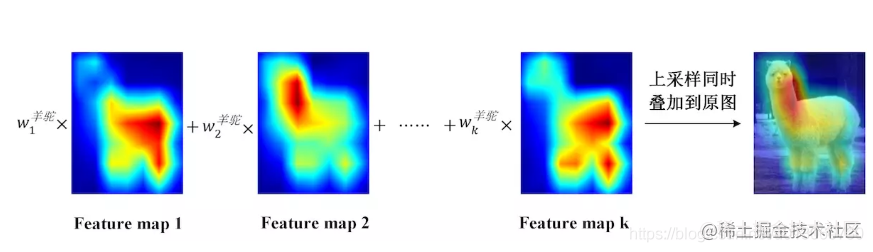
**大家應該明白這個原理了,但是這樣要修改模型的結構。之前訓練的模型用不了了,這很麻煩,所以才有了Grad-CAM的提出。**
## 3 Grad-CAM
Grad-CAM思路和CAM也是相同的,也是需要得到特徵圖每一個通道的權重值,然後做一個加權和。
所以關鍵在於,如何計算這個權重值,**論文提出了這樣的計算方法:**
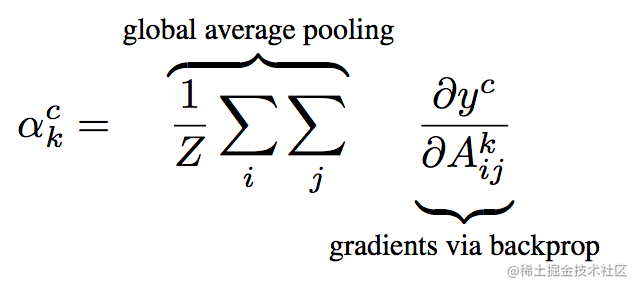
其中,z是一個特徵圖的畫素量,就是width\*height,可以看到,前面就是CAM的GAP的一個過程,後面的$y^c$是模型給類別c的打分,$A_{ij}^k$就是特徵圖中ij這個位置的元素值。**那麼對這個求導,其實就是這個位置的梯度。**
所以用pytorch的實現如下:
```python
self.model.features.zero_grad()
self.model.classifier.zero_grad()
one_hot.backward(retain_graph=True)#僅包含有最大概率值,然後進行反向傳播
grads_val = self.extractor.get_gradients()[-1].cpu().data.numpy()
weights = np.mean(grads_val, axis=(2, 3))[0, :]#求平均,就是上面這段公式
# 簡單的說上面的邏輯就是先反向傳播之後,然後獲取對應位置的梯度,然後計算平均。
```
在論文中作者證明了Grad-CAM和CAM的等價的結論,想了解的可以看看。
## 4 pytorch完整程式碼
官方提供了github程式碼:https://github.com/jacobgil/pytorch-grad-cam
其中關鍵的地方是:
```python
class FeatureExtractor():
""" Class for extracting activations and
registering gradients from targetted intermediate layers """
def __init__(self, model, target_layers):
self.model = model
self.target_layers = target_layers
self.gradients = []
def save_gradient(self, grad):
self.gradients.append(grad)
def __call__(self, x):
outputs = []
self.gradients = []
for name, module in self.model._modules.items():
x = module(x)
if name in self.target_layers:
x.register_hook(self.save_gradient)
outputs += [x]
return outputs, x
class ModelOutputs():
""" Class for making a forward pass, and getting:
1. The network output.
2. Activations from intermeddiate targetted layers.
3. Gradients from intermeddiate targetted layers. """
def __init__(self, model, feature_module, target_layers):
self.model = model
self.feature_module = feature_module
self.feature_extractor = FeatureExtractor(self.feature_module, target_layers)
def get_gradients(self):
return self.feature_extractor.gradients
def __call__(self, x):
target_activations = []
for name, module in self.model._modules.items():
if module == self.feature_module:
target_activations, x = self.feature_extractor(x)
elif "avgpool" in name.lower():
x = module(x)
x = x.view(x.size(0),-1)
else:
if name is 'classifier':
x = x.view(x.size(0), -1)
x = module(x)
return target_activations, x
class GradCam:
def __init__(self, model, feature_module, target_layer_names, use_cuda):
self.model = model
self.feature_module = feature_module
self.model.eval()
self.cuda = use_cuda
if self.cuda:
self.model = model.cuda()
self.extractor = ModelOutputs(self.model, self.feature_module, target_layer_names)
def forward(self, input_img):
return self.model(input_img)
def __call__(self, input_img, target_category=None):
if self.cuda:
input_img = input_img.cuda()
features, output = self.extractor(input_img)
if target_category == None:
target_category = np.argmax(output.cpu().data.numpy())
one_hot = np.zeros((1, output.size()[-1]), dtype=np.float32)
one_hot[0][target_category] = 1
one_hot = torch.from_numpy(one_hot).requires_grad_(True)
if self.cuda:
one_hot = one_hot.cuda()
one_hot = torch.sum(one_hot * output)
self.feature_module.zero_grad()
self.model.zero_grad()
one_hot.backward(retain_graph=True)
grads_val = self.extractor.get_gradients()[-1].cpu().data.numpy()
target = features[-1]
target = target.cpu().data.numpy()[0, :]
weights = np.mean(grads_val, axis=(2, 3))[0, :]
cam = np.zeros(target.shape[1:], dtype=np.float32)
for i, w in enumerate(weights):
cam += w * target[i, :, :]
cam = np.maximum(cam, 0)
cam = cv2.resize(cam, input_img.shape[2:])
cam = cam - np.min(cam)
cam = cam / np.max(cam)
return cam
```
把這一段複製到自己的程式碼中後,可以參考下面的程式碼邏輯,簡單改寫自己的程式碼即可實現視覺化(看不懂的話還是看github):
```python
grad_cam = GradCam(model = model,feature_module = model.features,target_layer_names=['11'],use_cuda=True)
def draw(ax,grayscale_cam,data):
heatmap = cv2.applyColorMap(np.uint8(255 * grayscale_cam), cv2.COLORMAP_JET)
heatmap = heatmap + data.detach().cpu().numpy()[0,0].reshape(28,28,1).repeat(3,axis=2)
heatmap = heatmap / np.max(heatmap)
ax.imshow(heatmap)
for data,target in val_loader:
if torch.cuda.is_available():
data = data.cuda()
target = target.cuda()
# 繪製9張視覺化圖
fig = plt.figure(figsize=(12,12))
for i in range(9):
d = data[i:i+1]
grayscale_cam = grad_cam(d)
ax = fig.add_subplot(3,3,i+1)
draw(ax,grayscale_cam,d)
break
```
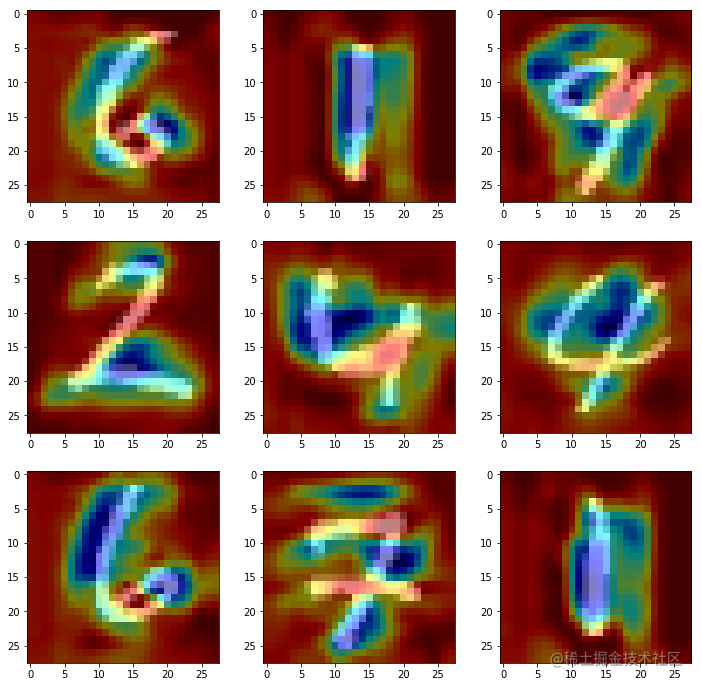
輸出影象為:
有問題歡迎聯絡作者討論,請多