
深入理解Go Context
阿新 • • 發佈:2021-01-14
[TOC]
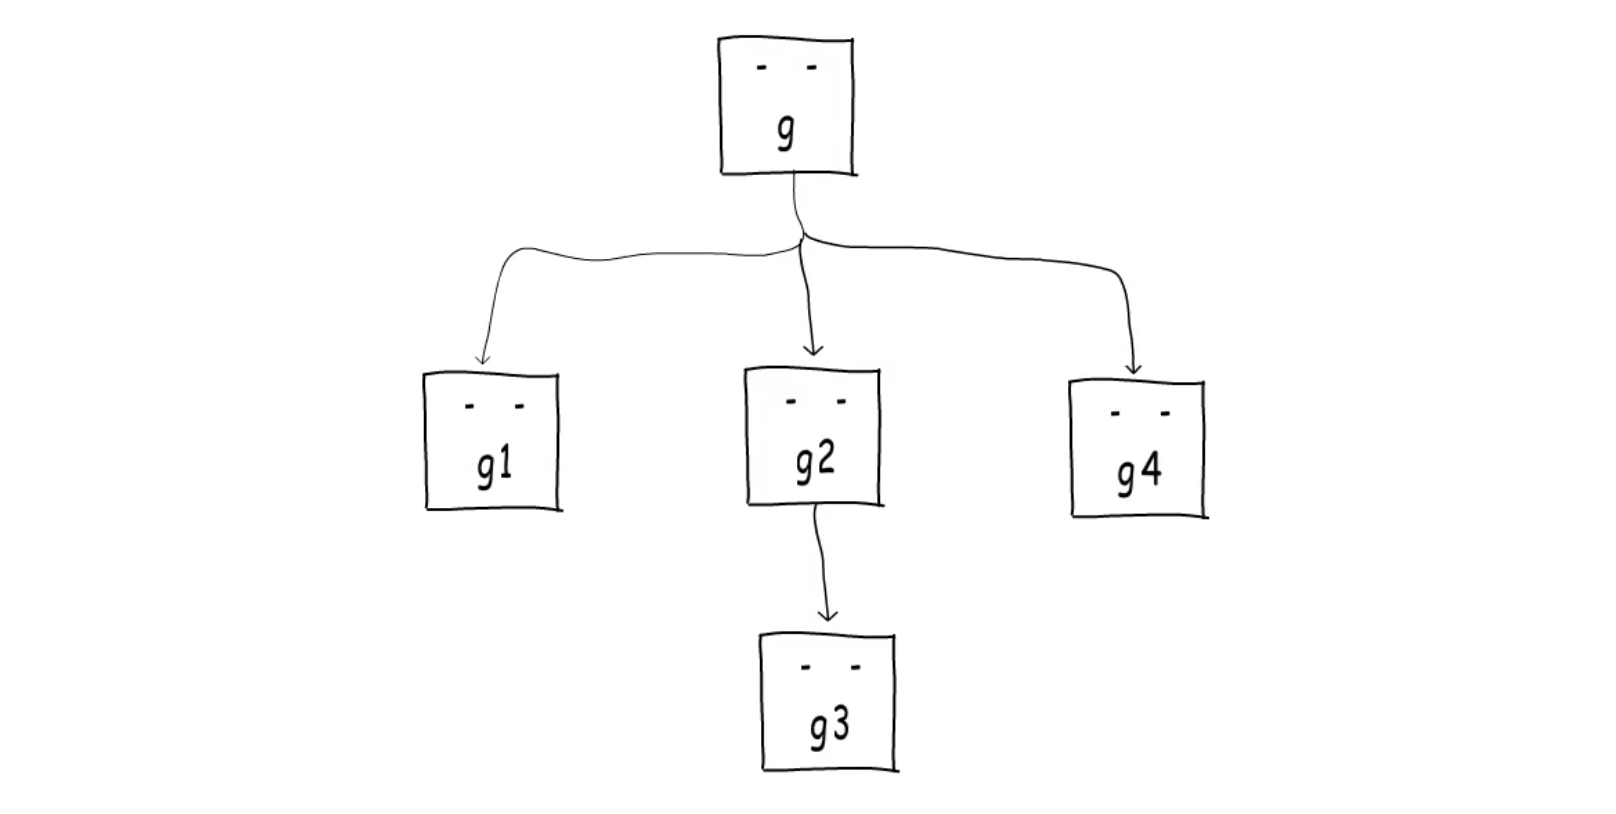
在Go語言併發程式設計中,用一個goroutine來處理一個任務,而它又會建立多個goroutine來負責不同子任務的場景非常常見。如下圖
這些場景中,往往會需要在API邊界之間以及過程之間傳遞截止時間、取消訊號或與其它請求相關的資料

誰是效能卡點呢?得通知它們任務取消了。
這時候就可以使用`Context`了。context包在Go1.7的時候被加入到官方庫中。
context包的內容可以概括為,一個介面,四個具體實現,還有六個函式。
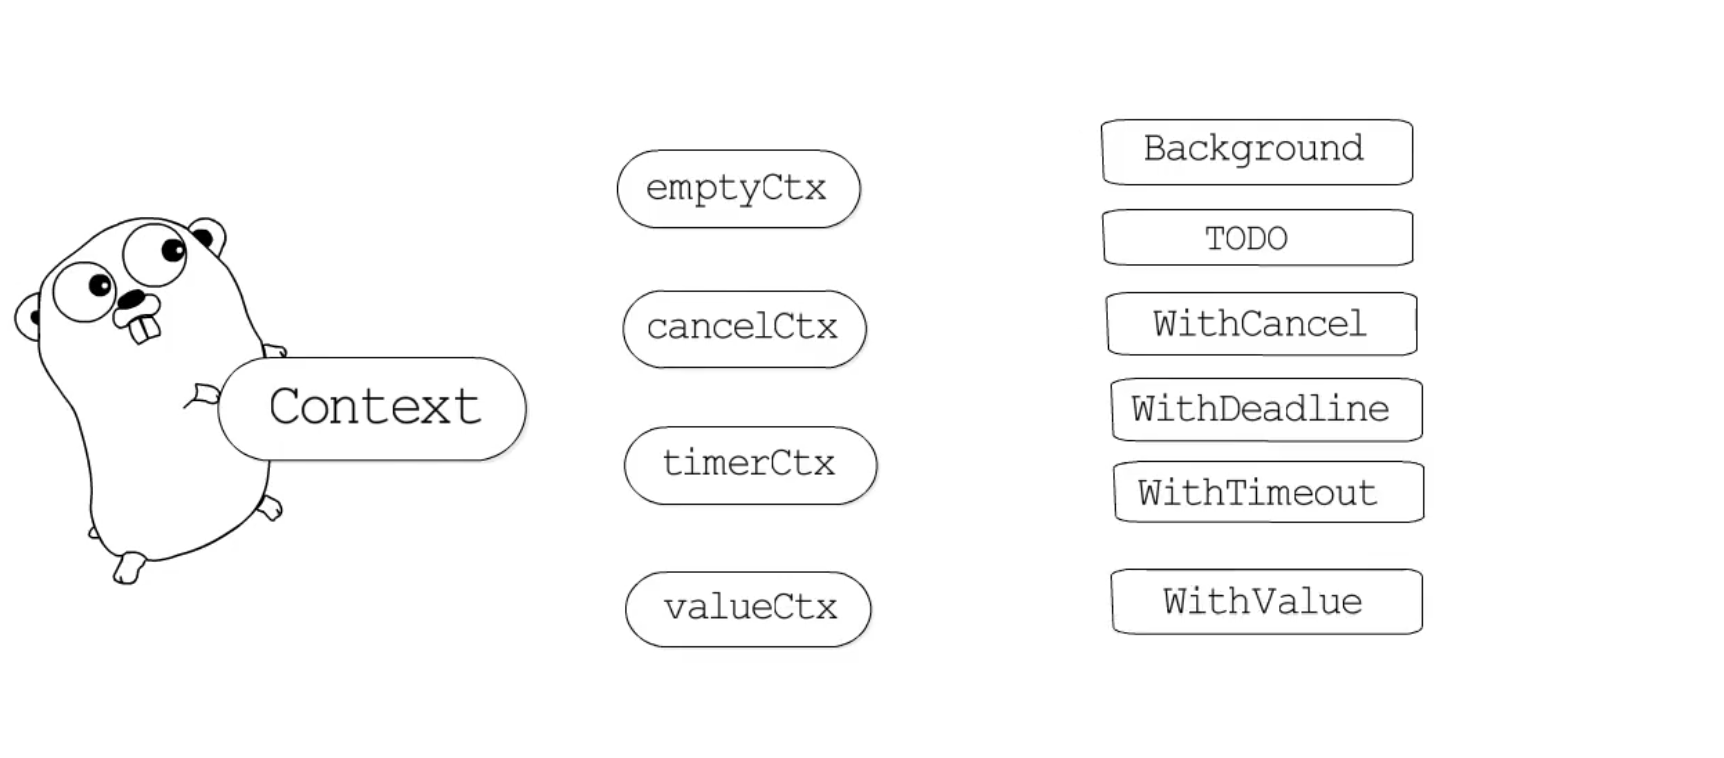
Context介面提供了四個方法,下面是Context的介面
```go
type Context interface {
Deadline() (deadline time.Time, ok bool)
Done() <-chan struct{}
Err() error
Value(key interface{}) interface{}
}
```
## emptyCtx型別
emptyCtx本質上是一個整型, \*emptyCtx對Context介面的實現,只是簡單的返回nil,false,實際上什麼也沒做。如下程式碼所示:
```go
type emptyCtx int
func (*emptyCtx) Deadline() (deadline time.Time, ok bool) {
return
}
func (*emptyCtx) Done() <-chan struct{} {
return nil
}
func (*emptyCtx) Err() error {
return nil
}
func (*emptyCtx) Value(key interface{}) interface{} {
return nil
}
```
Background和TODO這兩個函式內部都會建立emptyCtx
```go
var (
background = new(emptyCtx)
todo = new(emptyCtx)
)
func Background() Context {
return background
}
func TODO() Context {
return todo
}
```
其中Background主要用於在初始化時獲取一個Context(從程式碼中可知本質是一個*emptyCtx,而emptCtx本質上是一個Int),這就是Background()函式返回的變數結構。
而TODO()函式,官方文件建議在本來應該使用外層傳遞的ctx而外層卻沒有傳遞的地方使用,就像函式名稱表達的含義一樣,留下一個TODO。
## cancelCtx型別
再來看cancelCtx型別,cancleCtx定義如下
```go
// cancelCtx可以被取消。 取消後,它也會取消所有實現取消方法的子級。
type cancelCtx struct {
Context
mu sync.Mutex // protects following fields
done chan struct{} // created lazily, closed by first cancel call
children map[canceler]struct{} // set to nil by the first cancel call
err error // set to non-nil by the first cancel call
}
func (c *cancelCtx) Value(key interface{}) interface{} {
if key == &cancelCtxKey {
return c
}
return c.Context.Value(key)
}
func (c *cancelCtx) Done() <-chan struct{} {
c.mu.Lock()
if c.done == nil {
c.done = make(chan struct{})
}
d := c.done
c.mu.Unlock()
return d
}
func (c *cancelCtx) Err() error {
c.mu.Lock()
err := c.err
c.mu.Unlock()
return err
}
```
這是一種可取消的Context,done用於獲取該Context的取消通知,children用於儲存以當前節點為根節點的所有可取消的Context,以便在根節點取消時,可以把它們一併取消,err用於儲存取消時指定的錯誤資訊,而這個mu就是用來保護這幾個欄位的鎖,以保障cancelCtx是執行緒安全的。
而WithCancel函式,可以把一個Context包裝為cancelCtx,並提供一個取消函式,呼叫它可以Cancel對應的Context
```go
func WithCancel(parent Context) (ctx Context, cancel CancelFunc) {
if parent == nil {
panic("cannot create context from nil parent")
}
c := newCancelCtx(parent)
propagateCancel(parent, &c)
return &c, func() { c.cancel(true, Canceled) }
}
```
示例程式碼:
```go
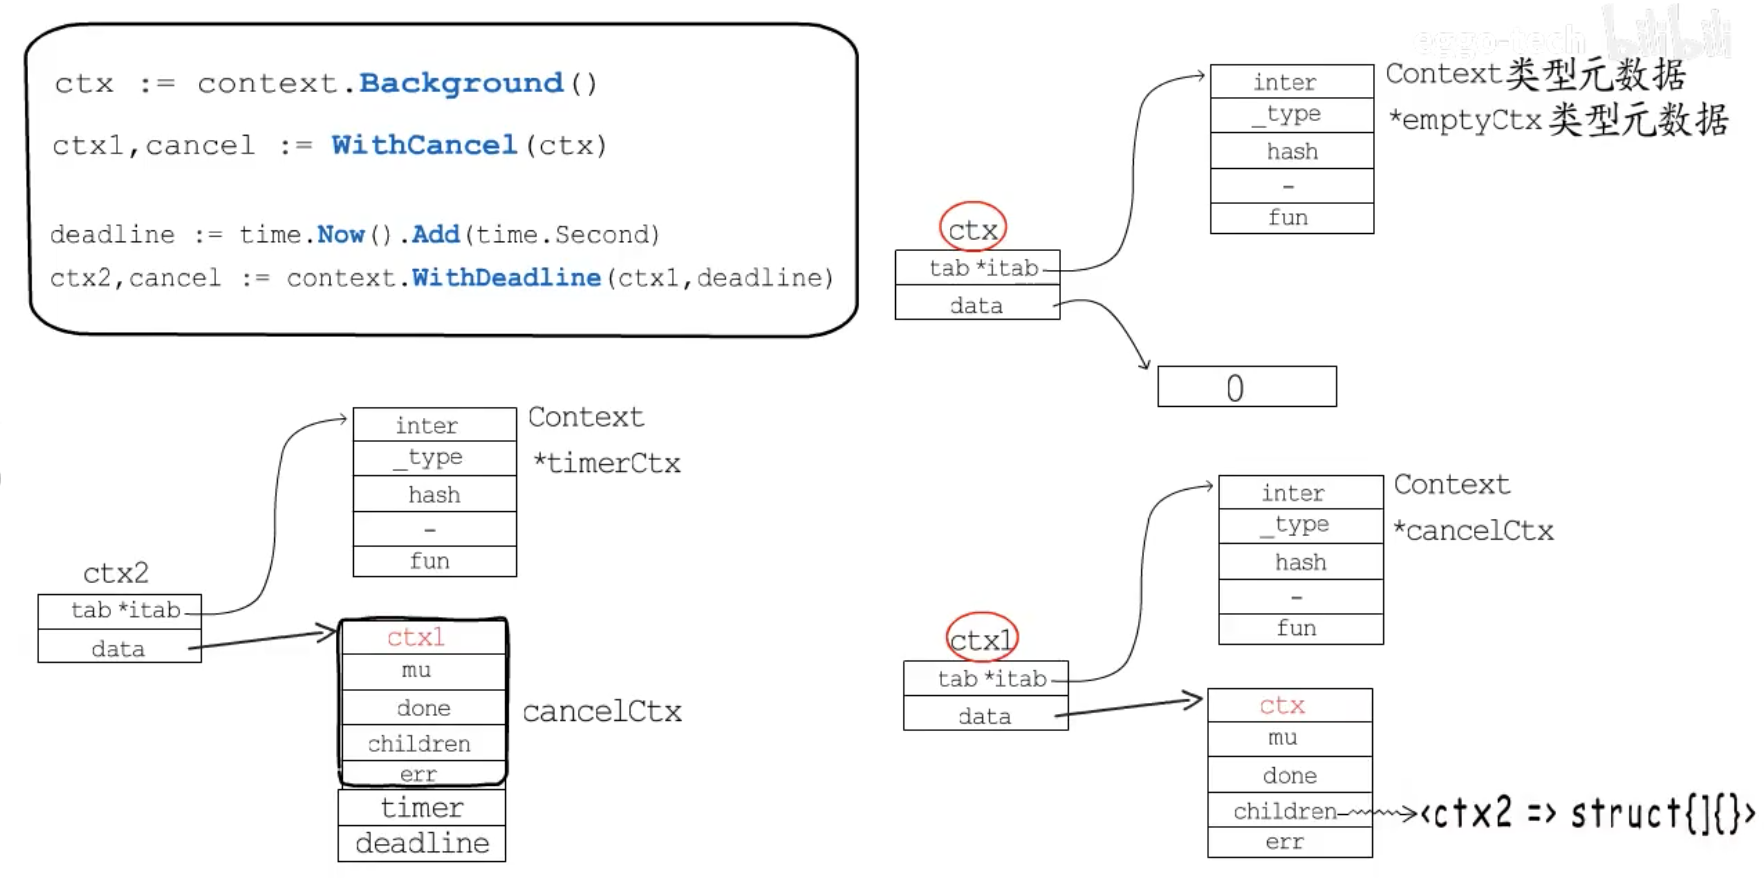
ctx := context.Background()
ctx1, cancel := context.WithCancel(ctx)
```

## timerCtx型別
再來看timerCtx,timerCtx定義如下
```go
type timerCtx struct {
cancelCtx
timer *time.Timer // Under cancelCtx.mu.
deadline time.Time
}
```
它在cancelCtx的基礎上,又封裝了一個定時器和一個截止時間,這樣既可以根據需要主動取消,也可以在到達deadline時,通過timer來觸發取消動作。
要注意,這個timer也會由cancelCtx.mu來保護,確保取消操作也是執行緒安全的。
通過WithDeadline和WithTimeout函式,都可以建立timerCtx,區別是WithDeadline函式需要指定一個時間點,而WithTimeout函式接收一個時間段。
接下來,我們基於ctx1構造一個timerCtx
```go
ctx := context.Background()
ctx1, cancel := context.WithCancel(ctx)
deadline := time.Now().Add(time.Second)
ctx2, cancel := context.WithDeadline(ctx1, deadline)
```

這個定時器會在deadline到達時,呼叫cancelCtx的取消函式,現在可以看到ctx2是基於ctx1建立的,而ctx1又是基於ctx建立的,基於每個Context可以建立多個Context,這樣就形成了一個Context樹,每個節點都可以有零個或多個子節點,可取消的Context都會被註冊到離它最近的、可取消的祖先節點中。對ctx2來說離它最新的、可取消的祖先節點是ctx1
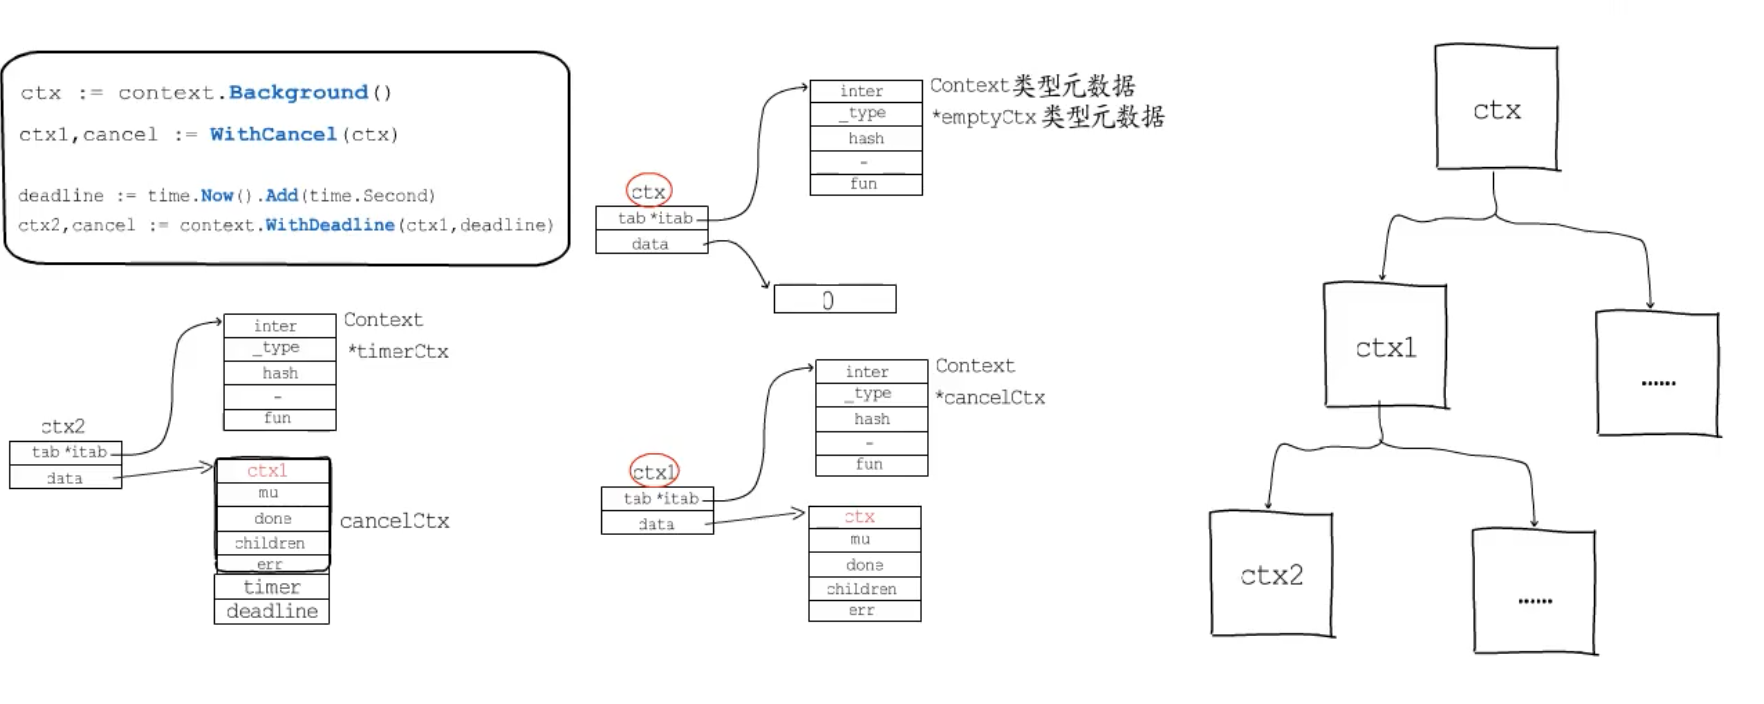
所以在ctx1這裡的children map中,會增加ctx2這組鍵值對
如果ctx2先取消,就只會影響到以它為根節點的Context,而如果ctx1先取消,就可以根據children map中的記錄,把ctx1子節點中所有可取消的Context全部Cancel掉。
最後來看valueCtx型別
## valueCtx型別
首先來看valueCtx的定義
```go
type valueCtx struct {
Context
key, val interface{}
}
```
它用來支援鍵值對打包,WithValue函式可以給Context附加一個鍵值對資訊,這樣就可以通過Context傳遞資料了
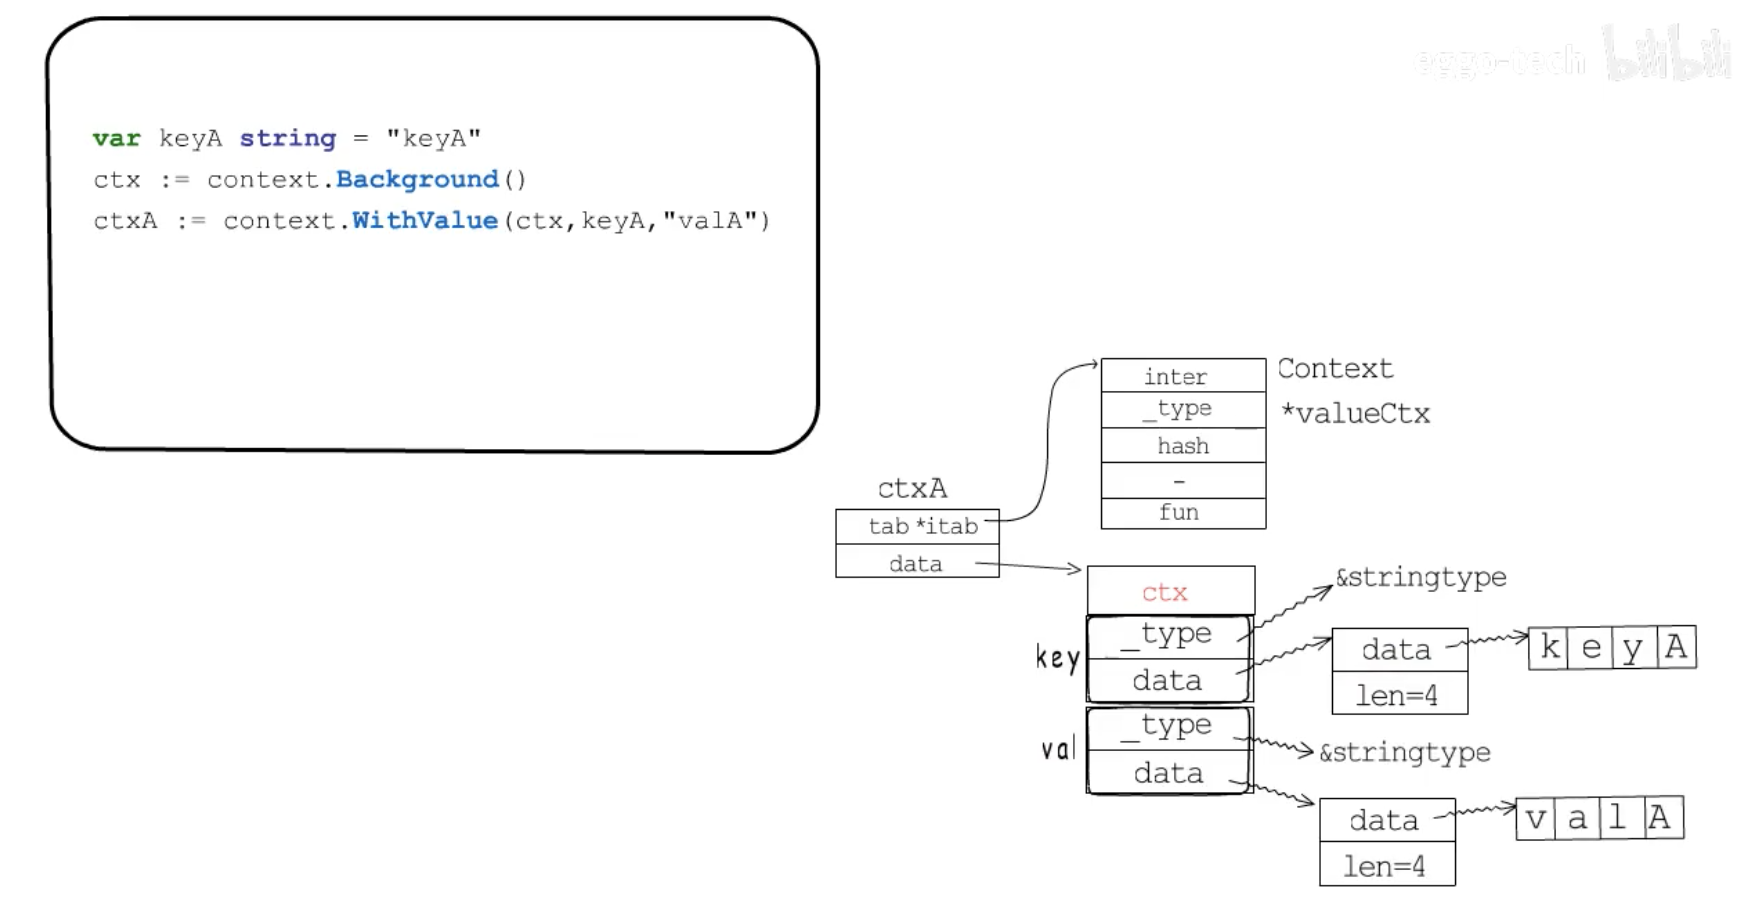
```go
var keyA string = "keyA"
ctx := context.Background()
ctxA := context.WithValue(ctx, keyA, "valA")
```
現在我們給ctx附加一個鍵值對keyA=>valA,變數ctxA也是Context介面型別,動態型別為\*valueCtx,data指向一個valueCtx結構體,第一個欄位是它的父級Context,key和val欄位都是空介面型別,keyA的動態型別為string,動態值是string型別的變數keyA,val的動態型別同樣是string,動態值為valA,
下面我們再基於ctxA,附加一個key相等但val不相等的鍵值對keyA=>eggo,ctxC的動態值指向這樣一個valueCtx,父級Context自然是ctxA,key與ctxA中的相同,但是val的值與ctxA中的不相等
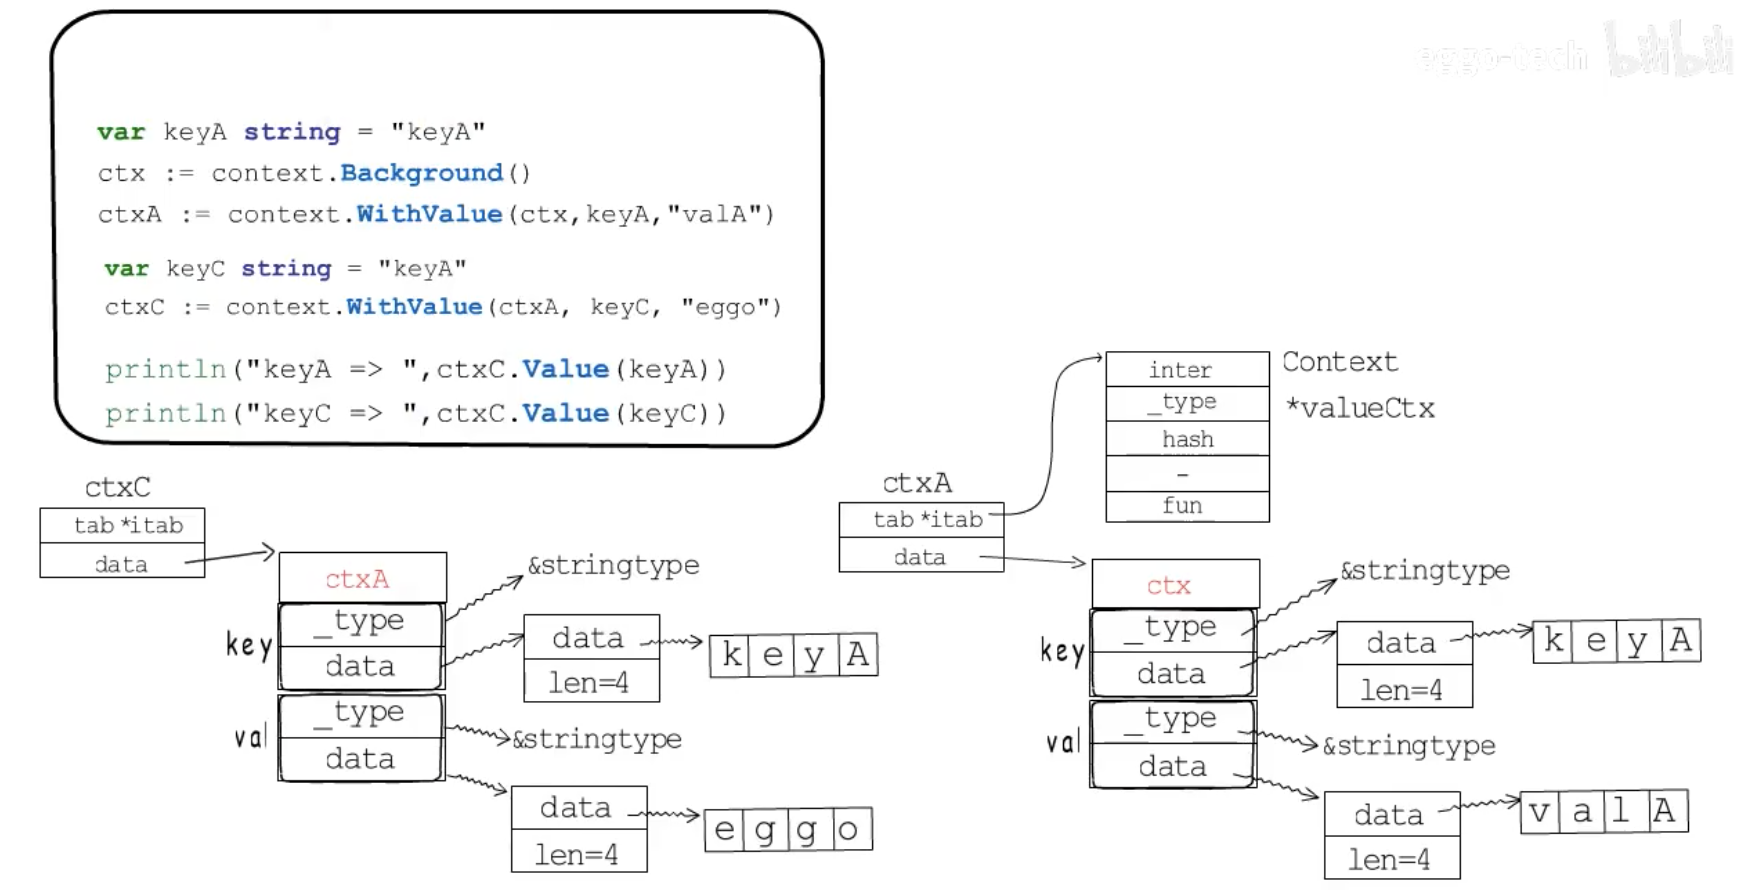
通過ctxC獲取kyA和keyC對應的值時會發現keyC覆蓋了keyA對應的val,要找到原因,就要先看看Value方法是怎麼工作的
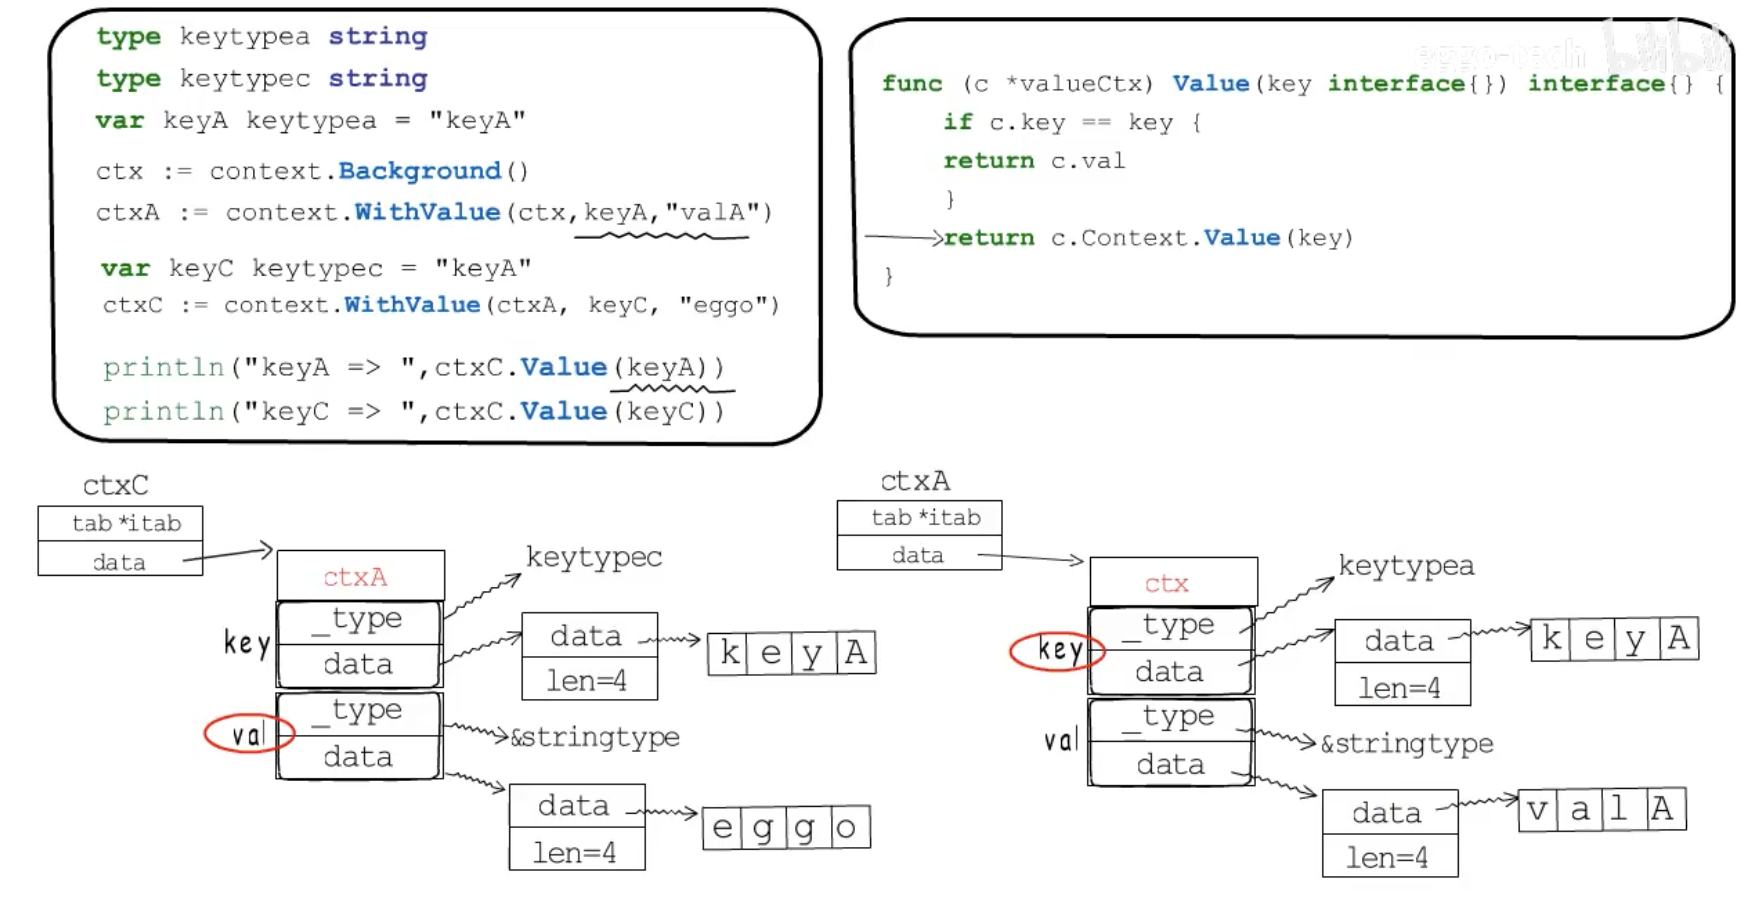
```go
func (c *valueCtx) Value(key interface{}) interface{} {
if c.key == key {
return c.val
}
return c.Context.Value(key)
}
```
首先它會筆記當前Context中的key是否等於要查詢的key,因為keyA等於keyC,所以對keyA的查詢會直接鎖定到ctxC這裡的val,因而出現了子節點覆蓋父節點資料的情況,為了規避這種情況,最好不要直接使用string、int這些基礎型別作為Key,而是用自定義型別包裝一下,就像下面這樣,把keyA定義為keytypea型別,keyC定義為keytypec型別,這樣再次通過ctxC獲取keyA時,因為key的型別不相同,第一步key相等性比較不通過,就會委託父節點繼續查詢,進而找到正確的val
所以說valueCtx之間通過Context欄位形成了一個連結串列結構,使用Context傳遞資料時還要注意,Context本身本著不可改變(immutable)的模式設計的,所以不要試圖修改ctx裡儲存的值,在http、sql相關的庫中,都提供了對Context的支援,方便我們在處理請求時,實現超時自動取消,或傳遞請求相關的控制資料等等

瞭解了context包中,一個介面,四種具體實現,以及六個函式的基本情況,有助於我們理解Context的工作原理

整理自:
[context原始碼](https://github.com/golang/go/blob/master/src/context/context.go)
[幼麟實驗室](https://space.bilibili.com/567