dubbo實戰之三:使用Zookeeper註冊中心
阿新 • • 發佈:2021-03-08
### 歡迎訪問我的GitHub
[https://github.com/zq2599/blog_demos](https://github.com/zq2599/blog_demos)
內容:所有原創文章分類彙總及配套原始碼,涉及Java、Docker、Kubernetes、DevOPS等;
### 《dubbo實戰》系列導航
1. [準備和初體驗](https://xinchen.blog.csdn.net/article/details/109096867)
2. [與SpringBoot整合](https://xinchen.blog.csdn.net/article/details/109142783)
3. [使用Zookeeper註冊中心](https://xinchen.blog.csdn.net/article/details/109147843)
4. [管理控制檯dubbo-admin](https://xinchen.blog.csdn.net/article/details/109267151)
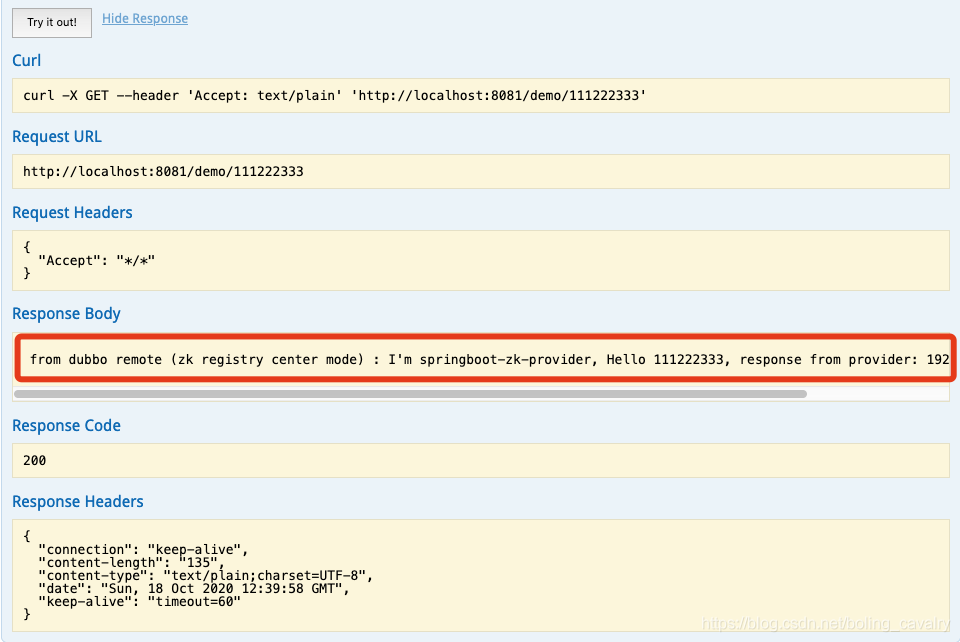
### 本篇概覽
- 本文是《dubbo實戰》系列的第三篇,主要內容是使用Zookeeper作為註冊中心的實戰;
- 前面兩篇的實戰都是使用了廣播模式,整個環境由服務提供者和服務消費者組成,這種簡單形態只是為了方便學習,實際上多數情況都會部署註冊中心,服務提供者在上面註冊,服務消費者再從註冊中心得到具體的服務資訊;
- 下面是個典型的提供者、消費者、註冊中心的典型架構圖:
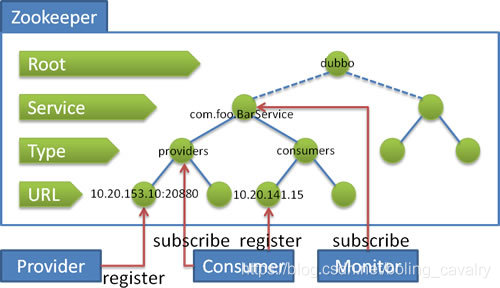
- 如下圖所示,dubbo官方推薦的註冊中心是Zookeeper:

### 關於Zookeeper
1. 本次使用了單節點Zookeeper,版本3.4.13,IP192.168.50.43,埠2181
2. 關於Zookeeper的部署,我這邊是通過docker快速部署的,參考文章[《群暉DS218+部署kafka》](https://xinchen.blog.csdn.net/article/details/105462692)
- 如果您部署好了Zookeeper,接下來開始編寫服務提供者和消費者的程式碼;
### 原始碼下載
1. 如果您不想編碼,可以在GitHub下載所有原始碼,地址和連結資訊如下表所示:
| 名稱 | 連結 | 備註|
| :-------- | :----| :----|
| 專案主頁| https://github.com/zq2599/blog_demos | 該專案在GitHub上的主頁 |
| git倉庫地址(https)| https://github.com/zq2599/blog_demos.git | 該專案原始碼的倉庫地址,https協議 |
| git倉庫地址(ssh)| [email protected]:zq2599/blog_demos.git | 該專案原始碼的倉庫地址,ssh協議 |
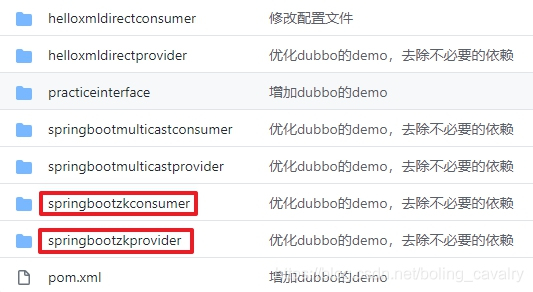
2. 這個git專案中有多個資料夾,本章的應用在dubbopractice資料夾下,如下圖紅框所示:

3. dubbopractice是父子結構的工程,本篇的程式碼在springbootzkprovider和springbootzkconsumer這兩個子工程中,如下圖:
### 編碼(服務提供方)
- 先建立提供服務的工程springbootmulticastprovider,一共要建立4個檔案,建立順序和功能如下表:
| 建立順序 | 檔名 | 作用 |
|--|--|--|
| 1 | pom.xml | 工程的pom檔案 |
| 2 | src/main/resources/application.yml | 配置檔案 |
| 3 | DemoServiceImpl.java | 提供具體的服務 |
| 4 | SpringBootZKProviderApplication.java | 啟動類 |
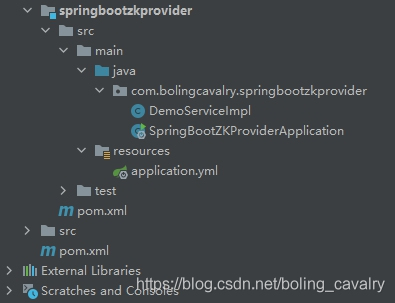
- 完整的檔案位置如下圖:
- 接下來逐個建立上述內容;
1. 建立名為springbootmulticastprovider的子工程,pom.xml內容如下,要重點關注的是新增依賴dubbo-spring-boot-starter,這就是dubbo在SpringBoot環境的starter依賴,還有Zookeeper的依賴dubbo-dependencies-zookeeper:
```xml
```
2. 配置檔案application.yml,要注意的是registry.address的值zookeeper://192.168.50.43:2181,這就是Zookeeper註冊中心的配置:
```yml
dubbo:
application:
#application-name 本模組名字
name: springboot-zk-provider
registry:
address: zookeeper://192.168.50.43:2181
protocol:
name: dubbo
port: 20880
```
3. 編寫服務實現類DemoServiceImpl.java,注意@Service註解將當前類的例項作為遠端服務對外暴露:
```java
package com.bolingcavalry.springbootzkprovider;
import com.bolingcavalry.dubbopractice.service.DemoService;
import lombok.extern.slf4j.Slf4j;
import org.apache.dubbo.config.annotation.Service;
import org.apache.dubbo.rpc.RpcContext;
@Slf4j
@Service
public class DemoServiceImpl implements DemoService {
@Override
public String sayHello(String name) {
log.info("I'm springboot-zk-provider, Hello " + name + ", request from consumer: " + RpcContext.getContext().getRemoteAddress());
try {
Thread.sleep(1000);
} catch (InterruptedException e) {
e.printStackTrace();
}
return "I'm springboot-zk-provider, Hello " + name + ", response from provider: " + RpcContext.getContext().getLocalAddress();
}
}
```
4. 編寫SpringBoot啟動類SpringBootZKProviderApplication.java,注意要新增@EnableDubbo註解:
```java
package com.bolingcavalry.springbootzkprovider;
import org.apache.dubbo.config.spring.context.annotation.EnableDubbo;
import org.springframework.boot.SpringApplication;
import org.springframework.boot.autoconfigure.SpringBootApplication;
@SpringBootApplication
@EnableDubbo
public class SpringBootZKProviderApplication {
public static void main(String[] args) {
SpringApplication.run(SpringBootZKProviderApplication.class, args);
}
}
```
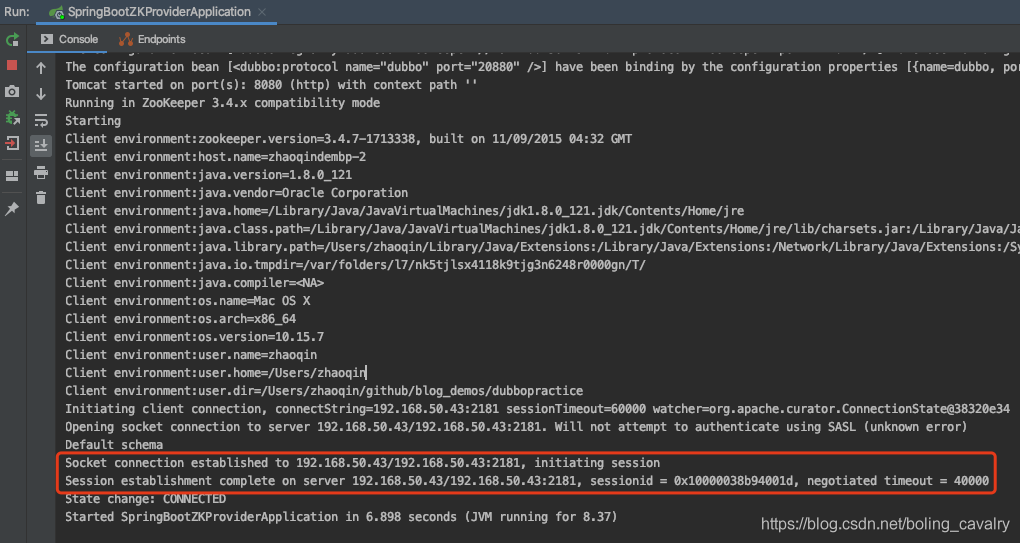
5. 至此服務提供方編碼完成,直接在IDEA上執行SpringBootZKProviderApplication類即可啟動服務,啟動成功後的日誌輸出如下圖,如紅框所示,已連上了Zookeeper:
### 編碼(服務消費方)
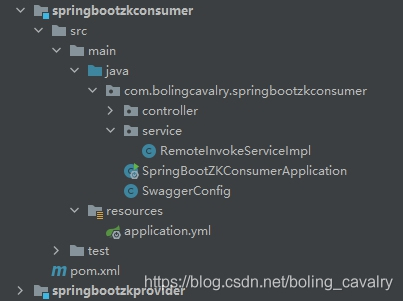
- 現在網路上已經有了服務,咱們再來編寫服用消費方的程式碼,一共要建立6個檔案,建立順序和功能如下表:
| 建立順序 | 檔名 | 作用 |
|--|--|--|
| 1 | pom.xml | 工程的pom檔案 |
| 2 | src/main/resources/application.yml | 配置檔案 |
| 3 | RemoteInvokeServiceImpl.java | service層,在這裡遠端呼叫服務提供方的服務 |
| 4 | DemoController.java | web介面類,對外提供web服務 |
| 5 | SwaggerConfig.java | swagger配置類,便於通過頁面測試介面 |
| 6 | SpringBootZKConsumerApplication.java | 啟動類 |
- 完整的檔案位置如下圖:
- 接下來逐個建立上述檔案;
1. 建立名為springbootzkconsumer的子工程,pom.xml內容如下,同樣需要依賴dubbo-spring-boot-starter和dubbo-dependencies-zookeeper:
```xml
```
2. 編寫配置檔案application.yml,注意dubbo.registry.address的值:
```yml
dubbo:
application:
#application-name 本模組名字
name: springboot-zk-consumer
registry:
address: zookeeper://192.168.50.43:2181
server:
port: 8081
```
3. 編寫呼叫遠端服務的程式碼,如下,可見如果想呼叫遠端服務,只要對介面做@Reference註釋即可,另外還通過timeout屬性增加了超時配置:
```java
package com.bolingcavalry.springbootzkconsumer.service;
import com.bolingcavalry.dubbopractice.service.DemoService;
import org.apache.dubbo.config.annotation.Reference;
import org.springframework.stereotype.Service;
@Service
public class RemoteInvokeServiceImpl {
@Reference(timeout = 2000)
private DemoService demoService;
public String sayHello(String name) {
return "from dubbo remote (zk registry center mode) : " + demoService.sayHello(name);
}
}
```
4. 再編寫對外提供web服務的Controller類:
```java
package com.bolingcavalry.springbootzkconsumer.controller;
import com.bolingcavalry.springbootzkconsumer.service.RemoteInvokeServiceImpl;
import io.swagger.annotations.Api;
import io.swagger.annotations.ApiImplicitParam;
import io.swagger.annotations.ApiOperation;
import org.springframework.beans.factory.annotation.Autowired;
import org.springframework.web.bind.annotation.PathVariable;
import org.springframework.web.bind.annotation.RequestMapping;
import org.springframework.web.bind.annotation.RequestMethod;
import org.springframework.web.bind.annotation.RestController;
@RestController
@RequestMapping("/demo")
@Api(tags = {"DemoController"})
public class DemoController {
@Autowired
private RemoteInvokeServiceImpl remoteInvokeService;
@ApiOperation(value = "獲取dubbo service provider的響應", notes="\"獲取dubbo service provider的響應")
@ApiImplicitParam(name = "name", value = "暱稱", paramType = "path", required = true, dataType = "String")
@RequestMapping(value = "/{name}", method = RequestMethod.GET)
public String sayHello(@PathVariable String name){
return remoteInvokeService.sayHello(name);
}
}
```
5. 還要新增swagger配置類:
```java
package com.bolingcavalry.springbootzkconsumer;
import org.springframework.context.annotation.Bean;
import org.springframework.context.annotation.Configuration;
import springfox.documentation.builders.ApiInfoBuilder;
import springfox.documentation.builders.PathSelectors;
import springfox.documentation.builders.RequestHandlerSelectors;
import springfox.documentation.service.ApiInfo;
import springfox.documentation.service.Contact;
import springfox.documentation.service.Tag;
import springfox.documentation.spi.DocumentationType;
import springfox.documentation.spring.web.plugins.Docket;
import springfox.documentation.swagger2.annotations.EnableSwagger2;
@Configuration
@EnableSwagger2
public class SwaggerConfig {
@Bean
public Docket createRestApi() {
return new Docket(DocumentationType.SWAGGER_2)
.apiInfo(apiInfo())
.tags(new Tag("DemoController", "演示服務"))
.select()
// 當前包路徑
.apis(RequestHandlerSelectors.basePackage("com.bolingcavalry.springbootzkconsumer.controller"))
.paths(PathSelectors.any())
.build();
}
//構建 api文件的詳細資訊函式,注意這裡的註解引用的是哪個
private ApiInfo apiInfo() {
return new ApiInfoBuilder()
//頁面標題
.title("dubbo遠端呼叫服務的操作(zk註冊中心)")
//建立人
.contact(new Contact("程式設計師欣宸", "https://github.com/zq2599/blog_demos", "[email protected]"))
//版本號
.version("1.0")
//描述
.description("API 描述")
.build();
}
}
```
6. 最後是啟動類SpringBootZKConsumerApplication.java:
```java
package com.bolingcavalry.springbootzkconsumer;
import org.apache.dubbo.config.spring.context.annotation.EnableDubbo;
import org.springframework.boot.SpringApplication;
import org.springframework.boot.autoconfigure.SpringBootApplication;
@SpringBootApplication
@EnableDubbo
public class SpringBootZKConsumerApplication {
public static void main(String[] args) {
SpringApplication.run(SpringBootZKConsumerApplication.class, args);
}
}
```
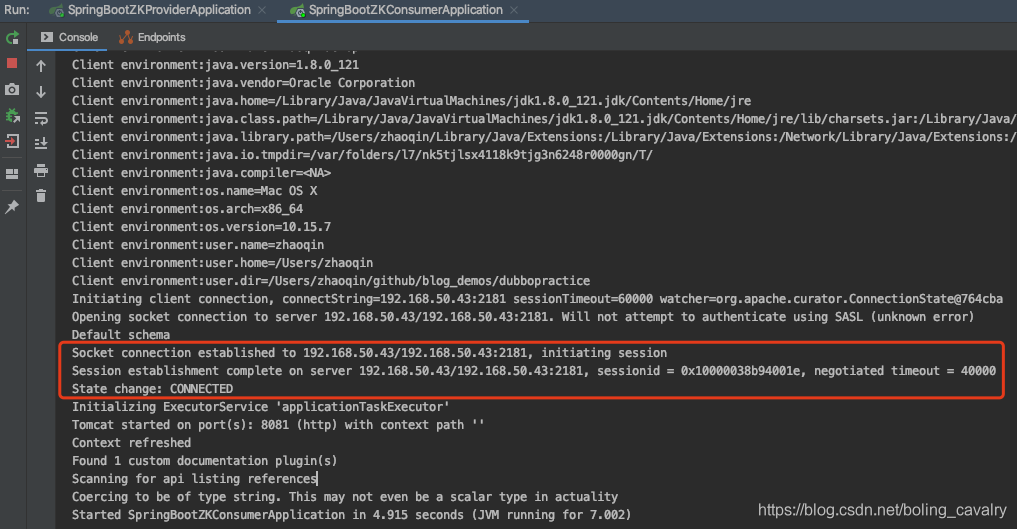
7. 至此,服務消費方編碼完成,直接在IDEA上執行SpringBootZKConsumerApplication類即可啟動,如下圖,可見服務消費方也連線Zookeeper成功:
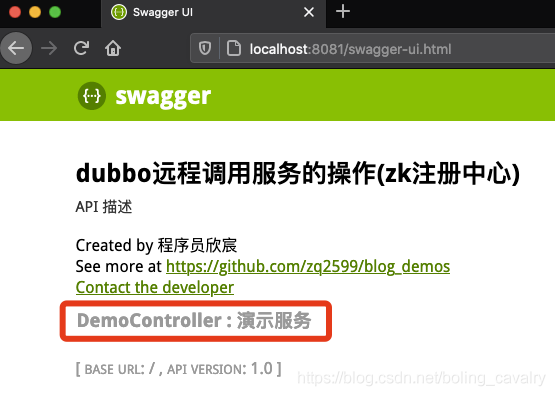
8. 通過瀏覽器訪問swagger,地址是:http://localhost:8081/swagger-ui.html ,如下圖,點選紅框位置展開介面詳情:
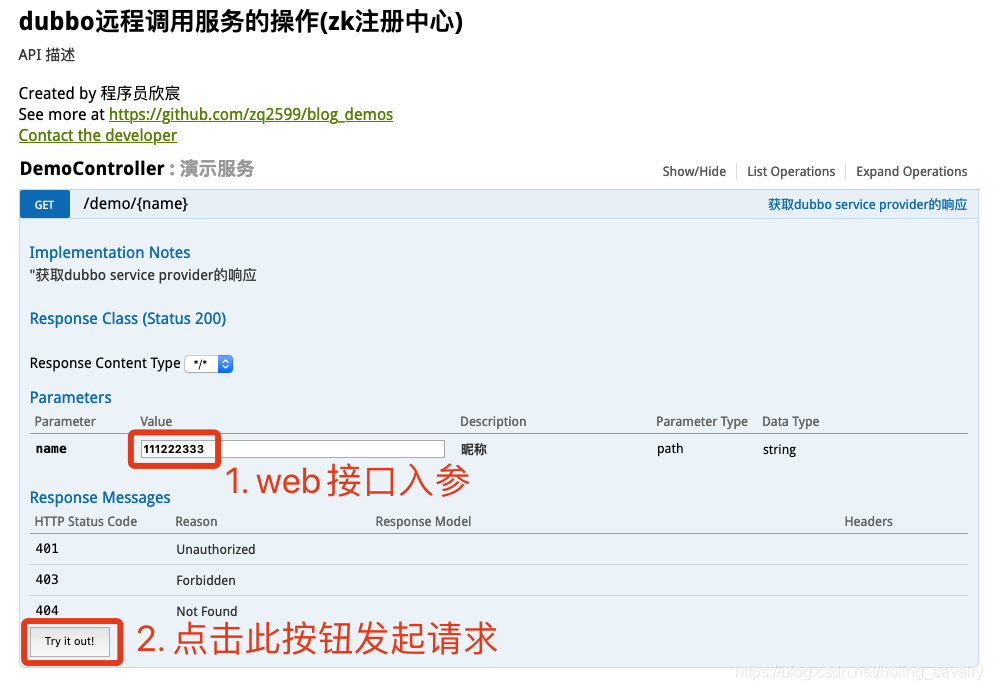
9. 如下圖,輸入web介面引數發起請求:
10. 下圖紅框中就是響應的資料,內容是springbootzkconsumer遠端呼叫springbootzkprovider的服務得到的:
### 檢視Zookeeper上的資料
1. 再回顧一下官方的有關Zookeeper註冊中心中資料的描述,如下圖:

2. 按照上述資訊,咱們去Zookeeper看看資料,驗證和上圖是否一致,登入Zookeeper後執行zkCli.sh進度互動模式;
3. 檢視根目錄,果然有名為dubbo的子目錄:
```shell
[zk: localhost:2181(CONNECTED) 18] ls /
[dubbo, log_dir_event_notification, isr_change_notification, zookeeper, admin, consumers, cluster, config, latest_producer_id_block, controller, brokers, controller_epoch]
```
4. 再看dubbo目錄下,有遠端服務的子目錄:
```shell
[zk: localhost:2181(CONNECTED) 19] ls /dubbo
[com.bolingcavalry.dubbopractice.service.DemoService, config, metadata]
```
5. 檢視遠端服務的providers節點,果然有服務提供者的資訊:
```shell
[zk: localhost:2181(CONNECTED) 16] get /dubbo/com.bolingcavalry.dubbopractice.service.DemoService/providers
169.254.38.208
cZxid = 0x552
ctime = Sat Oct 17 04:05:52 UTC 2020
mZxid = 0x552
mtime = Sat Oct 17 04:05:52 UTC 2020
pZxid = 0x5ec
cversion = 27
dataVersion = 0
aclVersion = 0
ephemeralOwner = 0x0
dataLength = 14
numChildren = 1
```
6. 再看看consumer節點的內容:
```shell
[zk: localhost:2181(CONNECTED) 17] get /dubbo/com.bolingcavalry.dubbopractice.service.DemoService/consumers
169.254.38.208
cZxid = 0x55f
ctime = Sat Oct 17 04:22:58 UTC 2020
mZxid = 0x55f
mtime = Sat Oct 17 04:22:58 UTC 2020
pZxid = 0x5f0
cversion = 33
dataVersion = 0
aclVersion = 0
ephemeralOwner = 0x0
dataLength = 14
numChildren = 1
```
7. 可見Zookeeper上記錄的資料與官方文件描述的一致;
- 至此,dubbo與springboot整合的實戰就完成了,希望能給您提供一些參考,助您快速開發dubbo應用;
### 歡迎關注公眾號:程式設計師欣宸
> 微信搜尋「程式設計師欣宸」,我是欣宸,期待與您一同暢遊Java世界...
### 你不孤單,欣宸原創一路相伴
1. [Java系列](https://xinchen.blog.csdn.net/article/details/105068742)
2. [Spring系列](https://xinchen.blog.csdn.net/article/details/105086498)
3. [Docker系列](https://xinchen.blog.csdn.net/article/details/105086732)
4. [kubernetes系列](https://xinchen.blog.csdn.net/article/details/105086794)
5. [資料庫+中介軟體系列](https://xinchen.blog.csdn.net/article/details/105086850)
6. [DevOps系列](https://xinchen.blog.csdn.net/article/details/105086920)
### 歡迎關注公眾號:程式設計師欣宸
> 微信搜尋「程式設計師欣宸」,我是欣宸,期待與您一同暢遊Java世界...
[https://github.com/zq2599/blog_demos](https://github.com/zq2599/blo
