第1章 Spring基礎:5、Spring Bean
學習目標:
Spring Bean
學習大綱:
1、Bean的例項化
2、Bean的作用域
3、Bean的初始化和銷燬
學習內容:
一、Bean的例項化
在面向物件程式設計中,想使用某個物件時,需要先例項化該物件。同樣,在Spring框架中,想使用Spring容器中的Bean,也需要例項化Bean。
Spring框架例項化Bean有三種方式:構造方法例項化、靜態工廠例項化和例項工廠例項化(其中,最常用的例項方法是構造方法例項化)。
下面通過一個例項【例1-5】ch1_5來演示Bean的例項化過程,具體步驟如下。
1.使用Eclipse建立Web應用並匯入JAR包
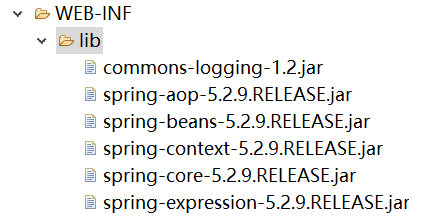
使用Eclipse建立一個名為ch1_5的Dynamic Web project,並將Spring的四個基礎包、第三方依賴包commons-logging-1.2.jar以及spring-aop-5.2.9.RELEASE.jar等JAR包複製到ch1_5的WEB-INF/lib目錄中。

2.建立例項化Bean的類
在ch1_5應用的src目錄下,建立包instance,並在該包中建立BeanClass、BeanInstanceFactory以及BeanStaticFactory等例項化Bean的類。
BeanClass的程式碼如下:
package instance;
public class BeanInstanceFactory的程式碼如下:
package instance;
public class BeanInstanceFactory{
public BeanClass createBeanClassInstance() {
return new BeanClass("呼叫例項工廠方法例項化Bean" BeanStaticFactory的程式碼如下:
package instance;

public class BeanStaticFactory
{
	private static BeanClass beanInstance=new BeanClass("呼叫靜態工廠方法呼叫例項化Bean");
	public static BeanClass createInstance() {
		return beanInstance;
	}

}
3.建立配置類
在ch1_5應用的src目錄下,建立包config,並在該包中建立配置類JavaConfig。在該配置類中使用@Bean定義3個Bean,具體程式碼如下:
package config;

import org.springframework.context.annotation.Bean;
import org.springframework.context.annotation.Configuration;

import instance.BeanClass;
import instance.BeanStaticFactory;
import instance.BeanInstanceFactory;
@Configuration
public class JavaConfig
{
	/**
	 *  構造方法例項化
	 */
	@Bean(value="beanClass")
	public BeanClass getBeanClass() {
		return new BeanClass();
	}

	/**
	 *  靜態工廠例項化
	 */
	@Bean(value="beanStaticFactory")
	public BeanClass getBeanStaticFactory() {
		return BeanStaticFactory.createInstance();
	}

	/**
	 * 例項工廠例項化
	 */
	@Bean(value="beanInstanceFactory")
	public BeanClass getBeanInstanceFactory() {
		BeanInstanceFactory bi=new BeanInstanceFactory();
		return bi.createBeanClassInstance();
	}

}
4.建立測試類
在ch1_5應用的config包中,建立測試類TestBean,在該類中測試配置類定義的Bean,程式碼如下:
package config;
import org.springframework.context.annotation.AnnotationConfigApplicationContext;
import instance.BeanClass;

public class TestBean
{
	public static void main(String[] args) {
		//初始化Spring容器ApplicationContext
		AnnotationConfigApplicationContext appCon=new AnnotationConfigApplicationContext(JavaConfig.class);
		BeanClass b1=(BeanClass)appCon.getBean("beanClass");
		System.out.println(b1+b1.message);
		BeanClass b2=(BeanClass)appCon.getBean("beanStaticFactory");
		System.out.println(b2+b2.message);
		BeanClass b3=(BeanClass)appCon.getBean("beanInstanceFactory");
		System.out.println(b3+b3.message);
		appCon.close();
	}

}
5.執行測試類
執行測試類TestBean的main方法,發現錯誤:

找到解決方案
執行結果如下:
二、Bean的作用域
在Spring中,不僅可以完成Bean的例項化,還可以為Bean指定作用域。在Spring中為Bean的例項定義瞭如表1.2所示的作用域,通過@Scope註解來實現。

下面通過一個例項【例1-6】來演示Bean的作用域,具體步驟如下:
1.使用Eclipse建立Web應用並匯入JAR包
使用Eclipse建立一個名為ch1_6的Dynamic Web project,並將Spring的四個基礎包、第三方依賴包commons-logging-1.2.jar以及spring-aop-5.2.9.RELEASE.jar等JAR包複製到ch1_6的WEB-INF/lib目錄中。

2.編寫不同作用域的Bean
在ch1_6應用的src目錄下,建立包service,並在該包中建立SingletonService和PrototypeService類。在SingletonService類中,Bean的作用域為預設作用域singleton;在PrototypeService類中,Bean的作用域為預設作用域prototype。
SingletonService的程式碼如下:
package service;
import org.springframework.stereotype.Service;

@Service
public class SingletonService
{

}
PrototypeService的程式碼如下:
package service;

import org.springframework.context.annotation.Scope;
import org.springframework.stereotype.Service;

@Service
@Scope("prototype")
public class PrototypeService
{

}
3.建立配置類
在ch1_6應用的src目錄下,建立包config,並在該包中建立配置類ScopeConfig
ScopeConfig的程式碼如下:
package config;

import org.springframework.context.annotation.ComponentScan;
import org.springframework.context.annotation.Configuration;

@Configuration
@ComponentScan("service")
public class ScopeConfig
{

}
4.建立測試類
在ch1_6應用的config包中,建立測試類TestScope,在該測試類中分別獲得SingletonService和PrototypeService的兩個Bean例項,具體程式碼如下:
package config;

import org.springframework.context.annotation.AnnotationConfigApplicationContext;
import service.PrototypeService;
import service.SingletonService;

public class TestScope
{
	public static void main(String[] args) {
		//初始化Spring容器ApplicationContext
		AnnotationConfigApplicationContext appCon=
				new AnnotationConfigApplicationContext(ScopeConfig.class);
		SingletonService ss1=appCon.getBean(SingletonService.class);
		SingletonService ss2=appCon.getBean(SingletonService.class);
		System.out.println(ss1);
		System.out.println(ss2);
		PrototypeService ps1=appCon.getBean(PrototypeService.class);
		PrototypeService ps2=appCon.getBean(PrototypeService.class);
		System.out.println(ps1);
		System.out.println(ps2);
		appCon.close();
	}
}
5.執行測試類

三、Bean的初始化和銷燬: 在實際工程應用中,經常需要在Bean使用之前或之後做些必要的操作,Spring對Bean的生命週期的操作提供了支援。可以使用@Bean註解的initMethod和destroyMethod屬性(相當於XML配置的init-method和destroy-method)對Bean進行初始化和銷燬。
下面通過一個例項【例1-7】來演示Bean的初始化和銷燬,具體步驟如下。
1.使用Eclipse建立Web應用並匯入JAR包
使用Eclipse建立一個名為ch1_7的Dynamic Web project,並將Spring的四個基礎包、第三方依賴包commons-logging-1.2.jar以及spring-aop-5.2.9.RELEASE.jar等JAR包複製到ch1_7的WEB-INF/lib目錄中。

2.建立Bean的類
在ch1_7應用的src目錄下,建立包service,並在該包中建立MyService類,具體程式碼如下:
package service;

public class MyService
{
  public void initService() {
  	System.out.println("initMethod");
  }
  public MyService() {
  	System.out.println("構造方法");
  }
  public void destroyService() {
  	System.out.println("destroyMethod");
  }
}
3.建立配置類
在ch1_7應用的src目錄下,建立包config,並在該包中建立配置類JavaConfig,具體程式碼如下:
package config;

import org.springframework.context.annotation.Bean;
import org.springframework.context.annotation.Configuration;
import service.MyService;

@Configuration
public class JavaConfig
{
	//initMethod和destroyMethod指定MyService類的initService和destroyService方法
	//在構造方法之後、銷燬之前執行
	@Bean(initMethod="initService",destroyMethod="destroyService")
	public MyService getMyService() {
		return new MyService();
	}
}
4.建立測試類
在ch1_7應用的config包中,建立測試類TestInitAndDestroy,具體程式碼如下:
package config;

import org.springframework.context.annotation.AnnotationConfigApplicationContext;

import service.MyService;

public class TestInitAndDestroy
{
	public static void main(String[] args)
	{
		AnnotationConfigApplicationContext appCon=
				new AnnotationConfigApplicationContext(JavaConfig.class);
		MyService ms=appCon.getBean(MyService.class);
		appCon.close();
	}

}
5.執行測試類

學習時間:

學習產出:
1、 技術筆記 1 遍
2、CSDN 技術部落格 1 篇
