OpenVPN2.4.3 安裝部署文檔(實戰)
VPN概述:
VPN(Virtual Private NetWork,虛擬專用網絡)架設在公共共享的基礎設施互聯網上,在非信任的網絡上建立私有的安全的連接,把分布在不同地域的辦公場所、用戶或者商業夥伴互聯起來。
在目前的實踐中,常見的VPN構建技術:
PPTP(Point-to-Point Tunneling Protocol,點到點的隧道協議)VPN
IPSec(Internet Protocol Security,互聯網協議安全)VPN
SSL/TLS(Secure Sockets Layer,安全接口層)VPN
3種常見VPN構建技術對比:
PPTP 需要建立2個隧道進行通信,控制和數據傳輸分離,其中傳輸數據使用GRE。在同一個局域網裏面的多個內網主機需要建立多條GRE通道連接到同一臺VPN服務器時,需要在防火墻或者NAT設備上進行特殊設置。
IPSec VPN是一個比較成熟的方案,但其配置較復雜,學習成本比較高。IPSec VPN 在商業VPN 硬件設備上實現的比較多。
SSL/TLS VPN 工作在用戶態,不需要對內核做特殊的修改,可移植性比較高,配置簡單,學習成本低(常見:OpenVPN,BadVPN)。
OpenVPN (當前主流)
功能特性:
對任何IP子網或者虛擬以太網通一個UDP或者TCP端口來建立隧道。
架構一個可擴展的,負載均衡的VPN集群系統,同時支持來自上千用戶的連接。
使用任意加密算法,可以實現簡單的靜態密碼的傳統加密,或者基於證書的公鑰私鑰加密算法。
對數據流進行實時的壓縮。
支持對端節點通過DHCP動態獲取IP
NAT 支持,對於面向連接的有狀態防火墻,不需要特殊設置。
客戶端使用,支持Windows,Mac OS ,Linux
3種實現案例:
Peer-to-Peer VPN,這種場景,將Internet 兩臺機器(公網地址)使用VPN連接起來。
Remote Access VPN(遠程訪問),該實現方案,旨在解決,移動辦公,經常出差不在辦公室的,公司生產環境連接。在這個場景種遠程訪問者一般沒有公網IP,他們使用內網地址通過防火墻設備及逆行NAT轉換後連接互聯網。
SIte-to-Site VPN ,用於連接兩個或者多個地域上不同的局域網LAN,每個LAN有一臺OpenVPN 服務器作為接入點,組成虛擬專用網絡,使得不同LAN裏面的主機和服務器都能夠相互通訊。
實踐案例1:
使用OpenVPN 創建基於證書驗證Remote Access 的VPN
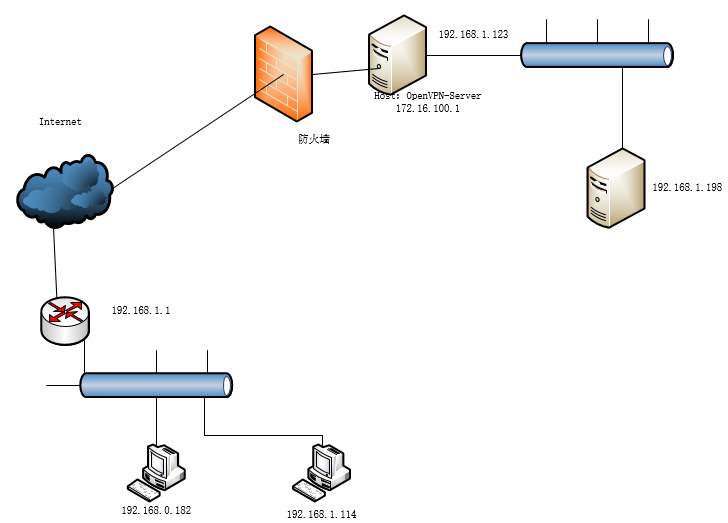
物理結構圖:
一、安裝準備
OpenVPN 服務器:CetnOS6.8(192.168.1.123,172.16.100.1)
客戶端:Windows 10(192.168.1.114) ,Ubuntu 16.0(192.168.0.182)
1、服務端安裝依賴庫:
OpenSSL,LSZ(一種無損壓縮算法),PAM(一種可插入式的身份驗證模塊)
#安裝gcc、openssl、lzo、pam
yum install -y gcc openssl-devel lzo-devel pam-devel
2、網絡設置
(1)開啟服務器端路由轉發功能
# vi /etc/sysctl.conf
net.ipv4.ip_forward = 1
# sysctl -p
或者:
#sed -i ‘s/net.ipv4.ip_forward = 0/net.ipv4.ip_forward = 1/g‘ /etc/sysctl.conf
#sysctl -p
(2)設置nat轉發:
註:保證VPN地址池可路由出外網
# iptables -t nat -A POSTROUTING -s 172.16.100.0/24 -o eth0 -j MASQUERADE
(3)設置openvpn端口通過:
# iptables -A INPUT -p UDP --dport 1194 -j ACCEPT
# iptables -A INPUT -m state --state ESTABLISHED,RELATED -j ACCEPT
重啟iptables:
註:這裏提一下,INPUT策略是執行後即時生效的,POSTROUTING需要保存並重啟服務才能生效
# service iptables saves
# service iptables restart
註:此防火墻也可以關閉(則2,3可以不用設置)。
(4)時間同步(重要):
# ntpdate asia.pool.ntp.org
二、安裝OpenVPN服務端
#wget http://swupdate.openvpn.org/community/releases/openvpn-2.4.3.tar.gz.asc
#tar zxvf openvpn-2.4.3.tar.gz
#cd openvpn-2.4.3
# ./configure --prefix=/usr/local/openvpn
# make && make install
三、配置OpenVPN服務端
配置主要有兩個部分:
生成服務器和客戶端所需的各種證書。
是編寫服務器和客戶端所需的配置文件。
(1)下載easy-rsa,創建證書(這部分可以參考"easy-rsa 生成OpenVPN證書"快速生成所有證書)。
Github 源碼2.x
地址:https://github.com/OpenVPN/easy-rsa/tree/release/2.x
#unzip easy-rsa-release-2.x.zip
#cp -rf easy-rsa/ /usr/local/openvpn/
########創建CA證書########
#cd /usr/local/openvpn/easy-rsa/2.0
#source ./vars       #初始化命令,用於設置後續命令所需的相關變量信息
NOTE: If you run ./clean-all, I will be doing a rm -rf on /usr/local/openvpn/easy-rsa/2.0/keys
#./clean-all  #清除之前創建的所有證書和密鑰
#./build-ca #生成CA證書和密鑰
Generating a 2048 bit RSA private key
...+++
...........................................................................+++
writing new private key to ‘ca.key‘
-----
You are about to be asked to enter information that will be incorporated
into your certificate request.
What you are about to enter is what is called a Distinguished Name or a DN.
There are quite a few fields but you can leave some blank
For some fields there will be a default value,
If you enter ‘.‘, the field will be left blank.
-----
Country Name (2 letter code) [US]:CN
State or Province Name (full name) [California]:SH
Locality Name (eg, city) [SanFrancisco]:SH
Organization Name (eg, company) [Fort-Funston]:ChangLiang
Organizational Unit Name (eg, section) [MyOrganizationalUnit]:DevOps
Common Name (eg, your name or your server‘s hostname) [Fort-Funston CA]:OpenVPN_CA
Name [EasyRSA]:
Email Address [[email protected]]:[email protected]
##我們的CA證書和密鑰就已經生成成功了,生成的證書和密碼默認均存放在當前目錄keys。
[[email protected] 2.0]#ls keys/
ca.crt  ca.key  index.txt  serial
############創建服務端證書#############
命令./build-key-server ServerName來生成客戶端證書和密鑰
[[email protected] 2.0]#./build-key-server server#./build-key clientName來生成客戶端證書和密鑰
Generating a 2048 bit RSA private key
............................+++
....................+++
writing new private key to ‘server.key‘
-----
You are about to be asked to enter information that will be incorporated
into your certificate request.
What you are about to enter is what is called a Distinguished Name or a DN.
There are quite a few fields but you can leave some blank
For some fields there will be a default value,
If you enter ‘.‘, the field will be left blank.
-----
Country Name (2 letter code) [US]:CN
State or Province Name (full name) [California]:SH
Locality Name (eg, city) [SanFrancisco]:SH
Organization Name (eg, company) [Fort-Funston]:ChangLiang
Organizational Unit Name (eg, section) [MyOrganizationalUnit]:DevOps
Common Name (eg, your name or your server‘s hostname) [server]:server
Name [EasyRSA]:
Email Address [[email protected]]:[email protected]
Please enter the following ‘extra‘ attributes
to be sent with your certificate request
A challenge password []:
An optional company name []:
Using configuration from /usr/local/openvpn/easy-rsa/2.0/openssl-1.0.0.cnf
Check that the request matches the signature
Signature ok
The Subject‘s Distinguished Name is as follows
countryName           :PRINTABLE:‘CN‘
stateOrProvinceName   :PRINTABLE:‘SH‘
localityName          :PRINTABLE:‘SH‘
organizationName      :PRINTABLE:‘ChangLiang‘
organizationalUnitName:PRINTABLE:‘DevOps‘
commonName            :PRINTABLE:‘server‘
name                  :PRINTABLE:‘EasyRSA‘
emailAddress          :IA5STRING:‘[email protected]‘
Certificate is to be certified until Aug 20 05:16:14 2027 GMT (3650 days)
Sign the certificate? [y/n]:y
1 out of 1 certificate requests certified, commit? [y/n]y
Write out database with 1 new entries
Data Base Updated
[[email protected] 2.0]#ls ./keys/
01.pem  ca.crt  ca.key  index.txt  index.txt.attr  index.txt.old  serial  serial.old  server.crt  server.csr  server.key
############創建客戶端證書###############
命令./build-key clientName來生成客戶端證書和密鑰
[[email protected] 2.0]#./build-key client1
Generating a 2048 bit RSA private key
........................................................+++
..................................................+++
writing new private key to ‘client1.key‘
-----
You are about to be asked to enter information that will be incorporated
into your certificate request.
What you are about to enter is what is called a Distinguished Name or a DN.
There are quite a few fields but you can leave some blank
For some fields there will be a default value,
If you enter ‘.‘, the field will be left blank.
-----
Country Name (2 letter code) [US]:CN
State or Province Name (full name) [California]:SH
Locality Name (eg, city) [SanFrancisco]:SH
Organization Name (eg, company) [Fort-Funston]:ChangLiang
Organizational Unit Name (eg, section) [MyOrganizationalUnit]:DevOps
Common Name (eg, your name or your server‘s hostname) [client1]:OpenVPN_Client
Name [EasyRSA]:
Email Address [[email protected]]:
Please enter the following ‘extra‘ attributes
to be sent with your certificate request
A challenge password []:
An optional company name []:
Using configuration from /usr/local/openvpn/easy-rsa/2.0/openssl-1.0.0.cnf
Check that the request matches the signature
Signature ok
The Subject‘s Distinguished Name is as follows
countryName           :PRINTABLE:‘CN‘
stateOrProvinceName   :PRINTABLE:‘SH‘
localityName          :PRINTABLE:‘SH‘
organizationName      :PRINTABLE:‘ChangLiang‘
organizationalUnitName:PRINTABLE:‘DevOps‘
commonName            :T61STRING:‘OpenVPN_Client‘
name                  :PRINTABLE:‘EasyRSA‘
emailAddress          :IA5STRING:‘[email protected]‘
Certificate is to be certified until Aug 20 05:34:01 2027 GMT (3650 days)
Sign the certificate? [y/n]:y
1 out of 1 certificate requests certified, commit? [y/n]y
Write out database with 1 new entries
Data Base Updated
[[email protected] 2.0]#ls ./keys/
01.pem  02.pem  ca.crt  ca.key  client1.crt  client1.csr  client1.key  index.txt  index.txt.attr  index.txt.attr.old  index.txt.old  serial  serial.old  server.crt  server.csr  server.key
##########生成迪菲·赫爾曼交換密鑰###########
命令為./build-dh(無需額外輸入,耐心等待生成完畢即可)。迪菲·赫爾曼交換密鑰是一種安全協議,用以對數據進行加密。
#./build-dh
###########生成TLS-auth密鑰############
這一步驟是可選操作。OpenVPN提供了TLS-auth功能,可以用來抵禦Dos、UDP端口淹沒攻擊。出於安全考慮,你可以啟用該功能;啟用該功能,你需要執行命令openvpn --genkey --secret keys/ta.key來生成TLS-auth所需的密鑰文件。
#/usr/local/openvpn/sbin/openvpn --genkey --secret keys/ta.key
到這裏,我們的證書生成就告一段落了。如果你以後想要生成新的客戶端或執行其他操作,只需要先執行命令. ./vars,然後執行相應的命令即可,例如./build-key client2。
證書到這創建完成,看看有哪些證書:

1:CA證書和密鑰
2:服務器端證書和密鑰。
3:客戶端client1的證書和密鑰,
4:迪菲·赫爾曼交換密鑰 (如果你的KEY_SIZE=1024,則該文件名稱為dh1024.pem)。
5:啟用tls-auth所需的文件。
其中,服務器端需要用到的文件有:
ca.crt
ca.key
dh2048.pem (如果最初的變量KEY_SIZE設為1024,這裏就是dh1024.pem)
server.crt
server.key
ta.key (如果不開啟tls-auth,則無需該文件)
客戶端client1需要用到的文件有:
ca.crt
client1.crt
client1.key (名稱client1根據個人設置可能有所不同)
ta.key (如果不開啟tls-auth,則無需該文件)
(2)編輯服務器所需的配置文件。
#mkdir -p /usr/local/openvpn/config
#cd /usr/local/openvpn/config
#cp /usr/local/openvpn/easy-rsa/2.0/keys/{ca.crt,ca.key,server.crt,server.key,ta.key,dh2048.pem} .
#ls
ca.crt  ca.key  dh2048.pem  server.crt  server.key  ta.key
#cp /opt/openvpn-2.4.3/sample/sample-config-files/server.conf .
#mkdir -p /var/log/openvpn#創建日誌目錄
#vim server.conf| local 192.168.1.123 #指定監聽的本機IP(因為有些計算機具備多個IP地址),該命令是可選的,默認監聽所有IP地址。 port 1194 #指定監聽的本機端口號 proto udp #指定采用的傳輸協議,可以選擇tcp或udp ;proto tcp dev tun #指定創建的通信隧道類型,可選tun或tap ca /usr/local/openvpn/config/ca.crt #指定CA證書的文件路徑 cert /usr/local/openvpn/config/server.crt #指定服務器端的證書文件路徑 key /usr/local/openvpn/config/server.key #指定服務器端的私鑰文件路徑 dh /usr/local/openvpn/config/dh2048.pem #指定迪菲赫爾曼參數的文件路徑 server 172.16.100.0 255.255.255.0 #指定虛擬局域網占用的IP地址段和子網掩碼,此處配置的服務器自身占用10.0.0.1。 ifconfig-pool-persist ipp.txt #服務器自動給客戶端分配IP後,客戶端下次連接時,仍然采用上次的IP地址(第一次分配的IP保存在ipp.txt中,下一次分配其中保存的IP)。 push "redirect-gateway def1 bypass-dhcp" #如果啟用,該命令將配置所有客戶端通過VPN重定向其默認 #網絡網關,導致所有IP流量(如Web瀏覽和#和DNS查找)通過VPN push "dhcp-option DNS 202.96.209.5" #給客戶端推送DNS push "dhcp-option DNS 8.8.8.8" tls-auth /usr/local/openvpn/config/ta.key 0 #開啟TLS-auth,使用ta.key防禦攻擊。服務器端的第二個參數值為0,客戶端的為1。 keepalive 10 120 #每10秒ping一次,連接超時時間設為120秒。 comp-lzo #開啟VPN連接壓縮,如果服務器端開啟,客戶端也必須開啟 client-to-client #允許客戶端與客戶端相連接,默認情況下客戶端只能與服務器相連接 persist-key persist-tun #持久化選項可以盡量避免訪問在重啟時由於用戶權限降低而無法訪問的某些資源。 status /var/log/openvpn/openvpn-status.log log /var/log/openvpn/openvpn.log log-append /var/log/openvpn/openvpn.log #日誌保存路徑 verb 4 #指定日誌文件的記錄詳細級別,可選0-9,等級越高日誌內容越詳細 explicit-exit-notify 2 #服務端重啟,客戶端自動重連 |
註意(可以不做配置。):
| push "redirect-gateway def1 bypass-dhcp" 如果啟用,該命令將配置所有客戶端通過VPN重定向其默認 #網絡網關,導致所有IP流量(如Web瀏覽和#和DNS查找)通過VPN push "dhcp-option DNS 202.96.209.5" #給客戶端推送DNS client-config-dir ccd #指定文件,對客戶端進行細粒度配置(單獨給某個客戶端推送路由等)。 |
(3)啟動OpenVPN
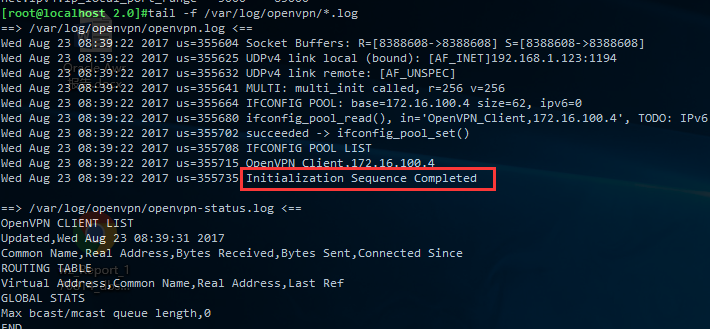
#/usr/local/openvpn/sbin/openvpn /usr/local/openvpn/config/server.conf &
#這裏要加載server.conf 配置文件啟動。
註:啟停腳本:
#cp -a /opt/openvpn-2.4.3/distro/rpm/openvpn.init.d.rhel /etc/init.d/openvpn          #創建啟動腳本
#ln -sv /usr/local/openvpn/sbin/openvpn /usr/sbin/openvpn               #啟動腳本中會用到,也可以不執行此命令,直接在啟動腳本中修改
#vi /etc/init.d/openvpn
#在85行,修改為:work=/usr/local/openvpn/config
[[email protected] config]#service openvpn stop
Shutting down openvpn:                                     [  OK  ]
[[email protected] config]#service openvpn start
Starting openvpn:                                          [  OK  ]
#添加開機啟動
[[email protected] config]#chkconfig --add openvpn
[[email protected] config]#chkconfig  openvpn on
[[email protected] config]#chkconfig --list | grep 3:on
crond          0:off1:off2:on3:on4:on5:on6:off
network        0:off1:off2:on3:on4:on5:on6:off
openvpn        0:off1:off2:on3:on4:on5:on6:off
rsyslog        0:off1:off2:on3:on4:on5:on6:off
sshd           0:off1:off2:on3:on4:on5:on6:off
四、OpenVPN客戶端安裝配置:
1、Linux客戶端(Ubuntu16 ):
(1)依賴環境配置:
# apt-get install libpam0g-dev libssl-dev
#wget http://www.oberhumer.com/opensource/lzo/download/lzo-2.06.tar.gz
#tar zxvf lzo-2.06.tar.gz
#cd lzo-2.06/
#./configure --prefix=/usr/local/
#make && make install
(2)其下載安裝同服務端一樣,但是配置文件及證書文件如下:
#mkdir -p /usr/local/openvpn/config
#cd /usr/local/openvpn/config
#scp [email protected]:/usr/local/openvpn/easy-rsa/2.0/keys/{client1.crt,client1.key,ca.crt,ca.key,ta.key,dh2048.pem} .
# ls
ca.crt  ca.key  client1.crt  client1.key  client.conf  dh2048.pem  ta.key
#vim client.conf| client #指定當前VPN是客戶端 dev tun #必須與服務器端的保持一致 proto udp #必須與服務器端的保持一致 remote 192.168.1.123 1194 #指定連接的遠程服務器的實際IP地址和端口號 resolv-retry infinite #斷線自動重新連接,在網絡不穩定的情況下(例如:筆記本電>腦無線網絡)非常有用。 nobind #不綁定特定的本地端口號 persist-key persist-tun ca ca.crt #指定CA證書的文件路徑 cert client1.crt #指定當前客戶端的證書文件路徑 key client1.key #指定當前客戶端的私鑰文件路徑 ns-cert-type server #指定采用服務器校驗方式 tls-auth ta.key 1 #如果服務器設置了防禦DoS等攻擊的ta.key,則必須每個客戶端開 啟;如果未設置,則註釋掉這一行,同服務端一致。 comp-lzo #啟用壓縮,與服務器保持一致 log-append /var/log/openvpn/openvpn.log verb 4 #指定日誌文件的記錄詳細級別,可選0-9,等級越高日誌內容越詳細 |
(3)啟動客戶端:
#/usr/local/openvpn/sbin/openvpn /usr/local/openvpn/config/client.conf &
#客戶端同樣可以使用服務端的啟動腳本,只需要修改配置文件為:client.conf

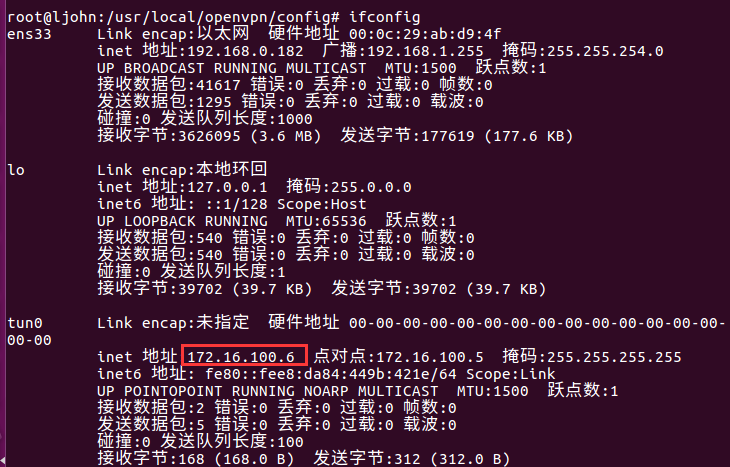
[email protected]:/usr/local/openvpn/config# ping 172.16.100.1
PING 172.16.100.1 (172.16.100.1) 56(84) bytes of data.
64 bytes from 172.16.100.1: icmp_seq=1 ttl=64 time=0.477 ms
64 bytes from 172.16.100.1: icmp_seq=2 ttl=64 time=1.09 ms
客戶端嘗試ping服務器的虛擬IP地址172.16.100.1,順利ping通。
2、Windows客戶端安裝配置
windows中只需要安裝OpenVPN GUI,並部署配置文件及客戶端證書。
(1)客戶端下載地址:https://swupdate.openvpn.org/community/releases/openvpn-install-2.4.3-I602.exe
安裝過程中,遇到網絡設配器請點擊安裝,其余默認"Next"即可:
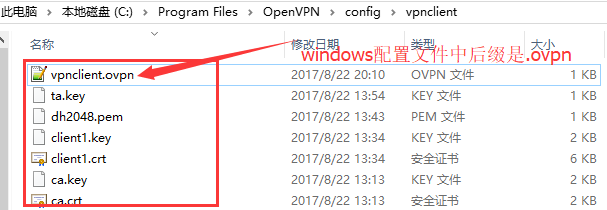
(2)安裝完成後在“C:\Program Files\OpenVPN\config”目錄中部署文件:配置文件同上(但後綴名.ovpn)
(3)啟動客戶端:
右擊桌面 "OpneVPN GUI" 以管理員身份運行,再雙擊任務欄"OpneVPN GUI" 圖標(或者任務欄右擊 "OpneVPN GUI",點擊 "connect" 連接),連接成功如下圖顯示。
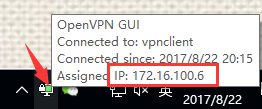
ping一下OpenVPN 服務器虛擬IP:172.16.100.1

至此完成基於證書驗證Remote Access OpenVPN的配置,至此客戶端可以連接上OpenVPN Server。
四、客戶端訪問內網地址配置
方案一:
以上4個步驟已經完成OpenVPN的配置,但是還不能與內網(192.168.1.198)通信,地址映射(虛擬主機 ,DMZ都可以,建議用)需要給內網機器添加靜態路由:
Linux平臺:
[[email protected] ~]#route add -net 172.16.100.0/24 gw 192.168.1.123

Windows平臺:
C:\WINDOWS\system32>route add -p 172.16.100.0 mask 255.255.255.0 192.168.1.123 metric 3 if 1

Ping 內網環境的IP:192.168.1.198

方案二:
給路由器配置一條靜態路由,如下圖所示:
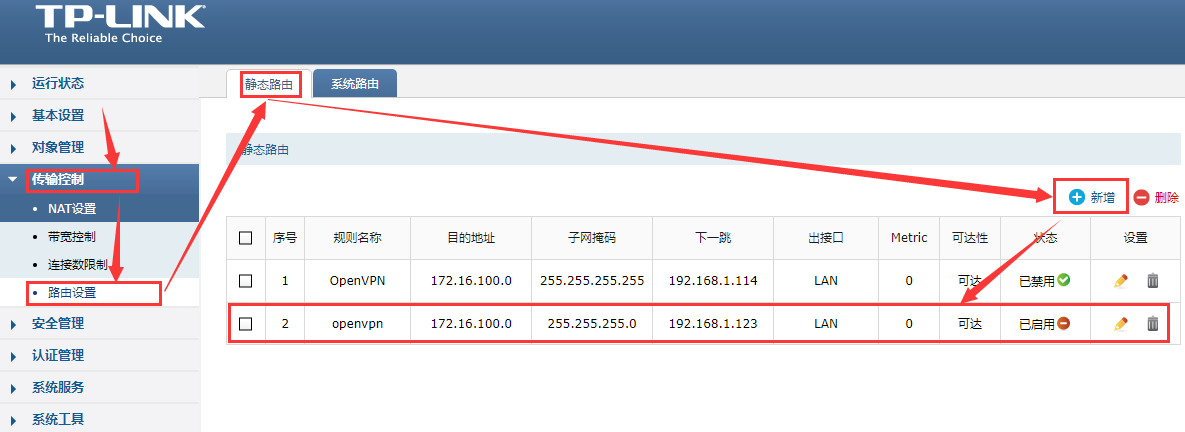
註意:如果是3層交換機加一條靜態路由,有防火墻還需要開啟端口映射及相關策略。
終於完成所有配置,對於出差在外,運維小夥伴,可以躺在家辦公了(想得美)。
*****************************FAQ******************************
1、Authenticate/Decrypt packet error: cipher final failed
編輯server.conf 配置文件
註釋:cipher AES-256-CBC
2、
Authenticate/Decrypt packet error: packet HMAC authentication failed
TLS Error: incoming packet authentication failed
TLS Error: cannot locate HMAC in incoming packet from [AF_INET]192.168.1.123:1194
註:這三個錯誤都源於這個tls-auth 認證問題,只需要服務端和客戶端關閉此功能即可解決:在此行加上; 分號。如果需要開啟可以關閉後再嘗試開啟
參考資料:
http://www.softown.cn/post/140.html
http://732233048.blog.51cto.com/9323668/1713088
本文出自 “Ljohn” 博客,謝絕轉載!
OpenVPN2.4.3 安裝部署文檔(實戰)
