
[Kaggle] dogs-vs-cats之建立模型
建立神經網絡模型,下面要建立的模型如下:
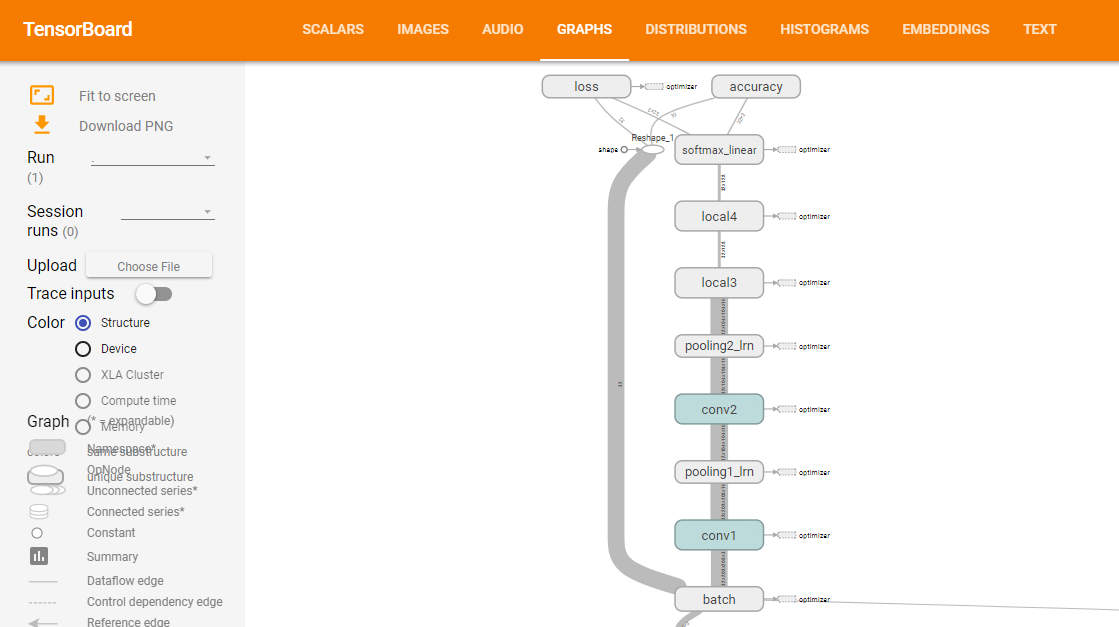
(上圖來源:訓練網絡時,打開tensorboard即可觀察網絡結構,在下一節模型訓練的時候會講到)
下面為具體步驟:
Step 0:導入相關庫
import tensorflow as tf
Step 1:定義網絡結構
def inference(images, batch_size, n_classes): ‘‘‘Build the model Args: images: image batch, 4D tensor, tf.float32, [batch_size, width, height, channels] Returns: output tensor with the computed logits, float, [batch_size, n_classes]‘‘‘ #conv1, shape = [kernel size, kernel size, channels, kernel numbers] #卷積層1 with tf.variable_scope(‘conv1‘) as scope: #變量初始化 weights = tf.get_variable(‘weights‘, shape = [3,3,3, 16], dtype = tf.float32, initializer=tf.truncated_normal_initializer(stddev=0.1,dtype=tf.float32)) biases = tf.get_variable(‘biases‘, shape=[16], dtype=tf.float32, initializer=tf.constant_initializer(0.1)) conv = tf.nn.conv2d(images, weights, strides=[1,1,1,1], padding=‘SAME‘) pre_activation = tf.nn.bias_add(conv, biases)#加上偏置 conv1 = tf.nn.relu(pre_activation, name= scope.name)#relu激活函數 #pool1 and norm1 with tf.variable_scope(‘pooling1_lrn‘) as scope: pool1 = tf.nn.max_pool(conv1, ksize=[1,3,3,1],strides=[1,2,2,1], padding=‘SAME‘, name=‘pooling1‘) norm1 = tf.nn.lrn(pool1, depth_radius=4, bias=1.0, alpha=0.001/9.0, beta=0.75,name=‘norm1‘) #conv2 with tf.variable_scope(‘conv2‘) as scope: weights = tf.get_variable(‘weights‘, shape=[3,3,16,16], dtype=tf.float32, initializer=tf.truncated_normal_initializer(stddev=0.1,dtype=tf.float32)) biases = tf.get_variable(‘biases‘, shape=[16], dtype=tf.float32, initializer=tf.constant_initializer(0.1)) conv = tf.nn.conv2d(norm1, weights, strides=[1,1,1,1],padding=‘SAME‘) pre_activation = tf.nn.bias_add(conv, biases) conv2 = tf.nn.relu(pre_activation, name=‘conv2‘) #pool2 and norm2 with tf.variable_scope(‘pooling2_lrn‘) as scope: norm2 = tf.nn.lrn(conv2, depth_radius=4, bias=1.0, alpha=0.001/9.0, beta=0.75,name=‘norm2‘) pool2 = tf.nn.max_pool(norm2, ksize=[1,3,3,1], strides=[1,1,1,1], padding=‘SAME‘,name=‘pooling2‘) #local3 #全連接層1 with tf.variable_scope(‘local3‘) as scope: reshape = tf.reshape(pool2, shape=[batch_size, -1])#轉換為一維 dim = reshape.get_shape()[1].value#獲取第二維的長度 weights = tf.get_variable(‘weights‘, shape=[dim,128], dtype=tf.float32, initializer=tf.truncated_normal_initializer(stddev=0.005,dtype=tf.float32)) biases = tf.get_variable(‘biases‘, shape=[128], dtype=tf.float32, initializer=tf.constant_initializer(0.1)) local3 = tf.nn.relu(tf.matmul(reshape, weights) + biases, name=scope.name) #local4 with tf.variable_scope(‘local4‘) as scope: weights = tf.get_variable(‘weights‘, shape=[128,128], dtype=tf.float32, initializer=tf.truncated_normal_initializer(stddev=0.005,dtype=tf.float32)) biases = tf.get_variable(‘biases‘, shape=[128], dtype=tf.float32, initializer=tf.constant_initializer(0.1)) local4 = tf.nn.relu(tf.matmul(local3, weights) + biases, name=‘local4‘) # softmax with tf.variable_scope(‘softmax_linear‘) as scope: weights = tf.get_variable(‘softmax_linear‘, shape=[128, n_classes], dtype=tf.float32, initializer=tf.truncated_normal_initializer(stddev=0.005,dtype=tf.float32)) biases = tf.get_variable(‘biases‘, shape=[n_classes], dtype=tf.float32, initializer=tf.constant_initializer(0.1)) softmax_linear = tf.add(tf.matmul(local4, weights), biases, name=‘softmax_linear‘) return softmax_linear
函數介紹:
1)tf.variable_scope
通過 tf.get_variable()為變量名指定命名空間。
2)tf.get_variable
通過所給的名字,創建或者返回一個變量。
以上兩個函數詳情參考:共享變量:http://wiki.jikexueyuan.com/project/tensorflow-zh/how_tos/variable_scope.html
3)tf.nn.conv2d
conv2d(
input,
filter,
strides,
padding,
use_cudnn_on_gpu=True,
data_format=‘NHWC‘,
name=None
)
作用:對給定的4-D輸入和卷積核(filter)做2-D的卷積。
輸入的張量(tensor)大小為[batch, in_height, in_width, in_channels],卷積核(filter/kernel)的大小為[filter_height, filter_width, in_channels, out_channels]。
Strides一般為[1, stride, stride,
1];padding,取值"SAME", "VALID"。
4)tf.nn.bias_add
bias_add(

    value,

    bias,

    data_format=None,

    name=None

)
作用:將bias添加至value。
tf.nn.bias_add 是 tf.add 的一個特例,也即 tf.add 支持的操作比 tf.nn.bias_add 更多。二者均支持 broadcasting(廣播機制),也即兩個操作數最後一個維度保持一致。除了支持最後一個維度保持一致的兩個操作數相加外,tf.add 還支持第二個操作數是一維的情況。
5)tf.nn.relu
relu(

    features,

    name=None

)
作用:是計算激活函數relu,即max(features, 0)。
6)tf.nn.max_pool
max_pool(

    value,

    ksize,

    strides,

    padding,

    data_format=‘NHWC‘,

    name=None

)
作用:計算池化區域中元素的最大值
輸入參數:
value: 一個四維的Tensor。數據維度是 [batch, height, width, channels]。數據類型是float32,float64,qint8,quint8,qint32。
ksize: 一個長度不小於4的整型數組。每一位上面的值對應於輸入數據張量中每一維的窗口對應值。
strides: 一個長度不小於4的整型數組。該參數指定滑動窗口在輸入數據張量每一維上面的步長。
padding: 一個字符串,取值為 SAME 或者 VALID 。
name: (可選)為這個操作取一個名字。
7)tf.nn.lrn
作用:局部響應歸一化
Step 2:定義損失函數
def losses(logits, labels):
    ‘‘‘Compute loss from logits and labels
    Args:
        logits: logits tensor, float, [batch_size, n_classes]
        labels: label tensor, tf.int32, [batch_size]

    Returns:
        loss tensor of float type
    ‘‘‘
    with tf.variable_scope(‘loss‘) as scope:#sparse  不需要one hot encoding
        cross_entropy = tf.nn.sparse_softmax_cross_entropy_with_logits                        (logits=logits, labels=labels, name=‘xentropy_per_example‘)
        loss = tf.reduce_mean(cross_entropy, name=‘loss‘)
        tf.summary.scalar(scope.name+‘/loss‘, loss)
    return loss
函數介紹:
1) tf.nn.sparse_softmax_cross_entropy_with_logits
sparse_softmax_cross_entropy_with_logits(

    _sentinel=None,

    labels=None,

    logits=None,

    name=None

)
作用:計算logits和labels之間的softmax交叉熵。
第一個參數logits:就是神經網絡最後一層的輸出,如果有batch的話,它的大小就是[batchsize,num_classes],單樣本的話,大小就是num_classes。
第二個參數labels以前也必須是[batch_size, num_classes]否則無法做Cross Entropy(softmax_cross_entropy_with_logits的用法),這個函數改為限制更強的[batch_size],而值必須是從0開始編碼的int32或int64,而且值範圍是[0, num_class)。
2) tf.reduce_mean
作用:計算輸入tensor的均值
3)tf.summary.scalar
scalar(

    name,

    tensor,

    collections=None,

    family=None

)
作用:輸出一個包含單個標量值的Summary protocol buffer 。
Step 3:定義訓練方法
def trainning(loss, learning_rate):
    ‘‘‘Training ops, the Op returned by this function is what must be passed to
        ‘sess.run()‘ call to cause the model to train.

    Args:
        loss: loss tensor, from losses()

    Returns:
        train_op: The op for trainning
    ‘‘‘
    with tf.name_scope(‘optimizer‘):
        optimizer = tf.train.AdamOptimizer(learning_rate= learning_rate)
        global_step = tf.Variable(0, name=‘global_step‘, trainable=False)
        train_op = optimizer.minimize(loss, global_step= global_step)
    return train_op
函數介紹:
1)tf.train.AdamOptimizer
__init__(

    learning_rate=0.001,

    beta1=0.9,

    beta2=0.999,

    epsilon=1e-08,

    use_locking=False,

    name=‘Adam‘

)
作用:利用Adam algorithm來
2)optimizer.minimize
minimize(

    loss,

    global_step=None,

    var_list=None,

    gate_gradients=GATE_OP,

    aggregation_method=None,

    colocate_gradients_with_ops=False,

    name=None,

    grad_loss=None

)
作用:最小化loss。
global_step: Optional Variable to increment by one after the variables have been updated.
Step4:定義評估方法
def evaluation(logits, labels):
  """Evaluate the quality of the logits at predicting the label.
  Args:
    logits: Logits tensor, float - [batch_size, NUM_CLASSES].
    labels: Labels tensor, int32 - [batch_size], with values in the
      range [0, NUM_CLASSES).
  Returns:
    A scalar int32 tensor with the number of examples (out of batch_size)
    that were predicted correctly.
  """
  with tf.variable_scope(‘accuracy‘) as scope:
      correct = tf.nn.in_top_k(logits, labels, 1)
      correct = tf.cast(correct, tf.float16)
      accuracy = tf.reduce_mean(correct)
      tf.summary.scalar(scope.name+‘/accuracy‘, accuracy)
  return accuracy
函數介紹:
1)tf.nn.in_top_k
in_top_k(

    predictions,

    targets,

    k,

    name=None

)
作用:返回targets是否位於前K個predictions中,True或者False。
Predictions:float32類型的Tensor,大小為batch_size x classes
Targets:必須是int32或者int64的Tensor。類id組成的batch_size大小的向量。
說明:
代碼來自:https://github.com/kevin28520/My-TensorFlow-tutorials,略有修改
函數作用主要參考tensorflow官網。https://www.tensorflow.org/versions/master/api_docs/
註:
我建了一個deep learning交流群,感興趣的可以加群,大家一起交流,一起進步。qq群號:134449436
[Kaggle] dogs-vs-cats之建立模型