學習WebSocket(一)
一:為什麽WebSocket
在傳統的互聯網通信上,我們一般都是用http協議,客戶端向服務器發起請求,服務器作出響應,返回靜態資源或對數據庫做讀寫操作等。但這種情況下,服務器是一個被動的角色,不能主動向客戶端推送消息。想要達到“推送”的效果,一般只能采用輪詢的方式,由客戶端按一定時間間隔發起請求,如果數據有更新,則服務器返回新數據,客戶端處理新數據並重新渲染。
http雖然簡單,但它基於“request--response”這種半雙工方式,如果每次傳遞的數據很小,輪詢的開銷就顯得大了。所以人們試圖尋找一種更好的實現服務器端向客戶端推送數據的方式。
這時候HTML5定義了WebSocket協議。
WebSocket是一個獨立的創建在TCP上的協議,它使用ws或wss的統一資源標誌符。使用和HTTP相同的端口號。ws---80,wss--443,通過HTTP/1.1的101狀態碼進行握手。
它可以發送文本或二進制數據。沒有同源限制。
創建websokect鏈接時,需要客戶端先發起請求,然後服務器回應,這個過程稱“握手”。
ws://example.com/wsapi
wss://secure.example.com/
二:WebSokect在前端的操作:
我記得剛接觸前端的時候,以為ajax是很復雜的東西。但接觸後發現,前端的ajax不過是操作XMLHttpRequest對象。我們new了一個XMLHttpRequest對象後,調用它的open()、onreadystatechange()、setRequestHeader()、send()等方法,就能向指定的服務器發起GET/POST請求並設定回調,而其API底層已經幫我們封裝了對http操作。
WebSocket也是一樣的,我們可以在js中通過new一個WebSocket對象,傳入絕對URL,並調用其api來實現基於ws協議的雙向連接。
1 var ws = new WebSocket("wss://echo.websocket.org"); 2 //創建連接成功,可以準備通訊 3 ws.onopen = function(evt) { 4 console.log("Connection open ..."); 5 ws.send("Hello WebSockets!"); 6 }; 7 //接收數據 8 ws.onmessage = function(evt) {9 console.log( "Received Message: " + evt.data); 10 ws.close(); 11 }; 12 //即將關閉連接 13 ws.onclose = function(evt) { 14 console.log("Connection closed."); 15 };
我們使用ajax時會監聽其readyState,當readyState值為4時表示響應已接收並調用回調。
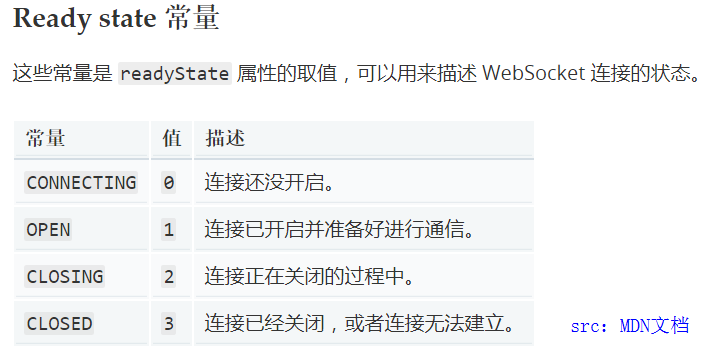
在WebSocket裏也有一個常量readyState用來描述 WebSocket 連接的狀態。

對應於這幾個狀態的監聽方法有:
WebSocket.onclose()
WebSocket.onerror()
WebSocket.onmessage()
WebSocket.onopen()
在Writing WebSocket client applications這篇websocket實踐的文章中提到使用websocket時要註意的一些地方:
*當連接發生錯誤時,一個命名為“error”的事件會發送到WebSocket實例對象上並觸發onerror監聽函數。隨後CloseEvent事件會發送到WebSocket實例對象上並觸發onclose回調函數。
*由於發起連接是異步的,所以WebSocket實例對象的send()方法應該放在onopen()的回調中。
*推薦使用json格式傳輸數據,考慮到在某些版本的火狐瀏覽器中,websocket只支持發送字符串。
*WebSocket的api都是事件驅動的,所以我們要習慣用回調的方式處理數據的接收:exampleSocket.onmessage = function (event){//do sth...}

 1 // Send text to all users through the server
 2 function sendText() {
 3   // Construct a msg object containing the data the server needs to process the message from the chat client.
 4   var msg = {
 5     type: "message",
 6     text: document.getElementById("text").value,
 7     id:   clientID,
 8     date: Date.now()
 9   };
10
11   // Send the msg object as a JSON-formatted string.
12   exampleSocket.send(JSON.stringify(msg));
13
14   // Blank the text input element, ready to receive the next line of text from the user.
15   document.getElementById("text").value = "";
16 }
View Code
三:服務器端的WebSocket
首先看看有哪些支持WebSocket的服務器,這裏引用維基百科的資料:
- php - http://code.google.com/p/phpwebsocket/
- jetty - http://jetty.codehaus.org/jetty/(版本7開始支持websocket)[失效鏈接]
- netty - http://www.jboss.org/netty
- ruby - http://github.com/gimite/web-socket-ruby
- Kaazing - https://web.archive.org/web/20100923224709/http://www.kaazing.org/confluence/display/KAAZING/Home
- Tomcat - http://tomcat.apache.org/(7.0.27支持websocket,建議用tomcat8,7.0.27中的接口已經過時)
- WebLogic - http://www.oracle.com/us/products/middleware/cloud-app-foundation/weblogic/overview/index.html(12.1.2開始支持)[失效鏈接]
- node.js - https://github.com/Worlize/WebSocket-Node
- node.js - http://socket.io
- nginx - http://nginx.com/
- mojolicious - http://mojolicio.us/
- python - https://github.com/abourget/gevent-socketio
- Django - https://github.com/stephenmcd/django-socketio
- erlang - https://github.com/ninenines/cowboy.git
可見,常見的服務器幾乎都支持websocket,我自己學的是node,就研究下node中如何實現websocket。
阮一峰老實在其博客中給出了常用的 Node 實現:
- μWebSockets
- Socket.IO
- WebSocket-Node
那我就試試Socket.IO吧。
//待續
參考:https://zh.wikipedia.org/wiki/WebSocket
WebSocket 教程
學習WebSocket(一)

