django + etcd + confd配置管理平臺
CentOS 6/7 x64
Python: 2.7.6
Etcd: 3.2.18
Confd: 0.16.0
Nginx: 1.12.1
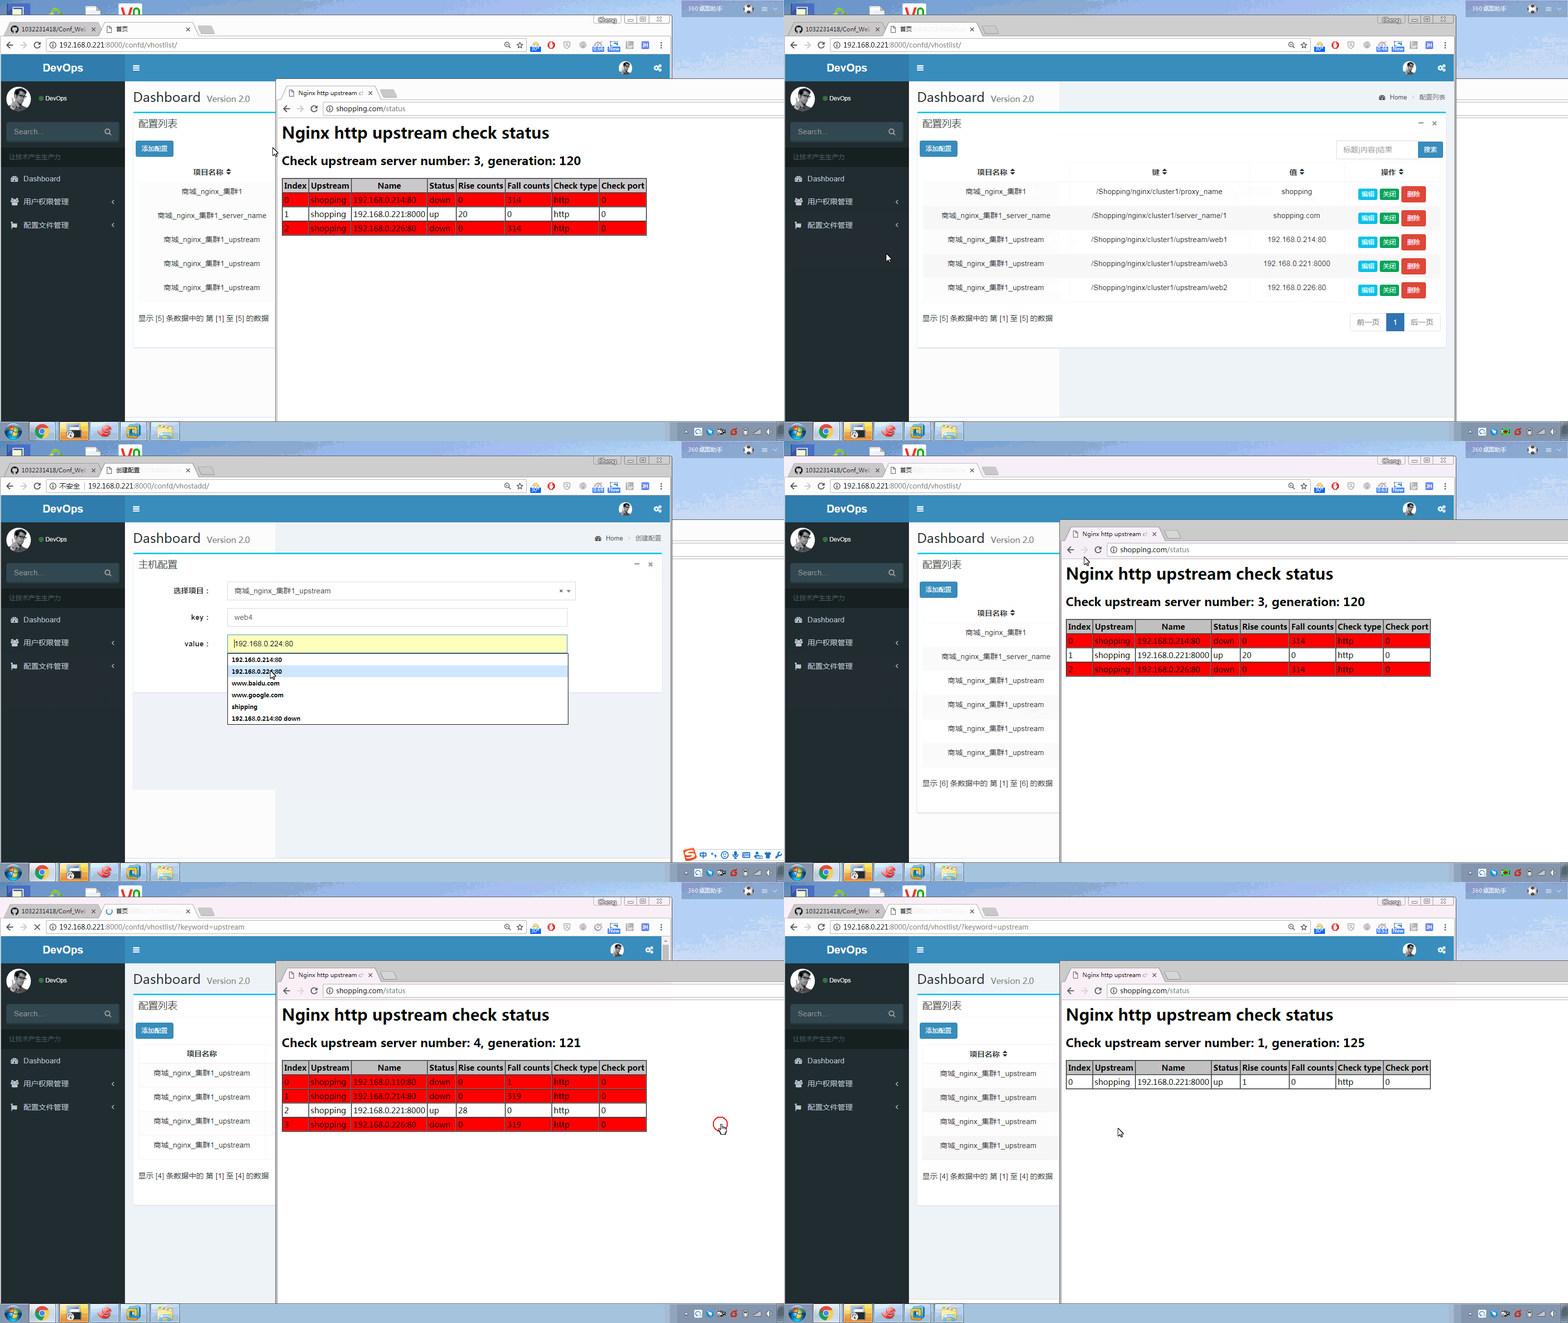
效果演示

一、拓撲圖:

二、涉及軟件
etcd:分布式 KV 存儲系統,一般用於共享配置和服務註冊和發現。是 CoreOS 公司發起的一個開源項目。ETCD 存儲格式類似於文件系統,以根“/”開始下一級目錄,最後一個是Key,一個關鍵對應的一個 Value。
etcd 集群:使用 Raft 協議保證每個節點數據一致,由多個節點對外提供服務。這裏只用單臺。
confd:管理本地應用配置文件,使用 etcd 或 consul 存儲的數據渲染模板,還支持 redis,zookeepe r等 .confd 有一個 watch 功能,通過 HTTP API 定期監測對應的 etcd 中目錄變化,獲取最新的 Value,然後渲染模板
Nginx: Nginx 是一款輕量級的 Web 服務器/反向代理服務器以及電子郵件代理服務器,並且在一個類似 BSD 的協議下發行。由俄羅斯的程序設計師 lgor Sysoev 所開發,供俄國大型的入口網站及搜索引擎 Rambler 使用。其特點是占用內存少,並發能力強,事實上 nginx的並發能力確實在同類型的網頁服務器中表現較好。
三、軟件部署
環境說明:建議使用 Cento7.X X64
1)安裝 etcd(這裏安裝的單機,集群環境根據自己的需求選取)
# yum install etcd -y
# sed -i  ‘s/localhost/0.0.0.0/g‘  /etc/etcd/etcd.conf  #配置監聽地址
# systemctl   start  etcd  &&  systemctl  enable  etcd  #啟動服務設置開機動
2)安裝 nginx
 #cd  /usr/local/src
 #wget  http://nginx.org/download/nginx-1.12.1.tar.gz
 #git clone https://github.com/yaoweibin/nginx_upstream_check_module.git
 #tar  -zxvf  nginx-1.12.1.tar.gz
 #cd nginx-1.12.1
 #patch  -p1 </usr/local/src/nginx_upstream_check_module/check_1.12.1+.patch
 #./configure   --prefix=/usr/local/nginx --add-module=/usr/local/src/nginx_upstream_check_module/
 make && make install
 #mkdir  /usr/local/nginx/conf/vhost/
 Nginx主配置文件修改為這個樣子,增加include目錄配置
 #vi  /usr/local/nginx/conf/nginx.conf

   #user  nobody;
   worker_processes  1;

   #error_log  logs/error.log;
   #error_log  logs/error.log  notice;
   #error_log  logs/error.log  info;

   #pid        logs/nginx.pid;

   events {
     worker_connections  1024;
   }

   http {
     include       mime.types;
     default_type  application/octet-stream;

     #log_format  main  ‘$remote_addr - $remote_user [$time_local] "$request" ‘
     #                  ‘$status $body_bytes_sent "$http_referer" ‘
     #                  ‘"$http_user_agent" "$http_x_forwarded_for"‘;

     #access_log  logs/access.log  main;

     sendfile        on;
     #tcp_nopush     on;

     #keepalive_timeout  0;
     keepalive_timeout  65;

     #gzip  on;

   include   vhost/*.conf;
   }
3)安裝 confd
下載地址https://github.com/kelseyhightower/confd/releases
下載完畢丟到系統裏面
#cp confd / usr / bin / confd
#哪個confd
在/ usr / bin中/ confd
4)創建配置文件目錄
# mkdir -p /etc/confd/{conf.d,templates}
 conf.d          # 資源模板,下面文件必須以toml後綴
 templates       # 配置文件模板,下面文件必須以tmpl後綴
5)創建confd配置文件
# vi /etc/confd/conf.d/app01.conf.toml

   [template]
   src = "app01.conf.tmpl"                              #默認在/etc/confd/templates目錄下
   dest = "/usr/local/nginx/conf/vhost/app01.conf"      #要更新的配置文件
   keys = [
      "/Shopping",                                      #監測的key
   ]
   reload_cmd ="/usr/local/nginx/sbin/nginx -s reload"   #最後執行的命令
6)創建confd模板
# vi  /etc/confd/templates/app01.conf.tmpl

   upstream {{getv "/Shopping/nginx/cluster1/proxy_name"}} {
     {{range getvs "/Shopping/nginx/cluster1/upstream/*"}}
       server {{.}};
     {{end}}

     check interval=5000 rise=1 fall=5 timeout=4000 type=http;
     check_http_send "HEAD / HTTP/1.0\r\n\r\n";
     check_http_expect_alive http_2xx http_3xx;

   }

   server {
      server_name   {{range getvs "/Shopping/nginx/cluster1/server_name/*"}} {{.}} {{end}};
      location / {
        proxy_pass        http://{{getv  "/Shopping/nginx/cluster1/proxy_name"}};
        proxy_redirect off;
        proxy_set_header Host $host;
        proxy_set_header X-Real-IP $remote_addr;
        proxy_set_header X-Forwarded-For $proxy_add_x_forwarded_for;
     }
       location /status {
           check_status;
           access_log   off;
          }
   }
7)啟動 confd 並設置開機啟動
開機啟動腳本會隨文檔附帶
拷貝至 /etc/init.d/confd,只需要更改 etcd 的連接地址即可
#/etc/init.d/confd start && chkconfig --add confd && chkconfig confd on
四、配置平臺部署
1)Github 克隆平臺代碼安裝平臺依賴
 # git  clone  https://github.com/1032231418/Conf_Web.git
 # cd Conf_Web/ospweb/
 #virtualenv   env                  #建議創建一個沙盒環境跑該平臺
 # source  env/bin/activate         #使用沙盒環境
 # pip install -r requirement.txt   #安裝相關軟件
2)創建數據庫並將表刷入數據庫
# vi opsweb/settings.py   #這裏數據庫信息改為自己的數據庫信息
     DATABASES = {
         ‘default‘: {
         ‘ENGINE‘: ‘django.db.backends.mysql‘,
         ‘NAME‘: ‘confd‘,
         ‘HOST‘: ‘192.168.8.114‘,
         ‘USER‘: ‘root‘,
         ‘PASSWORD‘: ‘123456‘,
         ‘PORT‘: 3306,
       }
     }

     ETCD_Server = "192.168.0.221"        #這裏改為自己etcd 的ip地址
     ETCD_Port = 2379

 # python manage.py   migrate          #提交遷移文件至數據庫,將表刷入數據庫
3)創建超級管理員賬號
#python manage.py createsuperuser
4)運行平臺
#python manage.py runserver 0:8000
訪問地址就是http:// ip:8000賬號密碼就是上一步創建的超級管理員賬號密碼
5)登錄平臺為nginx創建鍵/值
例子:購物平臺為例
項目創建:
1.創建商城項目/ Shopping

2.創建商城項目裏面的/ Shopping / nginx nginx服務

3.創建nginx集群目錄/ Shopping / nginx / cluster1

4.給我們的商城nginx集群1項目創建配置文件

5.域名和節點名稱可能是多個,這裏我們需要創建目錄/ Shopping / nginx / cluster1 / server_name和/ Shopping / nginx / cluster1 / upstream

etcd 裏面存儲的值
配置創建:
1.反向代理/ Shopping / nginx / cluster1 / proxy_name
2.綁定一個域名/ Shopping / nginx / cluster1 / server_name / 1
3.創建一個集群節點/ Shopping / nginx / cluster1 / upstream / web1
etcd裏面存儲的值
生成的配置文件
通過 hosts 文件我們可以查看節點狀態(雖然這個節點不是上升狀態但是由此可見,我們可以動態添加節點)

作者:保成
GitHub:https://github.com/1032231418/Conf_Web
django + etcd + confd配置管理平臺
