
實現列表二級展開/收起/選擇
代碼地址如下:
http://www.demodashi.com/demo/12628.html
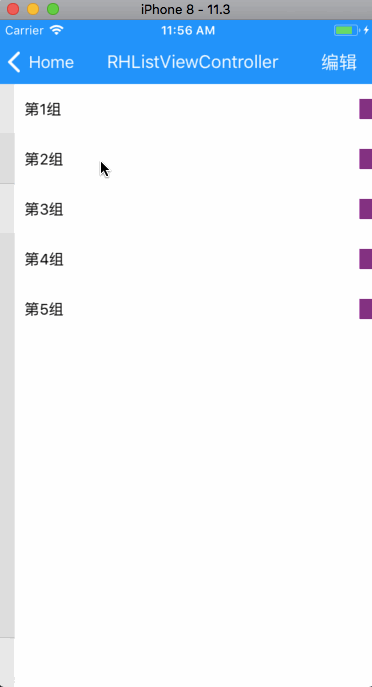
1、先看效果圖
2、實現原理
1)通過對UITableView進行分組來實現展開收起的功能;
2)通過cell的model和組model中的是否選中和是否展開的標記字段來記錄並實現展開/收起/選擇的功能;
3、代碼實現
1)創建cell的model類並添加如下屬性:
// 標記是否選中
@property (nonatomic, assign) BOOL isSelect;
// 文字
@property (nonatomic, copy) NSString * title;其中isSelect為必要屬性,主要用來標記該cell是否為選中狀態。
2)創建組的model類並添加如下屬性:
// 標記是否展開
@property (nonatomic, assign) BOOL isShow;
// 標記是否全選
@property (nonatomic, assign) BOOL isAllSelect;
// 存儲該組的數據
@property (nonatomic, strong) NSMutableArray * dataArr;
// 組標題
@property (nonatomic, copy) NSString * title;
@end其中isShow、isAllSelect、dataArr為必要屬性,isShow用來標記該組是否為展開狀態,isAllSelect
dataArr用來存儲該組的數據。
3)需要在組的model類.m文件中重寫init方法,對dataArr屬性進行初始化如下:
- (instancetype)init {

    self = [super init];

    if (self) {

        _dataArr = [NSMutableArray new];
    }
    return self;
}這裏對dataArr進行初始化是為了避免在後邊使用的時候因為忘記而導致數據存儲不上。
4)對cell進行簡單的布局和邏輯處理:
#pragma mark - config cell

- (void)configCellWithModel:(RHListModel *)model indexPath:(NSIndexPath *)indexPath isEditing:(BOOL)isEditing {

    _lab_title.text = model.title;
    _img_sel.hidden = !isEditing;
    if (isEditing) {

        [_lab_title mas_updateConstraints:^(MASConstraintMaker *make) {

            make.left.mas_equalTo(60);
        }];
        if (model.isSelect) {

//            _img_sel.image = [UIImage imageNamed:@""];
            _img_sel.backgroundColor = Color_Red;
        } else {

//            _img_sel.image = [UIImage imageNamed:@""];
            _img_sel.backgroundColor = Color_Blue;
        }
    } else {

        [_lab_title mas_updateConstraints:^(MASConstraintMaker *make) {

            make.left.mas_equalTo(30);
        }];
    }
}
這裏只創建了一個label和一個imageView,其中label用來顯示標題,imageView用來顯示是否為選中狀態。
在該配置cell的方法中通過model和isEditing兩個參數來對cell進行相應的布局和更改。其中參數isEditing為該cell是否在編輯狀態的標記。
5)對SectionHeaderView進行簡單的布局和邏輯處理:
#pragma mark - config section header

- (void)configSectionHeaderWithModel:(RHListSectionModel *)sectionModel isEditing:(BOOL)isEditing tapEventHandler:(void (^)(void))tapHandler selEventHandler:(void (^)(BOOL))selHandler {

    _tapEvent = tapHandler;
    _selEvent = selHandler;
    _lab_title.text = sectionModel.title;
    _btn_sel.selected = sectionModel.isAllSelect;
    _img_sel.hidden = !isEditing;
    _btn_sel.hidden = !isEditing;
    if (isEditing) {

        [_lab_title mas_updateConstraints:^(MASConstraintMaker *make) {

            make.left.mas_equalTo(40);
        }];
        if (sectionModel.isAllSelect) {

//            _img_sel.image = [UIImage imageNamed:@""];
            _img_sel.backgroundColor = Color_Red;
        } else {

//            _img_sel.image = [UIImage imageNamed:@""];
            _img_sel.backgroundColor = Color_Blue;
        }
    } else {

        [_lab_title mas_updateConstraints:^(MASConstraintMaker *make) {

            make.left.mas_equalTo(10);
        }];
    }
    if (sectionModel.isShow) {

//        _img_arrow.image = [UIImage imageNamed:@""];
        _img_arrow.backgroundColor = Color_Yellow;
    } else {

//        _img_arrow.image = [UIImage imageNamed:@""];
        _img_arrow.backgroundColor = Color_Purple;
    }
}
@end這裏通過對headerView添加手勢的方式對其添加點擊事件,由於需要在外部獲取到該點擊事件,所以這裏使用了block回調的方式來回調點擊該組和點擊選擇按鈕的兩個事件。其中tapHandler為點擊該組時的回調,selHandler為點擊選擇按鈕時的回調。在這裏分別定義了兩個block屬性來接收並在點擊事件中進行回調賦值。
這裏對標題和選擇按鈕圖片的處理與在cell中的類似,這裏不再多說。
6)在VC中實現布局及邏輯處理:
#pragma mark - load data

- (void)loadData {

    for (int i = 0; i < 5; i++) {

        RHListSectionModel * sectionModel = [[RHListSectionModel alloc] init];
        sectionModel.title = [NSString stringWithFormat:@"第%d組", i + 1];
        for (int j = 0; j < arc4random()%5 + 4; j++) {

            RHListModel * model = [[RHListModel alloc] init];
            model.title = [NSString stringWithFormat:@"第%d組,第%d個", i + 1, j + 1];
            [sectionModel.dataArr addObject:model];
        }
        [_dataArr addObject:sectionModel];
    }
    [_tableView reloadData];
}
首先這裏簡單模擬加載數據。
#pragma mark - btn event

- (void)clickEdit:(UIButton *)sender {

    sender.selected = !sender.selected;
    if (sender.selected) {

        for (RHListSectionModel * sectionModel in self.dataArr) {

            sectionModel.isAllSelect = NO;
            for (RHListModel * model in sectionModel.dataArr) {

                model.isSelect = NO;
            }
        }
    }
    [_tableView reloadData];
}
這是在導航上邊添加了一個編輯按鈕的點擊事件,點擊按鈕切換按鈕的選中狀態。通過此來切換列表是否為編輯狀態。
這裏是在按鈕選中前對所有數據的選中狀態進行了初始化,即全部設置為未選中。如果有需求需要記住編輯時的狀態,這裏的if判斷可以去掉即可。
#pragma mark - tableView dataSource and delegate

- (NSInteger)numberOfSectionsInTableView:(UITableView *)tableView {

    return self.dataArr.count;
}

- (NSInteger)tableView:(UITableView *)tableView numberOfRowsInSection:(NSInteger)section {

    RHListSectionModel * sectionModel = self.dataArr[section];
    if (!sectionModel.isShow) {

        return 0;
    }
    return sectionModel.dataArr.count;
}

- (UITableViewCell *)tableView:(UITableView *)tableView cellForRowAtIndexPath:(NSIndexPath *)indexPath {

    RHListCell * cell = [tableView dequeueReusableCellWithIdentifier:@"RHListCell" forIndexPath:indexPath];
    RHListSectionModel * sectionModel = self.dataArr[indexPath.section];
    RHListModel * model = sectionModel.dataArr[indexPath.row];
    [cell configCellWithModel:model indexPath:indexPath isEditing:self.btn_edit.selected];
    return cell;
}

- (UIView *)tableView:(UITableView *)tableView viewForHeaderInSection:(NSInteger)section {

    RHListSectionHeaderView * headerView = [[RHListSectionHeaderView alloc] init];
    RHListSectionModel * sectionModel = self.dataArr[section];
    [headerView configSectionHeaderWithModel:sectionModel isEditing:self.btn_edit.selected tapEventHandler:^{

        sectionModel.isShow = !sectionModel.isShow;
        [tableView reloadData];
    } selEventHandler:^(BOOL isAllSelect) {

        sectionModel.isAllSelect = isAllSelect;
        if (isAllSelect) {

            for (RHListModel * model in sectionModel.dataArr) {

                model.isSelect = YES;
            }
        } else {

            for (RHListModel * model in sectionModel.dataArr) {

                model.isSelect = NO;
            }
        }
        [tableView reloadData];
    }];
    return headerView;
}

- (void)tableView:(UITableView *)tableView didSelectRowAtIndexPath:(NSIndexPath *)indexPath {

    if (!self.btn_edit.selected) {

        return;
    }
    RHListSectionModel * sectionModel = self.dataArr[indexPath.section];
    RHListModel * model = sectionModel.dataArr[indexPath.row];
    model.isSelect = !model.isSelect;
    if (model.isSelect) {

        int count = 0;
        for (RHListModel * mod in sectionModel.dataArr) {

            if (mod.isSelect) {

                count++;
            }
        }
        if (count == sectionModel.dataArr.count) {

            sectionModel.isAllSelect = YES;
        }
    } else {

        sectionModel.isAllSelect = NO;
    }
    [tableView reloadData];
}這裏是tableView的主要代理實現方法主要說一下返回SectionHeader及點擊cell的兩個代理。
其中返回SectionHeader的代理裏邊使用定制的SectionHeader並調用外漏的配置方法,在block裏邊進行展開/收起/選中/取消選中該組的處理,最後對tableView進行刷新。
cell的點擊事件裏邊主要是對在點擊cell時的處理,如果在編輯狀態下,點擊cell時需要統計該組中選中cell的個數,來實時改變改組的組的選中狀態。
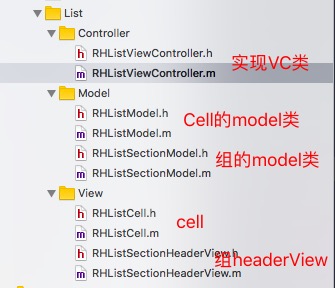
4、項目結構
主要采用MVC的方式來實現
OK!至此所有功能已經實現,我們在使用的時候可以根據自己的需求對model和cell進行相應的修改。實現列表二級展開/收起/選擇
代碼地址如下:
http://www.demodashi.com/demo/12628.html
註:本文著作權歸作者,由demo大師代發,拒絕轉載,轉載需要作者授權
實現列表二級展開/收起/選擇