
elementUI表格合併單元格
相信你肯定看了 ElementUI 官方文件了,沒看的話先去看下錶格各個屬性的意義,方便下文閱讀:傳送門
但你會發現此例過於簡單,死資料,但我們開發的時候往往都是後臺傳遞過來的資料,導致我們 rowspan 的引數需要自己做判斷,根據資料的相同行(或列)進行合併;
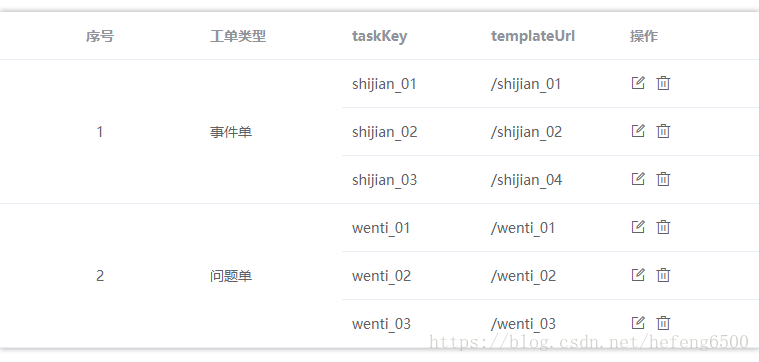
我們先看下結果:
程式碼附上:
<template>
  <div class="">
    <el-table
        :data="listData"
        :span-method="objectSpanMethod"
        class="tableArea"
        style="width: 100%">
        <el-table-column
          prop="type"
          label="序號"
          align="center"
          width="200"/>
        <el-table-column
          prop="sheetType"
          label="工單型別"
          />
        <el-table-column
          prop="taskKey"
          label="taskKey"
          />
        <el-table-column
          prop="templateUrl"
          label="templateUrl"
          />
        <el-table-column
          label="操作"
          >
          <template slot-scope="scope">
          	<el-tooltip class="item" effect="dark" content="修改" placement="top-start">
				      <i class="el-icon-edit-outline"  @click="modify(scope)" />
				    </el-tooltip>
				    <el-tooltip class="item" effect="dark" content="刪除" placement="top-start">
            <i class="el-icon-delete" @click="deleteData(scope)" />
				    </el-tooltip>
          </template>
        </el-table-column >
      </el-table>
  </div>
</template>
<script>

export default {
  name: 'myNeedDeal',
  data() {
    return {
      rowList: [],
      spanArr: [],
      position: 0,
      listData: []
    }
  },

  methods: {
  	queryData(){//查詢操作
  		this.listData = [
  			{
        	id:1,
          type:1,
          sheetType: "事件單",
          taskKey: "shijian_01",
          templateUrl: "/shijian_01"
        },
        {
        	id:2,
          type:1,
          sheetType: "事件單",
          taskKey: "shijian_02",
          templateUrl: "/shijian_02"
        },
        {
        	id:3,
          type:1,
          sheetType: "事件單",
          taskKey: "shijian_03",
          templateUrl: "/shijian_04"
        },
        {
        	id:4,
          type:2,
          sheetType: "問題單",
          taskKey: "wenti_01",
          templateUrl: "/wenti_01"
        },
        {
        	id:5,
          type:2,
          sheetType: "問題單",
          taskKey: "wenti_02",
          templateUrl: "/wenti_02"
        },
        {
        	id:6,
          type:2,
          sheetType: "問題單",
          taskKey: "wenti_03",
          templateUrl: "/wenti_03"
        }
  		];
		  this.rowspan()
  	},
  	rowspan() {
  		this.listData.forEach((item,index) => {
	    	if( index === 0){
	    		this.spanArr.push(1);
	    		this.position = 0;
	    	}else{
	    		if(this.listData[index].type === this.listData[index-1].type ){
	    			this.spanArr[this.position] += 1;
	    			this.spanArr.push(0);
	    		}else{
	    			this.spanArr.push(1);
	    			this.position = index;
	    		}
	    	}
	    })
  	},
    objectSpanMethod({ row, column, rowIndex, columnIndex }) {  //表格合併行
    	if (columnIndex === 0) {
    		const _row = this.spanArr[rowIndex];
    		const _col = _row>0 ? 1 : 0;
    		return {
    			rowspan: _row,
    			colspan: _col
    		}
    	}
    	if(columnIndex === 1){
    		const _row = this.spanArr[rowIndex];
    		const _col = _row>0 ? 1 : 0;
    		return {
    			rowspan: _row,
    			colspan: _col
    		}
    	}
    }
  },
  mounted() {
    this.queryData();
  }
}
</script>
<style lang="scss" scoped>
.el-select {
  margin-right: 15px;
}
.el-input {
  margin-right: 15px;
  width: 200px;
}
.tableArea {
  margin-top: 20px;
  box-shadow: 0 0 8px 0 #aaa;
}
i[class^="el-icon"] {
  margin-right: 5px;
  font-size: 16px;
  cursor: pointer;
}
.modify_table{
	td{
		padding: 10px ;
	}
}
.item_title{
	text-align: right;
}
</style>
詳細說明:
:span-method="objectSpanMethod"
這個是官方給定的繫結屬性和對應的方法,objectSpanMethod 傳入了 { row, column, rowIndex, columnIndex }
row: 當前行
column: 當前列
rowIndex:當前行號
columnIndex :當前列號
該函式可以返回一個包含兩個元素的陣列,第一個元素代表rowspan,第二個元素代表colspan。 也可以返回一個鍵名為rowspan和colspan
this.spanArr 陣列 ,返回的是相對應的行合併行數
這個示例打印出的this.spanArr為 [3, 0, 0, 3, 0, 0],比如,第一個元素為3,表示第一行應該向下合併3行(即第一行的rowspan為3),第二個元素的rowspan為0,就讓它“消失”。
rowspan()這個函式就是用來返回 this.spanArr 陣列的,定義每一行的 rowspan
rowspan()函式,if( index === 0),第一行,直接先給陣列push進一個1,表示自己先佔一行,this.position是陣列元素的位置(此時是從陣列元素的第一個開始,所以this.position為0), this.position為0意思表示的就是陣列的第一個元素。
當到了index為2的時候,if(this.listData[index].type === this.listData[index-1].type ),讓第二行與第一行作比較,
如果第二行與第一行相等的話,this.position就+1,當有n行第一行相同,this.position就為n,表示向下合併n行;第二行自己就this.spanArr.push(0),表示第二行“消失”,因為第一行和第二行合併了啊。
如果第二行與第一行不相等的話,那麼this.spanArr.push(1);就讓第二行自己獨佔一行;this.position = index意思就是把指標拿到index這行來,表示設定陣列this.spanArr[this.position]的元素值,然後定義從此行開始向下合併幾行(可能這句話我表述的不是很清楚你可以根據我這個示例研究下,當index為3時,this.position為3,當index為4時,第四行與第三行需要合併,那麼在陣列的this.position元素就要+1了,也就是this.spanArr[this.position] += 1)
還有最後一句話
const _col = _row>0 ? 1 : 0;
定義的這一個單元格列的合併,我們專案只合並行,不合並列;
_row:代表合併行的行數,_row的值要麼是1,或者更大的自然正整數,要麼是0。
1代表:獨佔一行
更大的自然數:代表合併了若干行
0:代表“消失”的哪那一個單元格,後面的單元格向前推一格
表述能力有限,若有錯誤或者問題,歡迎下方留言!
覺得不錯,歡迎點贊!