rosserial_arduino學習筆記11《紅外測距儀》
阿新 • • 發佈:2018-11-01
1 硬體設定
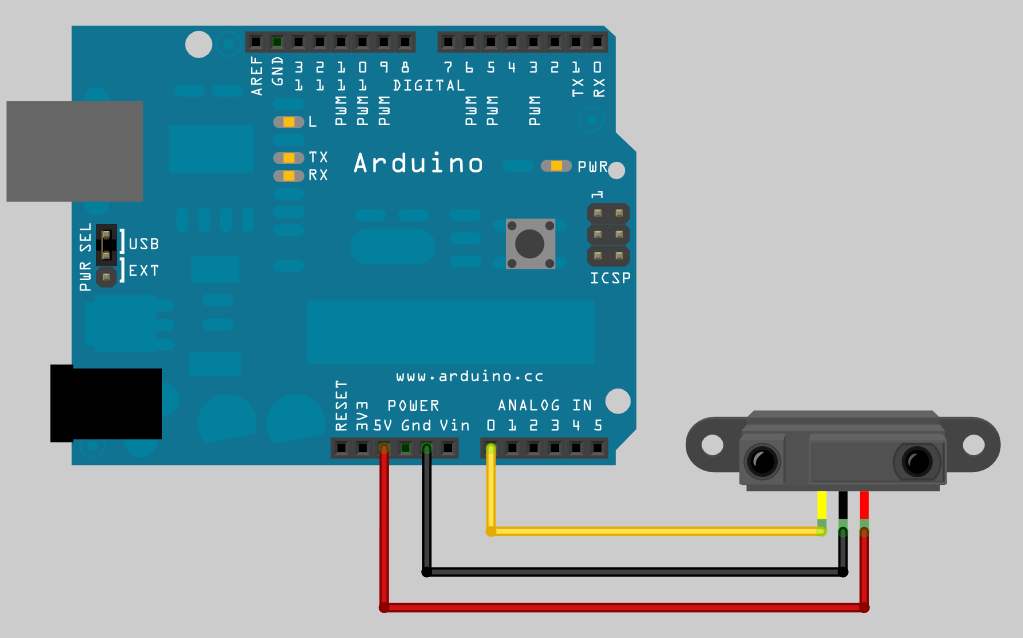
要開始使用,請將紅外測距儀連線到Arduino,如下所示。並將紅外測距儀的訊號引腳連線到模擬輸入0。
2 軟體設定
2.1 程式碼
接下來,開啟您的Arduino IDE並複製下面的程式碼。
/*
 * rosserial IR Ranger Example
 *
 * This example is calibrated for the Sharp GP2D120XJ00F.
 */

#include <ros.h>
#include <ros/time.h>
#include <sensor_msgs/Range.h>

ros::NodeHandle  nh;
sensor_msgs::Range range_msg;
ros::Publisher pub_range( "range_data", &range_msg);

const int analog_pin = 0;
unsigned long range_timer;

/*
 * getRange() - samples the analog input from the ranger
 * and converts it into meters.
 *
 * NOTE: This function is only applicable to the GP2D120XJ00F !!
 * Using this function with other Rangers will provide incorrect readings.
 */
float getRange(int pin_num){
    int sample;
    // Get data
    sample = analogRead(pin_num)/4;
    // if the ADC reading is too low,
    //   then we are really far away from anything
    if(sample < 10)
        return 254;     // max range
    // Magic numbers to get cm
    sample= 1309/(sample-3);
    return (sample - 1)/100; //convert to meters
}

char frameid[] = "/ir_ranger";

void setup()
{
  nh.initNode();
  nh.advertise(pub_range);

  range_msg.radiation_type = sensor_msgs::Range::INFRARED;
  range_msg.header.frame_id =  frameid;
  range_msg.field_of_view = 0.01;
  range_msg.min_range = 0.03;  // For GP2D120XJ00F only. Adjust for other IR rangers
  range_msg.max_range = 0.4;   // For GP2D120XJ00F only. Adjust for other IR rangers
}

void loop()
{
  // publish the range value every 50 milliseconds
  //   since it takes that long for the sensor to stabilize
  if ( (millis()-range_timer) > 50){
    range_msg.range = getRange(analog_pin);
    range_msg.header.stamp = nh.now();
    pub_range.publish(&range_msg);
    range_timer =  millis();
  }
  nh.spinOnce();
}
2.2 程式解釋
現在讓我們分析程式碼。
#include <ros.h>
#include <ros/time.h>
#include <sensor_msgs/Range.h>

ros::NodeHandle  nh;
sensor_msgs::Range range_msg;
ros::Publisher pub_range( "range_data", &range_msg);
與往常一樣,程式碼首先從rosserial庫中包含適當的訊息標頭檔案和ros標頭檔案,然後例項化釋出者。
const int analog_pin = 0;
unsigned long range_timer;

/*
 * getRange() - samples the analog input from the ranger
 * and converts it into meters.
 *
 * NOTE: This function is only applicable to the GP2D120XJ00F !!
 * Using this function with other Rangers will provide incorrect readings.
 */
float getRange(int pin_num){
    int sample;
    // Get data
    sample = analogRead(pin_num)/4;
    // if the ADC reading is too low,
    //   then we are really far away from anything
    if(sample < 10)
        return 254;     // max range
    // Magic numbers to get cm
    sample= 1309/(sample-3);
然後,我們定義了紅外測距儀附加到的analog_pin,建立了一個時間變數,定義了一個將模擬訊號轉換為以米為單位的相應距離讀數的函式。
return (sample - 1)/100; //convert to meters這裡,程式碼為感測器幀id字串建立一個全域性變數。重要的是這個字串全域性化,以便只要訊息正在使用它就會存活。
char frameid[] = "/ir_ranger";

void setup()
{
  nh.initNode();
  nh.advertise(pub_range);

  range_msg.radiation_type = sensor_msgs::Range::INFRARED;
  range_msg.header.frame_id =  frameid;
  range_msg.field_of_view = 0.01;
  range_msg.min_range = 0.03;  // For GP2D120XJ00F only. Adjust for other IR rangers
  range_msg.max_range = 0.4;   // For GP2D120XJ00F only. Adjust for other IR rangers
在Arduino的設定函式中,程式碼初始化節點控制代碼,然後填寫range_msg的描述符欄位。這個特殊的IR Ranger讀數在3釐米到40釐米之間。
注意:預設情況下,許多IR庫以釐米為單位報告。
如果您使用不同的Ranger或IR助手庫,則可能需要將其讀數轉換為米。
}

void loop()
{
  // publish the range value every 50 milliseconds
  //   since it takes that long for the sensor to stabilize
  if ( (millis()-range_timer) > 50){
    range_msg.range = getRange(analog_pin);
    range_msg.header.stamp = nh.now();
    pub_range.publish(&range_msg);
    range_timer =  millis();
  }
最後,在釋出迴圈中,Arduino每隔50毫秒對遊俠進行一次取樣併發布範圍資料。
3 啟動應用程式
在對Arduino進行程式設計之後,可以使用rxplot對感測器測量進行視覺化。
roscorerosrun rosserial_python serial_node.py _port:= / dev / ttyUSB0rqt_plot range_data / range如果這是您第一次執行rqt_plot,則需要先安裝軟體包。

