rosserial_arduino學習筆記10《Servo Controller Example》
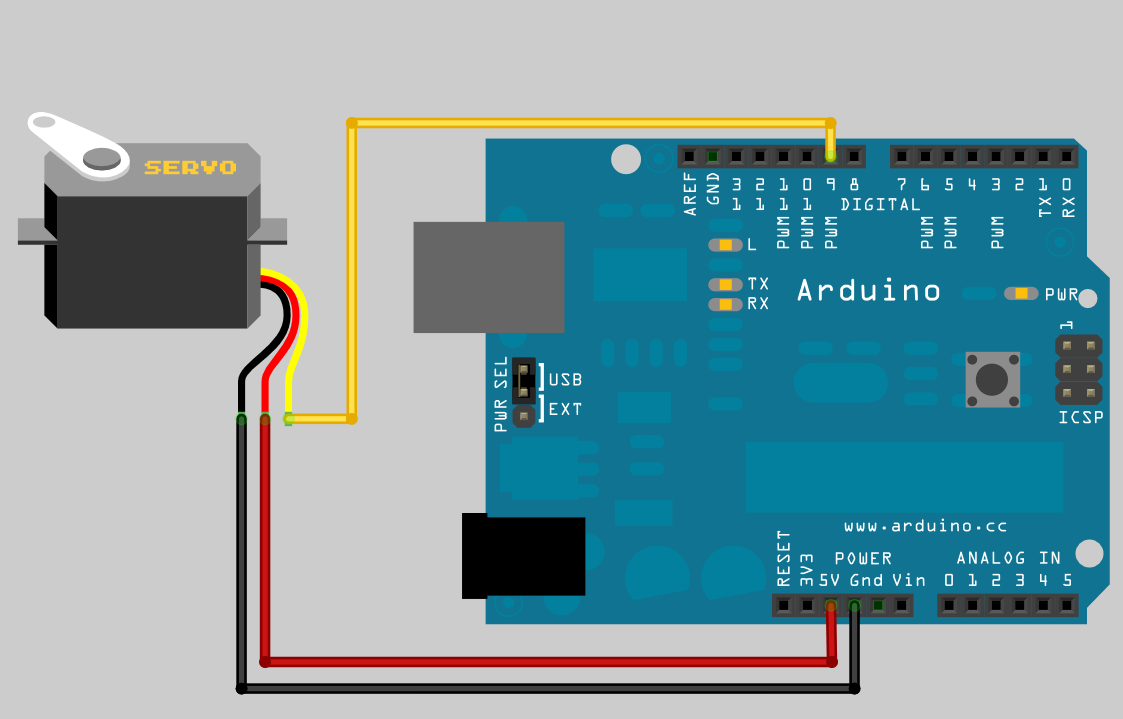
本教程介紹如何使用Arduino和rosserial基於ROS控制R/C 。
這可用於控制release mechanism,廉價機器人手臂,ROS動力兩足動物或任何需要廉價執行器的地方。
提供的程式碼是一個非常基本的例子,顯示了對單個可愛伺服的控制。
1 硬體

這個例子假設你有一個Arduino和一個r/c servo。r/c servo可以從當地的愛好商店,Towerhobbies,Sparkfun等等購買。
伺服遙控器是很棒的小型執行器,因為它們比較便宜(低至10美元),不過包含齒輪箱和電機控制電子裝置。
它們通過每20毫秒傳送1-2毫秒寬的方波脈衝來控制。
這通常會使伺服臂從0-180度轉動。伺服系統有各種尺寸,扭矩和角度精度。
2 程式
通過使用Arduino Servo庫,本教程的程式變得非常簡單。該伺服庫處理所有low level的控制的生成,並維持伺服脈衝。
您需要做的所有程式碼都是指定伺服器所連線的引腳,然後將角度寫入伺服物件。
在下面,Servo庫使用Arduino的內建定時器中斷來生成正確的脈衝。
在這個例子中,我們只控制一個伺服,但是同一個庫可以用來控制大多數Arduino板上的12個伺服器和Arduino Mega上的48個伺服器。
/*
 * rosserial Servo Control Example
 *
 * This sketch demonstrates the control of hobby R/C servos
 * using ROS and the arduiono
 *
 * For the full tutorial write up, visit
 * www.ros.org/wiki/rosserial_arduino_demos
 *
 * For more information on the Arduino Servo Library
 * Checkout :
 * http://www.arduino.cc/en/Reference/Servo
 */

#if defined(ARDUINO) && ARDUINO >= 100
  #include "Arduino.h"
#else
  #include <WProgram.h>
#endif

#include <Servo.h>
#include <ros.h>
#include <std_msgs/UInt16.h>

ros::NodeHandle  nh;

Servo servo;

void servo_cb( const std_msgs::UInt16& cmd_msg){
  servo.write(cmd_msg.data); //set servo angle, should be from 0-180
  digitalWrite(13, HIGH-digitalRead(13));  //toggle led
}


ros::Subscriber<std_msgs::UInt16> sub("servo", servo_cb);

void setup(){
  pinMode(13, OUTPUT);

  nh.initNode();
  nh.subscribe(sub);

  servo.attach(9); //attach it to pin 9
}

void loop(){
  nh.spinOnce();
  delay(1);
}
關鍵地方是,增加全域性Servo物件,連線到正確的Arduino引腳,在每個伺服訂閱主題,呼叫回撥函式,寫入一個新的角度到Servo物件。
這個程式可以參考《》基於ROS系統使用Arduino控制舵機》https://blog.csdn.net/qq_27806947/article/details/83153934
3 測試
首先,在他們自己的終端視窗中啟動你的roscore和rosserial python節點。
roscore
rosrun rosserial_python serial_node.py /dev/ttyACM0
現在,在一個新的終端視窗中,使用rostopic pub來控制你的伺服!只需指定0-180的角度並觀察它的移動。
rostopic pub servo std_msgs/UInt16 <angle>