
Android開發進階——測試
導言
每次使用Android Studio建立一個新的工程,都會看到類似如下的目錄結構:
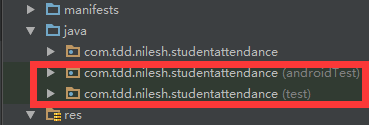
我們編寫的Java程式碼全部放在最上面的包中,下面兩個使用紅線圈中的包總是沒有用過,僅僅知道他們是用於放置測試程式碼的。標註為androidTest的包放置UI相關的測試,標註為test的包放置普通的單元測試(使用jUnit4)。下面就來探索如何編寫具體的測試程式碼。
測試金字塔
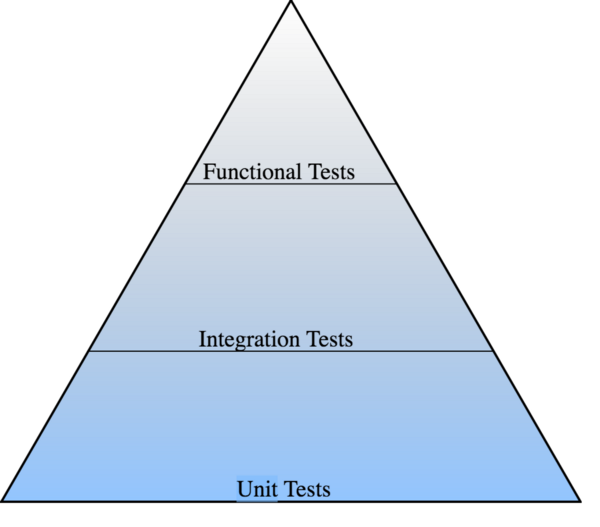
如圖,最基礎的是Unit Test
Android裡的測試型別
Unit Test
單元測試,用於測試小的功能點(如方法和類),不需要Android機器或者模擬器直接可以在開發機器上執行。可以使用的工具有jUnit和Robolectric。該類測試程式碼放到test
Instrumentation Test
UI測試,用於模擬使用者與應用的互動,如點選按鈕或者鍵入文字。可以使用的工具有Espresso、UIAutomator。該類測試程式碼放到androidTest中。
工程結構
為了方便測試,工程需要遵循一定的組織結構。這也是測試帶來的一個間接好處,那就是程式碼必須要編寫得低耦合。在這裡我們選擇MVP作為組織結構。
1. M代表Model,基本就是一些POJO
2. V代表View,一般使用Activity或者Fragment充當,View應該是純被動的。
3. P代表Presenter,包含了所有View的展示邏輯和應用程式邏輯。從Repository中獲取資料並在View中展示。儘量不要包含任何Android相關的程式碼。
單元測試的物件一般就是針對Presenter。
建立和執行單元測試程式碼
在要測試的目標類中使用快捷鍵,SHIFT+CTRL+T,然後選擇建立新的測試。測試檔案的命名一般就是在要測試的類後加上Test,如要測試LoginPresenter,那麼測試相應的測試檔案應該叫LoginPresenterTest。
編寫測試用例,如下:
public class LoginPresenterTest {
@Test
public void checkLoginAttemptIsExceeded() {
LoginPresenter loginPresenter = new 測試類的測試用例方法需要使用@Test註解,方法名任意。
點選方法名左邊出現的綠色三角形即可執行測試,或者右鍵測試類,然後選擇執行該類中所有的測試方法。
使用Mockito
一般Presenter在建立的時候需要傳遞一個實現了某介面的View物件。那麼就需要使用Mockito進行模擬一個實現了該介面的物件,首先在app module的build.gradle中新增依賴:
testCompile 'org.mockito:mockito-core:1.10.19'然後如下使用:
public class LoginPresenterTest {

    @Test
    public void checkLoginAttemptIsExceeded() {
        LoginView loginView = mock(LoginView.class);
        LoginPresenter loginPresenter = new LoginPresenter(loginView);
        Assert.assertEquals(1, loginPresenter.incrementLoginAttempt());
        Assert.assertTrue(loginPresenter.isLoginAttemptExceeded());
    }
}
Integration Testing(Presenter和View是否銜接)
Presenter需要呼叫View的方法來進行展示,這個過程的測試就是Integration Test,參看前面的測試金字塔第二層。如下進行:
public class LoginPresenterTest {

    @Test
    public void checkUsernameAndPasswordIsCorrect() {
        LoginView loginView = mock(LoginView.class);
        LoginPresenter loginPresenter = new LoginPresenter(loginView);
        loginPresenter.doLogin("nilesh", "tdd");
        verify(loginView).showLoginSuccessMessage();
    }
}
使用Espresso進行UI測試
在app module的build.gradle中,新增依賴:
androidTestCompile('com.android.support.test.espresso:espresso-core:2.2.2', {
        exclude group: 'com.android.support', module: 'support-annotations'
})在同一個build.gradle的defaultConfig節點中新增:
testInstrumentationRunner "android.support.test.runner.AndroidJUnitRunner"測試程式碼如下:
@RunWith(AndroidJUnit4.class)
public class LoginActivityTest {
    ActivityTestRule<LoginActivity> activityTestRule =
        new ActivityTestRule<>(LoginActivity.class);

    @Test
    public void checkUserNameEditTextIsDisplayed() {
        activityTestRule.launchActivity(new Intent());
        onView(withId(R.id.edt_user_name)).check(matches(isDisplayed()));
    }

    @Test
    public void checkLoginSuccess() {
        activityTestRule.launchActivity(new Intent());
        onView(withId(R.id.edt_user_name)).perform(typeText("nj"), closeSoftKeyboard());
        onView(withId(R.id.edt_password)).perform(typeText("tdd"), closeSoftKeyboard());
        onView(withId(R.id.edt_user_name)).check(matches(isDisplayed())).perform(click());
        onView(withText("Login successful.")).check(matches(isDisplayed()));
    }
}
然後就可以連線Android手機或者虛擬機器進行測試了。