
Opencv呼叫深度學習模型
https://blog.csdn.net/lovelyaiq/article/details/79929393
Opencv呼叫深度學習模型
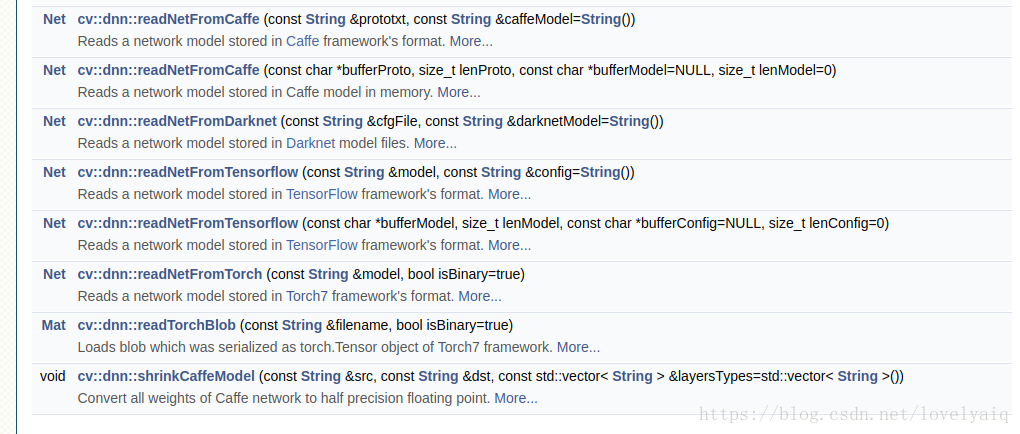
2018年04月13日 15:19:54 TiRan_Yang 閱讀數:1150更多 個人分類: TensorFlowPython深度學習 OpenCv 從V3.3版本開始支援呼叫深度學習模型,例如Caffe, Tensorflow, darknet等.詳細見下圖,具體的使用方法,可以參考官網:
目前Opencv可以支援的網路有GoogLeNet, ResNet-50,MobileNet-SSD from Caffe等,具體的可以參考:https://github.com/opencv/opencv/wiki/ChangeLog,裡面有對dnn模組的詳細介紹.
在github上,Opencv也有關於dnn模組的使用例子:https://github.com/opencv/opencv/tree/3.4.1/samples/dnn
這裡只使用Python介面的Opencv 對Yolo V2(目前Opencv還不支援Yolo V3, 期待下一個版本支援)和Tensorflow訓練出來的ssd_inception_v2_coco模型進行說明.
Yolo V2模型:
import cv2
import numpy as np

cap = cv2.VideoCapture('solidYellowLeft.mp4')
def read_cfg_model(): model_path = '/home/scyang/TiRan/WorkSpace/others/darknet/cfg/yolov2.weights' cfg_path = '/home/scyang/TiRan/WorkSpace/others/darknet/cfg/yolov2.cfg' yolo_net = cv2.dnn.readNet(model_path, cfg_path, 'darknet') while True: flag, img = cap.read() if flag: yolo_net.setInput(cv2.dnn.blobFromImage(img, 1.0/127.5, (416, 416), (127.5, 127.5, 127.5), False, False)) cvOut = yolo_net.forward() for detection in cvOut: confidence = np.max(detection[5:]) if confidence > 0: classIndex = np.argwhere(detection == confidence)[0][0] - 5 x_center = detection[0] * cols y_center = detection[1] * rows width = detection[2] * cols height = detection[3] * rows start = (int(x_center - width/2), int(y_center - height/2)) end = (int(x_center + width/2), int(y_center + height/2)) cv2.rectangle(img,start, end , (23, 230, 210), thickness=2) else: break cv2.imshow('show', img) cv2.waitKey(10) - 1
- 2
- 3
- 4
- 5
- 6
- 7
- 8
- 9
- 10
- 11
- 12
- 13
- 14
- 15
- 16
- 17
- 18
- 19
- 20
- 21
- 22
- 23
- 24
- 25
- 26
- 27
- 28
這裡需要對cvOut的結果說明一下:cvOut的前4個表示檢測到的矩形框資訊,第5位表示背景,從第6位開始代表檢測到的目標置信度及目標屬於那個類。
因此,下面兩處的作用是,從5位開始獲取結果中目標的置信度及目標屬於那個類。
confidence = np.max(detection[5:])
classIndex = np.argwhere(detection == confidence)[0][0] - 5- 1
- 2
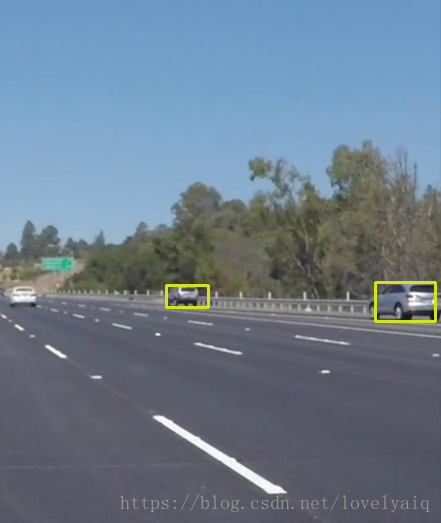
結果的截圖如下:
Tensorflow模型
cvNet = cv2.dnn.readNetFromTensorflow('model/ssd_inception_v2_coco_2017_11_17.pb','model/ssd_inception_v2_coco_2017_11_17.pbtxt')
while True:
    flag, img = cap.read()
    if flag:
rows = img.shape[0] cols = img.shape[1] width = height = 300 image = cv2.resize(img, ((int(cols * height / rows), width))) img = image[0:height, image.shape[1] - width:image.shape[1]] cvNet.setInput(cv2.dnn.blobFromImage(img, 1.0/127.5, (300, 300), (127.5, 127.5, 127.5), swapRB=True, crop=False)) cvOut = cvNet.forward() # Network produces output blob with a shape 1x1xNx7 where N is a number of # detections and an every detection is a vector of values # [batchId, classId, confidence, left, top, right, bottom] for detection in cvOut[0,0,:,:]: score = float(detection[2]) if score > 0.3: rows = cols = 300 # print(detection) left = detection[3] * cols top = detection[4] * rows right = detection[5] * cols bottom = detection[6] * rows cv2.rectangle(img, (int(left), int(top)), (int(right), int(bottom)), (23, 230, 210), thickness=2) cv2.imshow('img', img) cv2.waitKey(10) else: break- 1
- 2
- 3
- 4
- 5
- 6
- 7
- 8
- 9
- 10
- 11
- 12
- 13
- 14
- 15
- 16
- 17
- 18
- 19
- 20
- 21
- 22
- 23
- 24
- 25
- 26
- 27
- 28
- 29
- 30
- 31
效果如下: 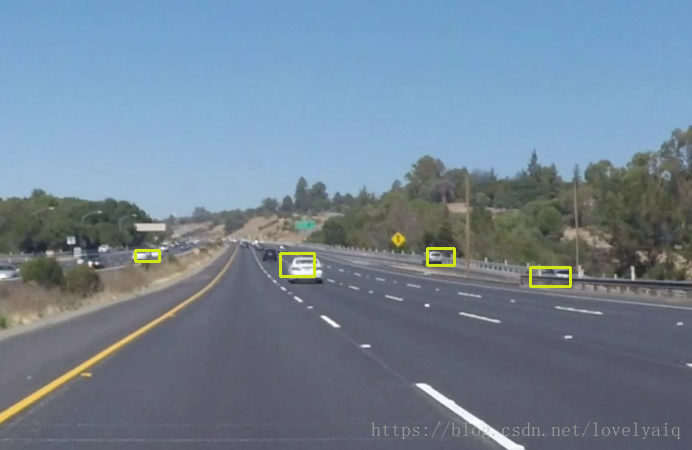
使用方法和Yolo的類似,從最終的效果可以看出,ssd_inception_v2模型要比V2好。
注:blobFromImage的詳細介紹及使用方法,可以參考某大神的部落格:https://www.pyimagesearch.com/2017/11/06/deep-learning-opencvs-blobfromimage-works/。這裡就不在多述了,要學會站在巨人的肩膀上