android中屬性動畫 ObjectionAnimation
阿新 • • 發佈:2018-11-05
關於動畫:
android中動畫包括 View Animation、Drawable Animation和屬性動畫Property Animation● View Animation較簡單的動畫包含平移、縮放、透明度和旋轉這些簡單的動畫。 ● Drawable Animation在xml中用多幅圖片實現動畫的效果。
●Property Animation用動畫的方式改變了控制元件的屬性,View Animation和Drawable Animation實現不了的都可以用屬
性動畫來實現。
View Animation和Drawable Animation不做太多解釋到時會在公眾號上推廣,主要解釋屬性動畫Property Animation.
原始碼下載 : http://download.csdn.net/detail/bruse_android/9466182
github 原始碼下載 : https://github.com/fanloveoupao/AnimationLearn
屬性動畫的四個方面:
    /**
     * 1、ObjectionAnimation
     * <p>
     * 2、AnimationSet
     * <p>
     * 3、AnimationListener
     * <p>
     * 4、LayoutAnimation
*/@Override
public void onClick(View v) {
switch (v.getId()) {
case R.id.id_objectionanimation:
ObjectAnimatActivity.launch(MainActivity.this);
break;
case R.id.id_animationset:
AnimatSetActivity.launch(MainActivity.this);
break;
case R.id.id_animlistener:
AnimationListenerActivity.launch(MainActivity.this);
break;
case R.id.id_layout_anim:
LayoutAnimationActivity.launch(MainActivity.this);
break;
}
}<?xml version="1.0" encoding="utf-8"?>
<RelativeLayout xmlns:android="http://schemas.android.com/apk/res/android"
xmlns:tools="http://schemas.android.com/tools"
android:layout_width="match_parent"
android:layout_height="match_parent"
android:paddingBottom="@dimen/activity_vertical_margin"
android:paddingLeft="@dimen/activity_horizontal_margin"
android:paddingRight="@dimen/activity_horizontal_margin"
android:paddingTop="@dimen/activity_vertical_margin"
tools:context="bruse.com.animationlearn.ObjectAnimatActivity">
<!--圖片沿著x進行旋轉-->
<ImageView
android:id="@+id/id_rotation"
android:layout_width="match_parent"
android:layout_height="match_parent"
android:layout_centerInParent="true"
android:onClick="rotationX"
android:src="@mipmap/objectanimat" />
</RelativeLayout>public class ObjectAnimatActivity extends AppCompatActivity {
public static void launch(Activity activity) {
Intent intent = new Intent(activity, ObjectAnimatActivity.class);
activity.startActivity(intent);
}
@Override
protected void onCreate(Bundle savedInstanceState) {
super.onCreate(savedInstanceState);
setContentView(R.layout.activity_object_animat);
}
public void rotationX(final View view) {
ObjectAnimator objectAnimator = ObjectAnimator.ofFloat(view, "rotationX", 0.0F, 360.0F);
objectAnimator.setDuration(1500);
objectAnimator.start();
objectAnimator.addUpdateListener(new ValueAnimator.AnimatorUpdateListener() {
@Override
public void onAnimationUpdate(ValueAnimator animation) {
view.postInvalidate();
view.invalidate();
}
});
}
}僅僅三行程式碼觸發一個動畫當然,改成一行也是可以的不過這裡為了方便理解就不拆開寫了。動畫效果很簡單就是一張圖片的旋轉。
效果圖
第二部分AnimationSet多個動畫一起播放當然可以定義播放的順序。
佈局檔案:
<?xml version="1.0" encoding="utf-8"?>
<RelativeLayout xmlns:android="http://schemas.android.com/apk/res/android"
    xmlns:tools="http://schemas.android.com/tools"
    android:layout_width="match_parent"
    android:layout_height="match_parent"
    android:paddingBottom="@dimen/activity_vertical_margin"
    android:paddingLeft="@dimen/activity_horizontal_margin"
    android:paddingRight="@dimen/activity_horizontal_margin"
    android:paddingTop="@dimen/activity_vertical_margin"
    tools:context=".AnimatSetActivity">
<ImageView
    android:layout_width="40dp"
    android:layout_height="40dp"
    android:id="@+id/iv_image1"
    android:layout_centerInParent="true"
    android:src="@mipmap/one"
    />

    <ImageView
        android:layout_width="40dp"
        android:layout_height="40dp"
        android:id="@+id/iv_image2"
        android:layout_centerInParent="true"
        android:src="@mipmap/two"
        />

    <ImageView
        android:layout_width="40dp"
        android:layout_height="40dp"
        android:id="@+id/iv_image3"
        android:layout_centerInParent="true"
        android:src="@mipmap/three"
        />

    <ImageView
        android:layout_width="40dp"
        android:layout_height="40dp"
        android:id="@+id/iv_image4"
        android:layout_centerInParent="true"
        android:src="@mipmap/four"
        />

    <ImageView
        android:layout_width="40dp"
        android:layout_height="40dp"
        android:id="@+id/iv_image5"
        android:layout_centerInParent="true"
        android:src="@mipmap/five"
        />

    <ImageView
        android:layout_width="40dp"
        android:layout_height="40dp"
        android:id="@+id/iv_image6"
        android:layout_centerInParent="true"
        android:src="@mipmap/six"
        />

    <ImageView
        android:layout_width="40dp"
        android:layout_height="40dp"
        android:id="@+id/iv_image7"
        android:layout_centerInParent="true"
        android:src="@mipmap/seven"
        />

    <ImageView
        android:layout_width="40dp"
        android:layout_height="40dp"
        android:id="@+id/iv_image8"
        android:layout_centerInParent="true"
        android:src="@mipmap/nine"
        />

    <ImageView
        android:layout_width="70dp"
        android:layout_height="70dp"
        android:id="@+id/iv_image9"
        android:layout_centerInParent="true"
        android:src="@mipmap/add"
        />
初始時圖片的全部疊加在一個位置,Activity中程式碼過多下面只粘出核心程式碼
 ObjectAnimator objectAnimator0 = ObjectAnimator.ofFloat(iv_images.get(0), "translationY", 0, -380F);
                ObjectAnimator objectAnimator1 = ObjectAnimator.ofFloat(iv_images.get(1), "translationY", 0, 380F);
                ObjectAnimator objectAnimator2 = ObjectAnimator.ofFloat(iv_images.get(2), "translationX", 0, -380F);
                ObjectAnimator objectAnimator3 = ObjectAnimator.ofFloat(iv_images.get(3), "translationX", 0, 380F);
                //
                ObjectAnimator objectAnimator4 = ObjectAnimator.ofFloat(iv_images.get(4), "translationX", 0, -300F);
                ObjectAnimator objectAnimator5 = ObjectAnimator.ofFloat(iv_images.get(4), "translationY", 0, -300F);
                //
                ObjectAnimator objectAnimator6 = ObjectAnimator.ofFloat(iv_images.get(5), "translationX", 0, 300F);
                ObjectAnimator objectAnimator7 = ObjectAnimator.ofFloat(iv_images.get(5), "translationY", 0, 300F);
                //
                ObjectAnimator objectAnimator8 = ObjectAnimator.ofFloat(iv_images.get(6), "translationX", 0, 300F);
                ObjectAnimator objectAnimator9 = ObjectAnimator.ofFloat(iv_images.get(6), "translationY", 0, -300F);
                //
                ObjectAnimator objectAnimator10 = ObjectAnimator.ofFloat(iv_images.get(7), "translationX", 0, -300F);
                ObjectAnimator objectAnimator11 = ObjectAnimator.ofFloat(iv_images.get(7), "translationY", 0, 300F);
                ObjectAnimator objectAnimator12 = ObjectAnimator.ofFloat(imageView, "alpha", 1.0f, 0.5f);
                AnimatorSet animatorSet = new AnimatorSet();
                animatorSet.setDuration(1000);
                animatorSet.setInterpolator(new BounceInterpolator());
                animatorSet.playTogether(objectAnimator12,objectAnimator0,objectAnimator1,objectAnimator2,objectAnimator3,objectAnimator4,objectAnimator5,objectAnimator6,objectAnimator7,objectAnimator8,objectAnimator9,objectAnimator10,objectAnimator11);
animatorSet.start(); animatorSet.play(objectAnimator0).with(objectAnimator1).before(objectAnimator3).after(objectAnimator4);
//替換下面
animatorSet.playTogether(objectAnimator12, objectAnimator0, objectAnimator1, objectAnimator2, objectAnimator3, objectAnimator4, objectAnimator5, objectAnimator6, objectAnimator7, objectAnimator8, objectAnimator9, objectAnimator10, objectAnimator11);效果圖

第三種情況既然動畫是用在控制元件或者佈局場景中的那麼就會有用到事件的動作監聽所以引入了AnimationListener 對於實現動畫的監聽有兩種方式一種只監聽動畫的結束動作
objectAnimator.addListener(new AnimatorListenerAdapter() {
            //只需實現這一個方法就好其它方法可以不用
            @Override
            public void onAnimationEnd(Animator animation) {
                super.onAnimationEnd(animation);
            }
});objectAnimator.addListener(new Animator.AnimatorListener() {
@Override
public void onAnimationStart(Animator animation) {
}
@Override
public void onAnimationEnd(Animator animation) {
}
@Override
public void onAnimationCancel(Animator animation) {
}
@Override
public void onAnimationRepeat(Animator animation) {
}
});<?xml version="1.0" encoding="utf-8"?>
<RelativeLayout xmlns:android="http://schemas.android.com/apk/res/android"
xmlns:tools="http://schemas.android.com/tools"
android:layout_width="match_parent"
android:layout_height="match_parent"
android:paddingBottom="@dimen/activity_vertical_margin"
android:paddingLeft="@dimen/activity_horizontal_margin"
android:paddingRight="@dimen/activity_horizontal_margin"
android:paddingTop="@dimen/activity_vertical_margin"
tools:context="bruse.com.animationlearn.AnimationListenerActivity">
<Button
android:id="@+id/id_tvlistener"
android:layout_width="250dp"
android:layout_height="wrap_content"
android:layout_centerInParent="true"
android:layout_marginTop="20dp"
android:background="@android:color/holo_green_light"
android:text="點我進行刪除"
android:textColor="@android:color/white"
android:textSize="18sp" />
</RelativeLayout>
ObjectAnimator objectAnimator = ObjectAnimator.ofFloat(btn_tv, "alph", 1.0f, 0.0f);
        objectAnimator.setDuration(500);
        objectAnimator.setInterpolator(new LinearInterpolator());

        //只需實現其中一個,實現所有方法用AnimationListener
        objectAnimator.addListener(new AnimatorListenerAdapter() {

            @Override
            public void onAnimationEnd(Animator animation) {
                super.onAnimationEnd(animation);
                ViewGroup parent = (ViewGroup) btn_tv.getParent();
                if (parent != null) {
                    parent.removeView(btn_tv);
                }

            }
        });
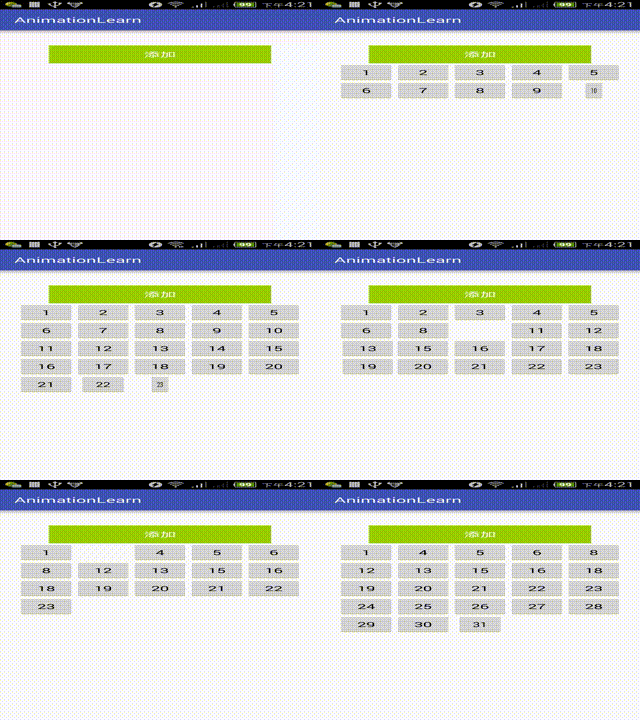
objectAnimator.start();4、佈局動畫 佈局動畫主要是通過LayoutTransition為佈局容器設定動畫,當容器中的控制元件位置或層次發生變化時起到過渡的效果。 佈局檔案:
<?xml version="1.0" encoding="utf-8"?>
<LinearLayout xmlns:android="http://schemas.android.com/apk/res/android"
    xmlns:tools="http://schemas.android.com/tools"
    android:id="@+id/id_container"
    android:layout_width="match_parent"
    android:layout_height="match_parent"
    android:orientation="vertical"
    android:padding="20dp"
    tools:context=".LayoutAnimationActivity">

    <Button
        android:id="@+id/id_add"
        android:layout_width="250dp"
        android:layout_height="wrap_content"
        android:layout_gravity="center_horizontal"
        android:layout_marginTop="20dp"
        android:background="@android:color/holo_green_light"
        android:text="新增"
        android:textColor="@android:color/white"
        android:textSize="18sp" />
</LinearLayout>public class LayoutAnimationActivity extends AppCompatActivity implements View.OnClickListener {
public static void launch(Activity activity) {
Intent intent = new Intent(activity, LayoutAnimationActivity.class);
activity.startActivity(intent);
}
private Button btn_add;
private ViewGroup viewGroup;
private GridLayout gridLayout;
private int mVal;
@Override
protected void onCreate(Bundle savedInstanceState) {
super.onCreate(savedInstanceState);
setContentView(R.layout.activity_layout_animation);
iniViews();
}
private void iniViews() {
btn_add = (Button) findViewById(R.id.id_add);
viewGroup = (ViewGroup) findViewById(R.id.id_container);
gridLayout = new GridLayout(this);
gridLayout.setColumnCount(5);
viewGroup.addView(gridLayout);
//動畫全部開啟
LayoutTransition transition = new LayoutTransition();
ObjectAnimator objectAnimator = ObjectAnimator.ofFloat(this, "scaleX", 0.0f, 1.0f);
transition.setAnimator(LayoutTransition.APPEARING, objectAnimator);
gridLayout.setLayoutTransition(transition);
btn_add.setOnClickListener(this);
}
@Override
public void onClick(View v) {
final Button button = new Button(this);
button.setText(++mVal + "");
gridLayout.addView(button);
button.setOnClickListener(new View.OnClickListener() {
@Override
public void onClick(View v) {
gridLayout.removeView(button);
}
});
}
}
LayoutTransition.APPEARING 當一個ViewGroup中出現一個新的View時為這個View設定動畫。
LayoutTransition.DISAPPEARING 當一個ViewGroup中消除一個View時為這個View設定動畫。
LayoutTransition.CHANGE_APPEARING 當ViewGroup出現新的View時這個View對其它View造成的影響對其它View設定動畫。
LayoutTransition.CHANGE_DISAPPEARIN 當ViewGroup中消除一個View時這個View對其它View造成的影響對其它View設定動畫。
特別要注意的是這個動畫是設定在哪個控制元件上的。
效果圖

基本目前常用的屬性動畫化都在這裡了~~~~~~謝謝大家的支援和關注。最後別忘了關注公眾號點選“二維碼激情裸聊”

