
python3.6 PIL + tkinter 實現帶UI的字元畫轉換器
阿新 • • 發佈:2018-11-10
閒著沒事就想著做點小東西調劑下,在知乎上看到了字元畫像,就想著用python實現這個功能,主要思路如下:
1、需要將圖片的轉化為灰度影象
2、將轉化後的灰度影象對映到字元上
3、通過for來轉化影象,主要考慮換行
4、將檔案儲存到本地資料夾
5、最後通過pyinstaller打包生成exe
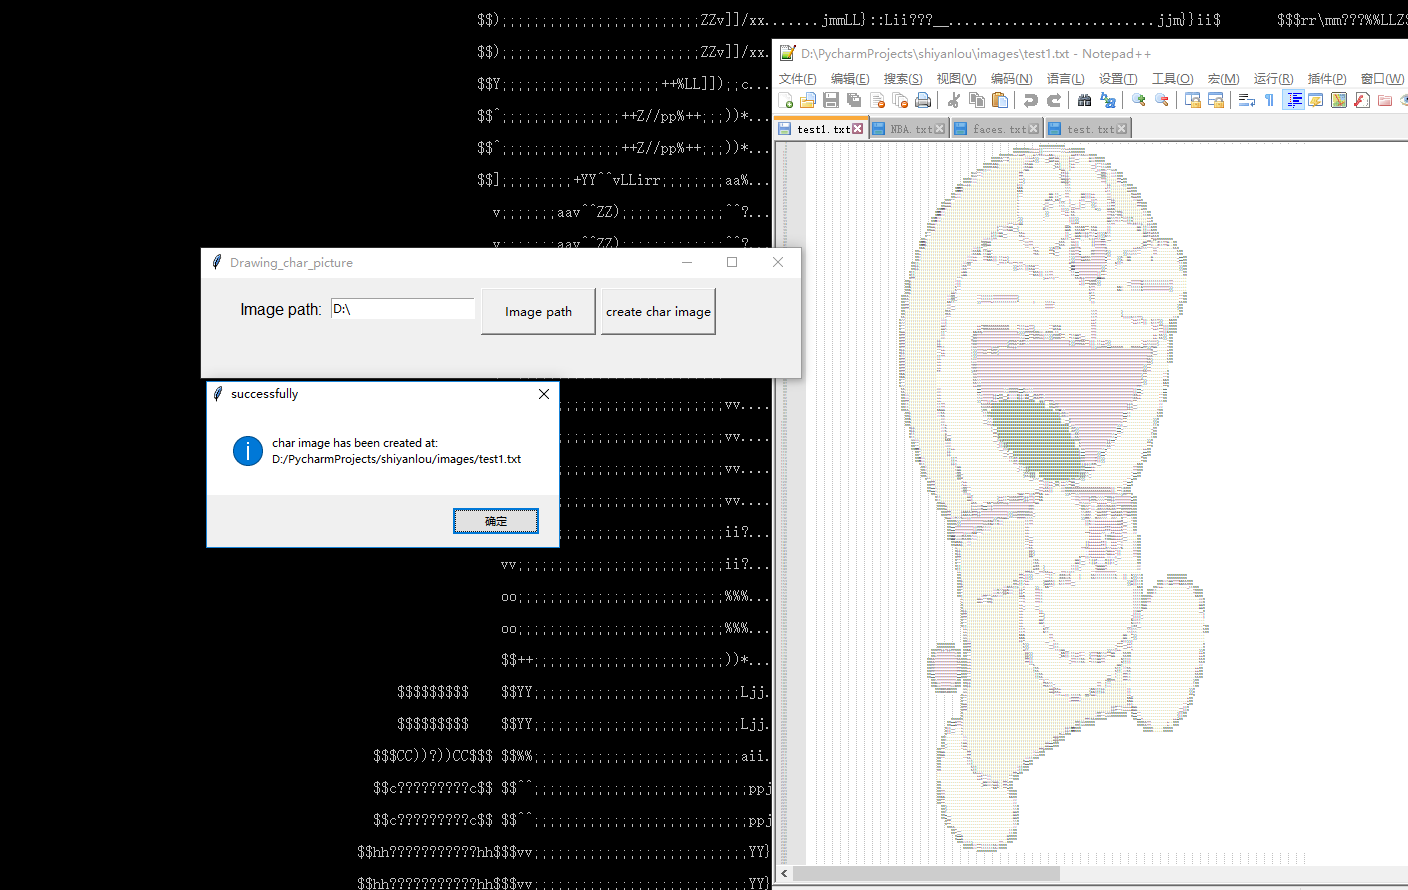
效果如圖:
程式碼如下:
from PIL import Image
import tkinter as tk
import tkinter.messagebox
from tkinter import filedialog
# Image file's path
file_path = "D:\\"
ascii_char = list("[email protected]%8&WM#*oahkbdpqwmZO0QLCJUYXzcvunxrjft/\|()1{}[]?-_+~<>i!lI;:,\"^`'. "
"[email protected]%8&WM#*oahkbdpqwmZO0QLCJUYXzcvunxrjft/\|()1{}[]?-_+~<>i!lI;:,\"^`'. "
"[email protected]%8&WM#*oahkbdpqwmZO0QLCJUYXzcvunxrjft/\|()1{}[]?-_+~<>i!lI;:,\"^`'. "
"LCJUYXzcvunxrjft/\|()1{}[]?-_+~<>i!lI;:,\"^`'. ")
# ascii_char = list("[email protected]#$%^&*()(*&^%$#@!>:}{:<=-`[email protected]#$%^&*()(*&>:}{:<=-`.^%$#@!>:}{:<=-`."
# "[email protected]#$%^&*()(*&^%!>:}{:<=-`[email protected]#$%^&*()(*&>:}{:<$#@=-`.^%$#@!>:}{:<=-`."
# "[email protected]#$%^%^&*()(*&>:}{:<=-`.^%$#@!>:}{:<=-`.&*()(*&^%$#@!>:}{:<=-`[email protected]#$"
# "[email protected]#$%^&*()(*&^%$#@!>:}{:<=-`[email protected]#$%^&*(")
# convert color to gray between[0,255]
def get_char(r, g, b, alpha = 256): # black is 0 white is 255
if alpha == 0:
return " "
# convert color to gray
gray = int(0.2126 * r + 0.7152 * g + 0.0722 * b)
index = int((gray / (alpha + 1)) * len(ascii_char))
# print(ascii_char[index])
return ascii_char[index]
# write char_image to disk
def write_file(out_file_name,content):
with open(out_file_name,"w") as f:
f.write(content)
# drawing the char image
def drawing(file_name= 'text.jpg', width = 250, height = 250,out_file_name = 'out_file'):
img = Image.open(file_name)
img.show()
img = img.resize((width, height), Image.NEAREST)
text = ""
for i in range(height):
for j in range(width):
text += get_char(*img.getpixel((j, i)))
text += '\n'
print(text)
write_file(out_file_name,text)
# select the image path
def select_image():
global file_path
file_path = filedialog.askopenfilename()
# print(file_path)
# this function used for button_creat command
def button_drawing():
out_file_path = file_path[:-3] + 'txt'
drawing(file_name=file_path, out_file_name= out_file_path)
tkinter.messagebox.showinfo(title='successfully', message='char image has been created at: ' + out_file_path)
# creat the mainwindow
def main_window_show():
window = tk.Tk()
window.title("Drawing_char_picture")
window.geometry('600x100')
label = tk.Label(window, text='Image path:', font=('Arial', 12), width=15, height=2)
label.place(x = 10, y = 10)
entry_path = tk.StringVar()
entry_path.set(file_path)
entry = tk.Entry(window, textvariable=entry_path)
entry.place(x = 130, y = 20)
button_path = tk.Button(window, text='Image path', width=15, height=2, command=select_image)
button_path.place(x = 280, y = 10)
button_creat = tk.Button(window, text='create char image', width=15, height=2, command=button_drawing)
button_creat.place(x=400, y=10)
window.mainloop()
if __name__ == '__main__':
main_window_show()
Windows Live