
第22天 常用模組三
介紹的模組
logging
hashlib
模組一:logging
人生三問
什麼是日誌
  對每天所發生的事情做的記錄就是日誌。

為什麼要用日誌
  日誌記錄了我們程式每天發生了什麼事情,這個對於我們程式的維護有很大的幫助。例如每天都會有同一個ip在嘗試登陸我們的
網站,如果我們沒有日誌就不會知道有這樣一個現象發生,可能在多年之後程式就會被攻破,但是如果有了日誌,我們就能即使的發
現程式的異常,並及時的修復它。

怎麼使用日誌?
預備知識:日誌級別
  1. debug  日常的除錯資訊  數字表示code為10
  2. info   常規資訊  code為20
  3. warning  提醒資訊  code為30
  4. error  錯誤資訊  code為40
  5. critical  常規的錯誤資訊  code為50
系統預設的級別是30
系統預設級別為warning,並列印到終端中:
# 錯誤資訊
logging.debug('除錯資訊')
logging.info('常規資訊')
logging.warning('提醒資訊')
logging.error('錯誤資訊')
logging.critical('重大錯誤資訊')

# 結果:
# WARNING:root:提醒資訊
# ERROR:root:錯誤資訊
# CRITICAL:root:重大錯誤資訊
日誌的基礎配置資訊
import logging # 配置日誌格式的時候無法通過basicConfig來配置編碼方式 format = '%(asctime)s - %(name)s - %(levelname)s -%(module)s: %(message)s' logging.basicConfig( filename='d.log', # 日誌的輸出的檔案,不寫預設是終端 filemode='a', # 這個是開啟檔案的格式,預設是追加寫入 level=logging.DEBUG, # 日誌的顯示級別,預設是warning以上 datefmt='%Y', # 顯示日期的格式,和format配套使用 format=format # 顯示日誌的格式 # stream:用指定的stream建立StreamHandler。# 可以指定輸出到sys.stderr,sys.stdout或者檔案,預設為sys.stderr。 # 若同時列出了filename和stream兩個引數,則stream引數會被忽略。 ) logging.debug('這是一個除錯資訊!') # 開啟檔案d.log,發現有亂碼


format引數中可能用到的格式化串:
%(name)s Logger的名字
%(levelno)s 數字形式的日誌級別
%(levelname)s 文字形式的日誌級別
%(pathname)s 呼叫日誌輸出函式的模組的完整路徑名,可能沒有
%(filename)s 呼叫日誌輸出函式的模組的檔名
%(module)s 呼叫日誌輸出函式的模組名
%(funcName)s 呼叫日誌輸出函式的函式名
%(lineno)d 呼叫日誌輸出函式的語句所在的程式碼行
%(created)f 當前時間,用UNIX標準的表示時間的浮 點數表示
%(relativeCreated)d 輸出日誌資訊時的,自Logger建立以 來的毫秒數
%(asctime)s 字串形式的當前時間。預設格式是 “2003-07-08 16:49:45,896”。逗號後面的是毫秒
%(thread)d 執行緒ID。可能沒有
%(threadName)s 執行緒名。可能沒有
%(process)d 程序ID。可能沒有
%(message)s使用者輸出的訊息
format引數中可能用到的格式化串
日誌系統的四個核心元件
1. logger 日誌生成器
2. filter 日誌過濾器
3. handler 日誌處理器,主要是用來呼叫formatter控制列印輸出
4. formatter 日誌格式定義
建立一個自己的日誌生成器:
import logging
# 1. 建立一個日誌生成器
my_logger = logging.getLogger('my_logger')
# 1.1 設定日誌生成器的級別
my_logger.setLevel(logging.DEBUG)
# 2. 建立一個日誌處理器, 此處可以設定編碼方式
my_handler = logging.FileHandler('f.log', 'a', encoding='utf-8')
# 3. 建立一個日誌格式定義
my_formatter = logging.Formatter(format)
# 4. 關聯生成器處理器
my_logger.addHandler(my_handler)
# 5. 關聯處理器和格式定義
my_handler.setFormatter(my_formatter)

my_logger.debug('這是一個debug資訊!')
# 檔案資訊:
2018-10-18 15:26:37,668 - my_logger - DEBUG -log模組練習: 這是一個debug資訊!
日誌的繼承:
import logging
# 建立三個日誌生成器
log1 = logging.getLogger('father')
log2 = logging.getLogger('father.son')
log3 = logging.getLogger('father.son.chiren')


# 建立日誌處理器
log1_handler = logging.FileHandler('g.log', 'a', encoding='utf-8')
# log2_handler = logging.FileHandler('g.log', 'a', encoding='utf-8')
# log3_handler = logging.FileHandler('g.log', 'a', encoding='utf-8')

# 建立一個formatter
format1 = '%(asctime)s - %(name)s - %(levelname)s -%(module)s:  %(message)s'
log_format = logging.Formatter(format1)

# 關聯生成器,處理器和定義格式
log1.addHandler(log1_handler)
log2.addHandler(log1_handler)
log3.addHandler(log1_handler)

log1_handler.setFormatter(log_format)

# 生成日誌
# log1.debug('father_log')  # 此時是建立了g.log檔案,但是檔案是空的,因為預設的級別是warning
# log1.warning('father_log') # 此時檔案內容:2018-10-18 18:15:09,940 - father - WARNING -log模組練習:  father_log

# log2.warning('father.son.log')
# 此時檔案內容為:因為此時father繼承了son的日誌
# 2018-10-18 18:15:09,940 - father - WARNING -log模組練習:  father_log
# 2018-10-18 18:16:20,146 - father.son - WARNING -log模組練習:  father.son.log
# 2018-10-18 18:16:20,146 - father.son - WARNING -log模組練習:  father.son.log

log3.warning('father.son.chiren.log')
# 此時檔案內容又增加了三條,因為此時繼承log3日誌有兩個父級
# 2018-10-18 18:15:09,940 - father - WARNING -log模組練習:  father_log
# 2018-10-18 18:16:20,146 - father.son - WARNING -log模組練習:  father.son.log
# 2018-10-18 18:16:20,146 - father.son - WARNING -log模組練習:  father.son.log
# 2018-10-18 18:18:32,956 - father.son.chiren - WARNING -log模組練習:  father.son.chiren.log
# 2018-10-18 18:18:32,956 - father.son.chiren - WARNING -log模組練習:  father.son.chiren.log
# 2018-10-18 18:18:32,956 - father.son.chiren - WARNING -log模組練習:  father.son.chiren.log
練習: 建立一個日誌生成器,讓日誌可以以三種不同的格式寫入檔案和列印到終端中
import logging
# 建立一個日誌生成器
logger = logging.getLogger(__file__)

# 建立三個不同的處理器列印到終端和檔案中
logger_handler1 = logging.FileHandler('ceshi1.log', encoding='utf-8')
logger_handler2 = logging.FileHandler('ceshi2.log', encoding='utf-8')  # 日誌輸出到兩個檔案中
logger_handler3 = logging.StreamHandler()  # 列印到終端

# 建立三種格式,格式對應
logger_format1 = logging.Formatter(
    '%(asctime)s - %(name)s - %(funcName)s - %(module)s - %(message)s',
    datefmt='%Y-%m-%d %X %p'
)
logger_format2 = logging.Formatter(
    '%(asctime)s - %(name)s - %(funcName)s - %(module)s - %(lineno)s - %(message)s',
    datefmt='%Y-%m-%d %X %p'
)
logger_format3 = logging.Formatter('%(module)s - %(message)s ')

# 處理器關聯定義格式
logger_handler1.setFormatter(logger_format1)
logger_handler2.setFormatter(logger_format2)
logger_handler3.setFormatter(logger_format3)

# 設定日誌級別
logger.setLevel(logging.DEBUG)
# 新增處理器
logger.addHandler(logger_handler1)
logger.addHandler(logger_handler2)
logger.addHandler(logger_handler3)

# 輸出日誌
logger.debug('這是一個debug資訊! ')


# 輸出資訊:
'''
終端:log模組練習 - 這是一個debug資訊!
ceshi1.log檔案:2018-10-18 18:36:19 PM - H:/python_study/day22/log模組練習.py - <module> - log模組練習 - 這是一個debug資訊!
ceshi2.log檔案:2018-10-18 18:36:19 PM - H:/python_study/day22/log模組練習.py - <module> - log模組練習 - 95 - 這是一個debug資訊!

'''
測試程式碼
案例分享:
通過logging讀出來日誌配置檔案並可以使用
建立規範化目錄的小工具:
import os, sys

dir_list = ['conf', 'core', 'bin', 'lib', 'db', 'log']

def create_dir(parent_path, dir_list):
    '''
    在一個目錄下面建立規範目錄
    :param parent_path: 需要建立的資料夾, 是全域性路徑
    :param dir_list: 建立的規範目錄列表
    :return: 建立成功返回True
    '''
    # 先規範化目錄
    parent_path = os.path.normpath(parent_path)
    # 迴圈列表拼接目錄並且建立
    for dir in dir_list:
        # 當前需要建立的目錄路徑
        current_dir = os.path.join(parent_path, dir)
        # 路徑不存在則建立目錄
        if not os.path.exists(current_dir):
            os.mkdir(current_dir)

if os.path.isdir(sys.argv[1]):
    create_dir(sys.argv[1], dir_list)
else:
    print('Usag: python current_exec_file parent_dir_path!')
在一個目錄下面建立規範目錄
初始化操作: 建立規範目錄,並建立logging配置檔案
檔案內容:
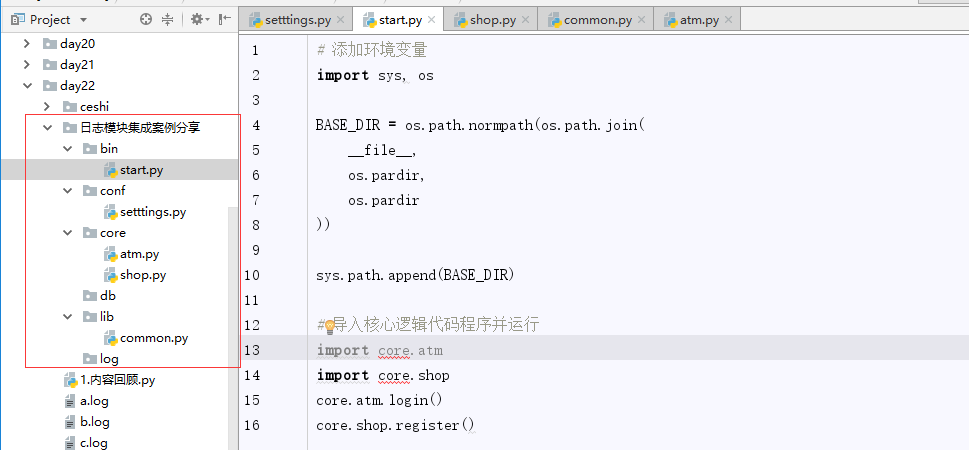
# star.py檔案內容

# 新增環境變數
import sys, os

BASE_DIR = os.path.normpath(os.path.join(
    __file__,
    os.pardir,
    os.pardir
))

sys.path.append(BASE_DIR)

# 匯入核心邏輯程式碼程式並執行
import core.atm
import core.shop
core.atm.login()
core.shop.register()

# atm.py檔案內容
def login():
    print('loggin')
# shop.py檔案內容
def register():
    print('register')
檔案內容
問題1:此時執行核心程式碼的login和register都是可以正常執行的,但是當他們執行的時候我想去往日誌檔案中寫入日誌,但是我又不想每次通過上面的方式手動的建立一個日誌生成器,然後配置一些內容。說白了就是想把日誌資訊儲存到配置檔案中,每次想用的時候呼叫一下就可以了,因此寫入配置檔案settings的內容如下:
日誌字典的解析
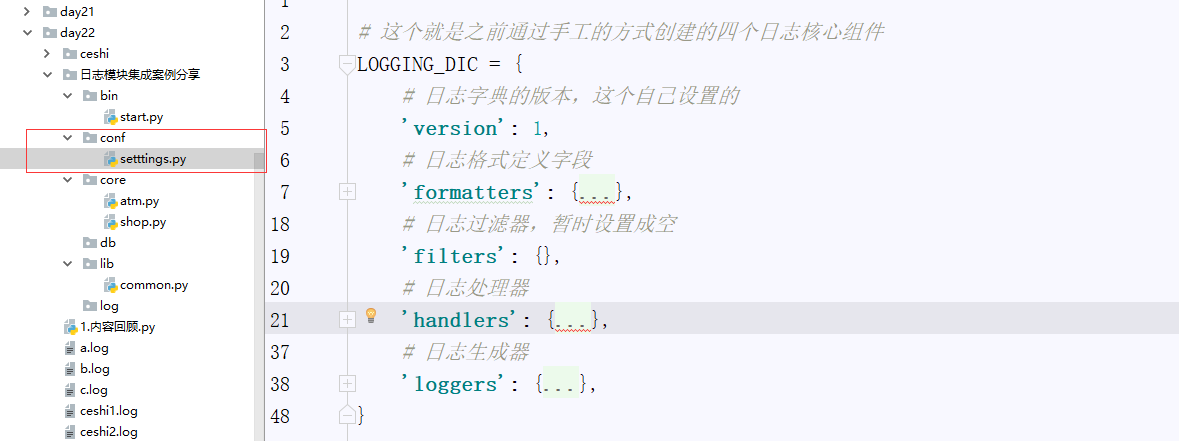
import os, sys
STANDARD_FORMAT = '%(asctime)s %(name)s %(funcName)s %(module)s %(message)s'
SIMPLE_FORMAT = '%(asctime)s %(module)s %(message)s'
COMPLETE_FORMAT = '%(asctime)s %(name)s %(funcName)s %(lineon)s %(module)s %(message)s'

# 拼接日誌檔案儲存路徑
LOGFILE_PATH = os.path.normpath(os.path.join(
    __file__,
    os.pardir,
    os.pardir,
    'log',
    'a.log'))

print(LOGFILE_PATH)

# 這個就是之前通過手工的方式建立的四個日誌核心元件
LOGGING_DIC = {
    # 日誌字典的版本,這個自己設定的
    'version': 1,
    # 日誌格式定義欄位,通過一定格式的字串進行建立
    'formatters': {
        # 定義了日誌的表示格式標準格式,簡單格式和完整格式
        'standard': {
            'format': STANDARD_FORMAT
        },
        # 簡單格式
        'simple': {
            'format': SIMPLE_FORMAT
        },
        # 完整格式
        "complete":{
            "format": COMPLETE_FORMAT
        }
    },
    # 日誌過濾器,暫時設定成空
    'filters': {},
    # 日誌處理器
    'handlers': {
        # 定義了兩種日誌處理器
        # 把日誌內容列印到終端
        'console': {
            'level': 'DEBUG',  # 日誌級別
            'class': 'logging.StreamHandler',  # 日誌流處理器
            'formatter': 'simple'   # 使用的列印格式是上面設定的simple
        },
        'default': {
            'level': 'DEBUG',
            'class': 'logging.handlers.RotatingFileHandler',   # 設定檔案通過一定大小之後就換檔案
            'formatter': 'standard',  # 寫入檔案的格式是上面定義的標準格式
            'filename': LOGFILE_PATH,  # 寫入檔案的路徑
            'maxBytes': 1024 * 1024 * 5,  # 日誌檔案的最大大小為5M 超出後 換檔案
            'backupCount': 5, # 最多留五個日誌檔案
            'encoding': 'utf-8', # 寫入的時候編碼方式
        },
    },
    # 日誌生成器
    'loggers': {
        # 在getLogger的時候  如果指定的名稱 不存在 或者不給名稱 用的就是預設的
        # 在這裡如果key為空 它就是預設的
        # 你可以自己定義生成器的名稱 並且他們還能使用相同的預設配置
        '': {
            'handlers': ['default', 'console'],
            'level': 'DEBUG',
            'propagate': False,
        },
    },
}
日誌配置字典
問題2:日誌檔案配置完成之後,首先我們應該考慮的時候日誌生成器應該放在哪個檔案裡面,atm或者shop核心程式碼在執行的時候都是要進行記錄日誌的,因此我們應該把日誌生成器函式寫在一個公共元件裡面以便於後續的呼叫,但是我們應該怎麼去建立一個日誌生成器呢?首先在common裡面寫入我們的日誌生成器程式碼
# 匯入日誌模組和配置檔案
import logging.config
import conf.settings


def create_logger():
    # 將配置檔案匯入到logging中
    logging.config.dictConfig(config=conf.settings.LOGGING_DIC)
    # 根據配置檔案獲得一個關聯了日誌處理器和格式的生成器
    logger = logging.getLogger('loggers')
    logger.debug('這是一個debug檔案')
配置atm.py檔案為下:
# 匯入日誌模組
import lib.common

def login():
    print('loggin')
    # 當函式執行完成之後寫入日誌
    lib.common.create_logger()
執行start檔案之後發現
終端中輸出:
2018-10-18 19:54:25,557 common 這是一個debug檔案
log目錄下建立了一個檔案內容為:
2018-10-18 19:54:25,557 loggers create_logger common 這是一個debug檔案
問題3:此時我們的日誌模組基本上是已經建立完成了,但是還有一些小小的問題,就是我們希望的是可以在函式內自定義輸入日誌的內容,而不是由公共元件給我們定義輸入的內容。也就是說我們的公共元件create_logger應該給我們返回一個日誌生成器,然後在函式中獲得此生成器,往檔案中寫入我們想要的內容。
修改common.py檔案如下:
# 匯入日誌模組和配置檔案
import logging.config
import conf.settings


def create_logger():
    # 將配置檔案匯入到logging中
    logging.config.dictConfig(config=conf.settings.LOGGING_DIC)
    # 根據配置檔案獲得一個關聯了日誌處理器和格式的生成器
    return logging.getLogger('loggers')
修改atm.py檔案內容如下:
# 匯入日誌模組
import lib.common

def login():
    print('loggin')
    # 當函式執行完成之後寫入日誌
    lib.common.create_logger().debug('今天我登陸了atm取款機!')
重新執行start.py檔案發現沒有問題,至此我們通過配置檔案建立日誌格式的內容就算大功告成了!
模組二:hashlib
人生三問
什麼是hash
  hash是一種將任意長度的資料經過計算返回固定長度特徵碼的演算法。
為什麼要用hash
  1. 無論值多大,hash值都是一樣長度的
  2. 同一個值hash值是一樣的, 不同的值hash是不一樣的
  3. 不會被反解
  基於上述特點,我們可以使用hash對資料進行完整性校驗。

怎麼使用hashlib
  hashlib封裝了一系列的雜湊演算法,我們可以通過hexdigest得到相應的的雜湊值

注意的是:hash演算法只能計算位元組,也就是說傳入的值必須是位元組型別的。
使用方法:
# 把一段很長的資料update多次與一次update這段資料是一樣的
import hashlib
# 一段很長的資料helloalvin
m2 = hashlib.md5()
m2.update('helloalvin'.encode('utf-8'))
print(m2.hexdigest())  # 92a7e713c30abbb0319fa07da2a5c4af

# 直接當引數傳遞進去也是一樣的
m3 = hashlib.md5('helloalvin'.encode('utf-8'))
print(m3.hexdigest())  # 92a7e713c30abbb0319fa07da2a5c4af


# 拆分開之後計算hash值
m = hashlib.md5()
print(m.hexdigest()) # d41d8cd98f00b204e9800998ecf8427e

m.update('hello'.encode('utf-8')) # 5d41402abc4b2a76b9719d911017c592
print(m.hexdigest())

m.update('alvin'.encode('utf-8'))  # 92a7e713c30abbb0319fa07da2a5c4af
print(m.hexdigest())
問題:撞庫
撞庫
  因為雜湊計算的其中一個特點是一樣的值通過一樣的方法得到的值一定是一樣的,也就是說密碼123的雜湊值一定是202cb962ac59075b964b07152d234b70
這樣子如果有人事先儲存了值這一對值,當出現這個雜湊值的時候我們就會知道你使用的密碼是123。
  但是庫也是有限的,也是大部分經常出現的資料,因此我們只要把密碼設定的相對複雜一點,反解是肯定反解不出來的。
模擬撞庫:
# 模擬撞庫
import hashlib
# 密碼
password = [
    'hello',
    'alexhello',
    'egonhello',
    'nihaohello',
    'hello,world',
]


def create_password_dict(password):
    temp_dict = {}
    for password_item in password:
        # 計算密碼的md5校驗值
        hash = hashlib.md5(password_item.encode('utf-8'))
        temp_dict[hash.hexdigest()] = password_item
    # 返回一個密碼與password的一個字典庫
    print(temp_dict)
    return temp_dict

def pojie_password(hash, password_dict):
    # 如果密碼庫中存在則返回密碼
    if hash in password_dict:
        return password_dict[hash]


# 得到密碼庫
password_lib = create_password_dict(password)
# 獲得密碼
ps = pojie_password('5d41402abc4b2a76b9719d911017c592', password_lib)
if ps:
    print('密碼為===》%s' % ps)
else:
    print('密碼庫中暫時還沒有,請稍等!')
撞庫的實現
另一個加密模組:hmac必須要加鹽
import hmac
# 這個裡面傳入的值是祕鑰
h = hmac.new('miyao'.encode('utf-8'))
# 這個是密碼
h.update('henchangdemima'.encode('utf-8'))
print(h.hexdigest())   # c3ffabf0cf7eef648ba783c9673a54d1


# 拆分密碼
# 密碼不能改變,否則出來的結果不一樣
h1 = hmac.new('miyao'.encode('utf-8'))

h1.update('henchang'.encode('utf-8'))
h1.update('de'.encode('utf-8'))
h1.update('mima'.encode('utf-8'))

print(h1.hexdigest())  # c3ffabf0cf7eef648ba783c9673a54d1
hmac