172322 2018-2019-1 《程式設計與資料結構》實驗二報告
阿新 • • 發佈:2018-11-11
172322 2018-2019-1 《程式設計與資料結構》實驗二報告
- 課程:《程式設計與資料結構》
- 班級: 1723
- 姓名: 張昊然
- 學號:20172322
- 實驗教師:王志強
- 助教:張之睿/張師瑜
- 實驗日期:2018年11月10日
- 必修/選修: 必修
1.實驗內容
- 此處填寫實驗的具體內容:
實驗內容過多,故參考作業:
- 實驗二-1-實現二叉樹
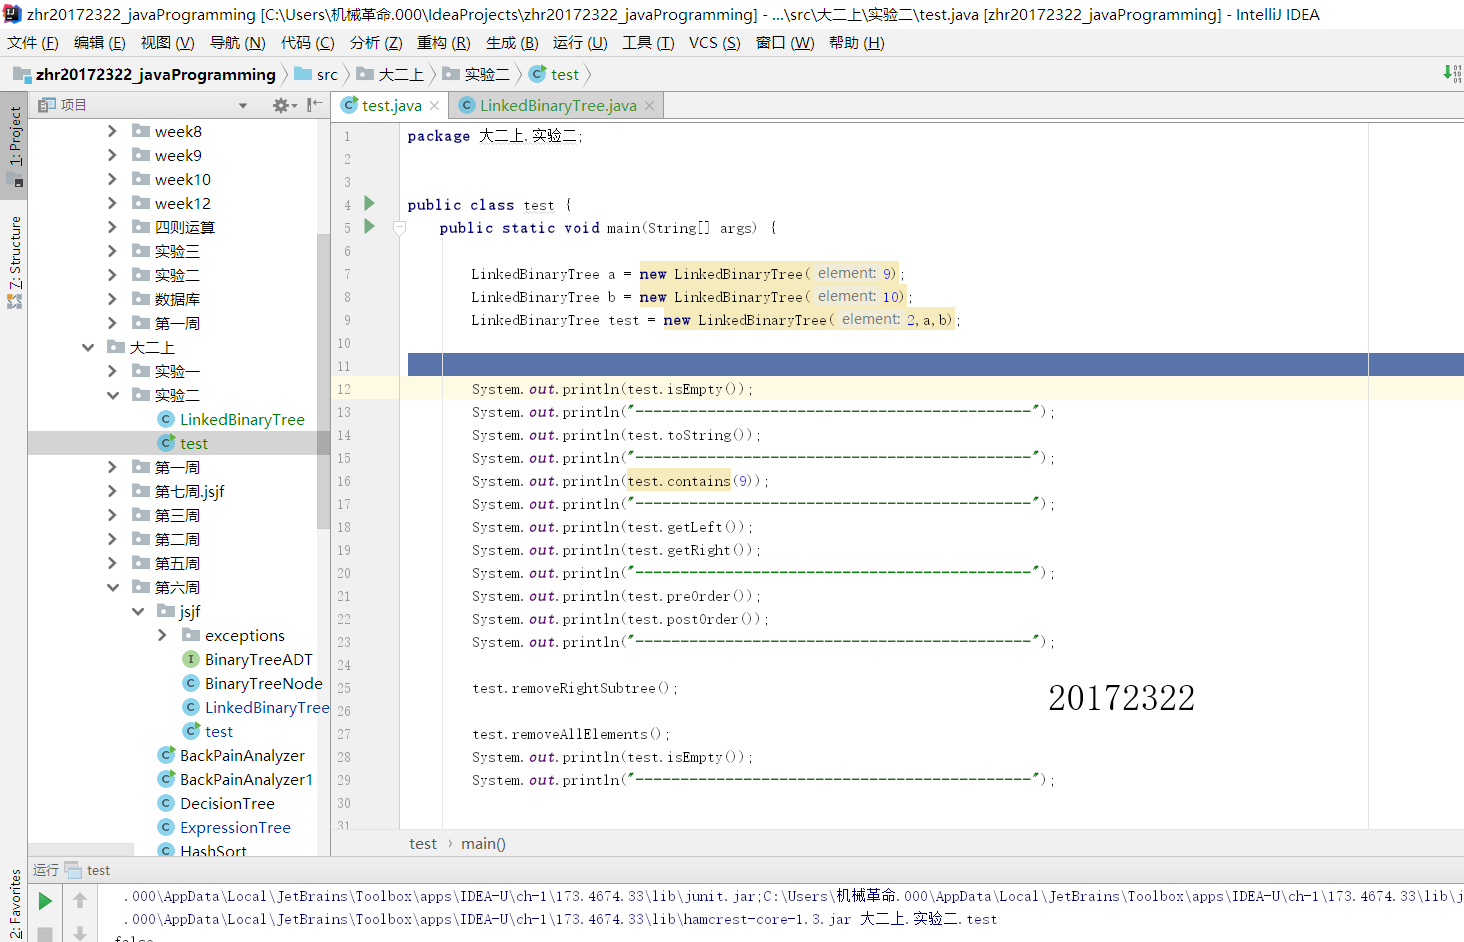
- 參考教材p212,完成鏈樹LinkedBinaryTree的實現(getRight,contains,toString,preorder,postorder), 用JUnit或自己編寫驅動類對自己實現的LinkedBinaryTree進行測試,提交測試程式碼執行截圖,要全屏,包含自己的學號資訊。
- 實驗二 樹-2-中序先序序列構造二叉樹
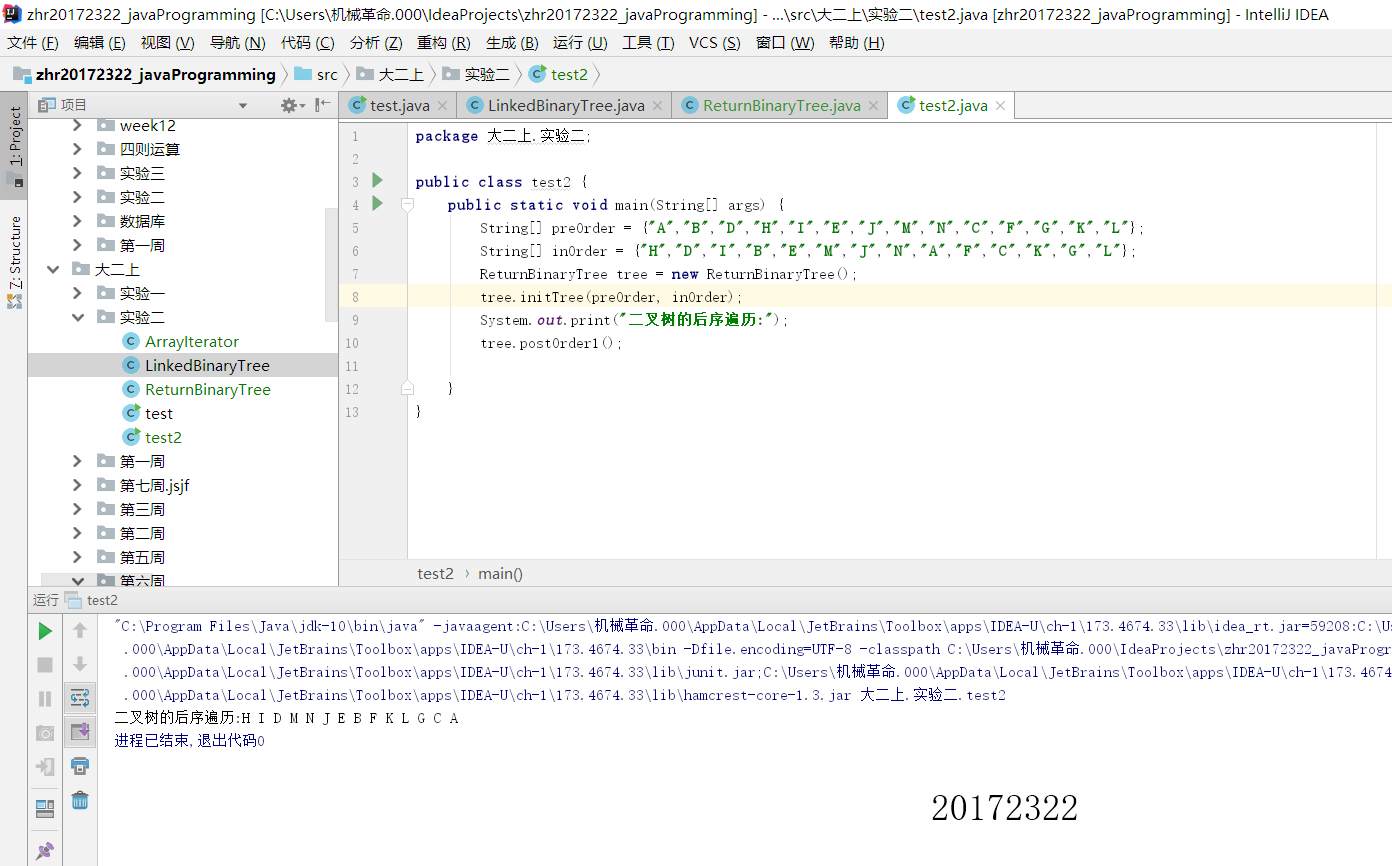
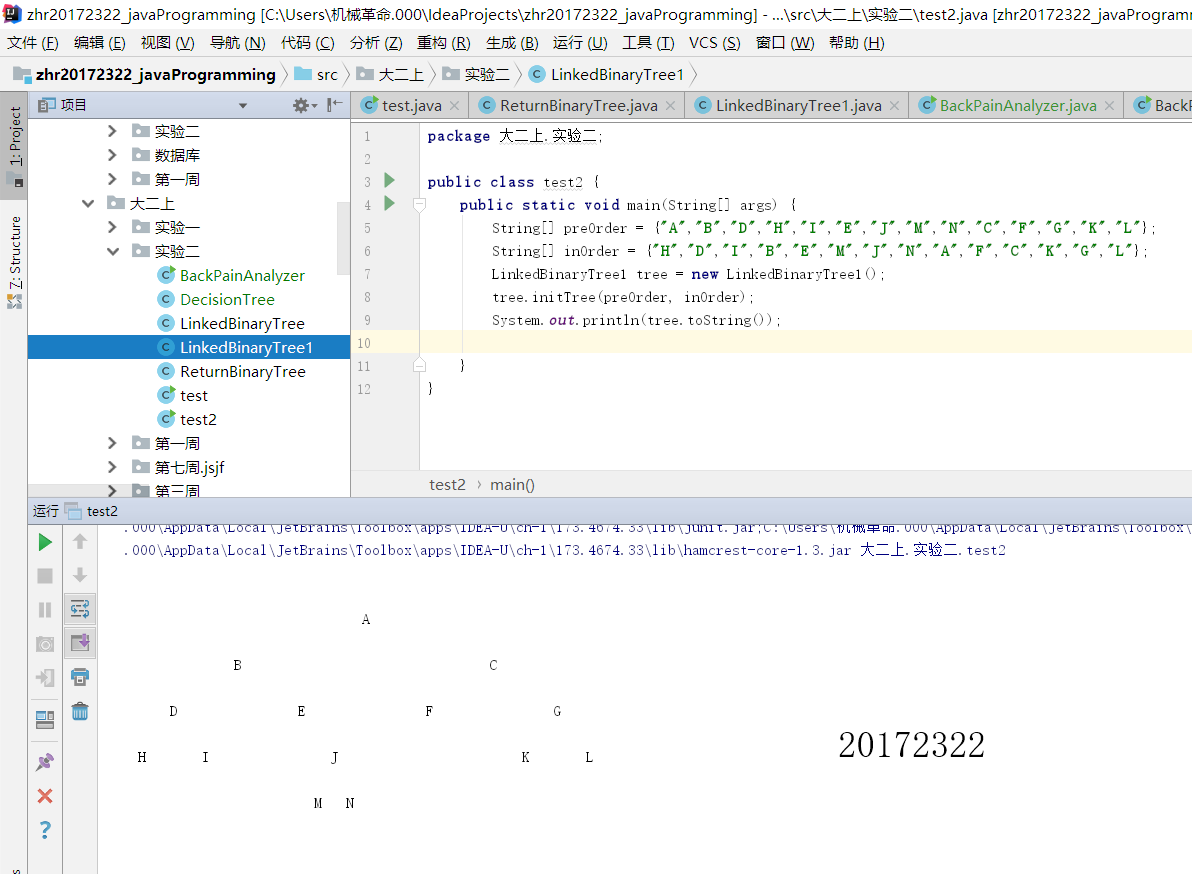
- 基於LinkedBinaryTree,實現基於(中序,先序)序列構造唯一一棵二㕚樹的功能,比如給出中序HDIBEMJNAFCKGL和後序ABDHIEJMNCFGKL,構造出附圖中的樹,用JUnit或自己編寫驅動類對自己實現的功能進行測試,提交測試程式碼執行截圖,要全屏,包含自己的學號資訊
- 實驗二 樹-3-決策樹
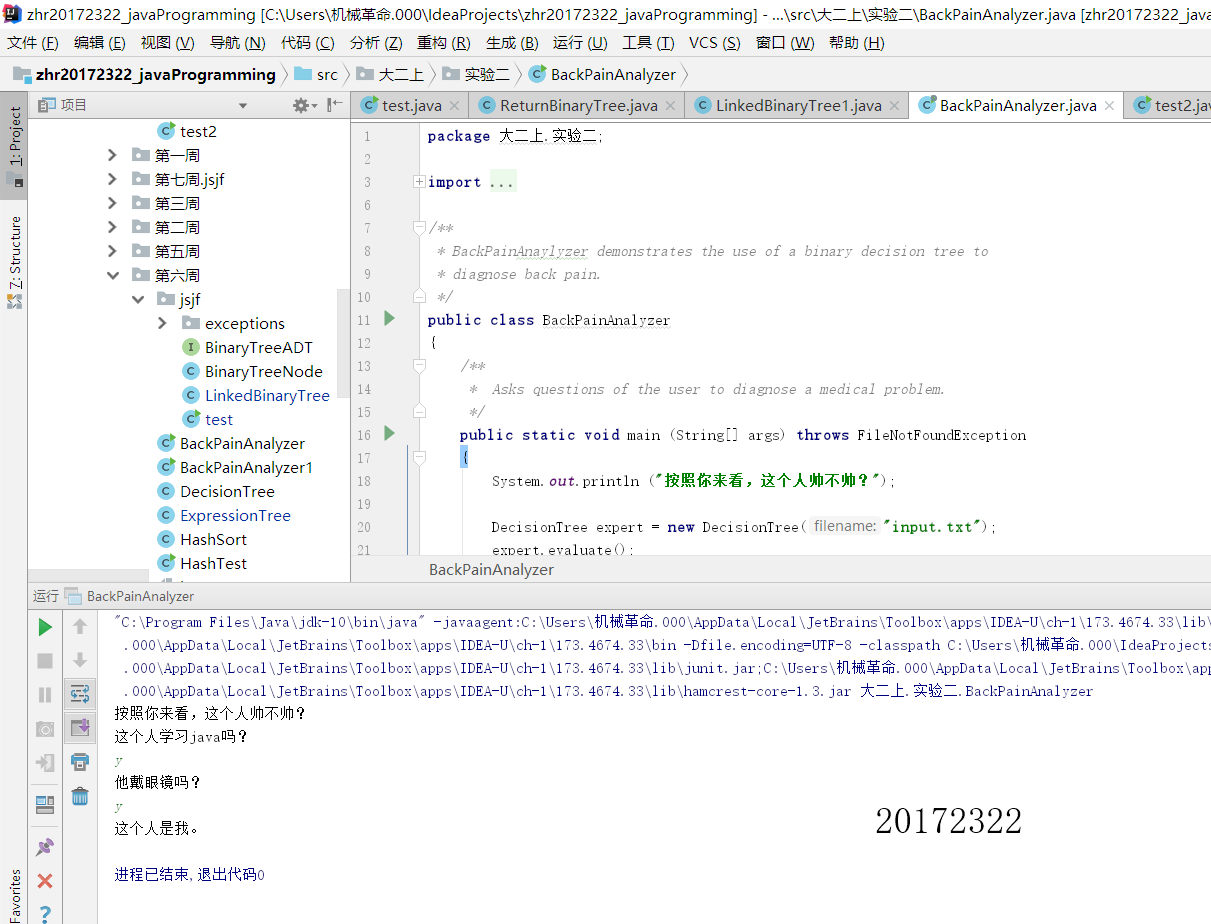
- 自己設計並實現一顆決策樹
- 實驗二 樹-4-表示式樹
- 輸入中綴表示式,使用樹將中綴表示式轉換為字尾表示式,並輸出字尾表示式和計算結果(如果沒有用樹,則為0分)
- 實驗二 樹-5-二叉查詢樹
- 完成PP11.3
- 實驗二 樹-6-紅黑樹分析
- 參考http://www.cnblogs.com/rocedu/p/7483915.html對Java中的紅黑樹(TreeMap,HashMap)進行原始碼分析,並在實驗報告中體現分析結果。
2.實驗過程及結果
過程:
- 本次實驗總共五個提交點。我也分為五個部分來寫過程。
- 第一:要求實現
getRight,contains,toString,preorder,postorder,這些分別是得到右孩子,是否包含,輸出,前序遍歷,後續遍歷,關鍵程式碼如下:
    public LinkedBinaryTree1<T> getRight()
    {
        if(root == null) {
            throw new EmptyCollectionException("BinaryTree");
        }
        LinkedBinaryTree1<T> result = new LinkedBinaryTree1<>();
        result.root = root.getRight();
        return result;

            public boolean contains(T targetElement)
    {
        BinaryTreeNode node = root;
        BinaryTreeNode temp = root;
        boolean result = false;

        if (node == null){
            result = false;
        }
        if (node.getElement().equals(targetElement)){
            result = true;
        }
        while (node.right != null){
            if (node.right.getElement().equals(targetElement)){
                result = true;
                break;
            }
            else {
                node = node.right;
            }
        }
        while (temp.left.getElement().equals(targetElement)){
            if (temp.left.getElement().equals(targetElement)){
                result = true;
                break;
            }
            else {
                temp = temp.left;
            }
        }
        return result;
    }

        public String toString()
    {
        UnorderedListADT<BinaryTreeNode<String>> nodes =
                new ArrayUnorderedList<BinaryTreeNode<String>>();
        UnorderedListADT<Integer> levelList =
                new ArrayUnorderedList<Integer>();
        BinaryTreeNode<String> current;
        String result = "";
        int printDepth = this.getHeight();
        int possibleNodes = (int)Math.pow(2, printDepth + 1);
        int countNodes = 0;

        nodes.addToRear((BinaryTreeNode<String>) root);
        Integer currentLevel = 0;
        Integer previousLevel = -1;
        levelList.addToRear(currentLevel);

        while (countNodes < possibleNodes)
        {
            countNodes = countNodes + 1;
            current = nodes.removeFirst();
            currentLevel = levelList.removeFirst();
            if (currentLevel > previousLevel)
            {
                result = result + "\n\n";
                previousLevel = currentLevel;
                for (int j = 0; j < ((Math.pow(2, (printDepth - currentLevel))) - 1); j++) {
                    result = result + " ";
                }
            }
            else
            {
                for (int i = 0; i < ((Math.pow(2, (printDepth - currentLevel + 1)) - 1)) ; i++)
                {
                    result = result + " ";
                }
            }
            if (current != null)
            {
                result = result + (current.getElement()).toString();
                nodes.addToRear(current.getLeft());
                levelList.addToRear(currentLevel + 1);
                nodes.addToRear(current.getRight());
                levelList.addToRear(currentLevel + 1);
            }
            else {
                nodes.addToRear(null);
                levelList.addToRear(currentLevel + 1);
                nodes.addToRear(null);
                levelList.addToRear(currentLevel + 1);
                result = result + " ";
            }

        }

        return result;
    }

        protected void preOrder(BinaryTreeNode<T> node,
                            ArrayUnorderedList<T> tempList)
    {
        if (node != null){
            tempList.addToRear(node.getElement());
            preOrder(node.getLeft(),tempList);
            preOrder(node.getRight(),tempList);
        }
    }

        protected void postOrder(BinaryTreeNode<T> node,
                             ArrayUnorderedList<T> tempList)
    {
        if (node != null){
            postOrder(node.getLeft(),tempList);
            postOrder(node.getRight(),tempList);
            tempList.addToRear(node.getElement());
        }
    }

    }
- 第二:利用中序和先序構建唯一的樹,關鍵程式碼如下:
    public BinaryTreeNode initTree(String[] preOrder, int start1, int end1, String[] inOrder, int start2, int end2) {
        if (start1 > end1 || start2 > end2) {
            return null;
        }
        String rootData = preOrder[start1];
        BinaryTreeNode head = new BinaryTreeNode(rootData);
        //找到根節點所在位置
        int rootIndex = findIndexInArray(inOrder, rootData, start2, end2);
        //構建左子樹
        BinaryTreeNode left = initTree(preOrder, start1 + 1, start1 + rootIndex - start2, inOrder, start2, rootIndex - 1);
        //構建右子樹
        BinaryTreeNode right = initTree(preOrder, start1 + rootIndex - start2 + 1, end1, inOrder, rootIndex + 1, end2);
        head.left = left;
        head.right = right;
        return head;
    }
    }
第三:對於書上的背部疼痛診斷器簡單修改,無需放上。
第四:本次實驗唯一的難點,關鍵程式碼:
    public static String  toSuffix(String infix) {
        String result = "";
        String[] array = infix.split("\\s+");
        Stack<LinkedBinaryTree> num = new Stack();
        Stack<LinkedBinaryTree> op = new Stack();

        for (int a = 0; a < array.length; a++) {
            if (array[a].equals("+") || array[a].equals("-") || array[a].equals("*") || array[a].equals("/")) {
                if (op.empty()) {
                    op.push(new LinkedBinaryTree<>(array[a]));
                } else {
                    if ((op.peek().root.element).equals("+") || (op.peek().root.element).equals("-") && array[a].equals("*") || array[a].equals("/")) {
                        op.push(new LinkedBinaryTree(array[a]));
                    } else {
                        LinkedBinaryTree right = num.pop();
                        LinkedBinaryTree left = num.pop();
                        LinkedBinaryTree temp = new LinkedBinaryTree(op.pop().root.element, left, right);
                        num.push(temp);
                        op.push(new LinkedBinaryTree(array[a]));
                    }
                }

            } else {
                num.push(new LinkedBinaryTree<>(array[a]));
            }
        }
        while (!op.empty()) {
            LinkedBinaryTree right = num.pop();
            LinkedBinaryTree left = num.pop();
            LinkedBinaryTree temp = new LinkedBinaryTree(op.pop().root.element, left, right);
            num.push(temp);
        }
        Iterator itr=num.pop().iteratorPostOrder();
        while (itr.hasNext()){
            result+=itr.next()+" ";
        }
        return result;
    }
- 第五:執行PP11.3之前的作業。
- 第六:對Java中的紅黑樹(TreeMap,HashMap)進行原始碼分析。
紅黑樹(TreeMap,HashMap)原始碼分析。
- 首先是對儲存結構進行分析,利用備註的形式在程式碼中標出。
   static final class Entry<K,V> implements Map.Entry<K,V> {
        K key; // 鍵
        V value; // 值
        Entry<K,V> left = null; // 左孩子
        Entry<K,V> right = null; // 右孩子
        Entry<K,V> parent; // 雙親節點
        boolean color = BLACK; // 當前節點顏色
        // 建構函式
        Entry(K key, V value, Entry<K,V> parent) {
            this.key = key;
            this.value = value;
            this.parent = parent;
        }
}- 之後是對
TreeMap的構造方法進行分析,TreeMap一共四個構造方法。
1.無引數構造方法
public TreeMap() {
    comparator = null;
}
2.帶有比較器的構造方法
public TreeMap(Comparator<? super K> comparator) {
    this.comparator = comparator;
}
3.帶Map的構造方法
public TreeMap(Map<? extends K, ? extends V> m) {
    comparator = null;
    putAll(m);
}
4.帶有SortedMap的構造方法
public TreeMap(SortedMap<K, ? extends V> m) {
    comparator = m.comparator();
    try {
        buildFromSorted(m.size(), m.entrySet().iterator(), null, null);
    } catch (java.io.IOException cannotHappen) {
    } catch (ClassNotFoundException cannotHappen) {
    }
} - 對於第三個帶Map的構造方法,該方法不指定比較器,呼叫putAll方法將Map中的所有元素加入到TreeMap中。putAll的原始碼如下:
    // 將map中的全部節點新增到TreeMap中
    public void putAll(Map<? extends K, ? extends V> map) {
        // 獲取map的大小
        int mapSize = map.size();
        // 如果TreeMap的大小是0,且map的大小不是0,且map是已排序的“key-value對”
        if (size==0 && mapSize!=0 && map instanceof SortedMap) {
            Comparator c = ((SortedMap)map).comparator();
            // 如果TreeMap和map的比較器相等;
            // 則將map的元素全部拷貝到TreeMap中,然後返回!
            if (c == comparator || (c != null && c.equals(comparator))) {
                ++modCount;
                try {
                    buildFromSorted(mapSize, map.entrySet().iterator(),
                                null, null);
                } catch (java.io.IOException cannotHappen) {
                } catch (ClassNotFoundException cannotHappen) {
                }
                return;
            }
        }
        // 呼叫AbstractMap中的putAll();
        // AbstractMap中的putAll()又會呼叫到TreeMap的put()
        super.putAll(map);
    }
顯然,如果Map裡的元素是排好序的,就呼叫buildFromSorted方法來拷貝Map中的元素,這在下一個構造方法中會重點提及,而如果Map中的元素不是排好序的,就呼叫AbstractMap的putAll(map)方法,該方法原始碼如下:
public void putAll(Map<? extends K, ? extends V> m) {
    for (Map.Entry<? extends K, ? extends V> e : m.entrySet())
        put(e.getKey(), e.getValue());
} put方法,同樣的,利用備註的形式在程式碼中標出。
    public V put(K key, V value) {
        Entry<K,V> t = root;
        // 若紅黑樹為空,則插入根節點
        if (t == null) {
        // throw NullPointerException
        // compare(key, key); // type check
            root = new Entry<K,V>(key, value, null);
            size = 1;
            modCount++;
            return null;
        }
        int cmp;
        Entry<K,V> parent;
        // split comparator and comparable paths
        Comparator<? super K> cpr = comparator;
        // 找出(key, value)在二叉排序樹中的插入位置。
        // 紅黑樹是以key來進行排序的,所以這裡以key來進行查詢。
        if (cpr != null) {
            do {
                parent = t;
                cmp = cpr.compare(key, t.key);
                if (cmp < 0)
                    t = t.left;
                else if (cmp > 0)
                    t = t.right;
                else
                    return t.setValue(value);
            } while (t != null);
        }
        else {
            if (key == null)
                throw new NullPointerException();
            Comparable<? super K> k = (Comparable<? super K>) key;
            do {
                parent = t;
                cmp = k.compareTo(t.key);
                if (cmp < 0)
                    t = t.left;
                else if (cmp > 0)
                    t = t.right;
                else
                    return t.setValue(value);
            } while (t != null);
        }
        // 為(key-value)新建節點
        Entry<K,V> e = new Entry<K,V>(key, value, parent);
        if (cmp < 0)
            parent.left = e;
        else
            parent.right = e;
        // 插入新的節點後,呼叫fixAfterInsertion調整紅黑樹。
        fixAfterInsertion(e);
        size++;
        modCount++;
        return null;
} - 刪除操作及對應
TreeMap的deleteEntry方法,deleteEntry方法同樣也只需按照二叉排序樹的操作步驟實現即可,刪除指定節點後,再對樹進行調整即可。deleteEntry方法的實現原始碼如下:
    // 刪除“紅黑樹的節點p”
    private void deleteEntry(Entry<K,V> p) {
        modCount++;
        size--;

        if (p.left != null && p.right != null) {
            Entry<K,V> s = successor (p);
            p.key = s.key;
            p.value = s.value;
            p = s;
        }

        Entry<K,V> replacement = (p.left != null ? p.left : p.right);

        if (replacement != null) {
            replacement.parent = p.parent;
            if (p.parent == null)
                root = replacement;
            else if (p == p.parent.left)
                p.parent.left  = replacement;
            else
                p.parent.right = replacement;

            p.left = p.right = p.parent = null;

            if (p.color == BLACK)
                fixAfterDeletion(replacement);
        } else if (p.parent == null) {
            root = null;
        } else {
            if (p.color == BLACK)
                fixAfterDeletion(p);

            if (p.parent != null) {
                if (p == p.parent.left)
                    p.parent.left = null;
                else if (p == p.parent.right)
                    p.parent.right = null;
                p.parent = null;
            }
        }
    }
對於紅黑樹的原始碼分析到此就告一段落,因為最近時間有限,如果後期有空閒時間會繼續對其原始碼進行分析。
結果:
1.

2.

3.
4.
5.
3.實驗過程中遇到的問題和解決過程
- 問題1:在完成節點四的時候,以為只是簡單的將書上的表示式樹的程式碼改一改就好。
問題1解決方案:在寢室中跟王文彬同學討論相應問題的時候他提醒我說“雖然對於一棵表示式樹來說中序遍歷得到的就是中綴表示式,後序遍歷得到的就是後續表示式,但書上是利用字尾表示式構建了一棵樹,而我們的要求是利用中綴表示式構建一棵樹。”這讓我意識到了問題所在。好像問題沒有那麼簡單,事實也證明如此,的確沒有那麼簡單。
- 問題2:在做節點六時,從IDEA中打開了
TreeMap的原始碼,看到那3013行程式碼時,腦殼都大了一圈。 問題2解決方案:好在有於欣月同學的提醒,網上有類似的分析,所以在網上搜了一下相應的問題,發現果然有類似的原始碼分析,便去參考了一番。
其他(感悟、思考等)
感悟
- 學海無涯苦作舟。
