影象去畸變矯正及雙線性內插法
阿新 • • 發佈:2018-11-15
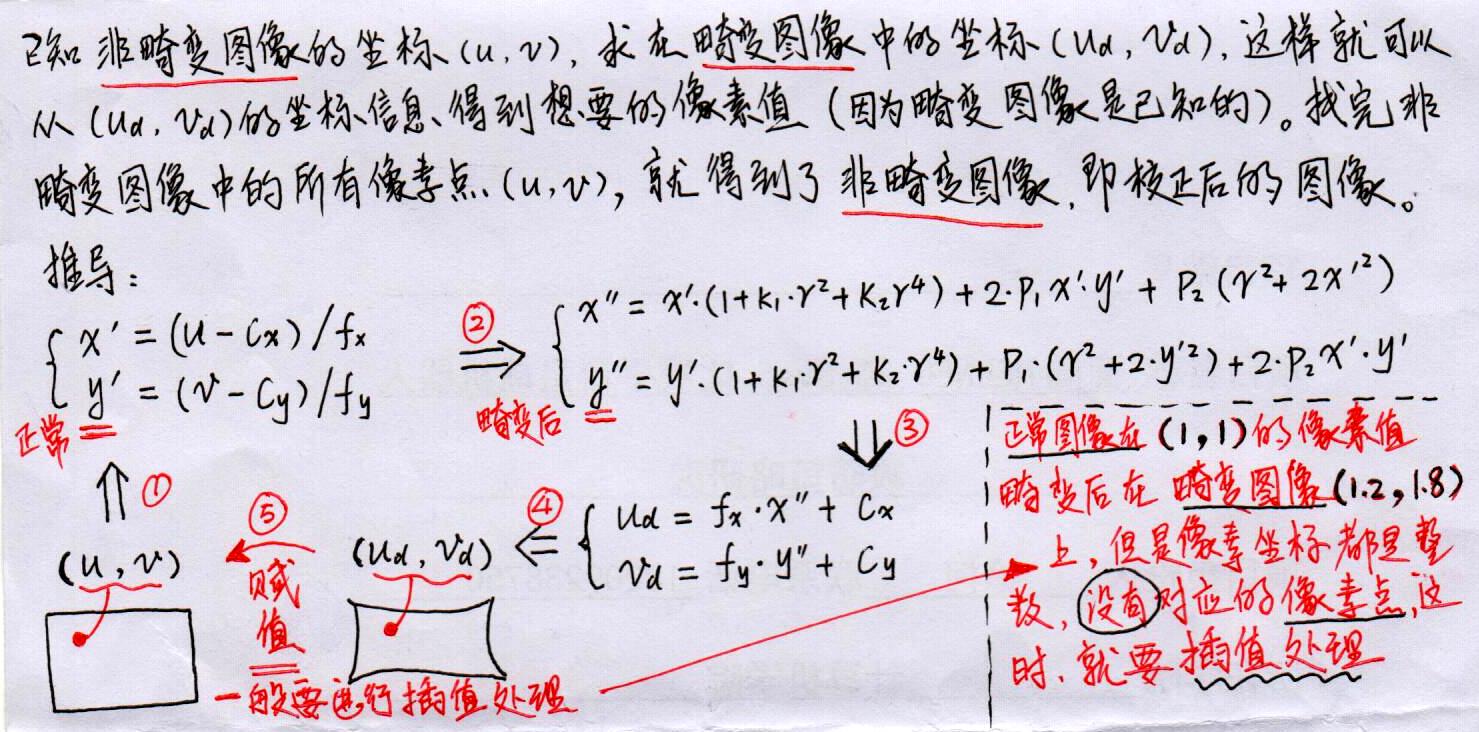
通過採集的影象我們可以得到畸變後的影象,要得到沒有畸變的影象要通過畸變模型推導其對映關係。
真實影象 imgR 與 畸變影象 imgD 之間的關係為: imgR(U, V) = imgD(Ud, Vd) 。遍歷所有(U,V)填充為對映對應的(Ud,Vd)即可實現影象去畸變處理。
前提條件是:已經得知相機內參K以及畸變引數k1,k2,k3,p1,p2,這部分可以由matlab工具箱實現。
程式碼:
#include <opencv2/opencv.hpp>
#include <string>
#include <math.h>

using namespace std;
string image_file = "1.png";   // 請確保路徑正確

int main(int argc, char **argv) {

	// 本程式需要你自己實現去畸變部分的程式碼。儘管我們可以呼叫OpenCV的去畸變,但自己實現一遍有助於理解。
	// 畸變引數
	double k1 = -0.3630, k2 = 0.1100, p1 = 0, p2 = 0;
	// 內參
	double fx = 1026, fy = 1019.2, cx = 922.9716, cy = 589.6080;

	cv::Mat image = cv::imread(image_file, 0);   // 影象是灰度圖,CV_8UC1
	int rows = image.rows, cols = image.cols;
	cv::Mat image_undistort = cv::Mat(rows, cols, CV_8UC1);   // 去畸變以後的圖

	// 計算去畸變後圖像的內容
	for (int v = 0; v < rows; v++)
		for (int u = 0; u < cols; u++) {
		double u_distorted = 0, v_distorted = 0;
		// TODO 按照公式,計算點(u,v)對應到畸變影象中的座標(u_distorted, v_distorted) (~6 lines)
		//image_undistort中含有非畸變的影象座標
		//將image_undistort的座標通過內參轉換到歸一化座標系下,此時得到的歸一化座標是對的
		//將得到的歸一化座標系進行畸變處理
		//將畸變處理後的座標通過內參轉換為影象座標系下的座標
		//這樣就相當於是在非畸變影象的影象座標和畸變影象的影象座標之間建立了一個對應關係
		//相當於是非畸變影象座標在畸變影象中找到了對映
		//對畸變影象進行遍歷之後,然後賦值(一般需要線性插值,因為畸變後圖像的座標不一定是整數的),即可得到矯正之後的影象

		double x1, y1, x2, y2;
		//未畸變畫素平面到成像平面
		x1 = (u - cx) / fx;
		y1 = (v - cy) / fy;
		double r2;
		//成像平面畸變後
		r2 = pow(x1, 2) + pow(y1, 2);
		x2 = x1*(1 + k1*r2 + k2*pow(r2, 2)) + 2 * p1*x1*y1 + p2*(r2 + 2 * x1*x1);
		y2 = y1*(1 + k1*r2 + k2*pow(r2, 2)) + p1*(r2 + 2 * y1*y1) + 2 * p2*x1*y1;
		//畸變的成像平面到畫素平面
		u_distorted = fx*x2 + cx;
		v_distorted = fy*y2 + cy;
		// 賦值 (最近鄰插值)
		if (u_distorted >= 0 && v_distorted >= 0 && u_distorted < cols && v_distorted < rows) {
			image_undistort.at<uchar>(v, u) = image.at<uchar>((int)v_distorted, (int)u_distorted);
		}
		else {
			image_undistort.at<uchar>(v, u) = 0;
		}
		}
	// 畫圖去畸變後圖像
	cv::imshow("image undistorted", image_undistort);
	cv::waitKey();
	return 0;

}
雙線性內插法利用待求畫素四個相鄰畫素的灰度在兩個方向上做線性內插,在光流法求取某畫素位置的灰度值時同樣用到了二維線性插值。
光流法這裡返回的是某個畫素位置的灰度值。
protected:
    // get a gray scale value from reference image (bilinear interpolated)
    //取得變換後的圖中對應畫素座標處的灰度值,這裡並不是返回一張影象的灰度值,而是就是寫死了,就是類構造裡傳入的那張圖
    inline float getPixelValue ( float x, float y )
    {
        //這裡先說一下各個引數的型別:
        //image_為Mat*型別,影象指標,所以呼叫data時用->符號,
        //data為影象矩陣首地址,支援陣列形式訪問,data[]就是訪問到畫素的值了,此處為畫素的灰度值,型別為uchar
        //關於step有點複雜,data[]中括號的式子有點複雜,總的意思就是y行乘上每行記憶體數,定位到行,然後在加上x,定位到畫素
        //step具體解釋在最後面有一些資料
        //image_->data[int(y)*image_->step + int(x)]這一步讀到了x,y處的灰度值,型別為uchar,
        //但是後面由於線性插值,需要定位這個畫素的位置,而不是他的灰度值,所以取其地址,賦值給data_ptr,記住它的位置,後面使用
        uchar* data_ptr = & image_->data[int(y)*image_->step + int(x)];

        //由於x,y這裡有可能帶小數,但是畫素位置肯定是整數,所以,問題來了,(1.2, 4.5)畫素座標處的灰度值為多少呢?OK,線性插值!
        //說一下floor(),std中的cmath函式。向下取整,返回不大於x的整數。例floor(4.9)=4
        //xx和yy,就是取到小數部分。例:x=4.9的話,xx=x-floor(x)就為0.9。y同理
        float xx = x - floor ( x );
        float yy = y - floor ( y );

        //這整個return一個float值包含了線性插值,二維線性差值,這裡後文有具體高清無碼解釋
        return float (
                   (1-xx) * ( 1-yy ) * data_ptr[0] +
                   xx* ( 1-yy ) * data_ptr[1] +
                   ( 1-xx ) *yy*data_ptr[ image_->step ] +
                   xx*yy*data_ptr[image_->step+1]
               );
    }


