
CLANG技術分享系列一:編寫你的第一個CLANG外掛
阿新 • • 發佈:2018-11-22
轉:http://kangwang1988.github.io/blog/
引子
   以前遇到一個需求,檢測iOS App程式碼中使用到的API是否存在開始支援的系統版本高於當前deploy target,或已經在當前支援的最新系統之前(包括當前系統)已經被標記為棄用(deprecated),以免發生Crash或者程式碼不能被調到的情況。
   這個問題可以看成時兩個子問題:
   1.獲取到所有的API的呼叫
   2.拿到所有的Documented公共API的(起始版本,廢棄版本)記錄.
   因OC:-[UIViewController viewDidLoad]的處理邏輯和C:CFNotificationCenterRemoveObserver或者C++ API等類似,而iOS開發中使用的主要是OC,此處只重點處理第一種情況(實際上也支援C函式呼叫)。
   為了獲取到所有API的呼叫,就需要分析原始碼(二進位制相關記錄中是基於selector的,而我們需要的是-/+[cls msg]).這就不得的不提到大名鼎鼎的llvm和clang了。
   Clang系列將推出多篇文章,基於Xcode和Clang,實現諸如程式碼風格規範,有效API檢查,無用程式碼篩查等特性,歡迎關注和討論。
LLVM & CLANG
LLVM工程包含了一組模組化,可複用的編譯器和工具鏈。和其名字的原意(Low level virtual machine)不同的是,LLVM不是一個首字母縮寫,而是工程的名字。
目前LLVM的主要子專案包括:
1.LLVM Core:包含一個現在的原始碼/目標裝置無關的優化器,一集一個針對很多主流(甚至於一些非主流)的CPU的彙編程式碼生成支援。
2.Clang:一個C/C++/Objective-C編譯器,致力於提供令人驚訝的快速編譯,極其有用的錯誤和警告資訊,提供一個可用於構建很棒的原始碼級別的工具.
3.dragonegg: gcc外掛,可將GCC的優化和程式碼生成器替換為LLVM的相應工具。
4.L CLANG外掛支援
Clang作為LLVM提供的編譯器前端,將使用者的原始碼(C/C++/Objective-C)編譯成語言/目標裝置無關的IR實現。並且提供良好的外掛支援,容許使用者在編譯時,執行額外的自定義動作。
要實現自定義的Clang外掛(以C++為例),應按照以下步驟:
1.自定義繼承自
		clang::PluginASTAction(基於consumer的AST前端Action抽象基類)
		clang::ASTConsumer(用於客戶讀取AST的抽象基類),
		clang::RecursiveASTVisitor(前序或後續地深度優先搜尋整個    	   AST,並訪問每一個節點的基類)等基類,
2.根據自身需要過載
		PluginASTAction::CreateASTConsumer,
	    PluginASTAction::ParseArgs,
        ASTConsumer::HandleTranslationUnit
        RecursiveASTVisitor::VisitDecl
		RecursiveASTVisitor::VisitStmt
   等方法,實現自定義的分析邏輯。
3.註冊外掛
	static FrontendPluginRegistry::Add<MyPlugin> X("my-plugin-		  name", "my-plugin-description");
4.編譯時載入外掛
	clang++ *** -Xclang -load -Xclang path-of-your-
	plugin.dylib -Xclang -add-plugin -Xclang your-pluginName
	-Xclang -plugin-arg-your-pluginName -Xclang your-
	pluginName-param
注:AST->Abstract Syntax Tree抽象語法樹 更多clang外掛
例子(分析某.M檔案中使用者定義的OC類)
環境搭建
1.下載clang相關原始碼並編譯
cd /opt
sudo mkdir llvm
sudo chown `whoami` llvm
cd llvm
export LLVM_HOME=`pwd`

git clone -b release_39 git@github.com:llvm-mirror/llvm.git llvm
git clone -b release_39 git@github.com:llvm-mirror/clang.git llvm/tools/clang
git clone -b release_39 git@github.com:llvm-mirror/clang-tools-extra.git llvm/tools/clang/tools/extra
git clone -b release_39 git@github.com:llvm-mirror/compiler-rt.git llvm/projects/compiler-rt

mkdir llvm_build
cd llvm_build
cmake ../llvm -DCMAKE_BUILD_TYPE:STRING=Release
make -j`sysctl -n hw.logicalcpu`
PS.檔案很多,也很大,如果clone緩慢,請先設定代理
2.編寫clang外掛
//printClsPlugin.cpp
#include <iostream>
#include "clang/Frontend/FrontendPluginRegistry.h"
#include "clang/AST/AST.h"
#include "clang/AST/ASTConsumer.h"
#include "clang/Frontend/CompilerInstance.h"
#include "clang/AST/RecursiveASTVisitor.h"
using namespace clang;
using namespace std;
using namespace llvm;
namespace ClangPlugin
{
class ClangPluginASTVisitor : public
RecursiveASTVisitor<ClangPluginASTVisitor>
{
private:
	ASTContext *context;
public:
	void setContext(ASTContext &context){
		this->context = &context;
 	}
 	bool VisitDecl(Decl *decl){
 		if(isa<ObjCImplDecl>(decl)){
 			ObjCImplDecl *interDecl = (ObjCImplDecl*)decl;
 			cout<<"[KWLM]Class Implementation Found:"
 			<<interDecl->getNameAsString()<<endl;
    		}
        return true;
    }
};
class ClangPluginASTConsumer : public ASTConsumer
{
private:
	ClangPluginASTVisitor visitor;
    void HandleTranslationUnit(ASTContext &context){
    	visitor.setContext(context);
    	visitor.TraverseDecl(context.getTranslationUnitDecl());
    }
};
class ClangPluginASTAction : public PluginASTAction
{
public:
    unique_ptr<ASTConsumer> CreateASTConsumer(CompilerInstance &Compiler,StringRef InFile){
    	return unique_ptr<ClangPluginASTConsumer>(new ClangPluginASTConsumer);
    }
    bool ParseArgs(const CompilerInstance &CI, const std::vector<std::string>& args){
    return true;
    }
};
}
static clang::FrontendPluginRegistry::Add
<ClangPlugin::ClangPluginASTAction>X("ClangPlugin",
"ClangPlugin");
3.編譯生成外掛(dylib)
clang -std=c++11 -stdlib=libc++ -L/opt/local/lib -
L/opt/llvm/llvm_build/lib
-I/opt/llvm/llvm_build/tools/clang/include -
I/opt/llvm/llvm_build/include -
I/opt/llvm/llvm/tools/clang/include -I/opt/llvm/llvm/include -
dynamiclib -Wl,-headerpad_max_install_names -lclang -
lclangFrontend -lclangAST -lclangAnalysis -lclangBasic -
lclangCodeGen -lclangDriver -lclangFrontendTool -lclangLex -
lclangParse -lclangSema -lclangEdit -lclangSerialization -
lclangStaticAnalyzerCheckers -lclangStaticAnalyzerCore -
lclangStaticAnalyzerFrontend -lLLVMX86CodeGen -
lLLVMX86AsmParser -lLLVMX86Disassembler -lLLVMExecutionEngine
-lLLVMAsmPrinter -lLLVMSelectionDAG -lLLVMX86AsmPrinter -
lLLVMX86Info -lLLVMMCParser -lLLVMCodeGen -lLLVMX86Utils -
lLLVMScalarOpts -lLLVMInstCombine -lLLVMTransformUtils -
lLLVMAnalysis -lLLVMTarget -lLLVMCore -lLLVMMC -lLLVMSupport -
lLLVMBitReader -lLLVMOption -lLLVMProfileData -lpthread -
lcurses -lz -lstdc++ -fPIC -fno-common -Woverloaded-virtual -
Wcast-qual -fno-strict-aliasing -pedantic -Wno-long-long -Wall
-Wno-unused-parameter -Wwrite-strings -fno-rtti -fPIC
./printClsPlugin.cpp -o ClangPlugin.dylib
4.編寫測試用oc檔案
//ocClsDemo.m
#import<UIKit/UIKit.h>
@interface MyViewController : UIViewController
@end

@implementation MyViewController
- (instancetype)init{
	if(self = [super init]){
	}
	return self;
}
@end
5.使用1生成的clang編譯oc檔案(載入3生成的ClangPlugin.dylib)
/opt/llvm/llvm_build/bin/clang -isysroot	/Applications/Xcode.app/Contents/Developer/Platforms/iPhoneSimulator.platform/Developer/SDKs/iPhoneSimulator10.0.sdk -I/Applications/Xcode.app/Contents/Developer/Toolchains/XcodeDefault.xctoolchain/usr/include/c++/v1
-mios-version-min=8.0 -Xclang -load -Xclang
~/Desktop/ClangPlugin.dylib -Xclang -add-plugin -Xclang
ClangPlugin -c ./ocClsDemo.m
結果如下圖所示: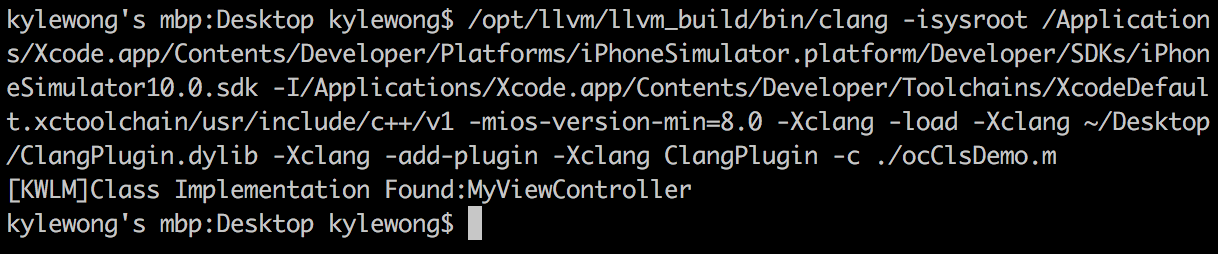
##Xcode整合Clang外掛
要在Xcode中使用Clang外掛,需要Hack Xcode.app。
執行:
sudo mv HackedClang.xcplugin `xcode-select -print-
path`/../PlugIns/Xcode3Core.ideplugin/Contents/SharedSupport/Developer/Library/Xcode/Plug-ins
sudo mv HackedBuildSystem.xcspec `xcode-select -print-
path`/Platforms/iPhoneSimulator.platform/Developer/Library/Xcode/Specifications
之後在Xcode->Target-Build Settings->Build Options->Compiler for C/C++/Objective-C選擇Clang LLVM Trunk即可使得Xcode使用1生成的的Clang來編譯。至於其他的命令列引數,均可以通過Xcode設定完成。 [Contact me](mailto:[email protected])