TiDB 部署及資料同步
簡介
TiDB 是 PingCAP 公司受 Google Spanner / F1 論文啟發而設計的開源分散式 HTAP (Hybrid Transactional and Analytical Processing) 資料庫, 結合了傳統的 RDBMS 和 NoSQL 的最佳特性。TiDB 相容 MySQL,支援無限的水平擴充套件,具備強一致性和高可用性。 TiDB 的目標是為 OLTP (Online Transactional Processing) 和 OLAP (Online Analytical Processing) 場景提供一站式的解決方案。
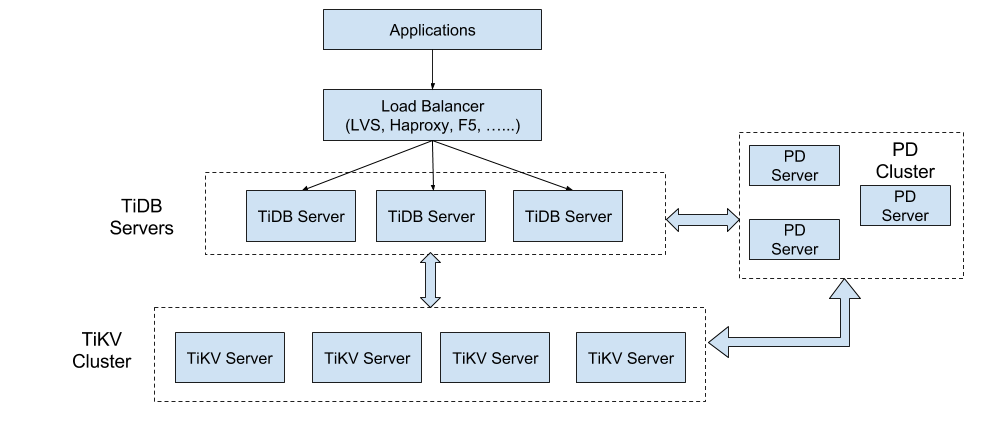
TiDB整體架構

TiDB 叢集主要分為三個元件:
-
TiDB Server
TiDB Server 負責接收 SQL 請求,處理 SQL 相關的邏輯,並通過 PD 找到儲存計算所需資料的 TiKV 地址, 與 TiKV 互動獲取資料,最終返回結果。 TiDB Server 是無狀態的,其本身並不儲存資料,只負責計算,可以無限水平擴充套件, 可以通過負載均衡元件(如LVS、HAProxy 或 F5)對外提供統一的接入地址。
-
PD Server
Placement Driver (簡稱 PD) 是整個叢集的管理模組,其主要工作有三個: 一是儲存叢集的元資訊(某個 Key 儲存在哪個 TiKV 節點); 二是對 TiKV 叢集進行排程和負載均衡(如資料的遷移、Raft group leader 的遷移等);三是分配全域性唯一且遞增的事務 ID。
PD 是一個叢集,需要部署奇數個節點,一般線上推薦至少部署 3 個節點。
-
TiKV Server
TiKV Server 負責儲存資料,從外部看 TiKV 是一個分散式的提供事務的 Key-Value 儲存引擎。儲存資料的基本單位是 Region, 每個 Region 負責儲存一個 Key Range (從 StartKey 到 EndKey 的左閉右開區間)的資料, 每個 TiKV 節點會負責多個 Region 。TiKV 使用 Raft 協議做複製,保持資料的一致性和容災。 副本以 Region 為單位進行管理,不同節點上的多個 Region 構成一個 Raft Group,互為副本。 資料在多個 TiKV 之間的負載均衡由 PD 排程,這裡也是以 Region 為單位進行排程。
安裝與部署
單節點方式快速部署(適用於功能測試,預覽)
執行步驟:
# 下載壓縮包

wget http://download.pingcap.org/tidb-latest-linux-amd64.tar.gz
wget http://download.pingcap.org/tidb-latest-linux-amd64.sha256

# 檢查檔案完整性,返回 ok 則正確
sha256sum -c tidb-latest-linux-amd64.sha256

# 解開壓縮包
tar -xzf tidb-latest-linux-amd64.tar.gz
cd tidb-latest-linux-amd64
在獲取 TiDB 二進位制檔案包後,我們可以在單機上面,執行和測試 TiDB 叢集,請按如下步驟依次啟動 PD,TiKV,TiDB。
注意:以下啟動各個應用程式元件例項的時候,請選擇後臺啟動,避免前臺失效後程序自動退出。
- 步驟一,啟動 PD
./bin/pd-server --data-dir=pd \
                --log-file=pd.log
- 步驟二,啟動 TiKV
./bin/tikv-server --pd="127.0.0.1:2379" \
                  --data-dir=tikv \
                  --log-file=tikv.log
- 步驟三,啟動 TiDB
./bin/tidb-server --store=tikv \
                  --path="127.0.0.1:2379" \
                  --log-file=tidb.log
- 步驟四,使用 MySQL 客戶端連線 TiDB:
mysql -h 127.0.0.1 -P 4000 -u root -D test Ansible 部署叢集(強烈推薦)
準備機器
測試部署,下列所有機器均由
Virtual Box生成的虛擬環境,生產環境中請參考官方文件配置。 注意開啟虛擬機器的 specific IP,eg:config.vm.network "private_network", ip: "192.168.12.10"。
- 部署目標機器若干
- 建議 4 臺及以上,TiKV 至少 3 例項(本教程 3 例項),且與 TiDB、PD 模組不位於同一主機,詳見部署建議
-
推薦安裝 CentOS 7.3 及以上版本 Linux 作業系統(本教程使用 ubuntu 16.04),x86_64 架構(amd64), 資料盤請使用 ext4 檔案系統,掛載 ext4 檔案系統時請新增 nodelalloc 掛載引數
編輯
/etc/fstab檔案,新增nodelalloc掛載引數:# vi /etc/fstab /dev/nvme0n1 /data1 ext4 defaults,nodelalloc,noatime 0 2使用以下命令 umount 掛載目錄並重新掛載:
# umount /data1
# mount -a
通過以下命令確認是否生效:
# mount -t ext4 /dev/nvme0n1 on /data1 type ext4 (rw,noatime,nodelalloc,data=ordered) - 機器之間內網互通,防火牆如 iptables 等請在部署時關閉
-
機器的時間、時區設定一致,開啟 NTP 服務且在正常同步時間
注: Ubuntu 系統請安裝 ntpstat 軟體包
$ ntpstat unsynchronised # NTP 服務未正常同步 $ ntpstat Unable to talk to NTP daemon. Is it running? # NTP 服務未正常執行 sudo systemctl status ntp.service # 檢視 ntp 服務執行狀態 -
建立 tidb 普通使用者 (本教程使用 vagrant 使用者)作為程式執行使用者,tidb 使用者可以免密碼 sudo 到 root 使用者
# useradd tidb
# passwd tidb
# visudo
tidb ALL=(ALL) NOPASSWD: ALL
本教程中
vagrant使用者預設免密 sudo 到 root 使用者
- 部署中控機器一臺
- 中控機可以是部署目標機器中的某一臺。
- 推薦安裝 CentOS 7.3 及以上版本 Linux 作業系統(預設包含 Python 2.7,本教程使用 ubuntu 16.04)。
- 該機器需開放外網訪問,用於下載 TiDB 及相關軟體安裝包。
-
配置 ssh authorized_key 互信,在中控機上可以使用 tidb 使用者(本教程使用 vagrant 使用者)免密碼 ssh 登入到部署目標機器
# vagrant 使用者
$ ssh-keygen -t rsa
Generating public/private rsa key pair.
Enter file in which to save the key (/home/tidb/.ssh/id_rsa): Created directory '/home/tidb/.ssh'. Enter passphrase (empty for no passphrase): Enter same passphrase again: Your identification has been saved in /home/tidb/.ssh/id_rsa. Your public key has been saved in /home/tidb/.ssh/id_rsa.pub. The key fingerprint is: SHA256:eIBykszR1KyECA/h0d7PRKz4fhAeli7IrVphhte7/So [email protected] The key's randomart image is: +---[RSA 2048]----+ |=+o+.o. | |o=o+o.oo | | .O.=.= | | . B.B + | |o B * B S | | * + * + | | o + . | | o E+ . | |o ..+o. | +----[SHA256]-----+ sudo cat ~/.ssh/id_rsa.pub authorized_keys # 依次執行以下命令,將 192.168.12.10 替換成目標機器的ip,按提示輸入部署目標機器 vagrant 使用者密碼, # 執行成功後即建立好 ssh 互信,其他機器同理。 ssh-copy-id -i ~/.ssh/id_rsa.pub 192.168.12.10 # 驗證 ssh 互信 ssh 192.168.12.10 # 不需要輸入密碼並登入成功
在中控機上下載 TiDB-Ansible
以 vagrant 使用者登入中控機並進入 /home/vagrant 目錄,使用以下命令從 Github TiDB-Ansible 專案 上下載 TiDB-Ansible 相應版本, 預設的資料夾名稱為 tidb-ansible,以下為各版本下載示例,版本選擇可以諮詢官方。
# 下載 2.0 GA 版本:
git clone -b release-2.0 https://github.com/pingcap/tidb-ansible.git

# 下載 master 版本: git clone https://github.com/pingcap/tidb-ansible.git 本教程為master版本
在中控機上安裝 Ansible 及其依賴
$ sudo apt-get install python-pip curl
$ cd tidb-ansible $ sudo pip install -r ./requirements.txt
pip install 時可能會報Python locale error: unsupported locale setting,執行下列命令:
export LC_ALL="en_US.UTF-8"
export LC_CTYPE="en_US.UTF-8"
sudo dpkg-reconfigure locales
分配機器資源,編輯 inventory.ini 檔案
sudo vim ~/tidb-ansible/inventory.ini
配置如下:(更換ip為你的目標機器ip,192.168.12.22為中控機器ip,其他為目標機器ip)
## TiDB Cluster Part
[tidb_servers]
192.168.12.22

[tikv_servers]
192.168.12.10
192.168.12.2
192.168.12.3
[pd_servers]
192.168.12.22

[spark_master]

[spark_slaves]

## Monitoring Part
# prometheus and pushgateway servers
[monitoring_servers]
192.168.12.22

[grafana_servers]
192.168.12.22

# node_exporter and blackbox_exporter servers
[monitored_servers]
192.168.12.22
192.168.12.10
192.168.12.2
192.168.12.3

[alertmanager_servers]

## Binlog Part [pump_servers:children] tidb_servers ## Group variables [pd_servers:vars] # location_labels = ["zone","rack","host"] ## Global variables [all:vars] deploy_dir = /home/vagrant/deploy ## Connection # ssh via normal user ansible_user = vagrant cluster_name = test-cluster tidb_version = latest # process supervision, [systemd, supervise] process_supervision = systemd # timezone of deployment region timezone = Asia/Shanghai set_timezone = True enable_firewalld = False # check NTP service enable_ntpd = True set_hostname = False ## binlog trigger enable_binlog = False # zookeeper address of kafka cluster, example: # zookeeper_addrs = "192.168.0.11:2181,192.168.0.12:2181,192.168.0.13:2181" zookeeper_addrs = "" # store slow query log into seperate file enable_slow_query_log = False # enable TLS authentication in the TiDB cluster enable_tls = False # KV mode deploy_without_tidb = False # Optional: Set if you already have a alertmanager server. # Format: alertmanager_host:alertmanager_port alertmanager_target = "" grafana_admin_user = "admin" grafana_admin_password = "admin"
部署任務
-
確認
tidb-ansible/inventory.ini檔案中ansible_user = vagrant,本例使用vagrant使用者作為服務執行使用者,配置如下:## Connection # ssh via normal user ansible_user = vagrant執行以下命令如果所有 server 返回 vagrant 表示 ssh 互信配置成功。
ansible -i inventory.ini all -m shell -a 'whoami'執行以下命令如果所有 server 返回 root 表示 vagrant 使用者 sudo 免密碼配置成功。
ansible -i inventory.ini all -m shell -a 'whoami' -b -
執行
local_prepare.ymlplaybook,聯網下載 TiDB binary 到中控機:ansible-playbook local_prepare.yml -
初始化系統環境,修改核心引數
ansible-playbook bootstrap.yml -
部署 TiDB 叢集軟體
ansible-playbook deploy.yml -
啟動 TiDB 叢集
ansible-playbook start.yml# 返回下列欄位時,表示啟動成功 Congrats! All goes well. :-)
測試叢集
測試連線 TiDB 叢集,推薦在 TiDB 前配置負載均衡來對外統一提供 SQL 介面。
-
使用 MySQL 客戶端連線測試,TCP 4000 埠是 TiDB 服務預設埠。
mysql -u root -h 192.168.12.22 -P 4000# eg [email protected] [09:48:48 PM] [~/tidb-ansible] [master *] -> % mysql -h192.168.12.22 -uroot -P 4000 Welcome to the MySQL monitor. Commands end with ; or \g. Your MySQL connection id is 1 Server version: 5.7.10-TiDB-v2.0.0-rc.4-147-g00d4831 MySQL Community Server (Apache License 2.0) Copyright (c) 2000, 2018, Oracle and/or its affiliates. All rights reserved. Oracle is a registered trademark of Oracle Corporation and/or its affiliates. Other names may be trademarks of their respective owners. Type 'help;' or '\h' for help. Type '\c' to clear the current input statement. mysql> -
通過瀏覽器訪問監控平臺。
地址:
http://192.168.12.22:3000預設帳號密碼是:admin/admin
Docker Compose 部署方案
待補充…
資料同步
由於 TiDB 本身相容絕大多數的 MySQL 語法,所以對於絕大多數業務來說,最安全的切換資料庫方式就是將 TiDB 作為現有資料庫的從庫接在主 MySQL 庫的後方, 這樣對業務方實現完全沒有侵入性下使用 TiDB 對現有的業務進行備份,應對未來資料量或者併發量增長帶來的單點故障風險,如需上線 TiDB, 也只需要簡單的將業務的主 MySQL 地址指向 TiDB 即可。
下面我們詳細介紹瞭如何將 MySQL 的資料遷移到 TiDB,並將 TiDB 作為 MySQL 的 Slave 進行資料同步。
這裡我們假定 MySQL 以及 TiDB 服務資訊如下:
+------------------+-----------------+----------------------------------------+
| Name             | Address         | Port   |   User      | Password        |
+------------------+-----------------+----------------------------------------+
| MySQL            |    127.0.0.1 | 3306 | root | | | TiDB | 192.168.12.22 | 4000 | vagrant | | +------------------+-------------+--------+-----------+-----------------------+
下載 TiDB 企業版工具集 (Linux)
注:普通工具集中,無
syncer,mydumper等工具
# 下載 tool 壓縮包
wget http://download.pingcap.org/tidb-enterprise-tools-latest-linux-amd64.tar.gz
wget http://download.pingcap.org/tidb-enterprise-tools-latest-linux-amd64.sha256

# 檢查檔案完整性,返回 ok 則正確
sha256sum -c tidb-enterprise-tools-latest-linux-amd64.sha256

# 解開壓縮包
tar -xzf tidb-enterprise-tools-latest-linux-amd64.tar.gz
cd tidb-enterprise-tools-latest-linux-amd64
使用 checker 進行 Schema 檢查
在遷移之前,我們可以使用 TiDB 的 checker 工具,checker 是我們開發的一個小工具,用於檢測目標 MySQL 庫中的表的表結構是否支援無縫的遷移到 TiDB, TiDB 支援絕大多數的 MySQL 常用的原生資料型別,所以大多數情況 checker 的返回應該是 ok。如果 check 某個 table schema 失敗,表明 TiDB 當前並不支援, 我們不能對該 table 裡面的資料進行遷移。checker 包含在 TiDB 工具集裡面。
./bin/checker -host 127.0.0.1 -port 3306 -user root -password password db_name
2016/10/27 13:11:49 checker.go:48: [info] Checking database db_name
2016/10/27 13:11:49 main.go:37: [info] Database DSN: root:@tcp(127.0.0.1:3306)/db_name?charset=utf8
2016/10/27 13:11:49 checker.go:63: [info] Checking table t1
2016/10/27 13:11:49 checker.go:69: [info] Check table t1 succ
2016/10/27 13:11:49 checker.go:63: [info] Checking table t2 2016/10/27 13:11:49 checker.go:69: [info] Check table t2 succ
使用 mydumper/myloader 全量匯入資料
我們使用 mydumper 從 MySQL 匯出資料,然後用 myloader 將其匯入到 TiDB 裡面。
注意,雖然我們也支援使用 MySQL 官方的 mysqldump 工具來進行資料的遷移工作,但相比於 mydumper/myloader,效能會慢很多, 對於大量資料的遷移會花費很多時間,這裡我們並不推薦。
mydumper/myloader是一個更強大的資料遷移工具,具體可以參考https://github.com/maxbube/mydumper。
# 下載 mydumper 壓縮包
wget http://download.pingcap.org/mydumper-linux-amd64.tar.gz
wget http://download.pingcap.org/mydumper-linux-amd64.sha256

# 檢查檔案完整性,返回 ok 則正確
sha256sum -c mydumper-linux-amd64.sha256

# 解開壓縮包
tar -xzf mydumper-linux-amd64.tar.gz
cd mydumper-linux-amd64
從 MySQL 匯出資料
我們使用 mydumper 從 MySQL 匯出資料,如下:
./bin/mydumper -h 127.0.0.1 -P 3306 -u root -t 16 -F 128 -B test -T t1,t2 -o ./guopisql
上面,我們使用-B test表明是對test這個database操作,然後用-T t1,t2表明只匯出t1,t2兩張表。 -t 16表明使用16個執行緒去匯出資料。-F 128是將實際的table切分成多大的chunk,這裡就是128MB一個chunk。
注意:在阿里雲一些需要super privilege的雲上面,mydumper需要加上--no-locks引數,否則會提示沒有許可權操作。
給 TiDB 匯入資料
我們使用 myloader 將之前匯出的資料匯入到 TiDB。
./bin/myloader -h 192.168.12.22 -P 4000 -u vagrant -p password -t 16 -q 100 -d ./guopisql
這裡-q 100表明每個事務包含多少個query,預設是1000,我們這裡使用100就可以了(資料多的話,可以加大)。
匯入成功之後,我們可以用 MySQL 官方客戶端進入 TiDB,檢視:
[email protected] [09:48:48 PM] [~/tidb-ansible] [master *]
-> % mysql -h192.168.12.22 -uroot -P 4000

mysql> show tables;
+----------------+
| Tables_in_test |
+----------------+
| t1             |
| t2             |
+----------------+
使用 syncer 增量匯入資料實現資料和 MySQL 實時同步
上面我們介紹瞭如何使用mydumper/myloader將 MySQL 的資料全量匯入到 TiDB,但如果後續 MySQL 的資料有更新,我們仍然希望快速匯入, 使用全量的方式就不合適了。
TiDB 提供syncer工具能方便的將 MySQL 的資料增量的匯入到 TiDB 裡面。
syncer也屬於 TiDB 企業工具集。
假設我們之前已經使用mydumper/myloader匯入了t1和t2兩張表的一些資料,現在我們希望這兩張表的任何更新, 都是實時的同步到 TiDB 上面。
MySQL 開啟 binlog
在使用 syncer 之前,我們必須保證:
- MySQL 開啟 binlog 功能,參考Setting the Replication Master Configuration
- Binlog 格式必須使用
row format,這也是 MySQL 5.7 之後推薦的binlog格式
# sudo vi /etc/mysql/my.cnf

[mysqld]
log-bin=mysql-bin
server-id=1 binlog-format=ROW 重啟mysql服務
sudo service mysql restart
獲取同步 position
我們通過show master status得到當前binlog的position,syncer的初始同步位置就是從這個地方開始。
show master status;
+------------------+----------+--------------+------------------+-------------------+
| File             | Position | Binlog_Do_DB | Binlog_Ignore_DB | Executed_Gtid_Set |
+------------------+----------+--------------+------------------+-------------------+ | mysql-bin.000001 | 154 | | | | +------------------+----------+--------------+------------------+-------------------+ 我們將position相關的資訊儲存到一個syncer.meta檔案裡面,用於syncer的同步:
# vim syncer.meta
binlog-name = "mysql-bin.000001"
binlog-pos = 154
啟動 syncer
syncer的配置檔案config.toml:
log-level = "info"

server-id = 1

# meta 檔案地址 meta = "./syncer.meta" worker-count = 1 batch = 1 pprof-addr = ":10081" [from] host = "127.0.0.1" user = "root" password = "your password" port = 3306 [to] host = "192.168.12.22" user = "root" password = "" port = 4000 啟動syncer
# 後臺執行
[email protected] [10:10:07 PM] [~/tidb-enterprise-tools-latest-linux-amd64]
-> % nohup ./bin/syncer -config config.toml &
[1] 4193
syncer每隔30s會輸出當前的同步統計,如下:
# cat nohub.out

2018/05/08 15:04:25 syncer.go:821: [info] [syncer]total events = 2, total tps = 0, recent tps = 0, master-binlog = (mysql-bin.000001, 574), master-binlog-gtid=, syncer-binlog = (mysql-bin.000001, 574), syncer-binlog-gtid =
2018/05/08 15:04:55 syncer.go:821: [info] [syncer]total events = 2, total tps = 0, recent tps = 0, master-binlog = (mysql-bin.000001, 574), master-binlog-gtid=, syncer-binlog = (mysql-bin.000001, 574), syncer-binlog-gtid =
2018/05/08 15:05:25 syncer.go:821: [info] [syncer]total events = 2, total tps = 0, recent tps = 0, master-binlog = (mysql-bin.000001, 574), master-binlog-gtid=, syncer-binlog = (mysql-bin.000001, 574), syncer-binlog-gtid =
2018/05/08 15:05:55 syncer.go:821: [info] [syncer]total events = 2, total tps = 0, recent tps = 0, master-binlog = (mysql-bin.000001, 574), master-binlog-gtid=, syncer-binlog = (mysql-bin.000001, 574), syncer-binlog-gtid =
在 MySQL 插入新的資料
INSERT INTO t1 VALUES (4, 4), (5, 5); 登入到 TiDB 檢視:
mysql -h127.0.0.1 -P4000 -uroot -p
mysql> select * from t1;
+----+------+
| id | age | +----+------+ | 1 | 1 | | 2 | 2 | | 3 | 3 | | 4 | 4 | | 5 | 5 | +----+------+