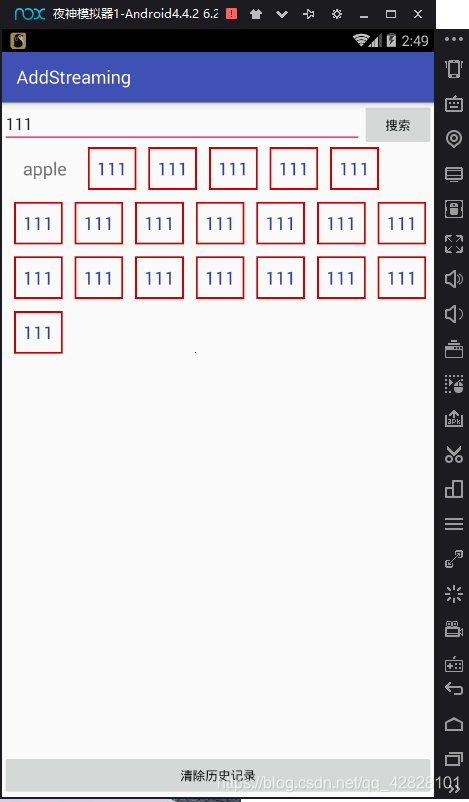
增加流式佈局
阿新 • • 發佈:2018-12-01
activity xml
<LinearLayout xmlns:android="http://schemas.android.com/apk/res/android"
    xmlns:app="http://schemas.android.com/apk/res-auto"
    xmlns:tools="http://schemas.android.com/tools"
    android:layout_width="match_parent"
    android:layout_height="match_parent"
    tools:context=".MainActivity"
    android:orientation="vertical">

    <LinearLayout
        android:layout_width="match_parent"
        android:layout_height="wrap_content"
        android:orientation="horizontal">
        <EditText
            android:id="@+id/edit_keys"
            android:layout_width="wrap_content"
            android:layout_height="wrap_content"
            android:layout_weight="1"/>

        <Button
            android:id="@+id/btn_search"
            android:layout_width="80dp"
            android:layout_height="50dp"
            android:text="搜尋"/>

    </LinearLayout>

    <com.example.addstreaming.addFlow
        android:id="@+id/flow_layout"
        android:layout_width="match_parent"
        android:layout_height="match_parent"
        android:layout_weight="1">
        <TextView
            android:layout_width="wrap_content"
            android:layout_height="wrap_content"
            android:padding="10dp"
            android:text="apple"
            android:textSize="20sp" />
    </com.example.addstreaming.addFlow>

    <Button
        android:layout_width="match_parent"
        android:layout_height="wrap_content"
        android:onClick="onClick"
        android:text="清除歷史記錄"/>

</LinearLayout>
mian java介面
public class MainActivity extends AppCompatActivity implements View.OnClickListener{
    private EditText mEdit;
    private Button mSearch;
    private addFlow mFlowLayout;
    @Override
    protected void onCreate(Bundle savedInstanceState) {
        super.onCreate(savedInstanceState);
        setContentView(R.layout.activity_main);
        mEdit = findViewById(R.id.edit_keys);
        mSearch = findViewById(R.id.btn_search);
        mFlowLayout = findViewById(R.id.flow_layout);
        mSearch.setOnClickListener(this);
    }

    @Override
    public void onClick(View v) {
        if (v.getId()==R.id.btn_search) {
            String keys = mEdit.getText().toString();
            mFlowLayout.addTextView(keys);
        }else{
            mFlowLayout.removeAllViews();
        }
    }
}
中間要加的字
<TextView xmlns:android="http://schemas.android.com/apk/res/android"
    android:layout_width="wrap_content"
    android:layout_height="wrap_content"
    android:padding="10dp"
    android:textSize="20sp"
    android:textColor="@color/colorPrimaryDark"
    android:background="@drawable/car_btn_bg">
自定義view介面
public class addFlow extends FrameLayout{
    private final static int H_DISTANCE = 20;//水平間距是20
    private final static int V_DISTANCE = 20;//豎直間距是20
    public addFlow(@NonNull Context context) {
        super(context);
    }

    public addFlow(@NonNull Context context, @Nullable AttributeSet attrs) {
        super(context, attrs);
    }

    public addFlow(@NonNull Context context, @Nullable AttributeSet attrs, int defStyleAttr) {
        super(context, attrs, defStyleAttr);
    }
    public void addTextView(String keys){

        //*******載入xml佈局的方式********
        TextView textView = (TextView) View.inflate(getContext(), R.layout.flow_item,null);
        //*******載入xml佈局的方式********
        textView.setText(keys);

        //佈局寬高自適應
        FrameLayout.LayoutParams params = new FrameLayout.LayoutParams(LinearLayout.LayoutParams.WRAP_CONTENT, LinearLayout.LayoutParams.WRAP_CONTENT);
        textView.setLayoutParams(params);//控制元件設定上佈局引數

        addView(textView);
    }

    @Override
    protected void onLayout(boolean changed, int left, int top, int right, int bottom) {
        super.onLayout(changed, left, top, right, bottom);
        int width = getWidth();//獲取本控制元件的寬度,用於計算換行
        int row = 0;//行數

        int disWidth = H_DISTANCE;//子控制元件左邊的座標

        for (int i = 0; i <getChildCount() ; i++) {

            View view = getChildAt(i);//查詢子控制元件

            int viewWidth = view.getWidth();
            int viewHeight = view.getHeight();
            Log.i("dt","textHeight:"+viewHeight);

            if (disWidth+viewWidth>width){//接下來的控制元件的右邊座標超過了螢幕寬度
                row++;//行數增加
                disWidth = H_DISTANCE;//還原左邊座標
            }

            //第一個引數是左邊座標,第二個引數是上邊座標
            //左座標應該是每行子控制元件寬度的總和disWidth
            //右座標為左座標+子控制元件寬度
            //上座標應該是行數*控制元件高度
            //下座標是上座標+控制元件高度=(行數+1)*控制元件高度
            int viewTop =row*viewHeight+row*V_DISTANCE;
            view.layout(disWidth,viewTop,
                    disWidth+viewWidth,viewTop+viewHeight);//子控制元件佈局

            disWidth+=(viewWidth+H_DISTANCE);//記錄下一次子控制元件左邊的座標

        }
    }
}

