馮志霞201771010107《面向物件程式設計(java)》第十四周學習總結
實驗十四 Swing圖形介面元件
實驗時間 20178-11-29
1、實驗目的與要求
(1) 掌握GUI佈局管理器用法;
(2) 掌握各類Java Swing元件用途及常用API;
2、實驗內容和步驟
實驗1: 匯入第12章示例程式,測試程式並進行組內討論。
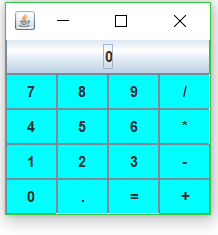
測試程式1
l 在elipse IDE中執行教材479頁程式12-1,結合執行結果理解程式;
l 掌握各種佈局管理器的用法;
l 理解GUI介面中事件處理技術的用途。
l 在佈局管理應用程式碼處添加註釋;
package calculator;

import java.awt.*;
import java.awt.event.*;
import javax.swing.*;

/**
 * A panel with calculator buttons and a result display.
 */
public class CalculatorPanel extends JPanel
{
   private JButton display;
   private JPanel panel;
   private double result;
   private String lastCommand;
   private boolean start;

   public CalculatorPanel()
   {
      setLayout(new BorderLayout());

      result = 0;
      lastCommand = "=";
      start = true;//指明一開始顯示的JButton("0")0不起作用

      // add the display

      display = new JButton("0");

      display.setEnabled(true);//設定成false時,按鈕是灰色的,無法響應任何觸發事件。設定成true時,相當於激活了按鈕,按鈕的狀態不再是死的
      add(display, BorderLayout.NORTH);

      ActionListener insert = new InsertAction();
      ActionListener command = new CommandAction();

      // add the buttons in a 4 x 4 grid

      panel = new JPanel();
     // panel.setLayout(new GridLayout(4, 4));//引數為指定的佈局管理器
      GridLayout g=new GridLayout(4, 4);
      panel.setLayout(g);
      addButton("7", insert);
      addButton("8", insert);
      addButton("9", insert);
      addButton("/", command);

      addButton("4", insert);
      addButton("5", insert);
      addButton("6", insert);
      addButton("*", command);

      addButton("1", insert);
      addButton("2", insert);
      addButton("3", insert);
      addButton("-", command);

      addButton("0", insert);
      addButton(".", insert);
      addButton("=", command);
      addButton("+", command);

      add(panel, BorderLayout.CENTER);
   }

   /**
    * Adds a button to the center panel.
    * @param label the button label
    * @param listener the button listener
    */
   private void addButton(String label, ActionListener listener)//分別給每個label註冊監聽器事件
   {
      JButton button = new JButton(label);
      button.setBackground(Color.CYAN);
      button.addActionListener(listener);
      panel.add(button);
   }

   /**
    * This action inserts the button action string to the end of the display text.
    */
   private class InsertAction implements ActionListener
   {
      public void actionPerformed(ActionEvent event)
      {
         String input = event.getActionCommand();
         if (start)
         {
            display.setText("");
            start = false;//一旦接收到字串不可變
         }
         display.setText(display.getText() + input);
      }
   }

   /**
    * This action executes the command that the button action string denotes.
    */
   private class CommandAction implements ActionListener
   {
      public void actionPerformed(ActionEvent event)
      {
         String command = event.getActionCommand();

         if (start)
         {

            if (command.equals("-"))
            {
               display.setText(command);
              start = false;
            }
            else lastCommand = command;
         }
         else
         {
            calculate(Double.parseDouble(display.getText()));//強制型別轉化成字串輸出
            lastCommand = command;
            start = true;
         }
      }
   }

   /**
    * Carries out the pending calculation.
    * @param x the value to be accumulated with the prior result.
    */
   public void calculate(double x)
   {
      if (lastCommand.equals("+")) result += x;
      else if (lastCommand.equals("-")) result -= x;
      else if (lastCommand.equals("*")) result *= x;
      else if (lastCommand.equals("/")) result /= x;
      else if (lastCommand.equals("=")) result = x;
      display.setText("" + result);
   }
}
package calculator;

import java.awt.Dimension;
import java.awt.Toolkit;

import javax.swing.*;

/**
 * A frame with a calculator panel.
 */
public class CalculatorFrame extends JFrame
{
   public CalculatorFrame()
   {
	   Toolkit tk = this.getToolkit();
       Dimension de = tk.getScreenSize();
       setBounds((de.width - this.getWidth()) / 2,(de.height - this.getHeight()) / 2, this.getWidth(), this.getHeight());//將框架居中
      add(new CalculatorPanel());//將容器類物件panel新增到框架中
     pack();
   }
}
package calculator;

import java.awt.*;
import javax.swing.*;

/**
 * @version 1.34 2015-06-12
 * @author Cay Horstmann
 */
public class Calculator
{
   public static void main(String[] args)
   {
      EventQueue.invokeLater(() -> {
         CalculatorFrame frame = new CalculatorFrame();
         frame.setTitle("Calculator");

        // frame.setBounds(300, 300, 500, 200);
         frame.setDefaultCloseOperation(JFrame.EXIT_ON_CLOSE);
         frame.setVisible(true);
      });
   }
}
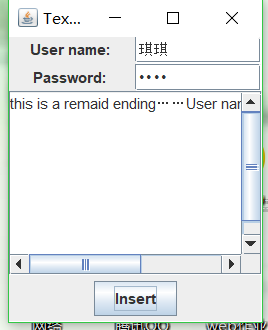
測試程式2
l 在elipse IDE中除錯執行教材486頁程式12-2,結合執行結果理解程式;
l 掌握各種文字元件的用法;
l 記錄示例程式碼閱讀理解中存在的問題與疑惑。
package text;

import java.awt.*;
import javax.swing.*;

/**
 * @version 1.41 2015-06-12
 * @author Cay Horstmann
 */
public class TextComponentTest
{
   public static void main(String[] args)
   {
      EventQueue.invokeLater(() -> {
         JFrame frame = new TextComponentFrame();
         frame.setTitle("TextComponentTest");
         frame.setDefaultCloseOperation(JFrame.EXIT_ON_CLOSE);
         frame.setVisible(true);
      });
   }
}
package text;

import java.awt.BorderLayout;
import java.awt.GridLayout;

import javax.swing.JButton;
import javax.swing.JFrame;
import javax.swing.JLabel;
import javax.swing.JPanel;
import javax.swing.JPasswordField;
import javax.swing.JScrollPane;
import javax.swing.JTextArea;
import javax.swing.JTextField;
import javax.swing.SwingConstants;

/**
 * 帶有輸入文字框元件的框架。
 */
public class TextComponentFrame extends JFrame
{
   public static final int TEXTAREA_ROWS = 8;
   public static final int TEXTAREA_COLUMNS = 20;

   public TextComponentFrame()
   {
      JTextField textField = new JTextField();
      JPasswordField passwordField = new JPasswordField();

      JPanel northPanel = new JPanel();
      northPanel.setLayout(new GridLayout(2, 2));
      //SwingConstants通常用於在螢幕上定位或定向元件的常量的集合
      northPanel.add(new JLabel("User name: ", SwingConstants.RIGHT));
      northPanel.add(textField);
      northPanel.add(new JLabel("Password: ", SwingConstants.RIGHT));
      northPanel.add(passwordField);

      add(northPanel, BorderLayout.NORTH);

      //構造具有指定行數和列數的新的空 TextArea。
      JTextArea textArea = new JTextArea(TEXTAREA_ROWS, TEXTAREA_COLUMNS);
      //建立一個顯示指定元件內容的 JScrollPane物件,只要元件的內容超過檢視大小就會顯示水平和垂直滾動條。
      JScrollPane scrollPane = new JScrollPane(textArea);

      add(scrollPane, BorderLayout.CENTER);

      // add button to append text into the text area

      JPanel southPanel = new JPanel();

      JButton insertButton = new JButton("Insert");
      southPanel.add(insertButton);
      //將給定文字追加到文件結尾。
      insertButton.addActionListener(event ->
         textArea.append("User name: " + textField.getText() + " Password: "
            + new String(passwordField.getPassword()) + "\n"));

      add(southPanel, BorderLayout.SOUTH);
      pack();
   }
}
測試程式3
l 在elipse IDE中除錯執行教材489頁程式12-3,結合執行結果理解程式;
l 掌握複選框元件的用法;
l 記錄示例程式碼閱讀理解中存在的問題與疑惑。
package checkBox;

import java.awt.*;
import javax.swing.*;

/**
 * @version 1.34 2015-06-12
 * @author Cay Horstmann
 */
public class CheckBoxTest
{
   public static void main(String[] args)
   {
      EventQueue.invokeLater(() -> {
         JFrame frame = new CheckBoxFrame();
         frame.setTitle("CheckBoxTest");
         frame.setDefaultCloseOperation(JFrame.EXIT_ON_CLOSE);
         frame.setVisible(true);
      });
   }
}
package checkBox;

import java.awt.*;
import java.awt.event.*;
import javax.swing.*;

/**
 * A frame with a sample text label and check boxes for selecting font attributes.
 */
public class CheckBoxFrame extends JFrame
{
   private JLabel label;
   private JCheckBox bold;
   private JCheckBox italic;
   private static final int FONTSIZE = 24;

   public CheckBoxFrame()
   {
      // 新增示例文字標籤

      label = new JLabel("The quick brown fox jumps over the lazy dog.");
      label.setFont(new Font("Serif", Font.BOLD, FONTSIZE));
      add(label, BorderLayout.CENTER);

      // 字型屬性
      // 複選框狀態的標籤

      ActionListener listener = event -> {
         int mode = 0;
         if (bold.isSelected()) mode += Font.BOLD;
         if (italic.isSelected()) mode += Font.ITALIC;
         label.setFont(new Font("Serif", mode, FONTSIZE));
      };

      // 新增複選框

      JPanel buttonPanel = new JPanel();

      bold = new JCheckBox("Bold");
      bold.addActionListener(listener);
      bold.setSelected(true);
      buttonPanel.add(bold);

      italic = new JCheckBox("Italic");
      italic.addActionListener(listener);
      buttonPanel.add(italic);

      add(buttonPanel, BorderLayout.SOUTH);
      pack();
   }
}

測試程式4
l 在elipse IDE中除錯執行教材491頁程式12-4,執行結果理解程式;
l 掌握單選按鈕元件的用法;
l 記錄示例程式碼閱讀理解中存在的問題與疑惑。
package radioButton;

import java.awt.*;
import javax.swing.*;

/**
 * @version 1.34 2015-06-12
 * @author Cay Horstmann
 */
public class RadioButtonTest
{
   public static void main(String[] args)
   {
      EventQueue.invokeLater(() -> {
         JFrame frame = new RadioButtonFrame();
         frame.setTitle("RadioButtonTest");
         frame.setDefaultCloseOperation(JFrame.EXIT_ON_CLOSE);
         frame.setVisible(true);
      });
   }
}
package radioButton;

import java.awt.*;
import java.awt.event.*;
import javax.swing.*;

/**
 * 帶有示例文字標籤和用於選擇字型大小的單選按鈕的框架。
 */
public class RadioButtonFrame extends JFrame
{
   private JPanel buttonPanel;
   private ButtonGroup group;
   private JLabel label;
   private static final int DEFAULT_SIZE = 36;

   public RadioButtonFrame()
   {
      // add the sample text label

      label = new JLabel("The quick brown fox jumps over the lazy dog.");
      label.setFont(new Font("Serif", Font.PLAIN, DEFAULT_SIZE));
      add(label, BorderLayout.CENTER);

      // add the radio buttons

      buttonPanel = new JPanel();
      group = new ButtonGroup();

      addRadioButton("Small", 8);
      addRadioButton("Medium", 12);
      addRadioButton("Large", 18);
      addRadioButton("Extra large", 36);

      add(buttonPanel, BorderLayout.SOUTH);
      pack();
   }

   /**
    * 新增一個單選按鈕,用於設定示例文字的字型大小。
    * @param 大小的規格要出現在按鈕上的字串
    * @param 按鈕設定的字型大小
    */
   public void addRadioButton(String name, int size)
   {
      boolean selected = size == DEFAULT_SIZE;
      JRadioButton button = new JRadioButton(name, selected);
      group.add(button);
      buttonPanel.add(button);

      // 此監聽器設定標籤字型大小

      ActionListener listener = event -> label.setFont(new Font("Serif", Font.PLAIN, size));

      button.addActionListener(listener);
   }
}

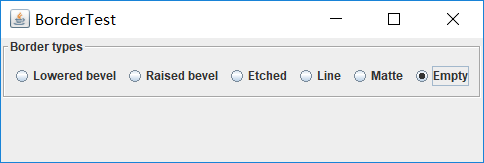
測試程式5
l 在elipse IDE中除錯執行教材494頁程式12-5,結合執行結果理解程式;
l 掌握邊框的用法;
l 記錄示例程式碼閱讀理解中存在的問題與疑惑。
package border;

import java.awt.*;
import javax.swing.*;
import javax.swing.border.*;

/**
 * A frame with radio buttons to pick a border style.
 */
public class BorderFrame extends JFrame
{
   private JPanel demoPanel;
   private JPanel buttonPanel;
   private ButtonGroup group;

   public BorderFrame()
   {
      demoPanel = new JPanel();
      buttonPanel = new JPanel();
      group = new ButtonGroup();

      //設定不同的邊框型別按鈕,共六種(提供標準 Border 物件的工廠類)
      addRadioButton("Lowered bevel", BorderFactory.createLoweredBevelBorder());
      addRadioButton("Raised bevel", BorderFactory.createRaisedBevelBorder());
      addRadioButton("Etched", BorderFactory.createEtchedBorder());
      addRadioButton("Line", BorderFactory.createLineBorder(Color.BLUE));
      addRadioButton("Matte", BorderFactory.createMatteBorder(10, 10, 10, 10, Color.BLUE));
      addRadioButton("Empty", BorderFactory.createEmptyBorder());

      Border etched = BorderFactory.createEtchedBorder();
      Border titled = BorderFactory.createTitledBorder(etched, "Border types");
      buttonPanel.setBorder(titled);

      setLayout(new GridLayout(2, 1));
      add(buttonPanel);
      add(demoPanel);
      pack();
   }

   public void addRadioButton(String buttonName, Border b)
   {
      JRadioButton button = new JRadioButton(buttonName);
      button.addActionListener(event -> demoPanel.setBorder(b));
      group.add(button);
      buttonPanel.add(button);
   }
}
測試程式6
l 在elipse IDE中除錯執行教材498頁程式12-6,結合執行結果理解程式;
l 掌握組合框元件的用法;
l 記錄示例程式碼閱讀理解中存在的問題與疑惑。
package comboBox;

import java.awt.BorderLayout;
import java.awt.Font;

import javax.swing.JComboBox;
import javax.swing.JFrame;
import javax.swing.JLabel;
import javax.swing.JPanel;

/**
 * 具有示例文字標籤和用於選擇字型外觀的組合框的框架。
 * 組合框:將按鈕或可編輯欄位與下拉列表組合的元件。
 * 使用者可以從下拉列表中選擇值,下拉列表在使用者請求時顯示
 */

public class ComboBoxFrame extends JFrame
{
   private JComboBox<String> faceCombo;
   private JLabel label;
   private static final int DEFAULT_SIZE = 24;

   public ComboBoxFrame()
   {
      // 新增示例文字標籤

      label = new JLabel("The quick brown fox jumps over the lazy dog.");

      label.setFont(new Font("Serif", Font.PLAIN, DEFAULT_SIZE));
      //新增到邊框佈局管理器的中間
      add(label, BorderLayout.CENTER);

      // 建立一個組合框物件並新增專案名稱

      faceCombo = new JComboBox<>();
      faceCombo.addItem("Serif");
      faceCombo.addItem("SansSerif");
      faceCombo.addItem("Monospaced");
      faceCombo.addItem("Dialog");
      faceCombo.addItem("DialogInput");

      // 組合框監聽器將標籤字型更改為所選的名稱(新增監聽器,使用lambda表示式)

      faceCombo.addActionListener(event ->

         label.setFont(
            //getItemAt用於返回指定索引處的列表項;getSelectedIndex用於返回當前選擇的選項
            new Font(faceCombo.getItemAt(faceCombo.getSelectedIndex()),
               Font.PLAIN, DEFAULT_SIZE)));


      JPanel comboPanel = new JPanel();
      comboPanel.add(faceCombo);
      add(comboPanel, BorderLayout.SOUTH);
      pack();
   }
}

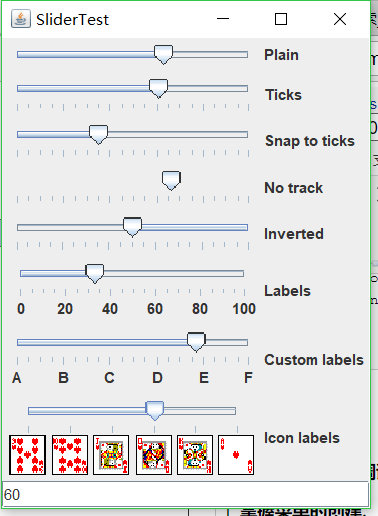
測試程式7
l 在elipse IDE中除錯執行教材501頁程式12-7,結合執行結果理解程式;
l 掌握滑動條元件的用法;
l 記錄示例程式碼閱讀理解中存在的問題與疑惑。
package slider;

import java.awt.*;
import java.util.*;
import javax.swing.*;
import javax.swing.event.*;

/**
 * A frame with many sliders and a text field to show slider values.
 */
public class SliderFrame extends JFrame//類的繼承
{
   private JPanel sliderPanel;
   private JTextField textField;
   private ChangeListener listener;

   public SliderFrame()
   {
      sliderPanel = new JPanel();//生成類物件
      sliderPanel.setLayout(new GridBagLayout());//設定此容器的佈局管理器為網格包佈局管理器。

      // 為所有 sliders註冊監聽器
      listener = event -> {
         //當滑動slider的時候 更新文字域的值
         JSlider source = (JSlider) event.getSource();//生成一個讓使用者以圖形方式在有界區間內通過移動滑塊來選擇值的元件類物件。
         textField.setText("" + source.getValue());//將此 TextComponent 文字設定為指定文字
      };


      JSlider slider = new JSlider();//建立一個水平滑塊。
      addSlider(slider, "Plain");


      slider = new JSlider();
      slider.setPaintTicks(true);//在滑塊上繪製刻度標記
      slider.setMajorTickSpacing(20);//設定主刻度標記的間隔
      slider.setMinorTickSpacing(5);
      addSlider(slider, "Ticks");

      slider = new JSlider();
      slider.setPaintTicks(true);
      slider.setSnapToTicks(true);
      slider.setMajorTickSpacing(20);
      slider.setMinorTickSpacing(5);
      addSlider(slider, "Snap to ticks");

      // 新增沒有軌跡的平滑快

      slider = new JSlider();
      slider.setPaintTicks(true);
      slider.setMajorTickSpacing(20);
      slider.setMinorTickSpacing(5);
      slider.setPaintTrack(false);
      addSlider(slider, "No track");

      //新增倒置的平滑快

      slider = new JSlider();
      slider.setPaintTicks(true);
      slider.setMajorTickSpacing(20);
      slider.setMinorTickSpacing(5);
      slider.setInverted(true);
      addSlider(slider, "Inverted");

      // 新增一個數字標籤的平滑快

      slider = new JSlider();
      slider.setPaintTicks(true);
      slider.setPaintLabels(true);//在滑塊上繪製標籤。
      slider.setMajorTickSpacing(20);
      slider.setMinorTickSpacing(5);
      addSlider(slider, "Labels");

      // 新增一個字母標籤的平滑快

      slider = new JSlider();
      slider.setPaintLabels(true);
      slider.setPaintTicks(true);//在滑塊上繪製刻度標記
      slider.setMajorTickSpacing(20);
      slider.setMinorTickSpacing(5);

      Dictionary<Integer, Component> labelTable = new Hashtable<>();
      labelTable.put(0, new JLabel("A"));//建立 JLabel 例項。
      labelTable.put(20, new JLabel("B"));
      labelTable.put(40, new JLabel("C"));
      labelTable.put(60, new JLabel("D"));
      labelTable.put(80, new JLabel("E"));
      labelTable.put(100, new JLabel("F"));

      slider.setLabelTable(labelTable);//在給定值處繪製標籤
      addSlider(slider, "Custom labels");


      slider = new JSlider();
      slider.setPaintTicks(true);
      slider.setPaintLabels(true);
      slider.setSnapToTicks(true);
      slider.setMajorTickSpacing(20);
      slider.setMinorTickSpacing(20);

      labelTable = new Hashtable<Integer, Component>();//構造一個新的空雜湊表。

      // 新增影象

      labelTable.put(0, new JLabel(new ImageIcon("nine.gif")));
      labelTable.put(20, new JLabel(new ImageIcon("ten.gif")));
      labelTable.put(40, new JLabel(new ImageIcon("jack.gif")));
      labelTable.put(60, new JLabel(new ImageIcon("queen.gif")));
      labelTable.put(80, new JLabel(new ImageIcon("king.gif")));
      labelTable.put(100, new JLabel(new ImageIcon("ace.gif")));

      slider.setLabelTable(labelTable);//用於指定將在給定值處繪製標籤
      addSlider(slider, "Icon labels");

      // 新增文字域

      textField = new JTextField();
      add(sliderPanel, BorderLayout.CENTER);
      add(textField, BorderLayout.SOUTH);
      pack();//調整此視窗的大小,以適合其子元件的首選大小和佈局。
   }

   /**
    * Adds a slider to the slider panel and hooks up the listener
    * @param s the slider
    * @param description the slider description
    */
   public void addSlider(JSlider s, String description)//一個讓使用者以圖形方式在有界區間內通過移動滑塊來選擇值的元件。
   {
      s.addChangeListener(listener);
      JPanel panel = new JPanel();
      panel.add(s);
      panel.add(new JLabel(description));
      panel.setAlignmentX(Component.LEFT_ALIGNMENT);//設定垂直對齊方式。
      GridBagConstraints gbc = new GridBagConstraints();//設定元件間的約束關係
      gbc.gridy = sliderPanel.getComponentCount();
      gbc.anchor = GridBagConstraints.WEST;
      sliderPanel.add(panel, gbc);
   }
}
測試程式8
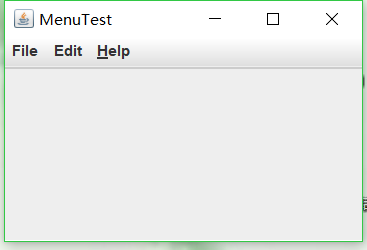
l 在elipse IDE中除錯執行教材512頁程式12-8,結合執行結果理解程式;
l 掌握選單的建立、選單事件監聽器、複選框和單選按鈕選單項、彈出選單以及快捷鍵和加速器的用法。
l 記錄示例程式碼閱讀理解中存在的問題與疑惑。
package menu;

import java.awt.event.*;
import javax.swing.*;

/**
 * 帶有示例選單欄的框架。
 */
public class MenuFrame extends JFrame
{
   private static final int DEFAULT_WIDTH = 300;
   private static final int DEFAULT_HEIGHT = 200;
   private Action saveAction;//
   private Action saveAsAction;
   private JCheckBoxMenuItem readonlyItem;//用給定的readonlyItem標籤構造一個複選框選單項
   private JPopupMenu popup;//彈出選單

   /**
    * 將操作名稱列印到System.out的示例操作
    */
   class TestAction extends AbstractAction
   {
      public TestAction(String name)
      {
         super(name);
      }

      public void actionPerformed(ActionEvent event)
      {
         System.out.println(getValue(Action.NAME) + " selected.");//實現介面方法
      }
   }

   public MenuFrame()
   {
      setSize(DEFAULT_WIDTH, DEFAULT_HEIGHT);

      JMenu fileMenu = new JMenu("File");//選單物件
      fileMenu.add(new TestAction("New"));//將TestAction物件新增到選單中

      // 演示加速器

      JMenuItem openItem = fileMenu.add(new TestAction("Open"));
      openItem.setAccelerator(KeyStroke.getKeyStroke("ctrl O"));//呼叫setAccelerator方法將加速器鍵關聯到一個選單項上,使用KeyStroke型別的物件作為引數,將CTRL+O關聯到OpenItem選單項

      fileMenu.addSeparator();//Jmenu的一個方法將新分隔符追加到選單的末尾。

      saveAction = new TestAction("Save");
      JMenuItem saveItem = fileMenu.add(saveAction);
      saveItem.setAccelerator(KeyStroke.getKeyStroke("ctrl S"));

      saveAsAction = new TestAction("Save As");//將要執行的行為賦值給選單子項
      fileMenu.add(saveAsAction);
      fileMenu.addSeparator();

      fileMenu.add(new TestAction("Exit")// AbstractAction或者TestAction都可以,,,因為子類繼承了出構造器外的所有方法
         {
            public void actionPerformed(ActionEvent event)
            {
               System.exit(0);
            }
         });

      // 演示覆選框和單選按鈕選單

      readonlyItem = new JCheckBoxMenuItem("Read-only");//建立複選框選單項
      readonlyItem.addActionListener(new ActionListener()
         {
            public void actionPerformed(ActionEvent event)
            {
               boolean saveOk = !readonlyItem.isSelected();
               saveAction.setEnabled(saveOk);//呼叫setEnable方法,啟用save選單項
               saveAsAction.setEnabled(saveOk);//呼叫setEnable方法,啟用saveAs選單項
            }
         });
      //將單選鈕選單項加入到按鈕組中,當按鈕組中的一個按鈕被選中時,其他的按鈕都自動的變為未選擇項
      ButtonGroup group = new ButtonGroup();

      JRadioButtonMenuItem insertItem = new JRadioButtonMenuItem("Insert");
      insertItem.setSelected(true);//呼叫setSelected方法,設定insert這個選單項的選擇狀態
      JRadioButtonMenuItem overtypeItem = new JRadioButtonMenuItem("Overtype");

      group.add(insertItem);
      group.add(overtypeItem);

      // 演示圖示

      Action cutAction = new TestAction("Cut");
      cutAction.putValue(Action.SMALL_ICON, new ImageIcon("cut.gif"));//使用關聯的鍵設定此物件的一個屬性
      Action copyAction = new TestAction("Copy");
      copyAction.putValue(Action.SMALL_ICON, new ImageIcon("copy.gif"));
      Action pasteAction = new TestAction("Paste");
      pasteAction.putValue(Action.SMALL_ICON, new ImageIcon("paste.gif"));

      JMenu editMenu = new JMenu("Edit");//構建一個JMenu類物件,為每一個選單建立一個選單物件
      editMenu.add(cutAction);
      editMenu.add(copyAction);
      editMenu.add(pasteAction);

      // 演示巢狀選單

      JMenu optionMenu = new JMenu("Options");

      optionMenu.add(readonlyItem);
      optionMenu.addSeparator();
      optionMenu.add(insertItem);
      optionMenu.add(overtypeItem);

      editMenu.addSeparator();
      editMenu.add(optionMenu);

      // 說明助記符

      JMenu helpMenu = new JMenu("Help");
      helpMenu.setMnemonic('H');//呼叫setMnemonic方法,為help選單設定快捷鍵

      JMenuItem indexItem = new JMenuItem("Index");
      indexItem.setMnemonic('I');//呼叫setMnemonic方法,為index選單設定快捷鍵,該字元會在標籤中以帶下劃線的形式顯示
      helpMenu.add(indexItem);

      // 您還可以向操作新增助記符鍵
      Action aboutAction = new TestAction("About");
      aboutAction.putValue(Action.MNEMONIC_KEY, new Integer('A'));//把快捷鍵作為Action.MNEMONIC_KEY的鍵值新增到物件中
      helpMenu.add(aboutAction);

      // 將所有頂級選單新增到選單欄

      JMenuBar menuBar = new JMenuBar();
      setJMenuBar(menuBar);//呼叫setMenuBar方法將選單欄新增到框架上

      menuBar.add(fileMenu);
      menuBar.add(editMenu);
      menuBar.add(helpMenu);

      // 顯示彈出視窗

      popup = new JPopupMenu();
      popup.add(cutAction);
      popup.add(copyAction);
      popup.add(pasteAction);

      JPanel panel = new JPanel();
      panel.setComponentPopupMenu(popup);
      add(panel);
   }
}
package menu;

import java.awt.*;
import javax.swing.*;

/**
 * @version 1.24 2012-06-12
 * @author Cay Horstmann
 */
public class MenuTest
{
   public static void main(String[] args)
   {
      EventQueue.invokeLater(() -> {
         JFrame frame = new MenuFrame();
         frame.setTitle("MenuTest");
         frame.setDefaultCloseOperation(JFrame.EXIT_ON_CLOSE);
         frame.setVisible(true);
      });
   }
}
測試程式9
l 在elipse IDE中除錯執行教材517頁程式12-9,結合執行結果理解程式;
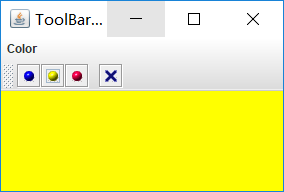
l 掌握工具欄和工具提示的用法;
l 記錄示例程式碼閱讀理解中存在的問題與疑惑。
package toolBar;

import java.awt.*;
import java.awt.event.*;
import javax.swing.*;

/**
 * A frame with a toolbar and menu for color changes.
 */
public class ToolBarFrame extends JFrame
{
   private static final int DEFAULT_WIDTH = 300;
   private static final int DEFAULT_HEIGHT = 200;
   private JPanel panel;

   public ToolBarFrame()
   {
      setSize(DEFAULT_WIDTH, DEFAULT_HEIGHT);

      // 新增顏色更改面板

      panel = new JPanel();
      add(panel, BorderLayout.CENTER);

      // 設定動作
      Action blueAction = new ColorAction("Blue", new ImageIcon("blue-ball.gif"), Color.BLUE);
      Action yellowAction = new ColorAction("Yellow", new ImageIcon("yellow-ball.gif"),
            Color.YELLOW);
      Action redAction = new ColorAction("Red", new ImageIcon("red-ball.gif"), Color.RED);

      Action exitAction = new AbstractAction("Exit", new ImageIcon("exit.gif"))
         {
            public void actionPerformed(ActionEvent event)
            {
               System.exit(0);
            }
         };
      exitAction.putValue(Action.SHORT_DESCRIPTION, "Exit");

      //填充工具欄

      JToolBar bar = new JToolBar();
      bar.add(blueAction);
      bar.add(yellowAction);
      bar.add(redAction);
      bar.addSeparator();
      bar.add(exitAction);
      add(bar, BorderLayout.NORTH);

      // populate menu

      JMenu menu = new JMenu("Color");
      menu.add(yellowAction);
      menu.add(blueAction);
      menu.add(redAction);
      menu.add(exitAction);
      JMenuBar menuBar = new JMenuBar();
      menuBar.add(menu);
      setJMenuBar(menuBar);
   }

   /**
    * The color action sets the background of the frame to a given color.
    */
   class ColorAction extends AbstractAction
   {
      public ColorAction(String name, Icon icon, Color c)
      {
         putValue(Action.NAME, name);
         putValue(Action.SMALL_ICON, icon);
         putValue(Action.SHORT_DESCRIPTION, name + " background");
         putValue("Color", c);
      }

      public void actionPerformed(ActionEvent event)
      {
         Color c = (Color) getValue("Color");
         panel.setBackground(c);
      }
   }
}
測試程式10
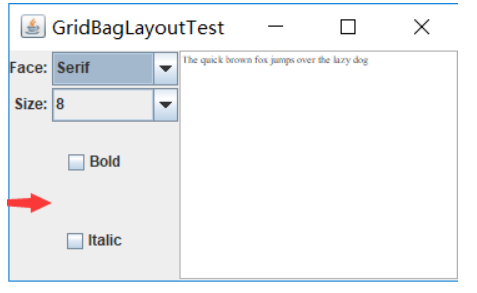
l 在elipse IDE中除錯執行教材524頁程式12-10、12-11,結合執行結果理解程式,瞭解GridbagLayout的用法。
l 在elipse IDE中除錯執行教材533頁程式12-12,結合程式執行結果理解程式,瞭解GroupLayout的用法。
l 記錄示例程式碼閱讀理解中存在的問題與疑惑。
測試程式11
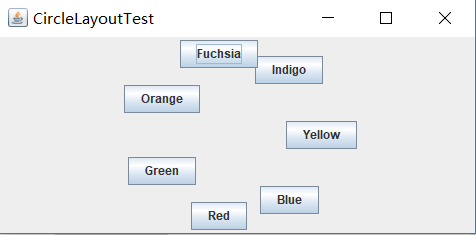
l 在elipse IDE中除錯執行教材539頁程式12-13、12-14,結合執行結果理解程式;
l 掌握定製佈局管理器的用法。
l 記錄示例程式碼閱讀理解中存在的問題與疑惑。
測試程式12
l 在elipse IDE中除錯執行教材544頁程式12-15、12-16,結合執行結果理解程式;
l 掌握選項對話方塊的用法。
l 記錄示例程式碼閱讀理解中存在的問題與疑惑。
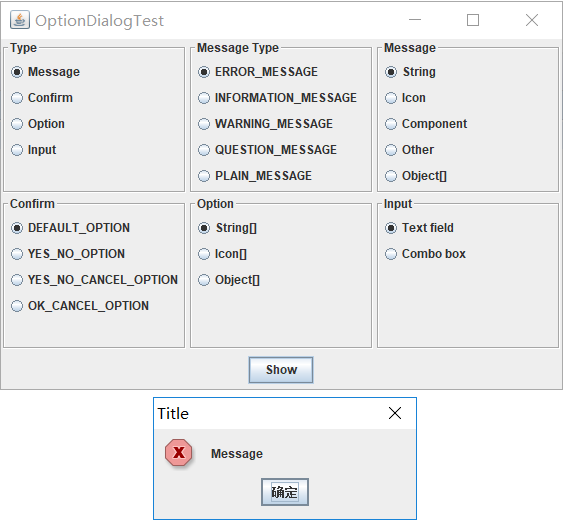
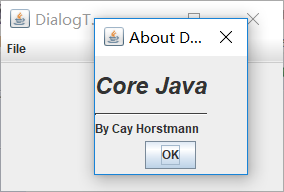
測試程式13
l 在elipse IDE中除錯執行教材552頁程式12-17、12-18,結合執行結果理解程式;
l 掌握對話方塊的建立方法;
l 記錄示例程式碼閱讀理解中存在的問題與疑惑。
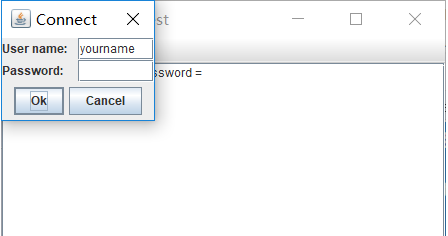
測試程式14
l 在elipse IDE中除錯執行教材556頁程式12-19、12-20,結合執行結果理解程式;
l 掌握對話方塊的資料交換用法;
l 記錄示例程式碼閱讀理解中存在的問題與疑惑。
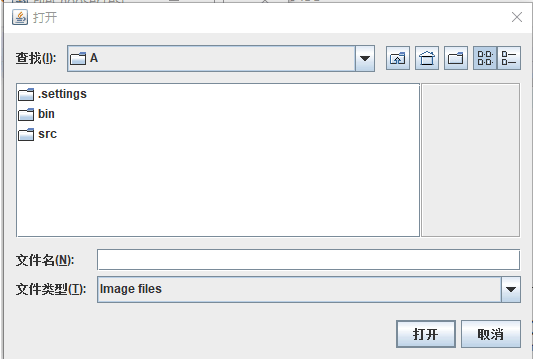
測試程式15
l 在elipse IDE中除錯執行教材556頁程式12-21、12-2212-23,結合程式執行結果理解程式;
l 掌握檔案對話方塊的用法;
l 記錄示例程式碼閱讀理解中存在的問題與疑惑。
package fileChooser;

import java.awt.*;
import javax.swing.*;

/**
 * @version 1.25 2015-06-12
 * @author Cay Horstmann
 */
public class FileChooserTest
{
   public static void main(String[] args)
   {
      EventQueue.invokeLater(() -> {
         JFrame frame = new ImageViewerFrame();
         frame.setTitle("FileChooserTest");
         frame.setDefaultCloseOperation(JFrame.EXIT_ON_CLOSE);
         frame.setVisible(true);
      });
   }
}
package fileChooser;

import java.awt.*;
import java.io.*;

import javax.swing.*;

/**
 * A file chooser accessory that previews images.
 */
public class ImagePreviewer extends JLabel
{
   /**
    * Constructs an ImagePreviewer.
    * @param chooser the file chooser whose property changes trigger an image
    *        change in this previewer
    */
   public ImagePreviewer(JFileChooser chooser)
   {
      setPreferredSize(new Dimension(100, 100));
      setBorder(BorderFactory.createEtchedBorder());

      chooser.addPropertyChangeListener(event -> {
         if (event.getPropertyName() == JFileChooser.SELECTED_FILE_CHANGED_PROPERTY)
         {
            // the user has selected a new file
            File f = (File) event.getNewValue();
            if (f == null)
            {
               setIcon(null);
               return;
            }

            // read the image into an icon
            ImageIcon icon = new ImageIcon(f.getPath());

            // if the icon is too large to fit, scale it
            if (icon.getIconWidth() > getWidth())
               icon = new ImageIcon(icon.getImage().getScaledInstance(
                     getWidth(), -1, Image.SCALE_DEFAULT));

            setIcon(icon);
         }
      });
   }
}
package fileChooser;

import java.io.*;

import javax.swing.*;
import javax.swing.filechooser.*;
import javax.swing.filechooser.FileFilter;

/**
 * A frame that has a menu for loading an image and a display area for the
 * loaded image.
 */
public class ImageViewerFrame extends JFrame
{
   private static final int DEFAULT_WIDTH = 300;
   private static final int DEFAULT_HEIGHT = 400;
   private JLabel label;
   private JFileChooser chooser;

   public ImageViewerFrame()
   {
      setSize(DEFAULT_WIDTH, DEFAULT_HEIGHT);

      // set up menu bar
      JMenuBar menuBar = new JMenuBar();
      setJMenuBar(menuBar);

      JMenu menu = new JMenu("File");
      menuBar.add(menu);

      JMenuItem openItem = new JMenuItem("Open");
      menu.add(openItem);
      openItem.addActionListener(event -> {
         chooser.setCurrentDirectory(new File("."));

         // show file chooser dialog
            int result = chooser.showOpenDialog(ImageViewerFrame.this);

            // if image file accepted, set it as icon of the label
            if (result == JFileChooser.APPROVE_OPTION)
            {
               String name = chooser.getSelectedFile().getPath();
               label.setIcon(new ImageIcon(name));
               pack();
            }
         });

      JMenuItem exitItem = new JMenuItem("Exit");
      menu.add(exitItem);
      exitItem.addActionListener(event -> System.exit(0));

      // use a label to display the images
      label = new JLabel();
      add(label);

      // set up file chooser
      chooser = new JFileChooser();

      // accept all image files ending with .jpg, .jpeg, .gif
      FileFilter filter = new FileNameExtensionFilter(
            "Image files", "jpg", "jpeg", "gif");
      chooser.setFileFilter(filter);

      chooser.setAccessory(new ImagePreviewer(chooser));

      chooser.setFileView(new FileIconView(filter, new ImageIcon("palette.gif")));
   }
}
測試程式16
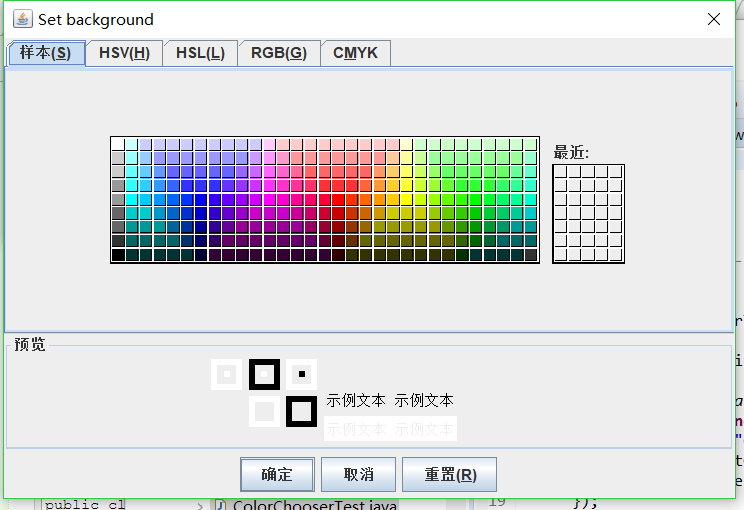
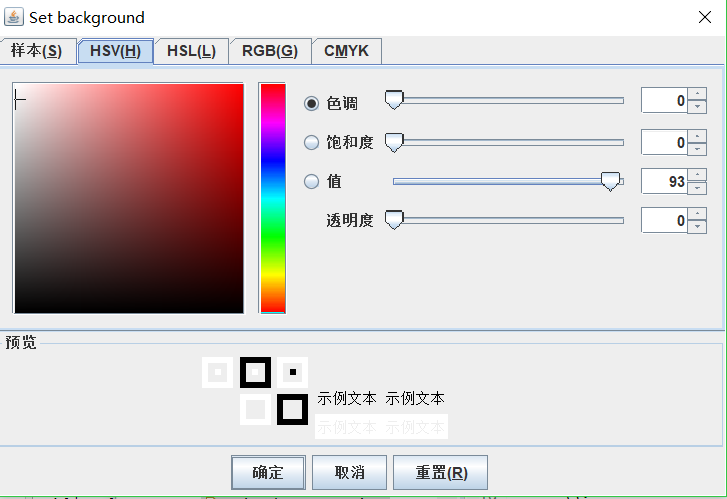
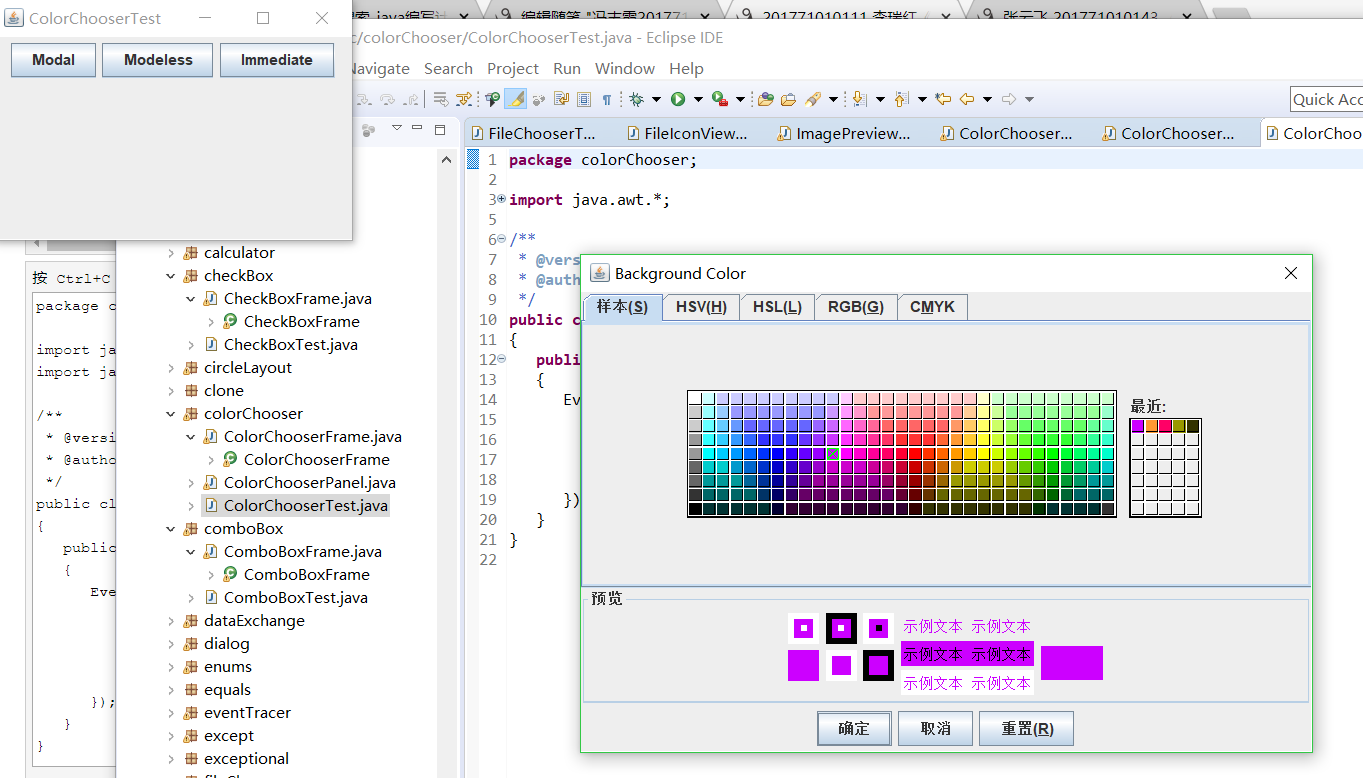
l 在elipse IDE中除錯執行教材570頁程式12-24,結合執行結果理解程式;
l 瞭解顏色選擇器的用法。
l 記錄示例程式碼閱讀理解中存在的問題與疑惑。
package colorChooser;

import java.awt.*;
import javax.swing.*;

/**
 * @version 1.04 2015-06-12
 * @author Cay Horstmann
 */
public class ColorChooserTest
{
   public static void main(String[] args)
   {
      EventQueue.invokeLater(() -> {
         JFrame frame = new ColorChooserFrame();
         frame.setTitle("ColorChooserTest");
         frame.setDefaultCloseOperation(JFrame.EXIT_ON_CLOSE);
         frame.setVisible(true);
      });
   }
}
package colorChooser;

import javax.swing.*;

/**
 * A frame with a color chooser panel
 */
public class ColorChooserFrame extends JFrame
{
   private static final int DEFAULT_WIDTH = 300;
   private static final int DEFAULT_HEIGHT = 200;

   public ColorChooserFrame()
   {
      setSize(DEFAULT_WIDTH, DEFAULT_HEIGHT);

      // add color chooser panel to frame

      ColorChooserPanel panel = new ColorChooserPanel();
      add(panel);
   }
}
實驗2:組內討論反思本組負責程式,理解程式總體結構,梳理程式GUI設計中應用的相關元件,整理相關元件的API,對程式中元件應用的相關程式碼添加註釋。
本組第八個
package menu;

import java.awt.event.*;
import javax.swing.*;

/**
 * 帶有示例選單欄的框架。
 */
public class MenuFrame extends JFrame
{
   private static final int DEFAULT_WIDTH = 300;
   private static final int DEFAULT_HEIGHT = 200;
   private Action saveAction;//
   private Action saveAsAction;
   private JCheckBoxMenuItem readonlyItem;//用給定的readonlyItem標籤構造一個複選框選單項
   private JPopupMenu popup;//彈出選單

   /**
    * 將操作名稱列印到System.out的示例操作
    */
   class TestAction extends AbstractAction
   {
      public TestAction(String name)
      {
         super(name);
      }

      public void actionPerformed(ActionEvent event)
      {
         System.out.println(getValue(Action.NAME) + " selected.");//實現介面方法
      }
   }

   public MenuFrame()
   {
      setSize(DEFAULT_WIDTH, DEFAULT_HEIGHT);

      JMenu fileMenu = new JMenu("File");//選單物件
      fileMenu.add(new TestAction("New"));//將TestAction物件新增到選單中

      // 演示加速器

      JMenuItem openItem = fileMenu.add(new TestAction("Open"));
      openItem.setAccelerator(KeyStroke.getKeyStroke("ctrl O"));//呼叫setAccelerator方法將加速器鍵關聯到一個選單項上,使用KeyStroke型別的物件作為引數,將CTRL+O關聯到OpenItem選單項

      fileMenu.addSeparator();//Jmenu的一個方法將新分隔符追加到選單的末尾。

      saveAction = new TestAction("Save");
      JMenuItem saveItem = fileMenu.add(saveAction);
      saveItem.setAccelerator(KeyStroke.getKeyStroke("ctrl S"));

      saveAsAction = new TestAction("Save As");//將要執行的行為賦值給選單子項
      fileMenu.add(saveAsAction);
      fileMenu.addSeparator();

      fileMenu.add(new TestAction("Exit")// AbstractAction或者TestAction都可以,,,因為子類繼承了出構造器外的所有方法
         {
            public void actionPerformed(ActionEvent event)
            {
               System.exit(0);
            }
         });

      // 演示覆選框和單選按鈕選單

      readonlyItem = new JCheckBoxMenuItem("Read-only");//建立複選框選單項
      readonlyItem.addActionListener(new ActionListener()
         {
            public void actionPerformed(ActionEvent event)
            {
               boolean saveOk = !readonlyItem.isSelected();
               saveAction.setEnabled(saveOk);//呼叫setEnable方法,啟用save選單項
               saveAsAction.setEnabled(saveOk);//呼叫setEnable方法,啟用saveAs選單項
            }
         });
      //將單選鈕選單項加入到按鈕組中,當按鈕組中的一個按鈕被選中時,其他的按鈕都自動的變為未選擇項
      ButtonGroup group = new ButtonGroup();

      JRadioButtonMenuItem insertItem = new JRadioButtonMenuItem("Insert");
      insertItem.setSelected(true);//呼叫setSelected方法,設定insert這個選單項的選擇狀態
      JRadioButtonMenuItem overtypeItem = new JRadioButtonMenuItem("Overtype");

      group.add(insertItem);
      group.add(overtypeItem);

      // 演示圖示

      Action cutAction = new TestAction("Cut");
      cutAction.putValue(Action.SMALL_ICON, new ImageIcon("cut.gif"));//使用關聯的鍵設定此物件的一個屬性
      Action copyAction = new TestAction("Copy");
      copyAction.putValue(Action.SMALL_ICON, new ImageIcon("copy.gif"));
      Action pasteAction = new TestAction("Paste");
      pasteAction.putValue(Action.SMALL_ICON, new ImageIcon("paste.gif"));

      JMenu editMenu = new JMenu("Edit");//構建一個JMenu類物件,為每一個選單建立一個選單物件
      editMenu.add(cutAction);
      editMenu.add(copyAction);
      editMenu.add(pasteAction);

      // 演示巢狀選單

      JMenu optionMenu = new JMenu("Options");

      optionMenu.add(readonlyItem);
      optionMenu.addSeparator();
      optionMenu.add(insertItem);
      optionMenu.add(overtypeItem);

      editMenu.addSeparator();
      editMenu.add(optionMenu);

      // 說明助記符

      JMenu helpMenu = new JMenu("Help");
      helpMenu.setMnemonic('H');//呼叫setMnemonic方法,為help選單設定快捷鍵

      JMenuItem indexItem = new JMenuItem("Index");
      indexItem.setMnemonic('I');//呼叫setMnemonic方法,為index選單設定快捷鍵,該字元會在標籤中以帶下劃線的形式顯示
      helpMenu.add(indexItem);

      // 您還可以向操作新增助記符鍵
      Action aboutAction = new TestAction("About");
      aboutAction.putValue(Action.MNEMONIC_KEY, new Integer('A'));//把快捷鍵作為Action.MNEMONIC_KEY的鍵值新增到物件中
      helpMenu.add(aboutAction);

      // 將所有頂級選單新增到選單欄

      JMenuBar menuBar = new JMenuBar();
      setJMenuBar(menuBar);//呼叫setMenuBar方法將選單欄新增到框架上

      menuBar.add(fileMenu);
      menuBar.add(editMenu);
      menuBar.add(helpMenu);

      // 顯示彈出視窗

      popup = new JPopupMenu();
      popup.add(cutAction);
      popup.add(copyAction);
      popup.add(pasteAction);

      JPanel panel = new JPanel();
      panel.setComponentPopupMenu(popup);
      add(panel);
   }
}
實驗3:組間協同學習:在本班課程QQ群內,各位同學對實驗1中存在的問題進行提問,提問時註明實驗1中的測試程式編號,負責對應程式的小組需及時對群內提問進行回答。
實驗總結:
1.Swing和MVC設計模式
MVC設計模式
– Model(模型):是程式中用於處理程式資料邏輯的部分,通常模型負責在資料庫中存取資料。
– View(檢視):是程式中處理資料顯示的部分,通常檢視依據模型存取的資料建立。
– Controller(控制器):是程式中處理使用者互動的部分。通常控制器負責從檢視讀取資料,控制使用者輸入,並向模型傳送資料。
佈局管理器
(1)FlowLayout: 流佈局(Applet和Panel的預設佈局管理器)
(2)BorderLayout:邊框佈局( Window、Frame和Dialog的預設佈局管理器)
(3)GridLayout: 網格佈局
BorderLayout (邊框佈局管理器):邊框佈局管理器是每個JFrame的內容窗格的預設佈局管理器;流佈局管理器可將元件置於內容窗格的中部,北 部、南部、東部或西部位置。流佈局管理器會擴充套件元件尺寸並填滿指定方位區域。
BorderLayout的使用方法:設定容器的佈局管理器為BorderLayout ;向容器中加入元件時,若使用兩個引數的add() 方法,第二個引數必須說明加入元件在容器中的放置位置;位置引數是BorderLayout 類的常量:CENTER、 NORTH、SOUTH、EAST、WEST 例如: frame.add(component,BorderLayout.SOUTH);
BorderLayout( ) :建立新的BorderLayout,元件之間沒有間距 ;setHgap(int hgap) :將元件間的水平間距設定為指定的值; setVgap(int vgap) :將元件間的垂直間距設定為指定的值
GridLayout (網格佈局管理器):網格佈局按行列排列所有的元件;在網格佈局物件的構造器中,需要指定行數和列數: panel.setLayout(new GridLayout(6,10));放置元件的每個單元具有相同的尺寸。新增元件,從第一行和第一列開始,然後是第一行的第二列。以此類推。
GridLayout:指定網格中的行數和列數,建立網格佈局
選單建立 選單項中的圖示 複選框和單選按鈕選單項 彈出選單 快捷鍵和加速器 啟用和禁用選單項 工具欄 工具提示
網格組佈局 (GridBagLayout):GridBagLayout與GridLayout有點相似,它也是 將元件排在格子裡,但是GridBagLayout在網格 的基礎上提供更復雜的佈局。
GridBagLayout允許單個元件在一個單元中不填 滿整個單元,而只是佔用最佳大小,也允許單個 元件擴充套件成不止一個單元,並且可以用任意順序 加入元件。
定製佈局管理器: 程式設計師可通過自己設計LayoutManager類來實現 特殊的佈局方式。定製佈局管理器需要實現LayoutManager介面, 並覆蓋以下方法。
對話方塊是一種大小不能變化、不能有選單的容器視窗;對話方塊不能作為一個應用程式的主框架,而必須包含在其他的容器中。
Java提供多種對話方塊類來支援多種形式的對話方塊。
對話方塊依賴於框架。當框架撤銷時,依賴該框架的對話方塊 也撤銷。當框架圖示化時,依賴它的對話方塊也從螢幕上消 失。當框架視窗恢復時,依賴框架的對話方塊又返回螢幕。
選項對話方塊:JOptionPane提供的對話方塊是模式對話方塊。當模 式對話方塊顯示時,它不允許使用者輸入到程式的 其他的視窗。使用JOptionPane,可以建立和自 定義問題、資訊、警告和錯誤等幾種型別的對 話框。
資料交換:輸入對話方塊含有供使用者輸入文字的文字框、一個確認和取 消按鈕,是有模式對話方塊。當輸入對話方塊可見時,要求使用者 輸入一個字串。
檔案對話方塊:專門用於對檔案(或目錄)進行瀏覽和選擇的對 話框,常用的構造方法: – JFileChooser():根據使用者的預設目錄建立檔案對話方塊 – JFileChooser(File currentDirectory):根據File型引數 currentDirectory指定的目錄建立檔案對話方塊
顏色對話方塊: javax.swing包中的JColorChooser類的靜態方 法: public static Color showDialog(Component component, String title, Color initialColor)建立一個顏色對話方塊
引數component指定對話方塊所依賴的元件,title 指定對話方塊的標題;initialColor 指定對話方塊返回 的初始顏色,即對話方塊消失後,返回的預設值。 顏色對話方塊可根據使用者在顏色對話方塊中選擇的顏 色返回一個顏色物件.
自己建立對話方塊,需呼叫超類JDialog類的構造器
public aboutD extends JDialog
{
public aboutD(JFrame owner)
{
super(owner,"About Text",true);
....
}
}
構造JDialog類後需要setVisible才能時視窗可見
if(dialog == null)
dialog = new JDialog();
dialog.setVisible(true);
經過分配學習,主要對常用的一些佈局管理器API有了一點了解但內容還是過於多,並不是所有都瞭解掌握
