OpenCV之處理影象前的基本準備工作
阿新 • • 發佈:2018-12-02
前面兩個部分分別介紹了在AS上安裝OpenCV的開發環境以及關於OpenCV的基本資訊,本部分就來說一說使用OpenCV處理影象的一些基本準備工作。
我們知道在AS上開發Android的專案最後都會執行到模擬器或者移動終端上,我們這裡要使用OpenCV來處理圖片,那麼首先的獲取影象,這裡可能主要分為兩個大部分,一部分是圖片來源於本地,另一個是圖片來源於網路。關於從網路中獲取圖片這裡就先不介紹,主要說一下通過裝置自帶的相機和本地檔案來獲取影象資源。這裡其實在我之前的部落格就有介紹,有興趣的朋友可以轉至 攝像頭呼叫與照片選擇
1,相機獲取圖片
開啟相機:
Intent intent = new Intent(MediaStore.ACTION_IMAGE_CAPTURE);
Uri fileUri = Uri.fromFile(new File(fielPath));
intent.putExtra(MediaStore.EXTRA_OUTPUT, fileUri);
startActivityForResult(intent, CAMERA_REQUEST_CODE);
獲取照片:
Bitmap bitmap=BitmapFactory.decodeFile(filePath);
2,檔案獲取圖片
開啟檔案選擇:
        Intent intent = new Intent();
        intent.setType("image/*");
        intent.setAction(Intent.ACTION_GET_CONTENT);
        startActivityForResult(Intent.createChooser(intent, "請選擇圖片"), FILE_REQUEST_CODE);
獲取圖片:
 private String handleImageOnKitKat(Intent data) {
        //獲取資源定位符
        Uri uri = data.getData();
        //選擇圖片路徑
        String imagePath = null;
        if (DocumentsContract.isDocumentUri(this, uri)) {
            String docId = DocumentsContract.getDocumentId(uri);
            if ("com.android.providers.media.documents".equals(uri.getAuthority())) {
                String id = docId.split(":")[1];
                String selection = MediaStore.Images.Media._ID + "=" + id;
                imagePath = getImagePath(MediaStore.Images.Media.EXTERNAL_CONTENT_URI, selection);
            } else if ("com.android.providers.downloads.documents".equals(uri.getAuthority())) {
                Uri contentUri = ContentUris.withAppendedId(Uri.parse("content://downloads/public_downloads"), Long.valueOf(docId));
                imagePath = getImagePath(contentUri, null);
            }

        } else if ("content".equalsIgnoreCase(uri.getScheme())) {

            imagePath = getImagePath(uri, null);
        } else if ("file".equalsIgnoreCase(uri.getScheme())) {
            imagePath = uri.getPath();
        }
        return imagePath;
    }


private String getImagePath(Uri externalContentUri, String selection) {
        String path = null;
        Cursor cursor = getContentResolver().query(externalContentUri, null, selection, null, null);
        if (cursor != null) {
            if (cursor.moveToFirst()) {
                path = cursor.getString(cursor.getColumnIndex(MediaStore.Images.Media.DATA));
            }
            cursor.close();
        }
        return path;
    }
只需要將回調的Intent傳進到handleImageOnKitKat方法中即可獲取選擇的圖片路徑。
3,圖片壓縮與旋轉
壓縮:
Bitmap.createScaledBitmap(bitmap,imgWidth,imgHeight, true) 旋轉:
  /**
     *
     * @param bitmap
     * @return
     */
    public static Bitmap rotateBitmap(Bitmap bitmap,float rotateAngle){
        Matrix matrix  = new Matrix();
        matrix.setRotate(rotateAngle);
        Bitmap newBitmap = Bitmap.createBitmap(bitmap, 0, 0, bitmap.getWidth(), bitmap.getHeight()
                        , matrix, true);

        return newBitmap;
    }
注意,在旋轉圖片的時候建議設定圖片Bitmap寬高一樣,否則在旋轉的過程中可能會報異常,因為Bitmap就像一個容器,我們旋轉的是裡面的內容,外殼沒有變化,如果原來是長方形,旋轉之後外殼還是長方形,裡面的東西變成了躺著的長方形,也就是寬高對調了,你是肯定放不進去的,這個時候就會出現異常,但是如果是正方形就不會(前提是以90度為單位旋轉)。
4,示例
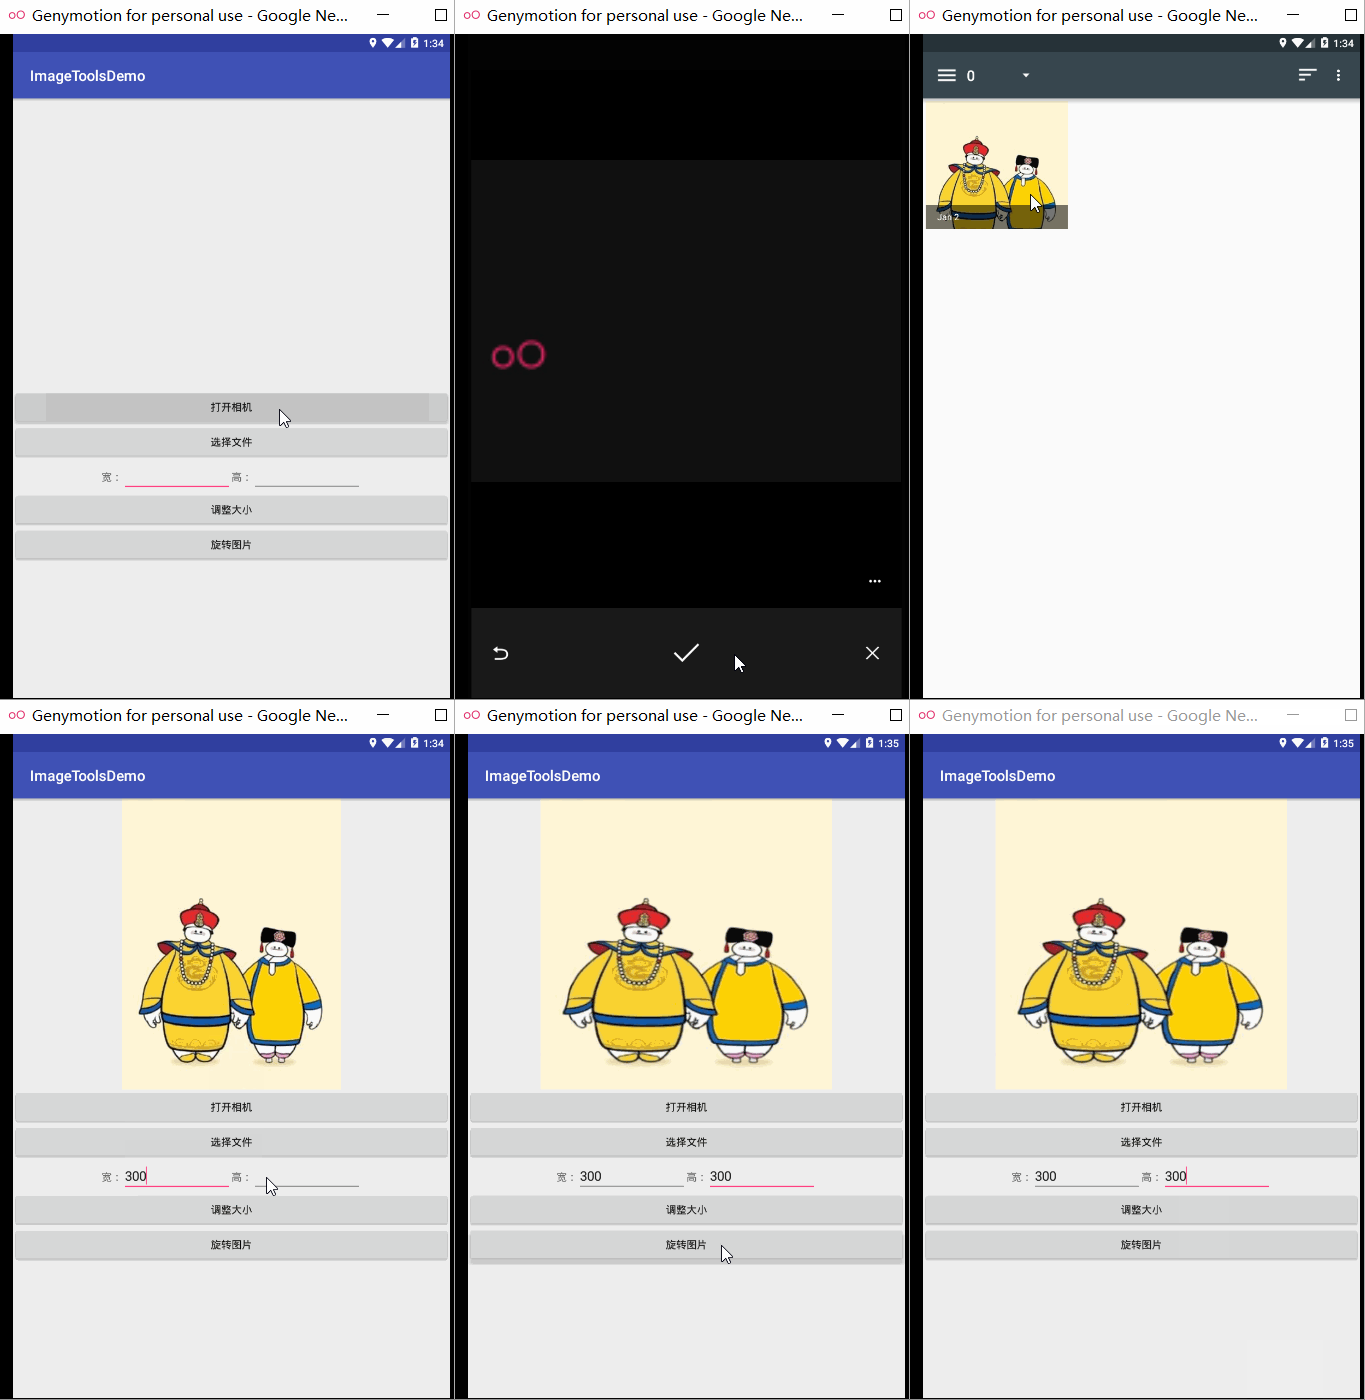
4.1 示例效果

4.2 實現程式碼
activity_main.xml程式碼:
<?xml version="1.0" encoding="utf-8"?>
<LinearLayout xmlns:android="http://schemas.android.com/apk/res/android"
    xmlns:app="http://schemas.android.com/apk/res-auto"
    xmlns:tools="http://schemas.android.com/tools"
    android:layout_width="match_parent"
    android:layout_height="match_parent"
    android:orientation="vertical"
    tools:context="com.hfut.imagetoolsdemo.MainActivity">

    <ImageView
        android:id="@+id/image_show"
        android:layout_width="match_parent"
        android:layout_height="400sp" />

    <Button
        android:id="@+id/open_camera"
        android:layout_width="match_parent"
        android:layout_height="wrap_content"
        android:onClick="openCamera"
        android:text="開啟相機" />

    <Button
        android:id="@+id/open_file"
        android:layout_width="match_parent"
        android:layout_height="wrap_content"
        android:onClick="openFile"
        android:text="選擇檔案" />

    <LinearLayout
        android:layout_width="match_parent"
        android:layout_height="wrap_content"
        android:gravity="center_horizontal"
        android:orientation="horizontal">

        <TextView
            android:layout_width="wrap_content"
            android:layout_height="wrap_content"
            android:text="寬:" />

        <EditText
            android:id="@+id/bitmap_width"
            android:layout_width="150sp"
            android:layout_height="wrap_content" />

        <TextView
            android:layout_width="wrap_content"
            android:layout_height="wrap_content"
            android:text="高:" />

        <EditText
            android:id="@+id/bitmap_height"
            android:layout_width="150sp"
            android:layout_height="wrap_content" />

    </LinearLayout>

    <Button
        android:layout_width="match_parent"
        android:layout_height="wrap_content"
        android:onClick="changeSize"
        android:text="調整大小" />

    <Button
        android:layout_width="match_parent"
        android:layout_height="wrap_content"
        android:onClick="rotateImage"
        android:text="旋轉圖片" />
</LinearLayout>
MainActivity.java 程式碼:
package com.hfut.imagetoolsdemo;

import android.Manifest;
import android.content.ContentUris;
import android.content.Intent;
import android.content.pm.PackageManager;
import android.database.Cursor;
import android.graphics.Bitmap;
import android.graphics.BitmapFactory;
import android.graphics.Matrix;
import android.net.Uri;
import android.provider.DocumentsContract;
import android.provider.MediaStore;
import android.support.annotation.NonNull;
import android.support.v4.app.ActivityCompat;
import android.support.v4.content.ContextCompat;
import android.support.v7.app.AppCompatActivity;
import android.os.Bundle;
import android.view.View;
import android.widget.EditText;
import android.widget.ImageView;
import android.widget.Toast;

import java.io.File;
import java.io.FileNotFoundException;
import java.io.IOException;

/**
 * @author why
 * @date 2018-12-1 12:14:56
 */
public class MainActivity extends AppCompatActivity {

    ImageView imageView;
    EditText imgWidth;
    EditText imgHeight;
    Bitmap bitmap;

    @Override
    protected void onCreate(Bundle savedInstanceState) {
        super.onCreate(savedInstanceState);
        setContentView(R.layout.activity_main);
        imageView = findViewById(R.id.image_show);
        imgWidth = findViewById(R.id.bitmap_width);
        imgHeight = findViewById(R.id.bitmap_height);
    }

    public void openCamera(View view) {

        Intent intent = new Intent(MediaStore.ACTION_IMAGE_CAPTURE);
        Uri fileUri = Uri.fromFile(new File("mnt/sdcard/why.jpg"));
        intent.putExtra(MediaStore.EXTRA_OUTPUT, fileUri);
        startActivityForResult(intent, 1);
    }

    public void openFile(View view) {
        Intent intent = new Intent();
        intent.setType("image/*");
        intent.setAction(Intent.ACTION_GET_CONTENT);
        startActivityForResult(Intent.createChooser(intent, "請選擇圖片"), 2);

    }


    @Override
    protected void onActivityResult(int requestCode, int resultCode, Intent data) {
        //super.onActivityResult(requestCode, resultCode, data);
        switch (requestCode) {
            case 1:
                bitmap = BitmapFactory.decodeFile("mnt/sdcard/why.jpg");
                imageView.setImageBitmap(bitmap);
                break;
            case 2:
                String imagePath = handleImageOnKitKat(data);
                bitmap = BitmapFactory.decodeFile(imagePath);
                imageView.setImageBitmap(bitmap);
                break;
        }
    }


    public void changeSize(View view) {
        if (imgHeight.getText().toString().equals("") || imgWidth.getText().toString().equals("")) {
            Toast.makeText(this, "please enter the size info", Toast.LENGTH_SHORT).show();
        } else {
            bitmap = Bitmap.createScaledBitmap(bitmap,
                    Integer.parseInt(imgWidth.getText().toString()),
                    Integer.parseInt(imgHeight.getText().toString()), true);
            imageView.setImageBitmap(bitmap);
        }
    }

    public void rotateImage(View view) {
        bitmap = rotateBitmap(bitmap, 90);
        imageView.setImageBitmap(bitmap);
    }

    private String handleImageOnKitKat(Intent data) {
        //獲取資源定位符
        Uri uri = data.getData();
        //選擇圖片路徑
        String imagePath = null;
        if (DocumentsContract.isDocumentUri(this, uri)) {
            String docId = DocumentsContract.getDocumentId(uri);
            if ("com.android.providers.media.documents".equals(uri.getAuthority())) {
                String id = docId.split(":")[1];
                String selection = MediaStore.Images.Media._ID + "=" + id;
                imagePath = getImagePath(MediaStore.Images.Media.EXTERNAL_CONTENT_URI, selection);
            } else if ("com.android.providers.downloads.documents".equals(uri.getAuthority())) {
                Uri contentUri = ContentUris.withAppendedId(Uri.parse("content://downloads/public_downloads"), Long.valueOf(docId));
                imagePath = getImagePath(contentUri, null);
            }

        } else if ("content".equalsIgnoreCase(uri.getScheme())) {

            imagePath = getImagePath(uri, null);
        } else if ("file".equalsIgnoreCase(uri.getScheme())) {
            imagePath = uri.getPath();
        }
        return imagePath;
    }

    private String getImagePath(Uri externalContentUri, String selection) {
        String path = null;
        Cursor cursor = getContentResolver().query(externalContentUri, null, selection, null, null);
        if (cursor != null) {
            if (cursor.moveToFirst()) {
                path = cursor.getString(cursor.getColumnIndex(MediaStore.Images.Media.DATA));
            }
            cursor.close();
        }
        return path;
    }

    private Bitmap rotateBitmap(Bitmap bitmap, float rotateAngle) {
        Matrix matrix = new Matrix();
        matrix.setRotate(rotateAngle);
        Bitmap newBitmap = Bitmap.createBitmap(bitmap, 0, 0, bitmap.getWidth(), bitmap.getHeight()
                , matrix, true);

        return newBitmap;
    }

}
在配置檔案中新增讀寫外部儲存和相機的許可權:
<uses-permission android:name="android.permission.WRITE_EXTERNAL_STORAGE"/>
<uses-permission android:name="android.permission.CAMERA"/>
注意,因為我是在5.1 的系統上測試的,在6.0及以上請新增許可權申請部分程式碼。到這裡,獲取本地圖片最基本的部分就介紹完了。更多類容請檢視:
下一篇:OpenCV中Mat與Android中Bitmap簡介
