Solr的安裝部署及簡單使用
由於demo專案使用的是maven構建,maven倉庫用的是oschina的,此時solr的最新版本是5.4,而oschina中的solrj最新版本是5.3.1,所以我們為了保持一致性,也將下載5.3.1的solr作為演示
一、下載
首先需要下載solr5.3.1,具體下載此處略。
二、安裝
1,解壓tomcat(此處使用的是tomcat 7)
2,解壓solr5.3.1
3,將 solr-5.3.1\server\solr-webapp 資料夾底下的 webapp 複製到 tomcat 對應目錄底下的 webapps 中,並將資料夾名字改為 solr(自己指定其他的名字也是可以的)
4,將 solr-5.3.1\server\lib\ext 資料夾底下的lib全部複製到tomcat底下的 solr/WEB-INF/libs/ 中
5,複製 log4j.properties到tomcat底下solr對應的classes資料夾下(classes需要建立)
6,複製 solr-5.3.1\server\solr 資料夾到自己指定的目錄,此目錄需要在下一步驟裡填寫(也可以不復制,直接引用)
7,修改tomcat底下的solr對應的web.xml配置檔案,找到以下片段
<env-entry>
<env-entry-name>solr/home</env-entry-name>
<env-entry-value>/put/your/solr/home/here</env-entry-value>
<env-entry-type>java.lang.String</ 注:此片段預設是註釋了的,需要解除註釋。
將 env-entry-value 裡的值替換為剛才第5步的路徑。
三、啟動tomcat,檢視安裝結果
http://localhost:8080/solr/
注:solr下載下來後,也可以使用自帶的命令來啟動,這裡是因為需要配合java web專案,才放在tomcat裡做演示使用
以上,我們就將solr安裝到tomcat底下,但是仍然沒有和我們的java專案結合起來使用,同時也沒有加入對應的中文分詞。接下來將繼續講下面的部分。
四、新增自定義solr
在剛才定義的
solr/home資料夾底下,新建一個資料夾 my_solr,在my_solr目錄中新建core.properties內容為name=mysolr (solr中的mysolr應用),同時將下載下來的solr-5.3.1解壓檔案中的 server/solr 資料夾的複製到my_solr目錄底下
五、配置中文分詞,以mmseg4j為例
1,下載jar包(mmseg4j-core-1.10.0.jar、mmseg4j-solr-2.3.0.jar),並複製到tomcat底下的 solr/WEB-INF/libs/ 中
2,配置my_solr資料夾中的schema.xml,在尾部新增
<fieldtype name="textComplex" class="solr.TextField" positionIncrementGap="100">
	<analyzer>
	<tokenizer class="com.chenlb.mmseg4j.solr.MMSegTokenizerFactory" mode="complex" dicPath="dic"/>
	</analyzer>
	</fieldtype>
	<fieldtype name="textMaxWord" class="solr.TextField" positionIncrementGap="100">
	<analyzer>
	<tokenizer class="com.chenlb.mmseg4j.solr.MMSegTokenizerFactory" mode="max-word" />
	</analyzer>
	</fieldtype>
	<fieldtype name="textSimple" class="solr.TextField" positionIncrementGap="100">
	<analyzer>
	<tokenizer class="com.chenlb.mmseg4j.solr.MMSegTokenizerFactory" mode="simple" dicPath="d:/my_dic" />
	</analyzer>
</fieldtype>
3,重啟tomcat,檢視效果
六、java中呼叫
1,在上面說的schema.xml中,新增
<field name="content_test" type="textMaxWord" indexed="true" stored="true" multiValued="true"/>2,新建測試類
package demo.test;

import org.apache.solr.client.solrj.*;
import org.apache.solr.client.solrj.impl.HttpSolrClient;
import org.apache.solr.client.solrj.response.QueryResponse;
import org.apache.solr.common.SolrDocument;
import org.apache.solr.common.SolrDocumentList;
import org.apache.solr.common.SolrInputDocument;
import java.io.IOException;
import java.util.ArrayList;
import java.util.List;

/**
 * solr 5.3.0
 * Created by daxiong on 2015/10/23.
 */
public class MySolr {

	//solr url
    public static final String URL = "http://localhost:8080/solr";
    //solr應用
    public static final String SERVER = "mysolr";
    //待索引、查詢欄位
    public static String[] docs = {"Solr是一個獨立的企業級搜尋應用伺服器",
                                    "它對外提供類似於Web-service的API介面",
                                    "使用者可以通過http請求",
                                     "向搜尋引擎伺服器提交一定格式的XML檔案生成索引",
                                    "也可以通過Http Get操作提出查詢請求",
                                    "並得到XML格式的返回結果"};

    public static SolrClient getSolrClient(){
        return new HttpSolrClient(URL+"/"+SERVER);
    }

    /**
     * 新建索引
     */
    public static void createIndex(){
        SolrClient client = getSolrClient();
        int i = 0;
        List<SolrInputDocument> docList = new ArrayList<SolrInputDocument>();
        for(String str : docs){
            SolrInputDocument doc = new SolrInputDocument();
            doc.addField("id",i++);
            doc.addField("content_test", str);
            docList.add(doc);
        }
        try {
            client.add(docList);
            client.commit();
        } catch (SolrServerException e) {
            e.printStackTrace();
        } catch (IOException e) {
            e.printStackTrace();
        }
    };

    /**
     * 搜尋
     */
    public static void search(){
        SolrClient client = getSolrClient();
        SolrQuery query = new SolrQuery();
        query.setQuery("content_test:搜尋");
        QueryResponse response = null;
        try {
            response = client.query(query);
            System.out.println(response.toString());
            System.out.println();
            SolrDocumentList docs = response.getResults();
            System.out.println("文件個數:" + docs.getNumFound());
            System.out.println("查詢時間:" + response.getQTime());
            for (SolrDocument doc : docs) {
                System.out.println("id: " + doc.getFieldValue("id") + "      content: " + doc.getFieldValue("content_test"));
            }
        } catch (SolrServerException e) {
            e.printStackTrace();
        } catch (IOException e) {
            e.printStackTrace();
        }
    }

    public static void main(String[] args) {
        createIndex();
        search();
    }
}
3,檢視執行結果
{responseHeader={status=0,QTime=23,params={q=content_test:搜尋,wt=javabin,version=2}},response={numFound=2,start=0,docs=[SolrDocument{id=0, content_test=[Solr是一個獨立的企業級搜尋應用伺服器], _version_=1522509944966873088}, SolrDocument{id=3, content_test=[向搜尋引擎伺服器提交一定格式的XML檔案生成索引], _version_=1522509945343311874}]}}

文件個數:2
查詢時間:23
id: 0      content: [Solr是一個獨立的企業級搜尋應用伺服器]
id: 3      content: [向搜尋引擎伺服器提交一定格式的XML檔案生成索引]
七,與資料庫整合
我們通常查詢的資料都是在資料庫(或快取資料庫),這裡以mysql作為示例。
1,進入my_solr/conf目錄中,找到 solrconfig.xml 配置檔案,開啟,在其中增加如下程式碼
<requestHandler name="/dataimport" class="org.apache.solr.handler.dataimport.DataImportHandler">
	<lst name="defaults">
	    <str name="config">data-config.xml</str>
	</lst>
</requestHandler>
這個是用來配置匯入資料的配置檔案
2,增加完後,再在同級目錄增加 data-config.xml 檔案,檔案內容如下
<?xml version="1.0" encoding="UTF-8"?>
<dataConfig>
<dataSource type="demoDataSource" driver="com.mysql.jdbc.Driver" url="jdbc:mysql://localhost:3306/demo" user="root" password="" batchSize="-1" />
    <document>
        <entity name="t_user" pk="id" query="SELECT * FROM t_user">
            <field column="username" name="username" />
        </entity>
    </document>
</dataConfig>
其中配置的欄位請填寫自己資料庫的相應配置。
3,然後開啟 schema.xml ,在其中增加如下程式碼
<field name="username" type="text_general" indexed="true" stored="true" required="true" multiValued="true" />這裡的username和上面的username對應,用作查詢使用。
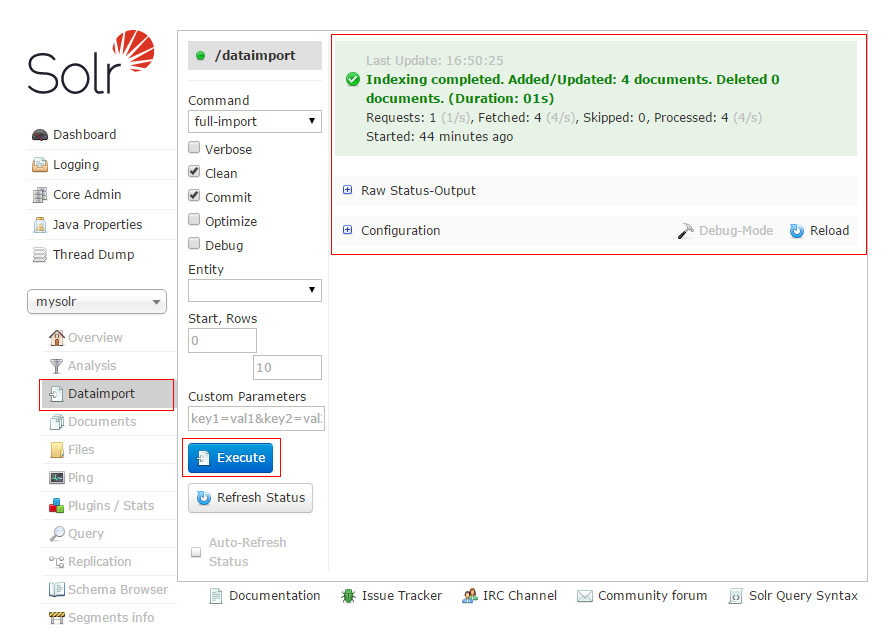
4,開啟solr管理後臺 http://localhost:8080/solr/#/mysolr ,點選左側選單“Dataimport“,預設勾選項即可,點選”Excute“按鈕,這時會按照剛才的配置匯入相應的資料到solr中,執行完成後會出現如下截圖(執行時間可能會比想象的要長一點)

以上,我們就將mysql和solr關聯了起來。接下來,我們可以點選左側選單”Query“,在”q“所在的對話方塊下,輸入對應的搜尋關鍵詞,例如:username:張三,然後點選”Excute Query“按鈕,就可以在右側看到查詢結果
那麼怎麼在java中呼叫,得到自己要的查詢結果呢?
現在我知道的是兩種方法:
1,使用http訪問,返回對應的json資料
2,使用SolrQuery呼叫(上述已有示例程式碼)
相應的高階查詢方法,後續如果有時間會繼續補充。
