
Picasso原始碼解析
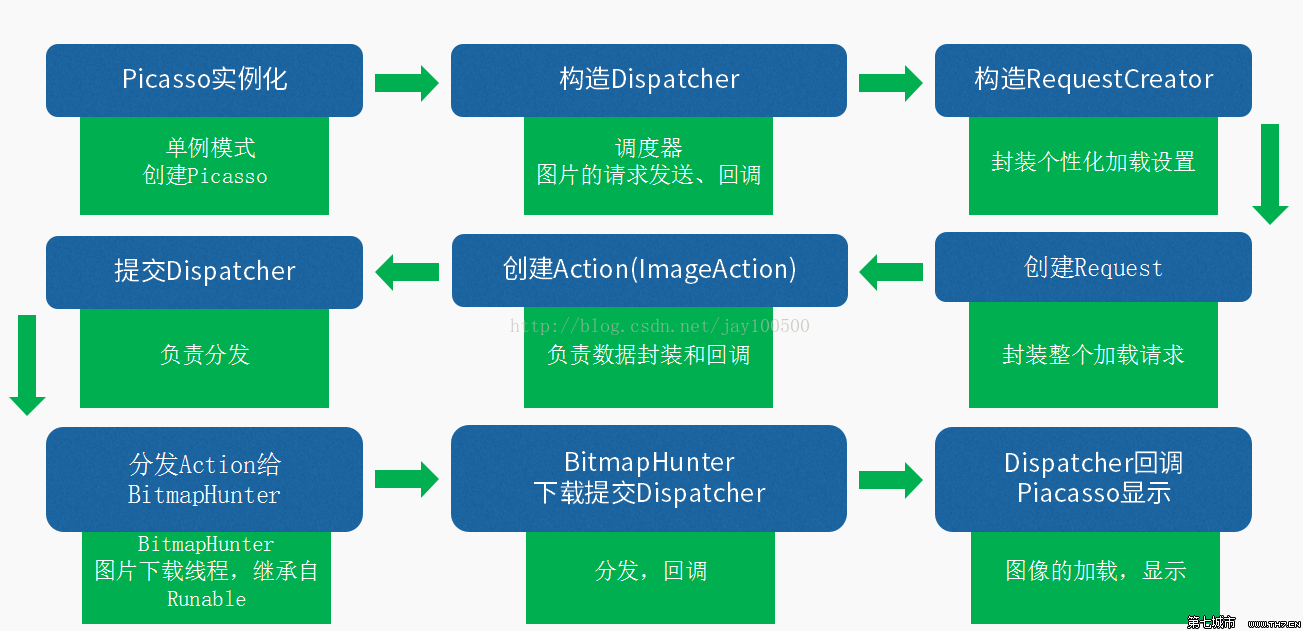
本來這一篇文章,早就應該寫了,但是最近一直在研究專案的安全性,就一直耽擱了。研究了一段時間的安全性,收穫頗豐,下一篇文章,將總結一下最近的收穫。好了,先把Picasso捋一遍。老規矩,先上流程圖。這張圖,從網上找來的。
Picasso的簡單使用
build.gradle依賴
1 implementation 'com.squareup.picasso:picasso:2.71828'
載入圖片
1 Picasso.get().load(url).into(imageView);
就一句程式碼,就實現了整個圖片的載入。簡單,明瞭。當然以前的版本是這樣使用的 Picasso.with(this).load(url).into(imageView);
Picasso的原始碼解析
get()
我們先看看get()方法做了哪些操作
1 public static Picasso get() { 2 if (singleton == null) { 3 synchronized (Picasso.class) { 4 if (singleton == null) { 5 if (PicassoProvider.context == null) { 6 throw new IllegalStateException("context == null"); 7 } 8 singleton = new Builder(PicassoProvider.context).build();9 } 10 } 11 } 12 return singleton; 13 }
直接就通過一個雙重判斷形式的單例來獲取到這個Picasso例項物件,我們看看singleton = new Builder(PicassoProvider.context).build();中的Builder做了什麼。
1 /** Start building a new {@link Picasso} instance. */ 2 public Builder(@NonNull Context context) { 3 if (context == null) { 4 throw new IllegalArgumentException("Context must not be null.");5 } 6 this.context = context.getApplicationContext(); 7 }
Building中所的操作不多,判斷一下這個上下文環境,並且對上下文環境賦值為context.getApplicationContext();也就是說,Picasso的生命週期是和整個專案的生命週期是一致的,
當專案退出後,Picasso才會銷燬。
build()
接著我們看看build()方法中做了哪些操作
 1 /** Create the {@link Picasso} instance. */
 2 public Picasso build() {
 3 Context context = this.context;
 4
 5 if (downloader == null) {
 6 downloader = new OkHttp3Downloader(context);
 7 }
 8 if (cache == null) {
 9 cache = new LruCache(context);
10 }
11 if (service == null) {
12 service = new PicassoExecutorService();
13 }
14 if (transformer == null) {
15 transformer = RequestTransformer.IDENTITY;
16 }
17
18 Stats stats = new Stats(cache);
19
20 Dispatcher dispatcher = new Dispatcher(context, service, HANDLER, downloader, cache, stats);
21
22 return new Picasso(context, dispatcher, cache, listener, transformer, requestHandlers, stats,
23 defaultBitmapConfig, indicatorsEnabled, loggingEnabled);
24 }
25 }
build()方法中,主要是對這個下載器downloader,快取cache,執行緒池PicassoExecutorService,事務分發器Dispatcher這幾個物件的例項化。這幾個物件,等會我們都會有介紹。
我們先看看Dispatcher這個事務分發器看看,先看看構造方法
 1 Dispatcher(Context context, ExecutorService service, Handler mainThreadHandler,
 2 Downloader downloader, Cache cache, Stats stats) {
 3 this.dispatcherThread = new DispatcherThread();
 4 this.dispatcherThread.start();
 5 Utils.flushStackLocalLeaks(dispatcherThread.getLooper());
 6 this.context = context;
 7 this.service = service;
 8 this.hunterMap = new LinkedHashMap<>();
 9 this.failedActions = new WeakHashMap<>();
10 this.pausedActions = new WeakHashMap<>();
11 this.pausedTags = new LinkedHashSet<>();
12 this.handler = new DispatcherHandler(dispatcherThread.getLooper(), this);
13 this.downloader = downloader;
14 this.mainThreadHandler = mainThreadHandler;
15 this.cache = cache;
16 this.stats = stats;
17 this.batch = new ArrayList<>(4);
18 this.airplaneMode = Utils.isAirplaneModeOn(this.context);
19 this.scansNetworkChanges = hasPermission(context, Manifest.permission.ACCESS_NETWORK_STATE);
20 this.receiver = new NetworkBroadcastReceiver(this);
21 receiver.register();
22 }
在構造方法中,除了將剛剛傳入的下載器downloader,快取cache,執行緒池PicassoExecutorService以外,還有幾個比較重要的的一個是DispatcherHandler,NetworkBroadcastReceiver這兩個物件我們分別看看。
downloader下載器
1 if (downloader == null) {
2         downloader = new OkHttp3Downloader(context);
3       }
4
5
6
7 public OkHttpClient build() {
8       return new OkHttpClient(this);
9     }
我看了Picasso以前的版本,以前的版本下載器中,它會通過反射來獲取OKhttp,如果專案中有使用OKhttp,則下載器就是使用OKhttp,否則的話,它會使用內嵌的UrlConnectionDownloader下載器。但是新的版本以後(具體哪個版本開始,我沒有深究)直接就是使用OKhttp了。
LruCache 快取
1  /** Create a cache with a given maximum size in bytes. */
2   public LruCache(int maxByteCount) {
3     cache = new android.util.LruCache<String, LruCache.BitmapAndSize>(maxByteCount) {
4       @Override protected int sizeOf(String key, BitmapAndSize value) {
5         return value.byteCount;
6       }
7     };
8   }
這個快取相當於給了一個具有給定最大位元組大小的快取。
PicassoExecutorService 執行緒池
 1 class PicassoExecutorService extends ThreadPoolExecutor {
 2   private static final int DEFAULT_THREAD_COUNT = 3;
 3
 4   PicassoExecutorService() {
 5     super(DEFAULT_THREAD_COUNT, DEFAULT_THREAD_COUNT, 0, TimeUnit.MILLISECONDS,
 6         new PriorityBlockingQueue<Runnable>(), new Utils.PicassoThreadFactory());
 7   }
 8
 9   void adjustThreadCount(NetworkInfo info) {
10     if (info == null || !info.isConnectedOrConnecting()) {
11       setThreadCount(DEFAULT_THREAD_COUNT);
12       return;
13     }
14     switch (info.getType()) {
15       case ConnectivityManager.TYPE_WIFI:
16       case ConnectivityManager.TYPE_WIMAX:
17       case ConnectivityManager.TYPE_ETHERNET:
18         setThreadCount(4);
19         break;
20       case ConnectivityManager.TYPE_MOBILE:
21         switch (info.getSubtype()) {
22           case TelephonyManager.NETWORK_TYPE_LTE:  // 4G
23           case TelephonyManager.NETWORK_TYPE_HSPAP:
24           case TelephonyManager.NETWORK_TYPE_EHRPD:
25             setThreadCount(3);
26             break;
27           case TelephonyManager.NETWORK_TYPE_UMTS: // 3G
28           case TelephonyManager.NETWORK_TYPE_CDMA:
29           case TelephonyManager.NETWORK_TYPE_EVDO_0:
30           case TelephonyManager.NETWORK_TYPE_EVDO_A:
31           case TelephonyManager.NETWORK_TYPE_EVDO_B:
32             setThreadCount(2);
33             break;
34           case TelephonyManager.NETWORK_TYPE_GPRS: // 2G
35           case TelephonyManager.NETWORK_TYPE_EDGE:
36             setThreadCount(1);
37             break;
38           default:
39             setThreadCount(DEFAULT_THREAD_COUNT);
40         }
41         break;
42       default:
43         setThreadCount(DEFAULT_THREAD_COUNT);
44     }
45   }
這個執行緒池直接就繼承ThreadPoolExecutor,預設的執行緒數是3個,而執行緒數的數量隨著網路的變化而改變,WiFi的為4,4G的為3,3G的為2,2G的為1,其他情況都是使用預設的。
DispatcherHandler
 1 private static class DispatcherHandler extends Handler {
 2     private final Dispatcher dispatcher;
 3
 4     DispatcherHandler(Looper looper, Dispatcher dispatcher) {
 5       super(looper);
 6       this.dispatcher = dispatcher;
 7     }
 8
 9     @Override public void handleMessage(final Message msg) {
10       switch (msg.what) {
11         case REQUEST_SUBMIT: {
12           Action action = (Action) msg.obj;
13           dispatcher.performSubmit(action);
14           break;
15         }
16         case REQUEST_CANCEL: {
17           Action action = (Action) msg.obj;
18           dispatcher.performCancel(action);
19           break;
20         }
21         case TAG_PAUSE: {
22           Object tag = msg.obj;
23           dispatcher.performPauseTag(tag);
24           break;
25         }
26         case TAG_RESUME: {
27           Object tag = msg.obj;
28           dispatcher.performResumeTag(tag);
29           break;
30         }
31         case HUNTER_COMPLETE: {
32           BitmapHunter hunter = (BitmapHunter) msg.obj;
33           dispatcher.performComplete(hunter);
34           break;
35         }
36         case HUNTER_RETRY: {
37           BitmapHunter hunter = (BitmapHunter) msg.obj;
38           dispatcher.performRetry(hunter);
39           break;
40         }
41         case HUNTER_DECODE_FAILED: {
42           BitmapHunter hunter = (BitmapHunter) msg.obj;
43           dispatcher.performError(hunter, false);
44           break;
45         }
46         case HUNTER_DELAY_NEXT_BATCH: {
47           dispatcher.performBatchComplete();
48           break;
49         }
50         case NETWORK_STATE_CHANGE: {
51           NetworkInfo info = (NetworkInfo) msg.obj;
52           dispatcher.performNetworkStateChange(info);
53           break;
54         }
55         case AIRPLANE_MODE_CHANGE: {
56           dispatcher.performAirplaneModeChange(msg.arg1 == AIRPLANE_MODE_ON);
57           break;
58         }
59         default:
60           Picasso.HANDLER.post(new Runnable() {
61             @Override public void run() {
62               throw new AssertionError("Unknown handler message received: " + msg.what);
63             }
64           });
65       }
66     }
67   }
這個DispatcherHandler直接Handler,並且是作用在dispatcherThread執行緒中的Handler,它用於把在dispatcherThread子執行緒的操作轉到到Dispatcher中去,通過handleMessage()方法可以知道如,請求取消,暫停,網路的變化,飛航模式的改變等等,都是通過Handler來切換處理的。
NetworkBroadcastReceiver
 1 static class NetworkBroadcastReceiver extends BroadcastReceiver {
 2     static final String EXTRA_AIRPLANE_STATE = "state";
 3
 4     private final Dispatcher dispatcher;
 5
 6     NetworkBroadcastReceiver(Dispatcher dispatcher) {
 7       this.dispatcher = dispatcher;
 8     }
 9
10     void register() {
11       IntentFilter filter = new IntentFilter();
12       filter.addAction(ACTION_AIRPLANE_MODE_CHANGED);
13       if (dispatcher.scansNetworkChanges) {
14         filter.addAction(CONNECTIVITY_ACTION);
15       }
16       dispatcher.context.registerReceiver(this, filter);
17     }
18
19     void unregister() {
20       dispatcher.context.unregisterReceiver(this);
21     }
22
23     @SuppressLint("MissingPermission")
24     @Override public void onReceive(Context context, Intent intent) {
25       // On some versions of Android this may be called with a null Intent,
26       // also without extras (getExtras() == null), in such case we use defaults.
27       if (intent == null) {
28         return;
29       }
30       final String action = intent.getAction();
31       if (ACTION_AIRPLANE_MODE_CHANGED.equals(action)) {
32         if (!intent.hasExtra(EXTRA_AIRPLANE_STATE)) {
33           return; // No airplane state, ignore it. Should we query Utils.isAirplaneModeOn?
34         }
35         dispatcher.dispatchAirplaneModeChange(intent.getBooleanExtra(EXTRA_AIRPLANE_STATE, false));
36       } else if (CONNECTIVITY_ACTION.equals(action)) {
37         ConnectivityManager connectivityManager = getService(context, CONNECTIVITY_SERVICE);
38         dispatcher.dispatchNetworkStateChange(connectivityManager.getActiveNetworkInfo());
39       }
40     }
41   }
這是一個廣播,他的主要作用就是監聽網路的變化,一旦網路發生了變化,則通過廣播來接收到,並且通知相應的操作,比如更改執行緒的數量。以上就是get()的所做的一些操作。
load()
 1 public RequestCreator load(@Nullable String path) {
 2     if (path == null) {
 3       return new RequestCreator(this, null, 0);
 4     }
 5     if (path.trim().length() == 0) {
 6       throw new IllegalArgumentException("Path must not be empty.");
 7     }
 8     return load(Uri.parse(path));
 9   }
10
11  RequestCreator(Picasso picasso, Uri uri, int resourceId) {
12     if (picasso.shutdown) {
13       throw new IllegalStateException(
14           "Picasso instance already shut down. Cannot submit new requests.");
15     }
16     this.picasso = picasso;
17     this.data = new Request.Builder(uri, resourceId, picasso.defaultBitmapConfig);
18   }
load()中所做的操作不多,主要通過path,來獲得一個請求構造器RequestCreator
into()
 public void into(ImageView target, Callback callback) {
    long started = System.nanoTime();
    checkMain(); //判斷是否在主執行緒

    if (target == null) {
      throw new IllegalArgumentException("Target must not be null.");
    }

    if (!data.hasImage()) { //這裡主要是判斷uri是否為空,或者是resourceId是否為0,如果是的話,Picasso就會取消這個imageView的請求。並且將佔點陣圖顯示
      picasso.cancelRequest(target);
      if (setPlaceholder) {
        setPlaceholder(target, getPlaceholderDrawable());
      }
      return;
    }

    if (deferred) {
      if (data.hasSize()) { //如果我們在程式碼中設定了fit()這個屬性,也就是調整影象的大小,使其完全適合目標,但是又設定圖片的寬高的話,就會拋異常了...
        throw new IllegalStateException("Fit cannot be used with resize.");
      }
      int width = target.getWidth();
      int height = target.getHeight();
      if (width == 0 || height == 0) { //如果我們設定的寬高中有一個為0的話,就會展示這個佔位圖
        if (setPlaceholder) {
          setPlaceholder(target, getPlaceholderDrawable());
        }
        picasso.defer(target, new DeferredRequestCreator(this, target, callback));
        return;
      }
      data.resize(width, height);
    }

    Request request = createRequest(started);
    String requestKey = createKey(request);

    if (shouldReadFromMemoryCache(memoryPolicy)) { //先判斷快取中是否有資料,如果快取中有資料的話則直接從快取中取出來
      Bitmap bitmap = picasso.quickMemoryCacheCheck(requestKey);
      if (bitmap != null) {
        picasso.cancelRequest(target);
        setBitmap(target, picasso.context, bitmap, MEMORY, noFade, picasso.indicatorsEnabled);
        if (picasso.loggingEnabled) {
          log(OWNER_MAIN, VERB_COMPLETED, request.plainId(), "from " + MEMORY);
        }
        if (callback != null) {
          callback.onSuccess();
        }
        return;
      }
    }

    if (setPlaceholder) { //先展示佔位圖
      setPlaceholder(target, getPlaceholderDrawable());
    }

    Action action =
        new ImageViewAction(picasso, target, request, memoryPolicy, networkPolicy, errorResId,
            errorDrawable, requestKey, tag, callback, noFade);

    picasso.enqueueAndSubmit(action); //將請求事件新增到佇列中,然後通過handler將請求事件傳送出去。
  }
基本Picasso的基本流程就是這樣的了,如果有哪些錯誤,麻煩請指出,一起學習,一起進步