K8S+openstack swift 多節點叢集部署
目的:通過k8s可以快速建立啟動swift叢集
思路:剛開始想全自動的,後來實現有點困難,主要對k8s不是很熟,所以先半自動了。。。先建立swift proxy的映象,再在worker節點中隨便找一臺製作swift 儲存的映象。swift物件儲存的多節點叢集模式暫時採用temauth臨時認證,具體的安裝文件可以參考官網瞭解下:https://docs.openstack.org/project-install-guide/object-storage/newton/,但是官網是採用的keystone認證方式。在這裡我們k8s的master就不介紹了,因為已經建好了,但需要用到新增k8s的node節點。
k8s叢集機器:
master節點:
k8smaster:192.168.18.73
worker節點:
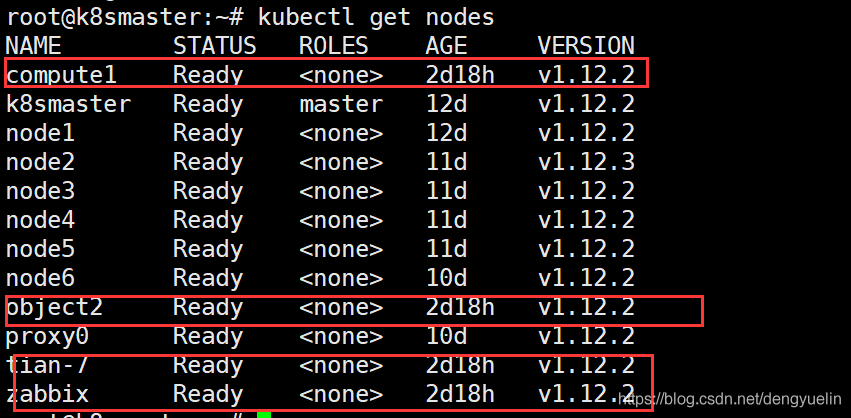
192.168.18.173 主機名 zabbix 作為swift的proxy節點
192.168.18.100 主機名:compute1 作swift 的node節點
192.168.18.84 主機名 object2 swift的node節點
192.168.18.172 主機名 tian-7 swift的node節點
在任意一個有docker的機器上 製作proxy映象:這裡在proxy0
先安裝docker製作proxy映象:
curl -fsSL https://mirrors.ustc.edu.cn/docker-ce/linux/ubuntu/gpg | sudo apt-key add -
echo 'deb https://mirrors.aliyun.com/kubernetes/apt kubernetes-xenial main' >> /etc/apt/sources.list
apt update
apt upgrade
apt install -y docker-ce
apt install docker-ce=18.06.1~ce~3-0~ubuntu -y
在當前目錄建立proxy目錄,然後再proxy目錄下建立files目錄和Dockerfile檔案:
在當前目錄建立storage目錄,然後再storage目錄下建立files目錄和Dockerfile檔案:
進入proxy目錄
[email protected]:~/dockerfile/proxy# ls files/
proxy-server.conf swift.conf
[email protected]:~/dockerfile/proxy# cat files/proxy-server.conf |grep -v ^#
[DEFAULT]
bind_port = 8080
swift_dir = /etc/swift
user = swift
log_facility = LOG_LOCAL1
[pipeline:main]
pipeline= healthcheck proxy-logging cache tempauth proxy-logging proxy-server
[app:proxy-server]
use = egg:swift#proxy
account_autocreate = True
allow_account_management = true
[filter:tempauth]
use = egg:swift#tempauth
reseller_prefix = ''
token_life = 86400000
user_admin_admin = admin .admin .reseller_admin
user_test_tester = testing .admin
user_test2_tester2 = testing2 .admin
user_test_tester3 = testing3
user_test5_tester5 = testing5 service
[filter:healthcheck]
use = egg:swift#healthcheck
[filter:cache]
use = egg:swift#memcache
memcache_servers = 192.168.18.178:11211
[filter:ratelimit]
use = egg:swift#ratelimit
[filter:domain_remap]
use = egg:swift#domain_remap
[filter:catch_errors]
use = egg:swift#catch_errors
[filter:cname_lookup]
use = egg:swift#cname_lookup
[filter:staticweb]
use = egg:swift#staticweb
[filter:tempurl]
use = egg:swift#tempurl
[filter:formpost]
use = egg:swift#formpost
[filter:name_check]
use = egg:swift#name_check
[filter:list-endpoints]
use = egg:swift#list_endpoints
[filter:proxy-logging]
use = egg:swift#proxy_logging
[filter:bulk]
use = egg:swift#bulk
[filter:slo]
use = egg:swift#slo
[filter:dlo]
use = egg:swift#dlo
[filter:container-quotas]
use = egg:swift#container_quotas
[filter:account-quotas]
use = egg:swift#account_quotas
[filter:gatekeeper]
use = egg:swift#gatekeeper
[filter:container_sync]
use = egg:swift#container_sync
[filter:xprofile]
use = egg:swift#xprofile
[filter:versioned_writes]
use = egg:swift#versioned_writes
[email protected]:~/dockerfile/proxy# cat Dockerfile
FROM ubuntu:16.04
CMD /bin/bash
MAINTAINER dyl <[email protected]>
# Install repository for latest version of swift installation
RUN apt-get update -y
RUN apt-get upgrade -y
# Install swift packages
RUN mkdir -p /etc/swift
RUN apt-get install swift swift-proxy python-swiftclient memcached -y
ADD files/proxy-server.conf /etc/swift/proxy-server.conf
ADD files/swift.conf /etc/swift/swift.conf
# Permission for swift
RUN chown -R swift:swift /etc/swift
#RUN service supervisor restart
這裡先不建立ring了,因為建立ring要使用到swift storage的地址,這裡無確定
接著在Dockerfile所在目錄使用Dockerfile建立proxy的映象:
docker build -t swift-proxy .
接著製作swift-storage映象
進入storage目錄:
[email protected]:~/dockerfile# cd storage/
[email protected]:~/dockerfile/storage# ls
Dockerfile files
[email protected]:~/dockerfile/storage# ls files/
account-server.conf container-server.conf object-server.conf proxy-server.conf rsync rsyncd.conf rsyslog.conf swift.conf
[email protected]:~/dockerfile/storage# cat files/account-server.conf |grep -v ^#
[DEFAULT]
bind_ip = 0.0.0.0
bind_port = 6002
workers = 2
user = swift
swift_dir = /etc/swift
devices = /srv/node
mount_check = True
log_facility = LOG_LOCAL4
[pipeline:main]
pipeline = healthcheck recon account-server
[filter:healthcheck]
use = egg:swift#healthcheck
[app:account-server]
use = egg:swift#account
[filter:recon]
use = egg:swift#recon
recon_cache_path = /var/cache/swift
[account-replicator]
[account-auditor]
[account-reaper]
[email protected]:~/dockerfile/storage# cat files/object-server.conf |grep -v ^#
[DEFAULT]
bind_ip = 0.0.0.0
bind_port = 6000
workers = 2
user = swift
swift_dir = /etc/swift
devices = /srv/node
mount_check = True
log_facility = LOG_LOCAL2
[pipeline:main]
pipeline = healthcheck recon object-server
[filter:healthcheck]
use = egg:swift#healthcheck
[filter:recon]
use = egg:swift#recon
recon_cache_path = /var/cache/swift
recon_lock_path = /var/lock
[app:object-server]
use = egg:swift#object
[object-replicator]
[object-updater]
[object-auditor]
[email protected]:~/dockerfile/storage# cat files/rsyncd.conf |grep -v ^#
uid = swift
gid = swift
log file = /var/log/rsyncd.log
pid file = /var/run/rsyncd.pid
address = 0.0.0.0
[account]
max connections = 2
path = /srv/node
read only = false
lock file = /var/lock/account.lock
[container]
max connections = 4
path = /srv/node
read only = false
lock file = /var/lock/container.lock
[object]
max connections = 8
path = /srv/node
read only = false
lock file = /var/lock/object.lock
[email protected]:~/dockerfile/storage# cat files/rsyslog.conf |grep -v ^#
module(load="imuxsock") # provides support for local system logging
module(load="imklog") # provides kernel logging support
$KLogPermitNonKernelFacility on
$ActionFileDefaultTemplate RSYSLOG_TraditionalFileFormat
$RepeatedMsgReduction on
$FileOwner syslog
$FileGroup adm
$FileCreateMode 0640
$DirCreateMode 0755
$Umask 0022
$PrivDropToUser syslog
$PrivDropToGroup syslog
$WorkDirectory /var/spool/rsyslog
$IncludeConfig /etc/rsyslog.d/*.conf
[email protected]:~/dockerfile/storage# cat files/rsy |grep -v ^#
rsync rsyncd.conf rsyslog.conf
[email protected]:~/dockerfile/storage# cat files/rsync |grep -v ^#
RSYNC_ENABLE=true
RSYNC_OPTS=''
RSYNC_NICE=''
[email protected]:~/dockerfile/storage# cat Dockerfile
FROM ubuntu:16.04
CMD /bin/bash
MAINTAINER dyl <[email protected]>
# Install repository for latest version of swift installation
RUN apt-get update -y
RUN apt-get upgrade -y
# Install supervisor for handling sub-process of swift
#RUN sudo apt-get install supervisor -y
#RUN mkdir -p /var/log/supervisor
#Installing swift supporting file system.
RUN apt-get install xfsprogs rsync -y
#RUN mkdir -p /etc/swift
# Installing storage packages
RUN apt-get install swift swift-account swift-container swift-object -y
# Add swift storage file
#ADD files/supervisord.conf /etc/supervisor/conf.d/supervisord.conf
ADD files/rsyncd.conf /etc/rsyncd.conf
ADD files/account-server.conf /etc/swift/account-server.conf
ADD files/object-server.conf /etc/swift/object-server.conf
ADD files/container-server.conf /etc/swift/container-server.conf
ADD files/swift.conf /etc/swift/swift.conf
ADD files/rsync /etc/default/rsync
#RUN mkdir -p /srv/node/sdb
#RUN mkdir -p /var/cache/swift
#RUN chown -R swift:swift /srv/node
#RUN chown -R swift:swift /var/cache/swift
在storage目錄下Dockerfile所在目錄利用Dockerfile建立swift-storage映象:
docker build -t swift-storage .
打包映象:
docker save -o swift-storage.tar swift-storage
docker save -o swift-proxy-server.tar swift-proxy-server
從tar包匯入映象:
docker load -i swift-proxy-server.tar
docker load -i swift-storage.tar
建立k8s節點,將節點加入k8s master:
先在master上面生成有效的token:
kubeadm token create --print-join-command
生成這段命令,將其放在worker.sh建立的時候時候:
kubeadm join 192.168.18.73:6443 --token whsk3i.qrp01768uirp7ibs --discovery-token-ca-cert-hash sha256:2fafddd03602bcc0d61c1c67fba09d5dfa5672e7cdd848a00211b88c0724d711
再在k8s的worker節點也就是下面這些機器上分別執行建立worker指令碼
worker節點:
192.168.18.173 主機名 zabbix 作為swift的proxy節點
192.168.18.100 主機名:compute1 作swift 的node節點
192.168.18.84 主機名 object2 swift的node節點
192.168.18.172 主機名 tian-7 swift的node節點
[email protected]:/usr/local/src# cat worker.sh
apt remove -y docker-ce kubelet kubeadm kubectl
modprobe -- ip_vs
modprobe -- ip_vs_rr
modprobe -- ip_vs_wrr
modprobe -- ip_vs_sh
modprobe -- nf_conntrack_ipv4
curl -fsSL https://mirrors.ustc.edu.cn/docker-ce/linux/ubuntu/gpg | sudo apt-key add -
curl -fsSL https://download.docker.com/linux/ubuntu/gpg | sudo apt-key add -
add-apt-repository \
"deb [arch=amd64] https://mirrors.ustc.edu.cn/docker-ce/linux/ubuntu \
$(lsb_release -cs) \
stable"
echo 'deb https://mirrors.aliyun.com/kubernetes/apt kubernetes-xenial main' >> /etc/apt/sources.list
apt-get update
apt install docker-ce=18.06.1~ce~3-0~ubuntu
systemctl enable docker && systemctl start docker
apt-get install kubeadm=1.12.2-00 kubectl=1.12.2-00 kubelet=1.12.2-00 --allow-unauthenticated
systemctl daemon-reload
systemctl restart kubelet
swapoff -a
kubeadm join 192.168.18.73:6443 --token whsk3i.qrp01768uirp7ibs --discovery-token-ca-cert-hash sha256:2fafddd03602bcc0d61c1c67fba09d5dfa5672e7cdd848a00211b88c0724d711
cd /usr/local/src/kubeadm1.12.2/ && docker load -i flannel.tar && docker load -i kube-proxy.tar && docker load -i pause.tar
systemctl daemon-reload
systemctl restart kubelet
[email protected]:/usr/local/src# sh worker.sh
來到master上面檢視節點是否新增成功,可以看到都新增成功了


