
(轉)AWS::LightSail建立MEAN的流程
很普通的blog,確保GD遮蔽了,只能在這裡轉一次
Publish a Node.js Express App on AWS for only $5 per month with free HTTPS certificate
Amazon recently launched its new service AWS Lightsail. And like its name suggest it’s Amazon bet to create a light version of AWS services to enrol another segment of users how prefers simplicity. With a couple of clicks you can choose a configuration from a menu and launch a virtual machine preconfigured with SSD-based storage, DNS management, and a static IP address. You can launch your favourite operating system (Amazon Linux AMI or Ubuntu), developer stack (
Lightsail is using Bitnami image for creating Node.js App. Node.js powered by Bitnami and sold by BitRock Inc. is a pre-configured, ready to run image for running Node.js on Amazon EC2. To make it more easy to follow will go step by step.
- After login this is how your screen will look like.

3. To create instance click on “Create Instance”. Select Node.js Option. You can launch multiple instances, set up a configuration script, or specify an alternate SSH keypair if you’d like. You can also choose an Availability Zone. For this demo I’ll choose Node.js on the $5 plan, leave everything else as-is, and click on Create. It will be up and running within seconds.

4. You can manage instance by clicking on this.

Brief of NodeJs instance on dashboard

Instance manage page
5 . On clicking Connect using SSH, you will be able to connect to you instance using browser. You can do same from terminal using ssh to your Public IP and default key pair. Instance comes with Node.js, Git, Redis, Apache and other useful applications preinstalled. You can access sample app running via browser using your public IP.

6. After login to your instance you will find “stack” and “htdocs” in your home directory. “stack” is link to “/opt/bitnami” and “htdocs” to “/opt/bitnami/apache2/htdocs”. Follow below commands to replace sample app to your app:
cd stack
sudo ./use_nodejs
mkdir apps
7. Git clone or copy your Express project inside apps folder.
8. Create directories as per these commands. My steps will assume your app name is “myapp”.
$ sudo mkdir /opt/bitnami/apps/myapp/conf
$ sudo mkdir /opt/bitnami/apps/myapp/htdocs
9. Create and edit the /opt/bitnami/apps/myapp/conf/httpd-prefix.conf file and add the line below to it:
Include "/opt/bitnami/apps/myapp/conf/httpd-app.conf"10. Create and edit the /opt/bitnami/apps/myapp/conf/httpd-app.conf file and add the content below to it. This is the main configuration file for your application, so modify it further depending on your application’s requirements.
ProxyPass / http://127.0.0.1:3000/
ProxyPassReverse / http://127.0.0.1:3000/
NOTE: 3000 is the default port for the Express server. If you have customized your application to use a different port, change it here as well.
11. Once you have created the files and directories above, add the following line to the end of the main Apache configuration file at /opt/bitnami/apache2/conf/bitnami/bitnami-apps-prefix.conf, as shown below:
Include "/opt/bitnami/apps/myapp/conf/httpd-prefix.conf"12. Restart the Apache server:
sudo /opt/bitnami/ctlscript.sh restart apache13. Start your Node.js app. By first installing all dependencies and then starting application.
npm install
node app.js
14. You can access your application now on browser using your public IP address.
15. To give a domain name to your application, we need to give static IP to your instance first. Upto 5 static IPs are free in LightSail. Goto networking tab in your LightSail dashboard. By default SSH, HTTP and HTTPS firewall rules are already added. You can always modify them here. Click on “Create static IP” to create a static IP and assign it to your instance.
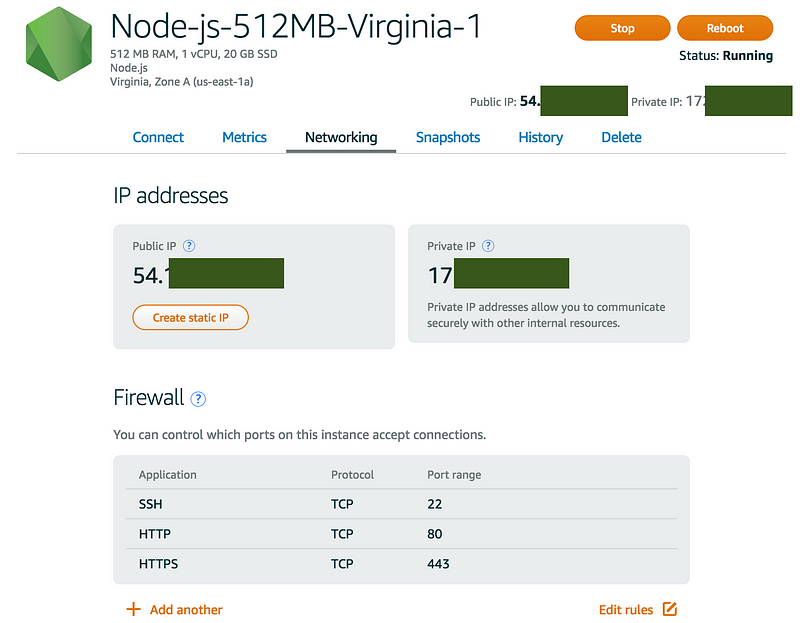
Networking tab
Once static IP is created you can access your app using that IP.
16. Lightsail also comes with DNS Zone. You can map your purchased domain to your static IP here. For that go to main dashboard and click “Create other resources” and select “DNS Zone”. Follow the steps to assign your Domain to static IP. Once its successful, you would be able to access your app using your registered domain.
You will be able to access your app using https also. But it will complain about the certificate. For that we will be using Let’s Encrypt free Certificate Authority.
17. Goto your terminal again. And follow these steps:
$ cd stack
$ sudo ./use_nodejs
$ cd /tmp
$ git clone https://github.com/letsencrypt/letsencrypt
$ /tmp/letsencrypt/letsencrypt-auto certonly --webroot -w ~/htdocs -d YOURDOMAIN.com
It will ask for your email address and to follow term and condition. Go through those steps and on completion you will see a congratulation message. And your certificates will be saved in /etc/letsencrypt/live/YOURDOMAIN.com/
18. Update apache conf file for these certs. Preferably point them to above location. As these certs are valid for 3 months and you need to refresh the certificates. And your live certificates reside in the same folder. To update conf file edit /opt/bitnami/apache2/conf/bitnami/bitnami.conf and look for SSLCertificateFile and SSLCertificateKeyFile. Point SSLCertificateFile to fullchain.pem and SSLCertificateKeyFile to privkey.pem. Save file and restart apache as in step 12.
Voila now you have Node.js express app running on $5 a month with free HTTPS certificate.
If you liked the article, hit the heart down there and help others see it. Follow me for other such articles.