機器學習基礎之knn的簡單例子
knn演算法是人工智慧的基本演算法,類似於語言中的"hello world!",python中的機器學習核心模組:Scikit-Learn
Scikit-learn(sklearn)模組,為Python語言實現機器學習的核心模組,其包含了大量的演算法模型函式API,
可以讓我們很輕鬆地建立、訓練、評估 演算法模型。同時該模組也是Python在人工智慧(機器學習)領域的基礎應用模組。
核心依賴模組:
NumPy:pip install –U numpy
Scipy:pip install –U scipy
Pandas:pip install –U pandas
Matplotlib:pip install –U matplotlib
Scikit-Learn模組:
Scikit-Learn:pip install –U scikit-learn
機器學習分為五個步驟:
1.演算法選型 看選擇監督學習還是無監督學習
2.樣本資料劃分 需要樣本資料對模型進行訓練
3.魔性訓練 使用fit()方法 演算法模型物件.fit( X_train_features, X_train_labels )
4.模型評估 metrics 使用sklearn中的 meterics 類可以實現對訓練後的模型進行量化指標評估
5.模型預測 predict Predict實現了對測試資料驗證以及用於對新資料的預測
KNN演算法的簡單應用,文件樹:

其中numbers.csv資料如下:
number,classes
1,A
2,A
3,A
4,B
5,B
6,B
7,C
8,C
9,C
num_knn.py原始碼:
from sklearn.neighbors import KNeighborsClassifier
import numpy as np
import matplotlib.pyplot as plt
import os
import pandas as pd
import imp
from sklearn.model_selection import train_test_split

data=pd.read_csv(os.getcwd()+'\data'+os.sep+'numbers.csv')
print('原始資料:\n',data)

X_train,X_test,y_train,y_test=train_test_split(data['number'],data['classes'],test_size=0.25,random_state=40)
print('訓練特徵值:\n',X_train.values)
print('訓練標籤值:\n',y_train.values)
print('測試特徵值:\n',X_test.values)
print('測試標籤值:\n',y_test.values)
#print(y_train)
#print(y_test)

plt.scatter(y_train,X_train)

print('建立knn模型物件...')
knn=KNeighborsClassifier(n_neighbors=3)

print('開始訓練knn模型...')
knn.fit(X_train.values.reshape(len(X_train),1),y_train)
#print(X_train.values)
#print(X_train.values.reshape(len(X_train),1)) #變成列向量

# 評估函式
# 演算法物件.score(測試特徵值資料, 測試標籤值資料)
score=knn.score(X_test.values.reshape(len(X_test),1),y_test)
print('模型訓練綜合得分:',score)

# 步驟6:模型預測
# predict()函式實現
# predict(新資料(二維陣列型別)): 分類結果
result = knn.predict([[12],[1.5]])
print('分類預測的結果為:{0},{1}'.format(result[0],result[1]))

# 繪製測試資料點
plt.scatter(result[0], 12, color='r')
plt.scatter(result[1], 1.5, color='g')
plt.grid(linestyle='--')
plt.show()
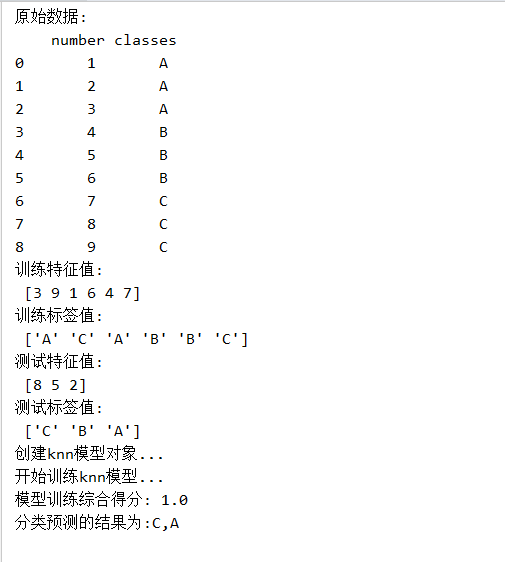
執行結果如下圖:

KNN第二個例子:
movies.csv:
filename,war_count,love_count,movietype
movieA,3,104,愛情片
movieB,2,100,愛情片
movieC,1,81,愛情片
movieD,101,10,戰爭片
movieF,99,5,戰爭片
movieF,98,2,戰爭片
movie_knn.py:
import pandas as pd
import os
import imp
#匯入分解詞
from sklearn.model_selection import train_test_split
#匯入knn演算法模型
from sklearn.neighbors import KNeighborsClassifier
# 匯入分類器效能監測報告模組
from sklearn.metrics import classification_report


def loaddata(filepath):  #載入資料
    data=pd.read_csv(filepath)
    print('樣本資料集:\n',data)
    #print('樣本資料集:\n{0}'.format(data))

    # 步驟2:資料抽取
    # 獲取war_count、love_count、movietype列資料
    data = data[['war_count', 'love_count', 'movietype']]
    print('原始樣本資料集(資料抽取):\n{0}'.format(data))

    # 返回資料
    return data


def splitdata(data):
    print('--資料劃分--')
    X_train,X_test,y_train,y_test=train_test_split(data[['war_count','love_count']],data['movietype'],\
                                                   test_size=0.25,random_state=30)
    print('訓練樣本特徵集:\n', X_train.values)
    print('訓練樣本標籤集:\n', X_test.values)
    print('測試樣本特徵集:\n', y_train.values)
    print('測試樣本標籤集:\n', y_test.values)

    # 返回資料
    return X_train, X_test, y_train, y_test


def ModelTraing(X_train,X_test,y_train,y_yest):
    #先建立knn演算法模型
    print('knn演算法模型...')
    knn=KNeighborsClassifier(n_neighbors=3)

    #訓練演算法模型
    print('演算法模型訓練...')
    knn.fit(X_train,y_train)

    #訓練模型評估
    result=knn.predict(X_test)
    print('knn訓練模型測試報告:\n')
    print(classification_report(y_test,result,target_names=data['movietype'].unique()))

    return knn


if __name__=='__main__':
    # 設定資料檔案的地址
    filePath = os.getcwd() + '\data' + os.sep + 'movies.csv'
    print(filePath)
    # 載入資料檔案
    data = loaddata(filePath)
    # 資料劃分
    X_train, X_test, y_train, y_test = splitdata(data)
    # 模型訓練
    knn = ModelTraing(X_train, X_test, y_train, y_test)
    # 模型應用
    movietype = knn.predict([[20, 94]])
    print('電影分類預測結果為:{0}'.format(movietype[0]))
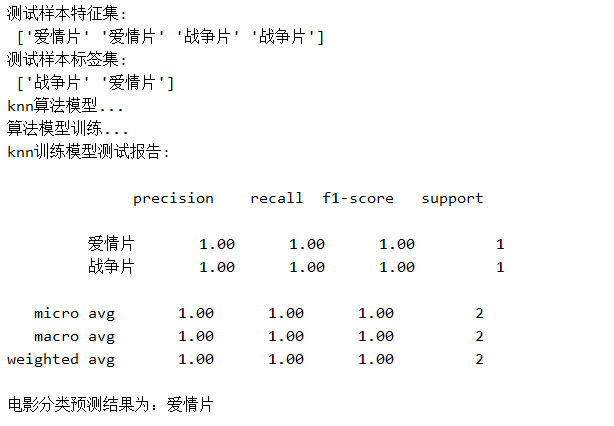
程式碼執行結果:

附上GitHub地址 tyutltf/knn_basic: knn的簡單例子 https://github.com/tyutltf/knn_basic
