
CUDA從入門到精通
在老闆的要求下,本博主從2012年上高效能運算課程開始接觸CUDA程式設計,隨後將該技術應用到了實際專案中,使處理程式加速超過1K,可見基於圖形顯示器的平行計算對於追求速度的應用來說無疑是一個理想的選擇。還有不到一年畢業,怕是畢業後這些技術也就隨畢業而去,準備這個暑假開闢一個CUDA專欄,從入門到精通,步步為營,順便分享設計的一些經驗教訓,希望能給學習CUDA的童鞋提供一定指導。個人能力所及,錯誤難免,歡迎討論。
PS:申請專欄好像需要先發原創帖超過15篇。。。算了,先寫夠再申請吧,到時候一併轉過去。
NVIDIA於2006年推出CUDA(Compute Unified Devices Architecture),可以利用其推出的GPU進行通用計算,將平行計算從大型叢集擴充套件到了普通顯示卡,使得使用者只需要一臺帶有Geforce顯示卡的筆記本就能跑較大規模的並行處理程式。
使用顯示卡的好處是,和大型叢集相比功耗非常低,成本也不高,但效能很突出。以我的筆記本為例,Geforce 610M,用DeviceQuery程式測試,可得到如下硬體引數:
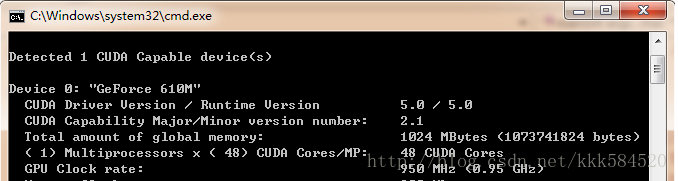
計算能力達48X0.95 = 45.6 GFLOPS。而筆記本的CPU引數如下:
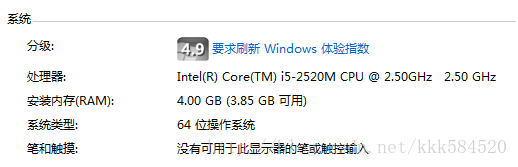
CPU計算能力為(4核):2.5G*4 = 10GFLOPS,可見,顯示卡計算效能是4核i5 CPU的4~5倍,因此我們可以充分利用這一資源來對一些耗時的應用進行加速。
好了,工欲善其事必先利其器,為了使用CUDA對GPU進行程式設計,我們需要準備以下必備工具:
1. 硬體平臺,就是顯示卡,如果你用的不是NVIDIA的顯示卡,那麼只能說抱歉,其他都不支援CUDA。
2. 作業系統,我用過windows XP,Windows 7都沒問題,本部落格用Windows7。
3. C編譯器,建議VS2008,和本部落格一致。
4. CUDA編譯器NVCC,可以免費免註冊免license從官網下載CUDA ToolkitCUDA下載,最新版本為5.0,本部落格用的就是該版本。
5. 其他工具(如Visual Assist,輔助程式碼高亮)
準備完畢,開始安裝軟體。VS2008安裝比較費時間,建議安裝完整版(NVIDIA官網說Express版也可以),過程不必詳述。CUDA Toolkit 5.0裡面包含了NVCC編譯器、設計文件、設計例程、CUDA執行時庫、CUDA標頭檔案等必備的原材料。
安裝完畢,我們在桌面上發現這個圖示:
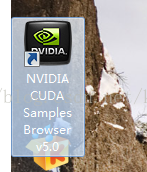
不錯,就是它,雙擊執行,可以看到一大堆例程。我們找到Simple OpenGL這個執行看看效果:
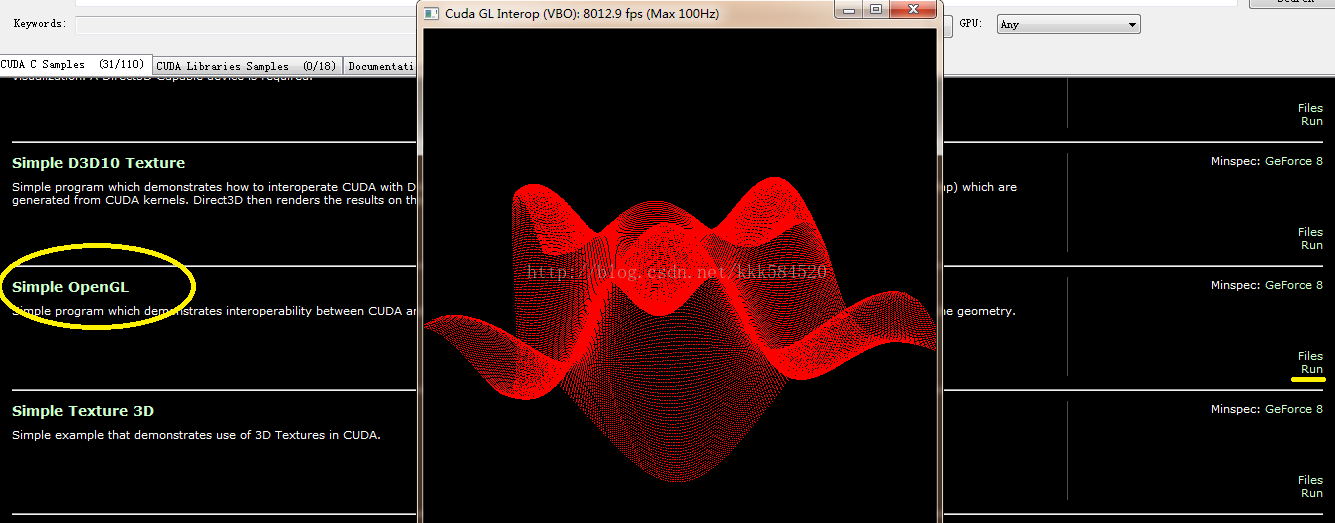
點右邊黃線標記處的Run即可看到美妙的三維正弦曲面,滑鼠左鍵拖動可以轉換角度,右鍵拖動可以縮放。如果這個執行成功,說明你的環境基本搭建成功。
出現問題的可能:
1. 你使用遠端桌面連線登入到另一臺伺服器,該伺服器上有顯示卡支援CUDA,但你遠端終端不能執行CUDA程式。這是因為遠端登入使用的是你本地顯示卡資源,在遠端登入時看不到伺服器端的顯示卡,所以會報錯:沒有支援CUDA的顯示卡!解決方法:1. 遠端伺服器裝兩塊顯示卡,一塊只用於顯示,另一塊用於計算;2.不要用圖形介面登入,而是用命令列介面如telnet登入。
2.有兩個以上顯示卡都支援CUDA的情況,如何區分是在哪個顯示卡上執行?這個需要你在程式裡控制,選擇符合一定條件的顯示卡,如較高的時鐘頻率、較大的視訊記憶體、較高的計算版本等。詳細操作見後面的部落格。
好了,先說這麼多,下一節我們介紹如何在VS2008中給GPU程式設計。
書接上回,我們既然直接執行例程成功了,接下來就是了解如何實現例程中的每個環節。當然,我們先從簡單的做起,一般程式語言都會找個helloworld例子,而我們的顯示卡是不會說話的,只能做一些簡單的加減乘除運算。所以,CUDA程式的helloworld,我想應該最合適不過的就是向量加了。
開啟VS2008,選擇File->New->Project,彈出下面對話方塊,設定如下:
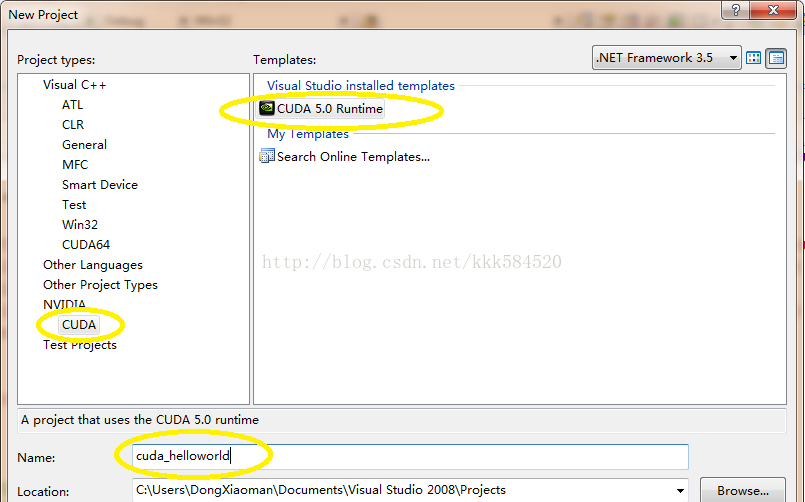
之後點OK,直接進入工程介面。
工程中,我們看到只有一個.cu檔案,內容如下:
#include "cuda_runtime.h"
#include "device_launch_parameters.h"

#include <stdio.h>

cudaError_t addWithCuda(int *c, const int *a, const int *b, size_t size);

__global__ void addKernel(int *c, const int *a, const int *b)
{
    int i = threadIdx.x;
    c[i] = a[i] + b[i];
}

int main()
{
    const int arraySize = 5;
    const int a[arraySize] = { 1, 2, 3, 4, 5 };
    const int b[arraySize] = { 10, 20, 30, 40, 50 };
    int c[arraySize] = { 0 };

    // Add vectors in parallel.
    cudaError_t cudaStatus = addWithCuda(c, a, b, arraySize);
    if (cudaStatus != cudaSuccess) {
        fprintf(stderr, "addWithCuda failed!");
        return 1;
    }

    printf("{1,2,3,4,5} + {10,20,30,40,50} = {%d,%d,%d,%d,%d}\n",
        c[0], c[1], c[2], c[3], c[4]);

    // cudaThreadExit must be called before exiting in order for profiling and
    // tracing tools such as Nsight and Visual Profiler to show complete traces.
    cudaStatus = cudaThreadExit();
    if (cudaStatus != cudaSuccess) {
        fprintf(stderr, "cudaThreadExit failed!");
        return 1;
    }

    return 0;
}

// Helper function for using CUDA to add vectors in parallel.
cudaError_t addWithCuda(int *c, const int *a, const int *b, size_t size)
{
    int *dev_a = 0;
    int *dev_b = 0;
    int *dev_c = 0;
    cudaError_t cudaStatus;

    // Choose which GPU to run on, change this on a multi-GPU system.
    cudaStatus = cudaSetDevice(0);
    if (cudaStatus != cudaSuccess) {
        fprintf(stderr, "cudaSetDevice failed!  Do you have a CUDA-capable GPU installed?");
        goto Error;
    }

    // Allocate GPU buffers for three vectors (two input, one output)    .
    cudaStatus = cudaMalloc((void**)&dev_c, size * sizeof(int));
    if (cudaStatus != cudaSuccess) {
        fprintf(stderr, "cudaMalloc failed!");
        goto Error;
    }

    cudaStatus = cudaMalloc((void**)&dev_a, size * sizeof(int));
    if (cudaStatus != cudaSuccess) {
        fprintf(stderr, "cudaMalloc failed!");
        goto Error;
    }

    cudaStatus = cudaMalloc((void**)&dev_b, size * sizeof(int));
    if (cudaStatus != cudaSuccess) {
        fprintf(stderr, "cudaMalloc failed!");
        goto Error;
    }

    // Copy input vectors from host memory to GPU buffers.
    cudaStatus = cudaMemcpy(dev_a, a, size * sizeof(int), cudaMemcpyHostToDevice);
    if (cudaStatus != cudaSuccess) {
        fprintf(stderr, "cudaMemcpy failed!");
        goto Error;
    }

    cudaStatus = cudaMemcpy(dev_b, b, size * sizeof(int), cudaMemcpyHostToDevice);
    if (cudaStatus != cudaSuccess) {
        fprintf(stderr, "cudaMemcpy failed!");
        goto Error;
    }

    // Launch a kernel on the GPU with one thread for each element.
    addKernel<<<1, size>>>(dev_c, dev_a, dev_b);

    // cudaThreadSynchronize waits for the kernel to finish, and returns
    // any errors encountered during the launch.
    cudaStatus = cudaThreadSynchronize();
    if (cudaStatus != cudaSuccess) {
        fprintf(stderr, "cudaThreadSynchronize returned error code %d after launching addKernel!\n", cudaStatus);
        goto Error;
    }

    // Copy output vector from GPU buffer to host memory.
    cudaStatus = cudaMemcpy(c, dev_c, size * sizeof(int), cudaMemcpyDeviceToHost);
    if (cudaStatus != cudaSuccess) {
        fprintf(stderr, "cudaMemcpy failed!");
        goto Error;
    }

Error:
    cudaFree(dev_c);
    cudaFree(dev_a);
    cudaFree(dev_b);

    return cudaStatus;
}__global__ void addKernel(int *c, const int *a, const int *b)
{
int i = threadIdx.x;
c[i] = a[i] + b[i];
}這個函式就是在GPU上執行的函式,稱之為核函式,英文名Kernel Function,注意要和作業系統核心函式區分開來。
我們直接按F7編譯,可以得到如下輸出:
1>------ Build started: Project: cuda_helloworld, Configuration: Debug Win32 ------
1>Compiling with CUDA Build Rule...
1>"C:\Program Files\NVIDIA GPU Computing Toolkit\CUDA\v5.0\\bin\nvcc.exe" -G -gencode=arch=compute_10,code=\"sm_10,compute_10\" -gencode=arch=compute_20,code=\"sm_20,compute_20\" --machine 32 -ccbin "C:\Program Files (x86)\Microsoft Visual Studio 9.0\VC\bin" -Xcompiler "/EHsc /W3 /nologo /O2 /Zi /MT " -I"C:\Program Files\NVIDIA GPU Computing Toolkit\CUDA\v5.0\\include" -maxrregcount=0 --compile -o "Debug/kernel.cu.obj" kernel.cu
1>tmpxft_000000ec_00000000-8_kernel.compute_10.cudafe1.gpu
1>tmpxft_000000ec_00000000-14_kernel.compute_10.cudafe2.gpu
1>tmpxft_000000ec_00000000-5_kernel.compute_20.cudafe1.gpu
1>tmpxft_000000ec_00000000-17_kernel.compute_20.cudafe2.gpu
1>kernel.cu
1>kernel.cu
1>tmpxft_000000ec_00000000-8_kernel.compute_10.cudafe1.cpp
1>tmpxft_000000ec_00000000-24_kernel.compute_10.ii
1>Linking...
1>Embedding manifest...
1>Performing Post-Build Event...
1>copy "C:\Program Files\NVIDIA GPU Computing Toolkit\CUDA\v5.0\\bin\cudart*.dll" "C:\Users\DongXiaoman\Documents\Visual Studio 2008\Projects\cuda_helloworld\Debug"
1>C:\Program Files\NVIDIA GPU Computing Toolkit\CUDA\v5.0\\bin\cudart32_50_35.dll
1>C:\Program Files\NVIDIA GPU Computing Toolkit\CUDA\v5.0\\bin\cudart64_50_35.dll
1>已複製 2 個檔案。
1>Build log was saved at "file://c:\Users\DongXiaoman\Documents\Visual Studio 2008\Projects\cuda_helloworld\cuda_helloworld\Debug\BuildLog.htm"
1>cuda_helloworld - 0 error(s), 105 warning(s)
========== Build: 1 succeeded, 0 failed, 0 up-to-date, 0 skipped ========== 可見,編譯.cu檔案需要利用nvcc工具。該工具的詳細使用見後面部落格。
直接執行,可以得到結果圖如下:
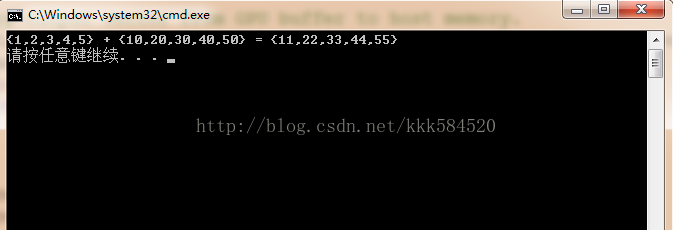
如果顯示正確,那麼我們的第一個程式宣告成功!
CUDA從入門到精通(三):必備資料
剛入門CUDA,跑過幾個官方提供的例程,看了看人家的程式碼,覺得並不難,但自己動手寫程式碼時,總是不知道要先幹什麼,後幹什麼,也不知道從哪個知識點學起。這時就需要有一本能提供指導的書籍或者教程,一步步跟著做下去,直到真正掌握。
一般講述CUDA的書,我認為不錯的有下面這幾本:
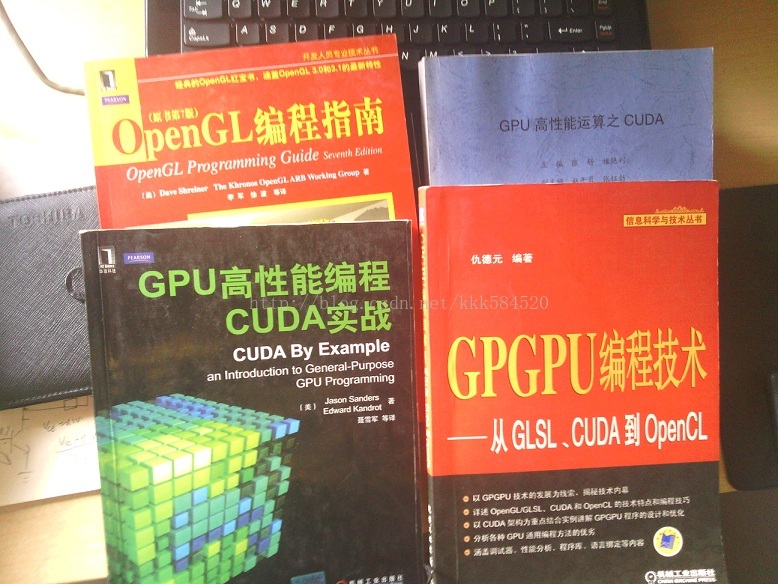
初學者可以先看美國人寫的這本《GPU高效能程式設計CUDA實戰》,可操作性很強,但不要期望能全看懂(Ps:裡面有些概念其實我現在還是不怎麼懂),但不影響你進一步學習。如果想更全面地學習CUDA,《GPGPU程式設計技術》比較客觀詳細地介紹了通用GPU程式設計的策略,看過這本書,可以對顯示卡有更深入的瞭解,揭開GPU的神祕面紗。後面《OpenGL程式設計指南》完全是為了體驗圖形互動帶來的樂趣,可以有選擇地看;《GPU高效能運算之CUDA》這本是師兄給的,適合快速查詢(感覺是將官方程式設計手冊翻譯了一遍)一些關鍵技術和概念。
有了這些指導材料還不夠,我們在做專案的時候,遇到的問題在這些書上肯定找不到,所以還需要有下面這些利器:
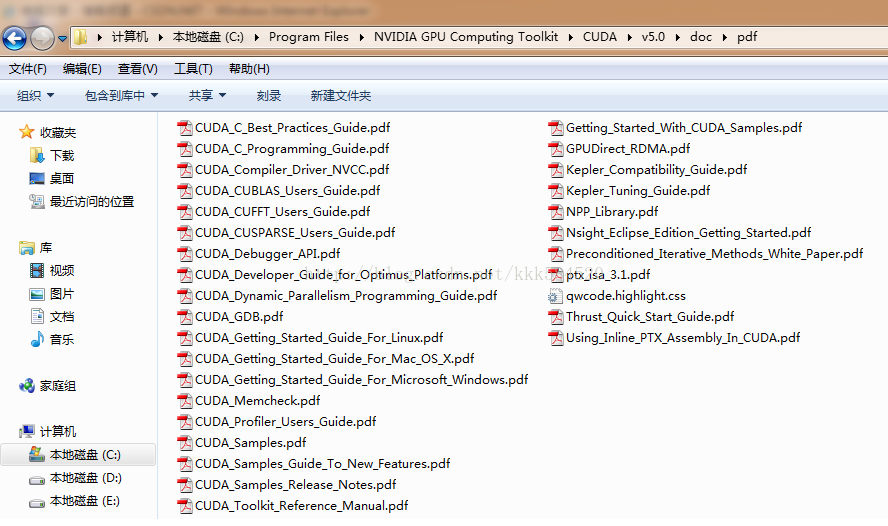
這裡面有很多工具的使用手冊,如CUDA_GDB,Nsight,CUDA_Profiler等,方便除錯程式;還有一些有用的庫,如CUFFT是專門用來做快速傅立葉變換的,CUBLAS是專用於線性代數(矩陣、向量計算)的,CUSPASE是專用於稀疏矩陣表示和計算的庫。這些庫的使用可以降低我們設計演算法的難度,提高開發效率。另外還有些入門教程也是值得一讀的,你會對NVCC編譯器有更近距離的接觸。
好了,前言就這麼多,本博主計劃按如下順序來講述CUDA:
1.瞭解裝置
2.執行緒並行
3.塊並行
4.流並行
5.執行緒通訊
6.執行緒通訊例項:規約
7.儲存模型
8.常數記憶體
9.紋理記憶體
10.主機頁鎖定記憶體
11.圖形互操作
12.優化準則
13.CUDA與MATLAB介面
14.CUDA與MFC介面
CUDA從入門到精通(四):加深對裝置的認識
前面三節已經對CUDA做了一個簡單的介紹,這一節開始真正進入程式設計環節。
首先,初學者應該對自己使用的裝置有較為紮實的理解和掌握,這樣對後面學習並行程式優化很有幫助,瞭解硬體詳細引數可以通過上節介紹的幾本書和官方資料獲得,但如果仍然覺得不夠直觀,那麼我們可以自己動手獲得這些內容。
以第二節例程為模板,我們稍加改動的部分程式碼如下:
// Add vectors in parallel.
cudaError_t cudaStatus;
int num = 0;
cudaDeviceProp prop;
cudaStatus = cudaGetDeviceCount(&num);
for(int i = 0;i<num;i++)
{
cudaGetDeviceProperties(&prop,i);
}
cudaStatus = addWithCuda(c, a, b, arraySize);這個改動的目的是讓我們的程式自動通過呼叫cuda API函式獲得裝置數目和屬性,所謂“知己知彼,百戰不殆”。
cudaError_t 是cuda錯誤型別,取值為整數。
cudaDeviceProp為裝置屬性結構體,其定義可以從cuda Toolkit安裝目錄中找到,我的路徑為:C:\Program Files\NVIDIA GPU Computing Toolkit\CUDA\v5.0\include\driver_types.h,找到定義為:
/**
* CUDA device properties
*/
struct __device_builtin__ cudaDeviceProp
{
char name[256]; /**< ASCII string identifying device */
size_t totalGlobalMem; /**< Global memory available on device in bytes */
size_t sharedMemPerBlock; /**< Shared memory available per block in bytes */
int regsPerBlock; /**< 32-bit registers available per block */
int warpSize; /**< Warp size in threads */
size_t memPitch; /**< Maximum pitch in bytes allowed by memory copies */
int maxThreadsPerBlock; /**< Maximum number of threads per block */
int maxThreadsDim[3]; /**< Maximum size of each dimension of a block */
int maxGridSize[3]; /**< Maximum size of each dimension of a grid */
int clockRate; /**< Clock frequency in kilohertz */
size_t totalConstMem; /**< Constant memory available on device in bytes */
int major; /**< Major compute capability */
int minor; /**< Minor compute capability */
size_t textureAlignment; /**< Alignment requirement for textures */
size_t texturePitchAlignment; /**< Pitch alignment requirement for texture references bound to pitched memory */
int deviceOverlap; /**< Device can concurrently copy memory and execute a kernel. Deprecated. Use instead asyncEngineCount. */
int multiProcessorCount; /**< Number of multiprocessors on device */
int kernelExecTimeoutEnabled; /**< Specified whether there is a run time limit on kernels */
int integrated; /**< Device is integrated as opposed to discrete */
int canMapHostMemory; /**< Device can map host memory with cudaHostAlloc/cudaHostGetDevicePointer */
int computeMode; /**< Compute mode (See ::cudaComputeMode) */
int maxTexture1D; /**< Maximum 1D texture size */
int maxTexture1DMipmap; /**< Maximum 1D mipmapped texture size */
int maxTexture1DLinear; /**< Maximum size for 1D textures bound to linear memory */
int maxTexture2D[2]; /**< Maximum 2D texture dimensions */
int maxTexture2DMipmap[2]; /**< Maximum 2D mipmapped texture dimensions */
int maxTexture2DLinear[3]; /**< Maximum dimensions (width, height, pitch) for 2D textures bound to pitched memory */
int maxTexture2DGather[2]; /**< Maximum 2D texture dimensions if texture gather operations have to be performed */
int maxTexture3D[3]; /**< Maximum 3D texture dimensions */
int maxTextureCubemap; /**< Maximum Cubemap texture dimensions */
int maxTexture1DLayered[2]; /**< Maximum 1D layered texture dimensions */
int maxTexture2DLayered[3]; /**< Maximum 2D layered texture dimensions */
int maxTextureCubemapLayered[2];/**< Maximum Cubemap layered texture dimensions */
int maxSurface1D; /**< Maximum 1D surface size */
int maxSurface2D[2]; /**< Maximum 2D surface dimensions */
int maxSurface3D[3]; /**< Maximum 3D surface dimensions */
int maxSurface1DLayered[2]; /**< Maximum 1D layered surface dimensions */
int maxSurface2DLayered[3]; /**< Maximum 2D layered surface dimensions */
int maxSurfaceCubemap; /**< Maximum Cubemap surface dimensions */
int maxSurfaceCubemapLayered[2];/**< Maximum Cubemap layered surface dimensions */
size_t surfaceAlignment; /**< Alignment requirements for surfaces */
int concurrentKernels; /**< Device can possibly execute multiple kernels concurrently */
int ECCEnabled; /**< Device has ECC support enabled */
int pciBusID; /**< PCI bus ID of the device */
int pciDeviceID; /**< PCI device ID of the device */
int pciDomainID; /**< PCI domain ID of the device */
int tccDriver; /**< 1 if device is a Tesla device using TCC driver, 0 otherwise */
int asyncEngineCount; /**< Number of asynchronous engines */
int unifiedAddressing; /**< Device shares a unified address space with the host */
int memoryClockRate; /**< Peak memory clock frequency in kilohertz */
int memoryBusWidth; /**< Global memory bus width in bits */
int l2CacheSize; /**< Size of L2 cache in bytes */
int maxThreadsPerMultiProcessor;/**< Maximum resident threads per multiprocessor */
};後面的註釋已經說明了其欄位代表意義,可能有些術語對於初學者理解起來還是有一定困難,沒關係,我們現在只需要關注以下幾個指標:
name:就是裝置名稱;
totalGlobalMem:就是視訊記憶體大小;
major,minor:CUDA裝置版本號,有1.1, 1.2, 1.3, 2.0, 2.1等多個版本;
clockRate:GPU時鐘頻率;
multiProcessorCount:GPU大核數,一個大核(專業點稱為流多處理器,SM,Stream-Multiprocessor)包含多個小核(流處理器,SP,Stream-Processor)
編譯,執行,我們在VS2008工程的cudaGetDeviceProperties()函式處放一個斷點,單步執行這一函式,然後用Watch視窗,切換到Auto頁,展開+,在我的筆記本上得到如下結果:
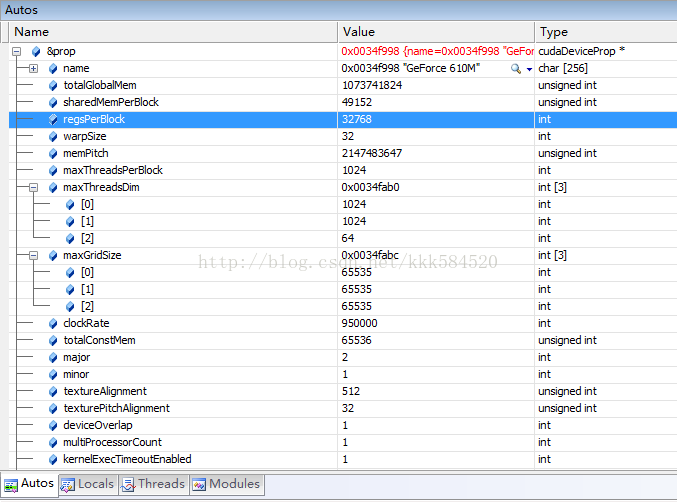
可以看到,裝置名為GeForce 610M,視訊記憶體1GB,裝置版本2.1(比較高端了,哈哈),時鐘頻率為950MHz(注意950000單位為kHz),大核數為1。在一些高效能GPU上(如Tesla,Kepler系列),大核數可能達到幾十甚至上百,可以做更大規模的並行處理。
PS:今天看SDK程式碼時發現在help_cuda.h中有個函式實現從CUDA裝置版本查詢相應大核中小核的數目,覺得很有用,以後程式設計序可以借鑑,摘抄如下:
// Beginning of GPU Architecture definitions
inline int _ConvertSMVer2Cores(int major, int minor)
{
// Defines for GPU Architecture types (using the SM version to determine the # of cores per SM
typedef struct
{
int SM; // 0xMm (hexidecimal notation), M = SM Major version, and m = SM minor version
int Cores;
} sSMtoCores;
sSMtoCores nGpuArchCoresPerSM[] =
{
{ 0x10, 8 }, // Tesla Generation (SM 1.0) G80 class
{ 0x11, 8 }, // Tesla Generation (SM 1.1) G8x class
{ 0x12, 8 }, // Tesla Generation (SM 1.2) G9x class
{ 0x13, 8 }, // Tesla Generation (SM 1.3) GT200 class
{ 0x20, 32 }, // Fermi Generation (SM 2.0) GF100 class
{ 0x21, 48 }, // Fermi Generation (SM 2.1) GF10x class
{ 0x30, 192}, // Kepler Generation (SM 3.0) GK10x class
{ 0x35, 192}, // Kepler Generation (SM 3.5) GK11x class
{ -1, -1 }
};
int index = 0;
while (nGpuArchCoresPerSM[index].SM != -1)
{
if (nGpuArchCoresPerSM[index].SM == ((major << 4) + minor))
{
return nGpuArchCoresPerSM[index].Cores;
}
index++;
}
// If we don't find the values, we default use the previous one to run properly
printf("MapSMtoCores for SM %d.%d is undefined. Default to use %d Cores/SM\n", major, minor, nGpuArchCoresPerSM[7].Cores);
return nGpuArchCoresPerSM[7].Cores;
}
// end of GPU Architecture definitions可見,裝置版本2.1的一個大核有48個小核,而版本3.0以上的一個大核有192個小核!
前文說到過,當我們用的電腦上有多個顯示卡支援CUDA時,怎麼來區分在哪個上執行呢?這裡我們看一下addWithCuda這個函式是怎麼做的。
cudaError_t cudaStatus;
// Choose which GPU to run on, change this on a multi-GPU system.
cudaStatus = cudaSetDevice(0);
if (cudaStatus != cudaSuccess) {
fprintf(stderr, "cudaSetDevice failed! Do you have a CUDA-capable GPU installed?");
goto Error;
}使用了cudaSetDevice(0)這個操作,0表示能搜尋到的第一個裝置號,如果有多個裝置,則編號為0,1,2...。
再看我們本節新增的程式碼,有個函式cudaGetDeviceCount(&num),這個函式用來獲取裝置總數,這樣我們選擇執行CUDA程式的裝置號取值就是0,1,...num-1,於是可以一個個列舉裝置,利用cudaGetDeviceProperties(&prop)獲得其屬性,然後利用一定排序、篩選演算法,找到最符合我們應用的那個裝置號opt,然後呼叫cudaSetDevice(opt)即可選擇該裝置。選擇標準可以從處理能力、版本控制、名稱等各個角度出發。後面講述流併發過程時,還要用到這些API。
如果希望瞭解更多硬體內容可以結合http://www.geforce.cn/hardware獲取。
CUDA從入門到精通(五):執行緒並行多執行緒我們應該都不陌生,在作業系統中,程序是資源分配的基本單元,而執行緒是CPU時間排程的基本單元(這裡假設只有1個CPU)。
將執行緒的概念引申到CUDA程式設計中,我們可以認為執行緒就是執行CUDA程式的最小單元,前面我們建立的工程程式碼中,有個核函式概念不知各位童鞋還記得沒有,在GPU上每個執行緒都會執行一次該核函式。
但GPU上的執行緒排程方式與CPU有很大不同。CPU上會有優先順序分配,從高到低,同樣優先順序的可以採用時間片輪轉法實現執行緒排程。GPU上執行緒沒有優先順序概念,所有執行緒機會均等,執行緒狀態只有等待資源和執行兩種狀態,如果資源未就緒,那麼就等待;一旦就緒,立即執行。當GPU資源很充裕時,所有執行緒都是併發執行的,這樣加速效果很接近理論加速比;而GPU資源少於匯流排程個數時,有一部分執行緒就會等待前面執行的執行緒釋放資源,從而變為序列化執行。
程式碼還是用上一節的吧,改動很少,再貼一遍:
#include "cuda_runtime.h" //CUDA執行時API
#include "device_launch_parameters.h"
#include <stdio.h>
cudaError_t addWithCuda(int *c, const int *a, const int *b, size_t size);
__global__ void addKernel(int *c, const int *a, const int *b)
{
    int i = threadIdx.x;
    c[i] = a[i] + b[i];
}
int main()
{
const int arraySize = 5;
const int a[arraySize] = { 1, 2, 3, 4, 5 };
const int b[arraySize] = { 10, 20, 30, 40, 50 };
int c[arraySize] = { 0 };
// Add vectors in parallel.
cudaError_t cudaStatus;
int num = 0;
cudaDeviceProp prop;
cudaStatus = cudaGetDeviceCount(&num);
for(int i = 0;i<num;i++)
{
	cudaGetDeviceProperties(&prop,i);
}
cudaStatus = addWithCuda(c, a, b, arraySize);
if (cudaStatus != cudaSuccess)
{
fprintf(stderr, "addWithCuda failed!");
return 1;
}
printf("{1,2,3,4,5} + {10,20,30,40,50} = {%d,%d,%d,%d,%d}\n",c[0],c[1],c[2],c[3],c[4]);
// cudaThreadExit must be called before exiting in order for profiling and
// tracing tools such as Nsight and Visual Profiler to show complete traces.
cudaStatus = cudaThreadExit();
if (cudaStatus != cudaSuccess)
{
fprintf(stderr, "cudaThreadExit failed!");
return 1;
}
return 0;
}
// 重點理解這個函式
cudaError_t addWithCuda(int *c, const int *a, const int *b, size_t size)
{
int *dev_a = 0; //GPU裝置端資料指標
int *dev_b = 0;
int *dev_c = 0;
cudaError_t cudaStatus; //狀態指示
// Choose which GPU to run on, change this on a multi-GPU system.
cudaStatus = cudaSetDevice(0); //選擇執行平臺
if (cudaStatus != cudaSuccess)
{
fprintf(stderr, "cudaSetDevice failed! Do you have a CUDA-capable GPU installed?");
goto Error;
}
// 分配GPU裝置端記憶體
cudaStatus = cudaMalloc((void**)&dev_c, size * sizeof(int));
if (cudaStatus != cudaSuccess)
{
fprintf(stderr, "cudaMalloc failed!");
goto Error;
}
cudaStatus = cudaMalloc((void**)&dev_a, size * sizeof(int));
if (cudaStatus != cudaSuccess)
{
fprintf(stderr, "cudaMalloc failed!");
goto Error;
}
cudaStatus = cudaMalloc((void**)&dev_b, size * sizeof(int));
if (cudaStatus != cudaSuccess)
{
fprintf(stderr, "cudaMalloc failed!");
goto Error;
}
// 拷貝資料到GPU
cudaStatus = cudaMemcpy(dev_a, a, size * sizeof(int), cudaMemcpyHostToDevice);
if (cudaStatus != cudaSuccess)
{
fprintf(stderr, "cudaMemcpy failed!");
goto Error;
}
cudaStatus = cudaMemcpy(dev_b, b, size * sizeof(int), cudaMemcpyHostToDevice);
if (cudaStatus != cudaSuccess)
{
fprintf(stderr, "cudaMemcpy failed!");
goto Error;
}
// 執行核函式
<span style="BACKGROUND-COLOR: #ff6666"><strong> addKernel<<<1, size>>>(dev_c, dev_a, dev_b);</strong>
</span> // cudaThreadSynchronize waits for the kernel to finish, and returns
// any errors encountered during the launch.
cudaStatus = cudaThreadSynchronize(); //同步執行緒
if (cudaStatus != cudaSuccess)
{
fprintf(stderr, "cudaThreadSynchronize returned error code %d after launching addKernel!\n", cudaStatus);
goto Error;
}
// Copy output vector from GPU buffer to host memory.
cudaStatus = cudaMemcpy(c, dev_c, size * sizeof(int), cudaMemcpyDeviceToHost); //拷貝結果回主機
if (cudaStatus != cudaSuccess)
{
fprintf(stderr, "cudaMemcpy failed!");
goto Error;
}
Error:
cudaFree(dev_c); //釋放GPU裝置端記憶體
cudaFree(dev_a);
cudaFree(dev_b);
return cudaStatus;
}紅色部分即啟動核函式的呼叫過程,這裡看到呼叫方式和C不太一樣。<<<>>>表示執行時配置符號,裡面1表示只分配一個執行緒組(又稱執行緒塊、Block),size表示每個執行緒組有size個執行緒(Thread)。本程式中size根據前面傳遞引數個數應該為5,所以執行的時候,核函式在5個GPU執行緒單元上分別運行了一次,總共運行了5次。這5個執行緒是如何知道自己“身份”的?是靠threadIdx這個內建變數,它是個dim3型別變數,接受<<<>>>中第二個引數,它包含x,y,z 3維座標,而我們傳入的引數只有一維,所以只有x值是有效的。通過核函式中int i = threadIdx.x;這一句,每個執行緒可以獲得自身的id號,從而找到自己的任務去執行。
同一版本的程式碼用了這麼多次,有點過意不去,於是這次我要做較大的改動 ,大家要擦亮眼睛,拭目以待。
塊並行相當於作業系統中多程序的情況,上節說到,CUDA有執行緒組(執行緒塊)的概念,將一組執行緒組織到一起,共同分配一部分資源,然後內部排程執行。執行緒塊與執行緒塊之間,毫無瓜葛。這有利於做更粗粒度的並行。我們將上一節的程式碼改為塊並行版本如下:
下節我們介紹塊並行。
#include "cuda_runtime.h"
#include "device_launch_parameters.h"
#include <stdio.h>
cudaError_t addWithCuda(int *c, const int *a, const int *b, size_t size);
__global__ void addKernel(int *c, const int *a, const int *b)
{
<span style="BACKGROUND-COLOR: #ff0000"> int i = blockIdx.x;
</span> c[i] = a[i] + b[i];
}
int main()
{
const int arraySize = 5;
const int a[arraySize] = { 1, 2, 3, 4, 5 };
const int b[arraySize] = { 10, 20, 30, 40, 50 };
int c[arraySize] = { 0 };
// Add vectors in parallel.
cudaError_t cudaStatus;
int num = 0;
cudaDeviceProp prop;
cudaStatus = cudaGetDeviceCount(&num);
for(int i = 0;i<num;i++)
{
cudaGetDeviceProperties(&prop,i);
}
cudaStatus = addWithCuda(c, a, b, arraySize);
if (cudaStatus != cudaSuccess)
{
fprintf(stderr, "addWithCuda failed!");
return 1;
}
printf("{1,2,3,4,5} + {10,20,30,40,50} = {%d,%d,%d,%d,%d}\n",c[0],c[1],c[2],c[3],c[4]);
// cudaThreadExit must be called before exiting in order for profiling and
// tracing tools such as Nsight and Visual Profiler to show complete traces.
cudaStatus = cudaThreadExit();
if (cudaStatus != cudaSuccess)
{
fprintf(stderr, "cudaThreadExit failed!");
return 1;
}
return 0;
}
// Helper function for using CUDA to add vectors in parallel.
cudaError_t addWithCuda(int *c, const int *a, const int *b, size_t size)
{
int *dev_a = 0;
int *dev_b = 0;
int *dev_c = 0;
cudaError_t cudaStatus;
// Choose which GPU to run on, change this on a multi-GPU system.
cudaStatus = cudaSetDevice(0);
if (cudaStatus != cudaSuccess)
{
相關推薦
CUDA從入門到精通
CUDA從入門到精通(零):寫在前面
在老闆的要求下,本博主從2012年上高效能運算課程開始接觸CUDA程式設計,隨後將該技術應用到了實際專案中,使處理程式加速超過1K,可見基於圖形顯示器的平行計算對於追求速度的應用來說無疑是一個理想的選擇。還有不到一年畢業,怕是畢業後這些技術也就
CUDA從入門到精通到精通_筆記5:GPU入門綜述博文
PS:這篇部落格出自我的一個同學的手中,寫的很好,是CUDA入門的好部落格,因此才從他的部落格中複製過來(複製改版也是個力氣活~),大家也可以檢視他部落格中其它的文章,涉獵很廣,從語言到開源包。此外,他是做推薦系統的,如果有關於推薦系統的問題也可以在部落格給他留言~!
CUDA從入門到精通(七):流並行
前面我們沒有講程式的結構,我想有些童鞋可能迫不及待想知道CUDA程式到底是怎麼一個執行過程。好的,這一節在介紹流之前,先把CUDA程式結構簡要說一下。
CUDA程式檔案字尾為.cu,有些編譯器可能不認識這個字尾的檔案,我們可以在VS2008的Tools->Opti
CUDA從入門到精通(一):環境搭建
NVIDIA於2006年推出CUDA(Compute Unified Devices Architecture),可以利用其推出的GPU進行通用計算,將平行計算從大型叢集擴充套件到了普通顯示卡,使得使用者只需要一臺帶有Geforce顯示卡的筆記本就能跑較大規模的並行處理程式
CUDA從入門到精通(大神之作)膜拜
在老闆的要求下,本博主從2012年上高效能運算課程開始接觸CUDA程式設計,隨後將該技術應用到了實際專案中,使處理程式加速超過1K,可見基於圖形顯示器的平行計算對於追求速度的應用來說無疑是一個理想的選擇。還有不到一年畢業,怕是畢業後這些技術也就隨畢業而去,準備這個暑假
CUDA從入門到精通(五):執行緒並行
多執行緒我們應該都不陌生,在作業系統中,程序是資源分配的基本單元,而執行緒是CPU時間排程的基本單元(這裡假設只有1個CPU)。
將執行緒的概念引申到CUDA程式設計中,我們可以認為執行緒就是執行CUDA程式的最小單元,前面我們建立的工程程式碼中,有個核函式概念不知各位
CUDA從入門到精通到精通_筆記1:CUDA程式設計開發環境的配置
(一)安裝環境
作業系統:windows7
顯示卡型號:NIVIDA
(二)軟體準備
1---VS2010(推薦大家使用VS2010,vs20
cuda學習從入門到精通-第一篇
在老闆的要求下,本博主從2012年上高效能運算課程開始接觸CUDA程式設計,隨後將該技術應用到了實際專案中,使處理程式加速超過1K,可見基於圖形顯示器的平行計算對於追求速度的應用來說無疑是一個理想的選擇。還有不到一年畢業,怕是畢業後這些技術也就隨畢業而去,準備這個暑假
[轉]從入門到精通: 最小費用流的“zkw算法”
值範圍 add turn 所有 運行時 static col sap 上下 >>>> 原文地址:最小費用流的“zkw算法” <<<<
1. 網絡流的一些基本概念
很多同學建立過網絡流模型做題目, 也
從零開始系列-Caffe從入門到精通之一 環境搭建
python 資源暫時不可用 強制 rec htm color 查看 cpu blog 先介紹下電腦軟硬件情況吧:
處理器:Intel? Core? i5-2450M CPU @ 2.50GHz × 4
內存:4G
操作系統:Ubuntu Kylin(優麒麟) 16.04
3ds Max從入門到精通
問題 正常 man 鏡頭 cfg 其中 合成 平臺 halo 1. 軟件的下載與安裝
這裏用的是3ds Max2009簡體中文版 32位 在 Win7上運行記得打上sp2補丁,不然會有bug。
2. 3ds Max的歷史
3ds Max前身為運行於PC機DOS平臺上的
Spring4.0從入門到精通視頻教程 - 1. Spring的特點
spring4.0從入門到精通視頻教程 java 第三方 開發 輕量級:Spring 是非侵入性的 - 基於 Spring 開發的應用中的對象可以不依賴於 Spring 的 API依賴註入(DI --- dependency injection、IOC)面向切面編程(AOP --- aspec
Spring4.0從入門到精通視頻教程 - 2. 安裝SPRING TOOL SUITE
spring4.0從入門到精通視頻教程 spring tool suite 1、找到與eclipse版本配套的SPRING TOOL SUITE。http://spring.io/tools/sts/all2、Help -> Install New Software...3、Click Add.
MySQL基礎知識(MySQL從入門到精通觀後感)
alter mes times 值範圍 model 。。 字符編碼 不同的 精通 17/7/9
1.主從式架構(Client-server model)或客戶端-服務器(Client-Server)結構簡稱C/S結構,是一種網絡架構,通常在該網絡架構下軟件分為客戶端和服務器
閱讀《Android 從入門到精通》(33)——Intent 分類
data- provide 推斷 gadget nload bat exceptio extra 有時
Intent 分類
顯式 Intent:Intent("android.intent.action.CALL", Uri.parse(&qu
《Android開發從入門到精通》扶松柏.掃描版.pdf
工具 機制 網絡 條碼 referer 列表 simple ott 賬號
下載地址:網盤下載
內容簡介
編輯
《Android開發從入門到精通》系統講解了Android軟件開發的基礎知識,圖文並茂地幫助讀者學習和掌握SDK、開發流程以及常用的API
glide從入門到精通使用
golang go glide 入門介紹不論是開發Java還是你正在學習的Golang,都會遇到依賴管理問題。Java有牛逼轟轟的Maven和Gradle。 Golang亦有godep、govendor、glide、gvt、gopack等等,本文主要給大家介紹gilde。 glide是Golang的包管理工
4.區塊鏈平臺以太坊從入門到精通之 以太幣
tps 圖形化 三種 lan 了解 市場 ref 圖形化界面 tar 1.以太幣簡介
以太幣( ether) 是以太坊中使用的貨幣的名字.它是用於支付在虛擬機中的運算的費用.
了解就可以
2.獲取和發送以太幣
有三種方式獲取
1.成為一名礦工
(轉)Android開發書籍推薦:從入門到精通系列學習路線書籍介紹
成長 程序員 理論 targe base 官方 app als 自己的 Android開發書籍推薦:從入門到精通系列學習路線書籍介紹
轉自:http://blog.csdn.net/findsafety/article/details/52317506
很多時候我們都會
Oracle 11g從入門到精通pdf
過程 ise color clas relative 第2章 stat nbsp ext 下載地址:網盤下載 內容要點編輯本書是針對Oracle公司最新推出的大型數據庫管理系統Oracle 11g編寫的,循環漸進地介紹了Oracle的基本知識。其內容包括四大部分:Orac