
springboot整合Freemark模板(詳盡版)
阿新 • • 發佈:2018-12-20
本篇是SpringBoot專案實戰(3):整合Freemark模板一文的修訂版,本文使用示例詳細介紹、演示了freemarker常用的語法,以及如何通過freemarker生成純靜態的html。
本文知識點:
想了解freemarker?沒有比這篇文章更詳細的了
springboot如何整合freemarker模板引擎
新增依賴
<dependency>
   <groupId>org.springframework.boot</groupId>
   <artifactId>spring-boot-starter-web</artifactId>
</dependency>
<dependency>
   <groupId>org.springframework.boot</groupId>
   <artifactId>spring-boot-starter-freemarker</artifactId>
</dependency>
配置屬性檔案
# 是否允許HttpServletRequest屬性覆蓋(隱藏)控制器生成的同名模型屬性。
spring.freemarker.allow-request-override=false
# 是否允許HttpSession屬性覆蓋(隱藏)控制器生成的同名模型屬性。
spring.freemarker.allow-session-override=false
# 是否啟用模板快取。
spring.freemarker.cache=false
# 模板編碼。
spring.freemarker.charset=UTF-8
# 是否檢查模板位置是否存在。
spring.freemarker.check-template-location=true
# Content-Type value.
spring.freemarker.content-type=text/html
# 是否啟用freemarker
spring.freemarker.enabled=true
# 設定所有request的屬性在merge到模板的時候,是否要都新增到model中.
spring.freemarker.expose-request-attributes=false
# 是否在merge模板的時候,將HttpSession屬性都新增到model中
spring.freemarker.expose-session-attributes=false
# 設定是否以springMacroRequestContext的形式暴露RequestContext給Spring’s macro library使用
spring.freemarker.expose-spring-macro-helpers=true
# 是否優先從檔案系統載入template,以支援熱載入,預設為true
spring.freemarker.prefer-file-system-access=true
# 設定模板的字尾.
spring.freemarker.suffix=.ftl
# 設定模板的載入路徑,多個以逗號分隔,預設:
spring.freemarker.template-loader-path=classpath:/templates/
# 設定FreeMarker keys.
spring.freemarker.settings.template_update_delay=0
spring.freemarker.settings.default_encoding=UTF-8
spring.freemarker.settings.classic_compatible=true
編寫Controller
@Controller
public class FreemarkController {

    @RequestMapping("/")
    public String index(Model model) {
        return "index";
    }
}
頁面
<!DOCTYPE html>
<html lang="en">
<head>
	<title>SpringBoot + Freemarker</title>
	<meta http-equiv="Content-Type" content="text/html; charset=UTF-8" />
</head>
<body>
	<h1>Hello boy,</h1><br>
	<p>當前時間:${.now?string("yyyy-MM-dd HH:mm:ss.sss")}</p>
</body>
</html>
常用的freemarker語法
下面詳細介紹在ftl模板中如何使用列表、map、字串、數字、日期、switch以及macro巨集指令等語法。
修改下controller,傳遞一些需要處理的引數
@RequestMapping("/")
public String index(Model model) {
	Map map = new LinkedHashMap<>();
	for (int i = 0; i < 5; i++) {
		map.put("key" + i, "value" + i);
	}
	model.addAttribute("list", Arrays.asList("string1", "string2", "string3", "string4", "string5", "string6"));
	model.addAttribute("map", map);
	model.addAttribute("name", "   htTps://wWw.zHyD.mE   ");
	model.addAttribute("htmlText", "<span style=\"color: red;font-size: 16px;\">html內容</span>");
	model.addAttribute("num", 123.012);
	model.addAttribute("null", null);
	model.addAttribute("dateObj", new Date());
	model.addAttribute("bol", true);
	return "index";
}
重寫index.ftl
<!DOCTYPE html>
<html lang="en">
<head>
<title>Freemarker 語法大全</title>
<meta http-equiv="Content-Type" content="text/html; charset=UTF-8"/>
<style>
html {
font-size: 14px;
font-weight: 400;
}
.exp {
font-size: 12px;
color: lightgray;
}
</style>
</head>
<body>
<p>當前時間:${.now?string("yyyy-MM-dd HH:mm:ss.sss")}</p>
<dl>
<dt>list長度:<span class="exp">${list?size}</span></dt>
<dt>列表</dt>
<#list list as item>
<dd>${item }, 索引:${item_index },hasNext:${item_has_next}</dd>
</#list>
<dt>數字遍歷</dt>
<#list 1..3 as item>
<dd>數字${item}</dd>
</#list>
<dt>map</dt>
<#list map?keys as key>
<dd>${map[key]}, 索引:${key_index },hasNext:${key_has_next}</dd>
</#list>
</dl>
<dl>
<dt>字串</dt>
<dd>普通字串:<span class="exp">${name}</span></dd>
<dd>非html編碼:<span class="exp">${htmlText}</span></dd>
<dd>html編碼:<span class="exp">${htmlText?html}</span></dd>
<dd>首字母大寫:<span class="exp">${name?cap_first}</span></dd>
<dd>首字母小寫:<span class="exp">${name?uncap_first}</span></dd>
<dd>全小寫:<span class="exp">${name?lower_case}</span></dd>
<dd>全大寫:<span class="exp">${name?upper_case}</span></dd>
<dd>去除首位空格:<span class="exp">${name?trim}</span></dd>
<dd>空字串:<span class="exp">${null?if_exists}</span></dd>
<dd>是否包含某個字串:<span class="exp">${name?contains("wWw")?string}</span></dd>
<dd>預設值:<span class="exp">${null?default("空值預設")}</span></dd>
<dd>“${name}”字串長度:<span class="exp">${name?length}</span></dd>
<dd>定義字串:<span class="exp">str=碼一碼<#assign str="碼一碼"/></span></dd>
<dd>字串拼接(1):<span class="exp">${"字串拼接 + " + str}</span></dd>
<dd>字串拼接(2):<span class="exp">${"字串拼接 + ${str}"}</span></dd>
<dd>字串擷取單個字元(1):<span class="exp">${str[1]}</span></dd>
<dd>字串擷取(2):<span class="exp">${str?substring(1)}</span></dd>
<dd>字串擷取(3):<span class="exp">${str?substring(1,2)}</span></dd>
<dd>indexOf:<span class="exp">${str?index_of("一")}</span></dd>
<dd>split分割字串:<span class="exp">
<#list "a|b|c"?split("|") as item>
${item}
</#list>
</span></dd>
<dd>if...elseif...else:<span class="exp">
<#if null == ''>
匹配if顯示
<#elseif null == '1'>
匹配elseif顯示
<#else>
匹配else顯示
</#if></span>
</dd>
</dl>
<dl>
<dt>switch</dt>
<dd>
<#switch str>
<#case "你好">
匹配“你好”
<#break >
<#case "碼一碼">
匹配“碼一碼”
<#break >
<#default>
預設匹配
</#switch>
</dd>
</dl>
<dl>
<dt>數字</dt>
<dd>普通數字:<span class="exp">${num}</span></dd>
<dd>數字型別:<span class="exp">${num?string.number}</span></dd>
<dd>貨幣型別:<span class="exp">${num?string.currency}</span></dd>
<dd>百分比型別:<span class="exp">${num?string.percent}</span></dd>
<dd>格式化數字:<span class="exp">${num?string("#.###")}</span></dd>
<dd>取數字的整數部分:<span class="exp">${num?int}</span></dd>
</dl>
<dl>
<dt>運算子</dt>
<dd>不等於:!= <span class="exp">例如:${(1 != 2)?string('1 != 2', '1 == 2')}</span></dd>
<dd>等於:== <span class="exp">例如:${(1 == 1)?string('1 == 1', '1 != 1')}</span></dd>
<dd>大於(1):> <span
class="exp">例如:${(2 > 1)?string('2 > 1', '2 < 1')}。<strong>注:使用> 時必須加括號,否則可能會被當成普通的標籤閉合符號而引起報錯</strong></span>
</dd>
<dd>大於(2):gt <span class="exp">例如:${(2 gt 1)?string('2 gt 1', '2 lte 1')}</span></dd>
<dd>大於等於:gte <span class="exp">例如:${(2 gte 2)?string('2 gte 2', '2 lt 2')}</span></dd>
<dd>小於(1):< <span
class="exp">例如:${(1 < 2)?string('1 < 2', '1 > 2')}。<strong>注:使用< 時必須加括號,否則可能會被當成普通的標籤閉合符號而引起報錯</strong></span>
</dd>
<dd>小於(2):lt <span class="exp">例如:${(1 lt 2)?string('1 lt 2', '1 gte 2')}</span></dd>
<dd>小於等於:lte <span class="exp">例如:${(2 lte 2)?string('2 lte 2', '2 gt 2')}</span></dd>
</dl>
<dl>
<dt>boolean</dt>
<dd>普通boolean輸出:<span class="exp">${bol}</span></dd>
<dd>boolean判斷輸出:<span class="exp">${bol?string('true的時候顯示','false的時候顯示')}</span></dd>
</dl>
<dl>
<dt>日期</dt>
<dd>${dateObj?date}</dd>
<dd>${dateObj?time}</dd>
<dd>${dateObj?string("yyyy-MM-dd HH:mm:ss.SSS")}</dd>
</dl>
<dl>
<dt>import</dt>
<dd>
<#import "import.ftl" as importObj>
<p>${importObj.importStr}</p>
<p>${importObj.importStr1}</p>
</dd>
</dl>
<dl>
<dt>macro巨集模板</dt>
<dd>
<#macro listMacro title items>
<p>${title?cap_first}:
<ul>
<#list items as item>
<li>${item?cap_first}</li>
</#list>
</ul>
<#nested >
</#macro>
</dd>
<dd>
<@listMacro items=["item1", "item2", "item3"] title="Items">
nested標籤表示可以插入自定義的內容
</@listMacro>
</dd>
</dl>
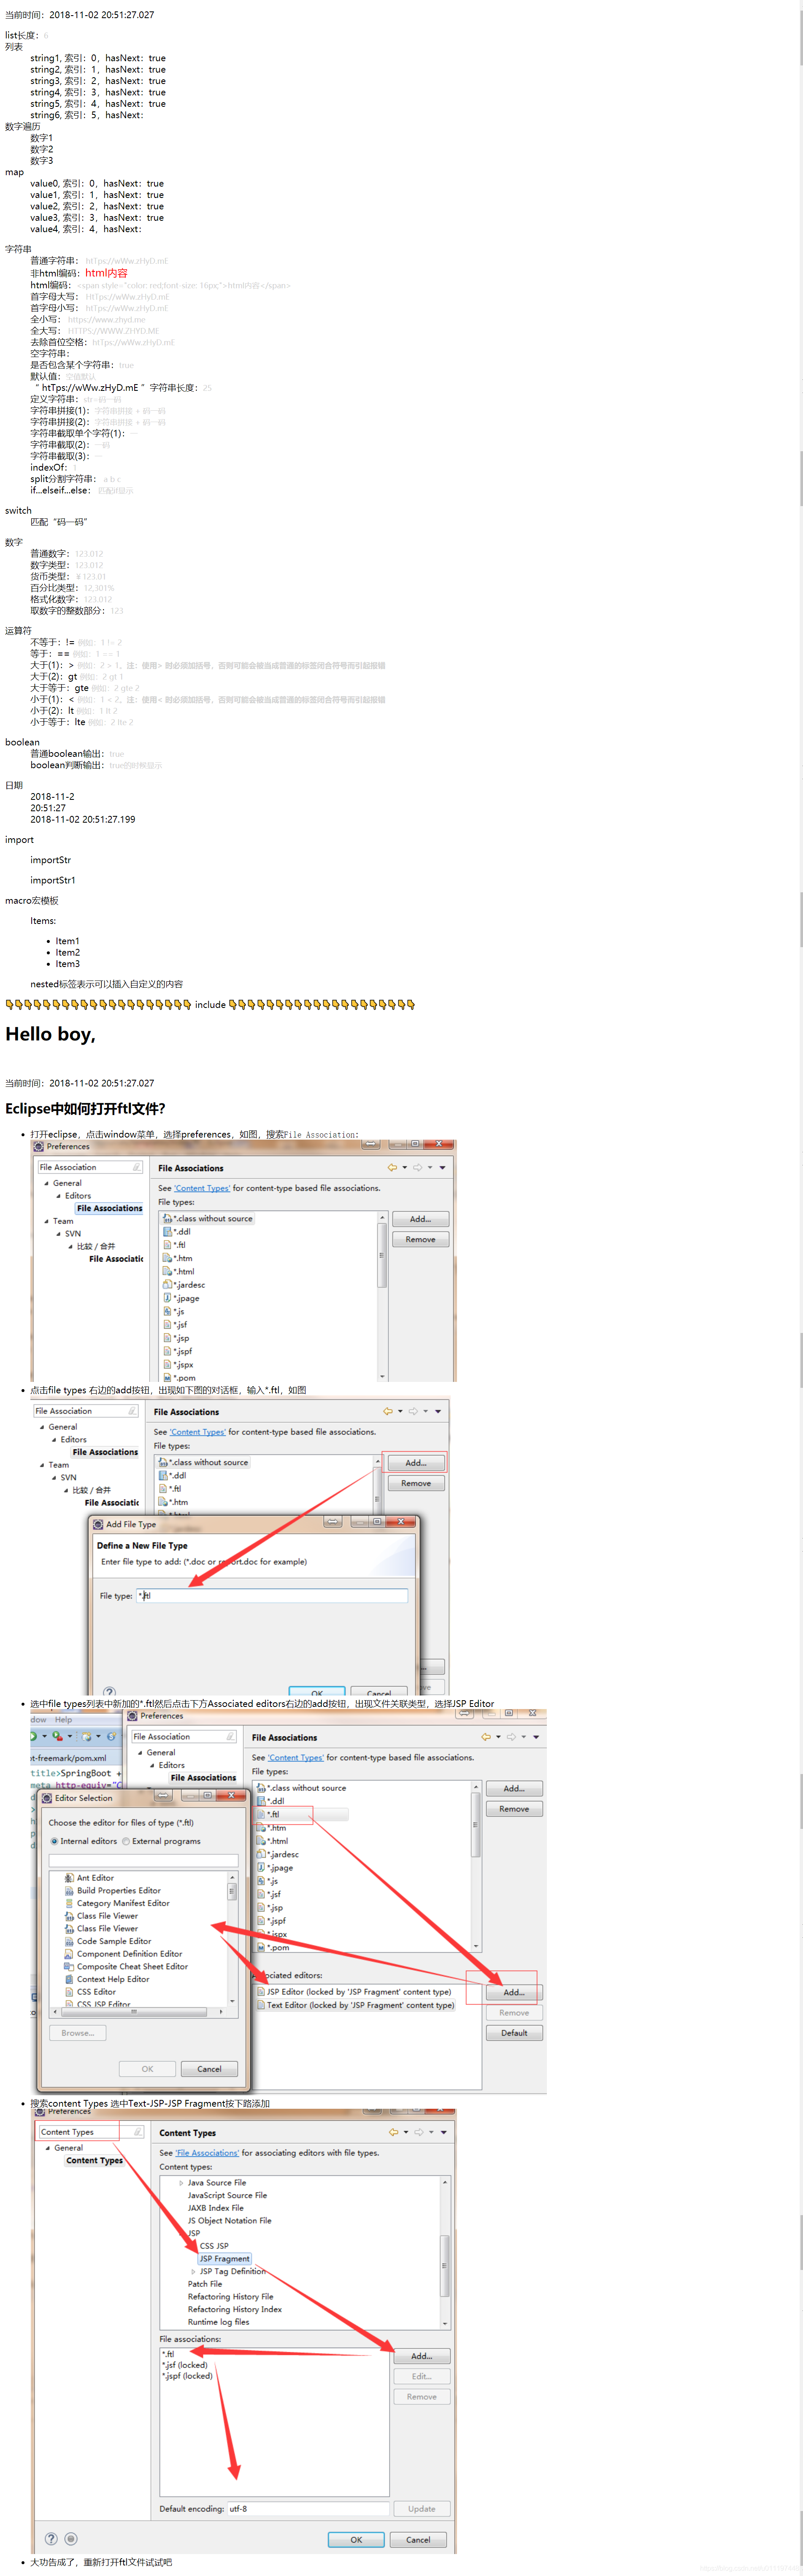
include
<#include "eclipse.ftl">
</body>
</html>
通過freemarker生成靜態html
首先需要編寫一個可以在普通類中獲取到springbean的工具類SpringContextHolder
@Component
public class SpringContextHolder implements ApplicationContextAware {

    private static ApplicationContext appContext = null;

    /**
     * 通過name獲取 Bean.
     *
     * @param name
     * @return
     */
    public static Object getBean(String name) {
        return appContext.getBean(name);

    }

    /**
     * 通過class獲取Bean.
     *
     * @param clazz
     * @param <T>
     * @return
     */
    public static <T> T getBean(Class<T> clazz) {
        return appContext.getBean(clazz);
    }

    /**
     * 通過name,以及Clazz返回指定的Bean
     *
     * @param name
     * @param clazz
     * @param <T>
     * @return
     */
    public static <T> T getBean(String name, Class<T> clazz) {
        return appContext.getBean(name, clazz);
    }

    @Override
    public void setApplicationContext(ApplicationContext applicationContext) throws BeansException {
        if (appContext == null) {
            appContext = applicationContext;
        }
    }
}
然後編寫一個生成靜態html檔案的工具類FreemarkerUtil
public class FreemarkerUtil {

    public static String parseTpl(String viewName, Map<String, Object> params) {
        Configuration cfg = SpringContextHolder.getBean(Configuration.class);
        String html = null;
        Template t = null;
        try {
            t = cfg.getTemplate(viewName + ".ftl");
            html = FreeMarkerTemplateUtils.processTemplateIntoString(t, params);
        } catch (IOException | TemplateException e) {
            e.printStackTrace();
        }
        return html;
    }
}
為了方便檢視, 新增一個mapping
@RequestMapping("/createHtml")
@ResponseBody
public String createHtml(Model model){
	Map map = new LinkedHashMap<>();
	for (int i = 0; i < 5; i++) {
		map.put("key" + i, "value" + i);
	}
	model.addAttribute("list", Arrays.asList("string1", "string2", "string3", "string4", "string5", "string6"));
	model.addAttribute("map", map);
	model.addAttribute("name", "   htTps://wWw.zHyD.mE   ");
	model.addAttribute("htmlText", "<span style=\"color: red;font-size: 16px;\">html內容</span>");
	model.addAttribute("num", 123.012);
	model.addAttribute("null", null);
	model.addAttribute("dateObj", new Date());
	model.addAttribute("bol", true);
	return FreemarkerUtil.parseTpl("index", model.asMap());
}
ok,訪問/createHtml

到此為止,本篇已詳細介紹了freemarker的使用方法。