python Deep learning 學習筆記(1)
Python深度學習筆記 -- 偏重實驗
Python 的 Keras 庫來學習手寫數字分類,將手寫數字的灰度影象(28 畫素 ×28 畫素)劃分到 10 個類別 中(0~9) 神經網路的核心元件是層(layer),它是一種資料處理模組,它從輸入資料中提取表示,緊接著的一個例子中,將含有兩個Dense 層,它們是密集連線(也叫全連線)的神經層,最後是一個10路的softmax層,它將返回一個由 10 個概率值(總和為 1)組成的陣列。每個概率值表示當前數字影象屬於 10 個數字類別中某一個的概率 損失函式(loss function):網路如何衡量在訓練資料上的效能,即網路如何朝著正確的方向前進 優化器(optimizer):
from keras.datasets import mnist
from keras import models
from keras import layers
from keras.utils import to_categorical


# 載入資料
(train_images, train_labels), (test_images, test_labels) = mnist.load_data()
print("訓練圖片個數與尺寸: ", train_images.shape, "標籤數: ", len(train_labels))
print("測試圖片數量與尺寸: ", test_images.shape, "標籤數: ", len(test_labels))
# 網路架構
network = models.Sequential()
network.add(layers.Dense(512, activation='relu', input_shape=(28 * 28,)))
network.add(layers.Dense(10, activation="softmax"))
# 編譯
network.compile(optimizer='rmsprop', loss='categorical_crossentropy', metrics=['accuracy'])
# 資料預處理,將其變換為網路要求的形狀,並縮放到所有值都在 [0, 1] 區間
train_images = train_images.reshape((60000, 28 * 28))
train_images = train_images.astype('float32') / 255
test_images = test_images.reshape((10000, 28 * 28))
test_images = test_images.astype('float32') / 255
# 對標籤進行分類編碼
train_labels = to_categorical(train_labels)
test_labels = to_categorical(test_labels)
# 訓練模型,epochs表示訓練遍數,batch_size表示每次餵給網路的資料數目
network.fit(train_images, train_labels, epochs=5, batch_size=128)
# 檢測在測試集上的正確率
test_loss, test_acc = network.evaluate(test_images, test_labels)
print('正確率: ', test_acc)
張量是矩陣向任意維度的推廣,僅包含一個數字的張量叫作標量,數字組成的陣列叫作向量(vector)或一維張量(1D 張量)。一維張量只有一個軸 顯示圖片
(train_images, train_labels), (test_images, test_labels) = mnist.load_data("/home/fan/dataset/mnist.npz")
# 顯示第0個數字
import matplotlib.pyplot as plt
digit = train_images[0]
plt.imshow(digit, cmap=plt.cm.binary)
plt.show()
一些資料張量 向量資料:
當時間(或序列順序)對於資料很重要時,應該將資料儲存在帶有時間軸的 3D 張量中
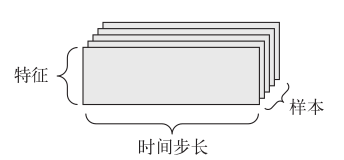
根據慣例,時間軸始終是第 2 個軸
影象通常具有三個維度: 高度、寬度和顏色深度
灰度影象只有一個顏色通道,因此可以儲存在 2D 張量中
4D張量表示

影象張量的形狀有兩種約定: 通道在後(channels-last)的約定(在 TensorFlow 中使用)和通道在前(channels-first)的約定(在 Theano 中使用)。TensorFlow 機器學習框架將顏色深度軸放在最後: (samples, height, width, color_depth),Theano將影象深度軸放在批量軸之後: (samples, color_depth, height, width),Keras 框架同時支援這兩種格式 視訊資料為 5D 張量,每一幀都可以儲存在一個形狀為 (height, width, color_depth) 的 3D 張量中,因此一系列幀可以儲存在一個形狀為 (frames, height, width, color_depth) 的 4D 張量中,而不同視訊組成的批量則可以儲存在一個 5D 張量中,其形狀為(samples, frames, height, width, color_depth) 一個以每秒 4 幀取樣的 60 秒 YouTube 視訊片段,視訊尺寸為 144×256,這個視訊共有 240 幀。4 個這樣的視訊片段組成的批量將儲存在形狀為 (4, 240, 144, 256, 3)的張量中
如果將兩個形狀不同的張量相加,較小的張量會被廣播(broadcast),以匹配較大張量的形狀:
- 向較小的張量新增軸(叫作廣播軸),使其 ndim 與較大的張量相同
- 將較小的張量沿著新軸重複,使其形狀與較大的張量相同
a = np.array([[2, 2], [1, 1]])
c = np.array([3, 3])
print(a + c)
結果為
[[5 5]
 [4 4]]
如果一個張量的形狀是 (a, b, ... n, n+1, ... m) ,另一個張量的形狀是 (n, n+1, ... m) ,那麼你通常可以利用廣播對它們做兩個張量之間的逐元素運算。廣播操作會自動應用於從 a 到 n-1 的軸
在 Numpy、Keras、Theano 和 TensorFlow 中,都是用 * 實現逐元素乘積,在 Numpy 和 Keras 中,都是用標準的 dot 運算子來實現點積
a = np.array([1, 2])
b = np.array([[5], [6]])
# 輸出[17]
print(a.dot(b))張量變形是指改變張量的行和列,以得到想要的形狀。變形後的張量的元素總個數與初始張量相同
a = np.array([[0, 1], [2, 3], [4, 5]])
print(a)
print("after reshape: \n", a.reshape((2, 3)))
輸出
[[0 1]
 [2 3]
 [4 5]]
after reshape:
 [[0 1 2]
 [3 4 5]]
轉置 np.transpose(x)
SGD(stochastic gradient descent) -- 隨機梯度下降
不同的張量格式與不同的資料處理型別需要用到不同的層,簡單的向量資料儲存在形狀為 (samples, features) 的 2D 張量中,通常用密集連線層[densely connected layer,也叫全連線層(fully connected layer)或密集層(dense layer),對應於 Keras 的 Dense 類]來處理。序列資料儲存在形狀為 (samples, timesteps, features) 的 3D 張量中,通常用迴圈層(recurrent layer,比如 Keras 的 LSTM 層)來處理。影象資料儲存在 4D 張量中,通常用二維卷積層(Keras 的 Conv2D )來處理
Keras框架具有層相容性,具體指的是每一層只接受特定形狀的輸入張量,並返回特定形狀的輸出張量
layer = layers.Dense(32, input_shape=(784,))建立了一個層,只接受第一個維度大小為 784 的 2D 張量作為輸入。這個層將返回一個張量,第一個維度的大小變成了 32 因此,這個層後面只能連線一個接受 32 維向量作為輸入的層,使用 Keras 時,你無須擔心相容性,因為向模型中新增的層都會自動匹配輸入層的形狀,下一次層可以寫為
model.add(layers.Dense(32))它可以自動推匯出輸入形狀等於上一層的輸出形狀
具有多個輸出的神經網路可能具有多個損失函式(每個輸出對應一個損失函式)。但是,梯度下降過程必須基於單個標量損失值。因此,對於具有多個損失函式的網路,需要將所有損失函式取平均,變為一個標量值
一個 Keras 工作流程
- 定義訓練資料: 輸入張量和目標張量
- 定義層組成的網路(或模型),將輸入對映到目標
- 配置學習過程:選擇損失函式、優化器和需要監控的指標
- 呼叫模型的 fit 方法在訓練資料上進行迭代
定義模型有兩種方法: 一種是使用 Sequential 類(僅用於層的線性堆疊,這是目前最常見的網路架構) 另一種是函式式 API(functional API,用於層組成的有向無環圖,讓你可以構建任意形式的架構) Sequential 類定義兩層模型
model = models.Sequential()
model.add(layers.Dense(32, activation='relu', input_shape=(784,)))
model.add(layers.Dense(10, activation='softmax'))
函式式 API 定義的相同模型
input_tensor = layers.Input(shape=(784,))
x = layers.Dense(32, activation='relu')(input_tensor)
output_tensor = layers.Dense(10, activation='softmax')(x)
model = models.Model(inputs=input_tensor, outputs=output_tensor)
以下學習根據電影評論的文字內容將其劃分為正面或負面 使用 IMDB 資料集,資料集被分為用於訓練的 25 000 條評論與用於測試的 25 000 條評論,訓練集和測試集都包含 50% 的正面評論和 50% 的負面評論 其中,資料集中的labels 都是 0 和 1 組成的列表,0代表負面(negative),1 代表正面(positive) 你不能將整數序列直接輸入神經網路。你需要將列表轉換為張量。轉換方法有以下兩種
- 填充列表,使其具有相同的長度,再將列表轉換成形狀為 (samples, word_indices)的整數張量,然後網路第一層使用能處理這種整數張量的層
- 對列表進行 one-hot 編碼,將其轉換為 0 和 1 組成的向量。舉個例子,序列 [3, 5] 將會被轉換為 10 000 維向量,只有索引為 3 和 5 的元素是 1,其餘元素都是 0,然後網路第一層可以用 Dense 層,它能夠處理浮點數向量資料
訓練程式碼
from keras.datasets import imdb
import os
import numpy as np
from keras import models
from keras import layers
import matplotlib.pyplot as plt


# 將整數序列編碼為二進位制矩陣
def vectorize_sequences(sequences, dimension=10000):
    results = np.zeros((len(sequences), dimension))
    for i, sequence in enumerate(sequences):
        # results[i] 的指定索引設為 1
        results[i, sequence] = 1
    return results


data_url_base = "/home/fan/dataset"
# 下載資料且只保留出現頻率最高的前10000個單詞
(train_data, train_labels), (test_data, test_labels) = imdb.load_data(num_words=10000, path=os.path.join(data_url_base, "imdb.npz"))

# 將某條評論迅速解碼為英文單詞
# word_index 是一個將單詞對映為整數索引的字典
word_index = imdb.get_word_index(path=os.path.join(data_url_base, "imdb_word_index.json"))
# 將整數索引對映為單詞
reverse_word_index = dict([(value, key) for (key, value) in word_index.items()])
# 索引減去了 3,因為 0、1、2是為“padding”(填充)、
# “start of sequence”(序列開始)、“unknown”(未知詞)分別保留的索引
decoded_review = ' '.join([reverse_word_index.get(i - 3, '?') for i in train_data[0]])
print(decoded_review)

# 將資料向量化
x_train = vectorize_sequences(train_data)
x_test = vectorize_sequences(test_data)
# 將標籤向量化
y_train = np.asarray(train_labels).astype('float32')
y_test = np.asarray(test_labels).astype('float32')

# 設計網路
# 兩個中間層,每層都有 16 個隱藏單元
# 第三層輸出一個標量,預測當前評論的情感
# 中間層使用 relu 作為啟用函式,最後一層使用 sigmoid 啟用以輸出一個 0~1 範圍內的概率值
model = models.Sequential()
model.add(layers.Dense(16, activation='relu', input_shape=(10000,)))
model.add(layers.Dense(16, activation='relu'))
model.add(layers.Dense(1, activation='sigmoid'))
# 模型編譯
# binary_crossentropy二元交叉熵
model.compile(optimizer='rmsprop', loss='binary_crossentropy', metrics=['acc'])
# 留出驗證集
x_val = x_train[:10000]
partial_x_train = x_train[10000:]
y_val = y_train[:10000]
partial_y_train = y_train[10000:]
history = model.fit(partial_x_train, partial_y_train, epochs=20, batch_size=512, validation_data=(x_val, y_val))
# 得到訓練過程中的所有資料
history_dict = history.history
print(history_dict.keys())

# 繪製訓練損失和驗證損失
loss_values = history_dict['loss']
val_loss_values = history_dict['val_loss']
epochs = range(1, len(loss_values) + 1)
# 'bo' 藍色圓點
plt.plot(epochs, loss_values, 'bo', label='Training loss')
# 'b' 藍色實線
plt.plot(epochs, val_loss_values, 'b', label='Validation loss')
plt.title("Training and Validation loss")
plt.xlabel('Epochs')
plt.legend()
plt.show()

# 繪製訓練精度和驗證精度
# plt.clf() 清空影象
acc = history_dict['acc']
val_acc = history_dict['val_acc']

plt.plot(epochs, acc, 'bo', label='Training acc')
plt.plot(epochs, val_acc, 'b', label='Validation acc')
plt.title('Training and validation accuracy')
plt.xlabel('Epochs')
plt.ylabel('Accuracy')
plt.legend()
plt.show()
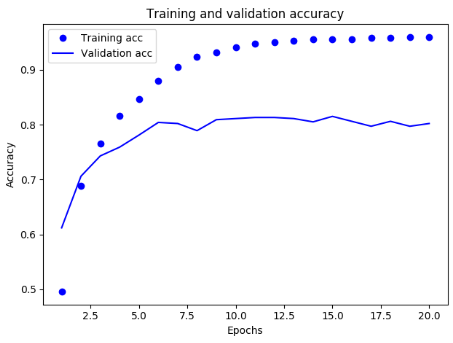
結果如下
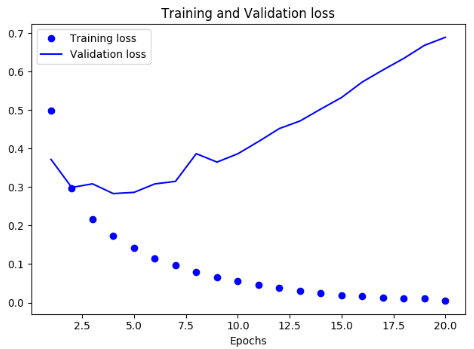
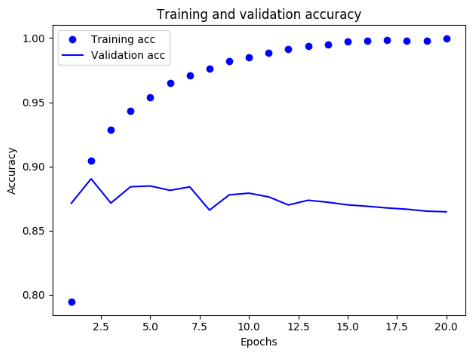
可見訓練損失每輪都在降低,訓練精度每輪都在提升,但驗證損失和驗證精度並非如此,這是因為我們遇到了過擬合的情況,可以採用多種方法防止過擬合,如增加資料樣本,減少訓練次數,減少網路引數等 使用訓練好的網路對新資料進行預測
model.predict(x_test)多分類問題 -- 新聞主題分類 如果每個資料點只能劃分到一個類別,那麼這就是一個單標籤、多分類問題,而如果每個資料點可以劃分到多個類別(主題),那它就是一個多標籤、多分類問題,此處為單標籤、多分類問題
將標籤向量化有兩種方法
- 你可以將標籤列表轉換為整數張量
- 或者使用 one-hot 編碼,one-hot 編碼是分類資料廣泛使用的一種格式,也叫分類編碼(categorical encoding)
將標籤轉換為整數張量
y_train = np.array(train_labels)
y_test = np.array(test_labels)對於此種編碼方法,我們選擇的損失函式應該為sparse_categorical_crossentropy,該編碼方法適用於整數標籤
新聞分類示例
from keras.datasets import reuters
import numpy as np
from keras.utils.np_utils import to_categorical
from keras import models
from keras import layers
import matplotlib.pyplot as plt


# 將整數序列編碼為二進位制矩陣
def vectorize_sequences(sequences, dimension=10000):
    results = np.zeros((len(sequences), dimension))
    for i, sequence in enumerate(sequences):
        # results[i] 的指定索引設為 1
        results[i, sequence] = 1
    return results


# 將資料限定為前10000個最常出現的單詞
(train_data, train_labels), (test_data, test_labels) = reuters.load_data(num_words=10000, path="/home/fan/dataset/reuters/reuters.npz")
# 新聞解析
word_index = reuters.get_word_index(path="/home/fan/dataset/reuters/reuters_word_index.json")
reversed_word_index = dict([(value, key) for (key, value) in word_index.items()])
# 索引減去了3,因為 0、1、2 是為“padding”( 填 充 )、“start of
# sequence”(序列開始)、“unknown”(未知詞)分別保留的索引
decoded_newswire = ' '.join([reversed_word_index.get(i-3, '?') for i in train_data[0]])
print(decoded_newswire)
# 標籤的索引範圍為0 - 45
print(np.amax(train_labels))

# 資料向量化
x_train = vectorize_sequences(train_data)
x_test = vectorize_sequences(test_data)
# 標籤向量化
one_hot_train_labels = to_categorical(train_labels)
one_hot_test_labels = to_categorical(test_labels)

model = models.Sequential()
model.add(layers.Dense(64, activation='relu', input_shape=(10000, )))
model.add(layers.Dense(64, activation='relu'))
model.add(layers.Dense(46, activation='softmax'))

model.compile(optimizer='rmsprop', loss='categorical_crossentropy', metrics=['accuracy'])
# 留出1000驗證集
x_val = x_train[:1000]
partial_x_train = x_train[1000:]
y_val = one_hot_train_labels[:1000]
partial_y_train = one_hot_train_labels[1000:]

history = model.fit(partial_x_train, partial_y_train, epochs=20, batch_size=512, validation_data=(x_val, y_val))

loss = history.history['loss']
val_loss = history.history['val_loss']
epochs = range(1, len(loss) + 1)
plt.plot(epochs, loss, 'bo', label='Training loss')
plt.plot(epochs, val_loss, 'b', label='Validation loss')
plt.title('Training and validation loss')
plt.xlabel('Epochs')
plt.ylabel('Loss')
plt.legend()
plt.show()

acc = history.history['acc']
val_acc = history.history['val_acc']
plt.plot(epochs, acc, 'bo', label='Training acc')
plt.plot(epochs, val_acc, 'b', label='Validation acc')
plt.title('Training and validation accuracy')
plt.xlabel('Epochs')
plt.ylabel('Accuracy')
plt.legend()
plt.show()
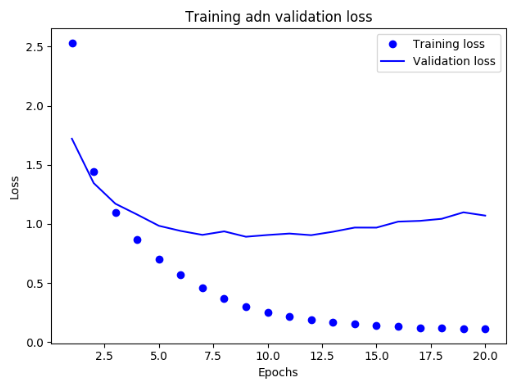
實驗結果
Loss
Accuracy
要點
- 如果要對 N 個類別的資料點進行分類,網路的最後一層應該是大小為 N 的 Dense 層
- 對於單標籤、多分類問題,網路的最後一層應該使用 softmax 啟用,這樣可以輸出在 N 個輸出類別上的概率分佈
迴歸問題 預測一個連續值而不是離散的標籤
當我們將取值範圍差異很大的資料輸入到神經網路中,網路可能會自動適應這種資料,但是學習肯定是困難的。對於這種資料,普遍採用的最佳實踐是對每個特徵做標準化,即對於輸入資料的每個特徵(輸入資料矩陣中的列),減去特徵平均值,再除以標準差,這樣得到的特徵平均值為 0,標準差為 1
此處要注意,用於測試資料標準化的均值和標準差都是在訓練資料上計算得到的。在工作流程中,你不能使用在測試資料上計算得到的任何結果,即使是像資料標準化這麼簡單的事情也不行
當樣本數量很少,我們應該使用一個非常小的網路,不然會出現嚴重的過擬合
當進行標量回歸時,網路的最後一層只設置一個單元,不需要啟用,是一個線性層,新增啟用函式將會限制輸出範圍
當你的資料量較小時,無法給驗證集分出較大的樣本,這導致驗證集的劃分方式會造成驗證分數上有很大的方差,而無法對模型進行有效的評估,這時我們可以選用K折交叉驗證
K折交叉驗證

例子
from keras.datasets import boston_housing
from keras import models
from keras import layers
import numpy as np
import matplotlib.pyplot as plt


def builde_model():
    model = models.Sequential()
    model.add(layers.Dense(64, activation='relu',
                           input_shape=(train_data.shape[1],)))
    model.add(layers.Dense(64, activation='relu'))
    model.add(layers.Dense(1))
    model.compile(optimizer='rmsprop', loss='mse', metrics=['mae'])
    return model


(train_data, train_targets), (test_data, test_targets) = boston_housing.load_data('/home/fan/dataset/boston_housing.npz')
# 資料標準化
mean = train_data.mean(axis=0)
train_data -= mean
std = train_data.std(axis=0)
train_data /= std
test_data -= mean
test_data /= std

k = 4
num_val_samples = len(train_data)
num_epochs = 500
all_mae_histories = []
for i in range(k):
    print('processing fold #', i)
    val_data = train_data[i * num_val_samples: (i + 1) * num_val_samples]
    val_targets = train_targets[i * num_val_samples: (i + 1) * num_val_samples]
    partial_train_data = np.concatenate([train_data[:i * num_val_samples], train_data[(i + 1) * num_val_samples:]], axis=0)
    partial_train_targets = np.concatenate([train_targets[:i * num_val_samples], train_targets[(i + 1) * num_val_samples:]], axis=0)

    model = builde_model()
    # 靜默模式 verbose = 0
    history = model.fit(partial_train_data, partial_train_targets, validation_data=(val_data, val_targets), epochs=num_epochs, batch_size=1, verbose=0)
    print(history.history.keys())
    if 'mean_absolute_error' not in history.history.keys():
        continue
    mae_history = history.history['mean_absolute_error']
    all_mae_histories.append(mae_history)
average_mae_history = [np.mean([x[i] for x in all_mae_histories]) for i in range(num_epochs)]


def smooth_curve(points, factor=0.9):
    smoothed_points = []
    for point in points:
        if smoothed_points:
            previous = smoothed_points[-1]
            smoothed_points.append(previous * factor + point * (1 - factor))
        else:
            smoothed_points.append(point)
    return smoothed_points


smooth_mae_history = smooth_curve(average_mae_history[10:])
plt.plot(range(1, len(smooth_mae_history) + 1), smooth_mae_history)
plt.xlabel('Epochs')
plt.ylabel('Validation mae')
plt.show()
實驗結果
每個資料點為前面資料點的指數移動平均值

