
Hadoop RPC機制的使用
阿新 • • 發佈:2018-12-22
一、基礎概念
概念:
RPC(Remote Procedure Call)–遠端過程呼叫,它是一種通過網路從遠端計算機程式上請求服務,而不需要了解底層網路技術的協議。RPC協議假定某些傳輸協議的存在,如TCP或UDP,為通訊程式之間攜帶資訊資料。在OSI網路通訊模型中,RPC跨越了傳輸層和應用層。RPC使得開發包括網路分散式多程式在內的應用程式更加容易。
它允許一臺計算機程式遠端呼叫另外一臺計算機的子程式,而不用去關心底層的網路通訊細節,對我們來說是透明的。因此,它經常用於分散式網路通訊中。
Hadoop的程序間互動都是通過RPC來進行的,比如Namenode與Datanode之間,Jobtracker與Tasktracker之間等。可以說,Hadoop的執行就是建立在RPC基礎之上的。
特點:
(1)透明性:遠端呼叫其他機器上的程式,對使用者來說就像是呼叫本地方法一樣;
(2)高效能:RPC Server能夠併發處理多個來自Client的請求;
(3)可控性:jdk中已經提供了一個RPC框架—RMI,但是該RPC框架過於重量級並且可控之處比較少,所以Hadoop RPC實現了自定義的RPC框架。
基本流程

(1)RPC採用了C/S的模式;
(2)Client端傳送一個帶有引數的請求資訊到Server;
(3)Server接收到這個請求以後,根據傳送過來的引數呼叫相應的程式,然後把自己計算好的結果傳送給Client端;
(4)Client端接收到結果後繼續執行;
二、程式實現
程式清單:
- UserService.java(介面)
- UserServiceImpl.java
- Server.java
- Client.java
1.UserService.java
public interface UserService {

	public static final long versionID=8888;

	public void addUser(String name,int age);

}
2.UserServiceImpl.java
public class UserServiceImpl implements UserService{
	@Override
	public void addUser(String name, int age) {
		System.out.println("姓名:"+name+" "+"年齡"+age);
	}
}
3.Server.java
public class Server {
	public static void main(String[] args) throws HadoopIllegalArgumentException, IOException {
		Configuration config = new Configuration();

		RPC.Builder builder = new RPC.Builder(config);

		RPC.Server server = builder.setProtocol(UserService.class)
				.setInstance(new UserServiceImpl())
				.setBindAddress("localhost")
				.setPort(9999)
				.build();
		//啟動服務
		server.start();
	}
}
4.Client.java
import java.io.IOException;
import java.net.InetSocketAddress;
import org.apache.hadoop.conf.Configuration;
import org.apache.hadoop.ipc.RPC;

public class Client {
	public static void main(String[] args) throws IOException {
		Configuration config = new Configuration();

		long clientVersion = 8888;

		UserService proxy = RPC.getProxy(UserService.class, clientVersion, new InetSocketAddress("localhost", 9998), config);

		proxy.addUser("zhangsan", 22);

		System.out.println("新增成功");
	}
}
三、執行
首先執行Server程式,然後執行Client
我為了方便截圖,把這兩個程式放入執行緒中執行了
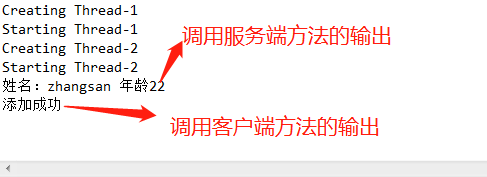
結果:
附錄
這裡我把剛才做的多執行緒程式實驗也貼過來
import java.io.IOException;
import java.net.InetSocketAddress;
import org.apache.hadoop.HadoopIllegalArgumentException;
import org.apache.hadoop.conf.Configuration;
import org.apache.hadoop.ipc.RPC;
import com.css.test.rpc.UserService;
import com.css.test.rpc.UserServiceImpl;

class ThreadDemo extends Thread {
	private Thread t;
	private String threadName;

	ThreadDemo( String name) {
		threadName = name;
		System.out.println("Creating " +  threadName );
	}

	public void run() {
		Configuration config = new Configuration();
		RPC.Builder builder = new RPC.Builder(config);
		RPC.Server server;
		try {
			server = builder.setProtocol(UserService.class)
					.setInstance(new UserServiceImpl())
					.setBindAddress("localhost")
					.setPort(9998)
					.build();
			server.start();
		} catch (HadoopIllegalArgumentException | IOException e) {
			e.printStackTrace();
		}
	}

	public void start () {
		System.out.println("Starting " +  threadName );
		if (t == null) {
			t = new Thread (this, threadName);
			t.start ();
		}
	}
}

class ThreadDemo2 extends Thread {
	private Thread t;
	private String threadName;

	ThreadDemo2(String name) {
		threadName = name;
		System.out.println("Creating " +  threadName );
	}

	public void run() {
		Configuration config = new Configuration();
		long clientVersion = 8888;
		UserService proxy;
		try {
			proxy = RPC.getProxy(UserService.class, clientVersion, new InetSocketAddress("localhost", 9998), config);
			proxy.addUser("zhangsan", 22);

			System.out.println("新增成功");
		} catch (IOException e) {
			e.printStackTrace();
		}
	}

	public void start () {
		System.out.println("Starting " +  threadName );
		if (t == null) {
			t = new Thread (this, threadName);
			t.start ();
		}
	}
}

public class TestThread {
	public static void main(String args[]) throws InterruptedException {
		// 執行服務端程式
		ThreadDemo T1 = new ThreadDemo( "Thread-1");
		T1.start();
		// 執行客戶端程式
		ThreadDemo2 T2 = new ThreadDemo2( "Thread-2");
		T2.start();
	}
}