
ansible安裝部署及測試
(1)下載pip
(2)解壓安裝
解壓下載的檔案(windows下只用解壓工具解壓如RAR,Linux下終端輸入tar -xf pip-9.0.1.tar.gz,即tar -xf 檔名),進入解壓後的資料夾中,調出命令列視窗或者終端,windows下輸入
python setup.py install· 1
Linux下輸入
sudo python setup.py install· 1
安裝成功後測試下,輸入
pip -V· 1
搞定!
一、Ansible工作機制
從圖中可以看出ansible分為以下幾個部份:
1> Control Node:控制機器
2> Inventory:主機清單,配置管理主機列表
3> Playbooks:劇本、任務編排。根據規則定義多個任務,模組組織結構清晰,由ansible自動執行。
4> Modules(Core | Custom):模組,用於執行某個具體的任務
5> connection plugin(連線外掛):Ansible通過不同的協議連線到遠端主機上,執行指定的命令。預設採用ssh協議連線遠端主機。
二、Ansible執行流程
簡單理解就是Ansible在執行時,首先讀取ansible.cfg中的配置,根據規則獲取Inventory中的管理主機列表,並行的在這些主機中執行配置的任務,最後等待執行返回的結果。
三、安裝Ansible
一臺控制主機:192.168.0.202
三臺管理主機:
- 192.168.0.200
- 192.168.0.201
- 192.168.0.203
安裝要求:
- 控制伺服器:需要安裝 Python2.6/2.7
- 管理伺服器:需要安裝 Python2.4 以上版本,若低於 Python2.5 需要安裝 pythonsimplejson; 若啟用了 selinux,則需要安裝 libselinux-python。
本次安裝基於CentOS7系統環境、Python2.7.5、root使用者。
3.1、yum安裝(推薦)
yum install epel-release
yum install ansible
· 1
· 2
3.2、pip安裝
pip install ansible
· 1
注:pip方式安裝不會在/etc/ansible目錄下生成預設的相關配置檔案
四、配置
控制主機:用於控制其它機器的主機
管理主機:被控制主機管理的主機
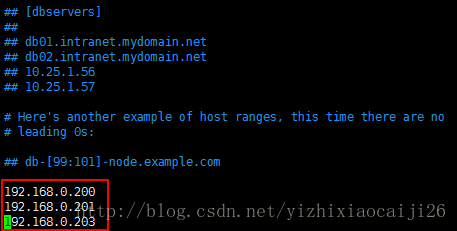
4.1、配置管理主機
vim /etc/ansible/hosts
在hosts檔案中新增管理主機的IP地址列表:
4.2、配置控制主機SSH金鑰
4.2.1、在控制主機中生成ssh金鑰對
ssh-keygen -t rsa
· 1
一路回車即可在$HOME/.ssh目錄下生成id_rsa和id_rsa.put私鑰和公鑰兩個檔案。
注: 如果在生成金鑰的時候設定了密碼,ansible每次執行命令的時候,都會提示輸入金鑰密碼,可通過下面的命令記住密碼。
ssh-agent bsh
ssh-add ~/.ssh/id_rsa
· 1
· 2
4.2.2、將公鑰拷貝到管理主機中.ssh/authorized_keys檔案中,實現免密碼登入遠端管理主機
ssh-copy-id -i ~/.ssh/id_rsa.pub [email protected]
ssh-copy-id -i ~/.ssh/id_rsa.pub [email protected]
ssh-copy-id -i ~/.ssh/id_rsa.pub [email protected]
· 1
· 2
· 3
注:ssh-copy-id命令會自動將id_rsa.pub檔案的內容追加到遠端主機root使用者下.ssh/authorized_keys檔案中。
4.2.3、ansible配置
vim /etc/ansible/ansible.cfg
· 1
1> 禁用每次執行ansbile命令檢查ssh key host
host_key_checking = False
2> 開啟日誌記錄
log_path = /var/log/ansible.log
3> ansible連線加速配置
[accelerate]
#accelerate_port = 5099
accelerate_port = 10000
#accelerate_timeout = 30
#accelerate_connect_timeout = 5.0
# If set to yes, accelerate_multi_key will allow multiple
# private keys to be uploaded to it, though each usermust
# have access to the system via SSH to add a new key. Thedefault
# is "no".
accelerate_multi_key = yes
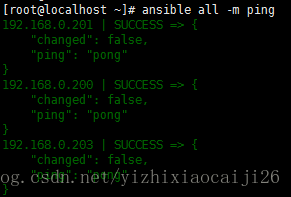
五、測試
最後測試下在三臺管理機器批量執行一個ping命令
ansible all -mping
結果如下:
五、例項
[[email protected] ~]# ansible 192.168.1.98 -a "touch /mnt/file3"[DEPRECATION WARNING]: ACCELERATE_TIMEOUToption, Removing accelerateasa
connection method, settingsnotneeded either. . This feature will be removed
inversion2.5. Deprecation warnings can be disabledbysetting
deprecation_warnings=Falseinansible.cfg.
[DEPRECATION WARNING]: ACCELERATE_MULTI_KEYoption, Removing accelerateasa
connection method, settingsnotneeded either. . This feature will be removed
inversion2.5. Deprecation warnings can be disabledbysetting
deprecation_warnings=Falseinansible.cfg.
[WARNING]: Considerusingfilemodulewithstate=touch rather than running
touch192.168.1.98| SUCCESS | rc=0>>
注意引數 -a 後面用雙引號或者單引號“”將命令引起來,即
常用模組:
!所有示例以webserver為匹配目標主機。
1.ping
ansible all -m ping
!檢測機器是否可登入,ping模組不需要傳送引數
!注:這裡的ping模組並非呼叫了系統的ping命令,而是類似於登入到遠端機器再echo出一個資訊。
2.command
!可以執行任意命令,但不接受管道命令和重定向符號,如果想使用這些,則需要使用Shell模組。
ansible all -m command -a "ls" #在所有匹配主機上執行ls命令
playbook:
- name: test for command
command: ls
3.copy
#複製一個檔案到遠端伺服器
ansible all -m copy -a "src=/tmp/text.txt dest=/home/tmp/"
#將本地text.txt檔案複製到所有匹配主機的/home/tmp/路徑下。
playbook:
- name: test for copy
copy: src=/tmp/text.txt dest=/home/tmp/ force=yes
4.file
這個模組這次構建系統中並沒有用到,官方的解釋是用來設定檔案、資料夾或快鏈的屬性,或者刪除檔案、快鏈、資料夾。
建立一個資料夾,如果目標不存在
ansible webservers -m file -a "path=/tmp/tdir state=directory mode=0755"
playbook
- name: create a directory if it doesn't exist
- file:
path: /etc/some_directory
state: directory
mode: 0755
5.get_url
!從伺服器上下載一個檔案到遠端主機指定的目錄
ansible webservers -m get_url -a "url='http://baidu.com dest=/tmp/ba.html"
playbook
- name: download foo.conf
get_url:
url: http://example.com/path/file.conf
dest: /etc/foo.conf
mode: 0440
6.yum
特別適用於批量安裝一些依賴包的時候
ansible webservers -m yum -a "name=httpd state=latest"
ansible webservers -m yum -a "name=httpd state=absent" !刪除包
playbook
- name: install the latest version of Apache
yum:
name: httpd
state: latest
7.service
控制遠端伺服器上的服務
ansible webservers -m service -a "name=nginx state=restart"
playbook
- name: restart rmote nginx
service: name=nginx state=restart
8.setup
收集遠端伺服器資訊
ansible all -m setup
在playbook中,這項任務預設是執行的,不需要列出。