spring cloud :五、分散式配置中心(spring cloud config)
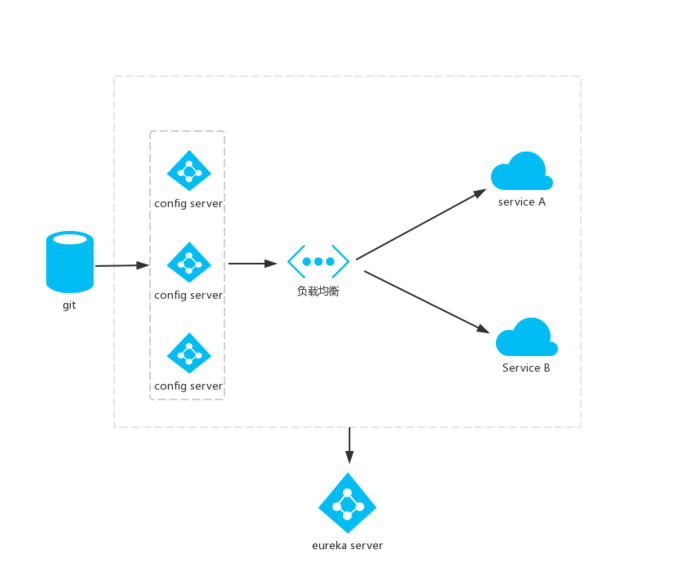
在分散式系統中,每一個功能模組都能拆分成一個獨立的服務,一次請求的完成,可能會呼叫很多個服務協調來完成,為了方便服務配置檔案統一管理,更易於部署、維護,所以就需要分散式配置中心元件了,在spring cloud中,有分散式配置中心元件spring cloud config,它支援配置檔案放在在配置服務的記憶體中,也支援放在遠端Git倉庫裡。引入spring cloud config後,我們的外部配置檔案就可以集中放置在一個git倉庫裡,再新建一個config server,用來管理所有的配置檔案,維護的時候需要更改配置時,只需要在本地更改後,推送到遠端倉庫,所有的服務例項都可以通過config server來獲取配置檔案,這時每個服務例項就相當於配置服務的客戶端config client,為了保證系統的穩定,配置服務端config server可以進行叢集部署,即使某一個例項,因為某種原因不能提供服務,也還有其他的例項保證服務的繼續進行。
分享一個在網上看到架構圖:
下面就在前幾篇的文章的基礎上,作一些修改,實際感受一下。
一、新建一個maven專案:configServer
完整的pom.xml如下:
<?xml version="1.0" encoding="UTF-8"?>
<project xmlns="http://maven.apache.org/POM/4.0.0"xmlns:xsi="http://www.w3.org/2001/XMLSchema-instance"
xsi:schemaLocation="http://maven.apache.org/POM/4.0.0http://maven.apache.org/xsd/maven-4.0.0.xsd"
<modelVersion>4.0.0</modelVersion>
<groupId>com.gaox.configServer</groupId>
<artifactId>configServer</artifactId>
<version>0.0.1-SNAPSHOT</version>
<packaging>jar</packaging>
<name>configServer</name>
<description>
<parent>
<groupId>org.springframework.boot</groupId>
<artifactId>spring-boot-starter-parent</artifactId>
<version>1.5.10.RELEASE</version>
<relativePath/> <!-- lookup parent from repository -->
</parent>
<properties>
<project.build.sourceEncoding>UTF-8</project.build.sourceEncoding>
<project.reporting.outputEncoding>UTF-8</project.reporting.outputEncoding>
<java.version>1.8</java.version>
<spring-cloud.version>Edgware.SR2</spring-cloud.version>
</properties>
<dependencies>
<dependency>
<groupId>org.springframework.boot</groupId>
<artifactId>spring-boot-starter-web</artifactId>
</dependency>
<dependency>
<groupId>org.springframework.cloud</groupId>
<artifactId>spring-cloud-config-server</artifactId>
</dependency>
<dependency>
<groupId>org.springframework.cloud</groupId>
<artifactId>spring-cloud-starter-eureka</artifactId>
</dependency>
<dependency>
<groupId>org.springframework.boot</groupId>
<artifactId>spring-boot-starter-test</artifactId>
<scope>test</scope>
</dependency>
</dependencies>
<dependencyManagement>
<dependencies>
<dependency>
<groupId>org.springframework.cloud</groupId>
<artifactId>spring-cloud-dependencies</artifactId>
<version>${spring-cloud.version}</version>
<type>pom</type>
<scope>import</scope>
</dependency>
</dependencies>
</dependencyManagement>
<build>
<plugins>
<plugin>
<groupId>org.springframework.boot</groupId>
<artifactId>spring-boot-maven-plugin</artifactId>
</plugin>
</plugins>
</build>
</project>
在本地倉庫建立一個lisiService-dev.properties和lisiService-prod.properties的配置檔案,然後推送到遠端的git倉庫(這裡貼出我在碼雲上新建的遠端倉庫https://gitee.com/fox9916/springCloudConfig),
lisiService-dev.properties內容如下:
name=lisi
age=18
version=dev
lisiService-prod.properties內容如下:
name=lisi
age=18
version=prod
完整的application.properties:
#服務埠
server.port=8091
#服務名稱
spring.application.name=configServer
#服務註冊中心
eureka.client.service-url.defaultZone=http://localhost:8761/eureka/
#服務的git倉庫地址
spring.cloud.config.server.git.uri=https://gitee.com/fox9916/springCloudConfig
#配置檔案所在的目錄
spring.cloud.config.server.git.search-paths=/**
#配置檔案所在的分支
spring.cloud.config.label=master
#git倉庫的使用者名稱
spring.cloud.config.username=fox9916
#git倉庫的密碼
spring.cloud.config.password=********
在啟動類上開啟配置中心的註解:@EnableConfigServer
package com.gaox.configServer;

import org.springframework.boot.SpringApplication;
import org.springframework.boot.autoconfigure.SpringBootApplication;
import org.springframework.cloud.config.server.EnableConfigServer;
import org.springframework.cloud.netflix.eureka.EnableEurekaClient;

@SpringBootApplication
@EnableConfigServer
@EnableEurekaClient
public class ConfigServerApplication {

   public static void main(String[] args) {
      SpringApplication.run(ConfigServerApplication.class, args);
   }
}
服務端配置完成,下面驗證一下服務端的配置有沒有什麼問題,依次啟動serviceCenter、configServer,在瀏覽器裡輸入http://localhost:8091/lisiService/dev或
{"name":"lisiService","profiles":["dev"],"label":null,"version":"86e81c9a9c191738398d7390efa7518a90e641c3","state":null,"propertySources":[{"name":"https://gitee.com/fox9916/springCloudConfig/lisiService-dev.properties","source":{"version":"dev","age":"18","name":"lisi"}}]}從裡可以看到lisiService-dev.properties裡的內容,則說明配置沒有問題,如果返回內容類似,沒有isiService-dev.properties裡的內容,說明配置有問題,沒有讀取到配置檔案。
證明配置服務中心可以從遠端程式獲取配置資訊,http請求地址和資原始檔對映如下:,可參考
· /{application}/{profile}[/{label}]
· /{application}-{profile}.yml
· /{label}/{application}-{profile}.yml
· /{application}-{profile}.properties
· /{label}/{application}-{profile}.properties
二、對上一篇文章中新建的lisiService作一些改動,驗證一下是否能從遠端倉庫裡讀取到配置內容
在pom.xml裡新增配置:
<dependency>
   <groupId>org.springframework.cloud</groupId>
   <artifactId>spring-cloud-starter-config</artifactId>
</dependency>
在resources目錄下新建檔案bootstrap.properties,內容:
#開啟配置服務發現
spring.cloud.config.discovery.enabled=true
#配置服務例項名稱
spring.cloud.config.discovery.service-id=configServer
#配置檔案所在分支
spring.cloud.config.label=master
spring.cloud.config.profile=prod
#配置服務中心
spring.cloud.config.uri=http://localhost:8091/
Application.properties配置內容不變:
server.port=8765
spring.application.name=lisiService
eureka.client.service-url.defaultZone=http://localhost:8761/eureka/
feign.hystrix.enabled=true
LisiServerApplication.java:
package com.gaox.lisiService;

import org.springframework.beans.factory.annotation.Autowired;
import org.springframework.beans.factory.annotation.Value;
import org.springframework.boot.SpringApplication;
import org.springframework.boot.autoconfigure.SpringBootApplication;
import org.springframework.cloud.client.circuitbreaker.EnableCircuitBreaker;
import org.springframework.cloud.netflix.eureka.EnableEurekaClient;
import org.springframework.cloud.netflix.feign.EnableFeignClients;
import org.springframework.cloud.netflix.feign.FeignClient;
import org.springframework.cloud.netflix.hystrix.dashboard.EnableHystrixDashboard;
import org.springframework.stereotype.Component;
import org.springframework.web.bind.annotation.RequestMapping;
import org.springframework.web.bind.annotation.RequestMethod;
import org.springframework.web.bind.annotation.RequestParam;
import org.springframework.web.bind.annotation.RestController;

@SpringBootApplication
@EnableEurekaClient
@EnableFeignClients
@RestController
@EnableHystrixDashboard
@EnableCircuitBreaker
public class LisiServiceApplication {

    public static void main(String[] args) {
        SpringApplication.run(LisiServiceApplication.class, args);
    }


    @FeignClient(value = "helloService" ,fallback = HelloError.class)
    public interface HelloService {
        @RequestMapping(value = "/hello", method = RequestMethod.GET)
         String hello(@RequestParam("name") String name);
    }
    @Component
    public class HelloError implements HelloService {
        @Override
        public String hello(String name){
            return "hello  ,"+name+"!  sorry ,error !";
        }
    }
    @Autowired
   private HelloService helloService;

    @RequestMapping("/hello")
    public String hello(@RequestParam("name")String name){
    return helloService.hello(name);
    }
    @Value("${name}")
    private  String name;
    @Value("${age}")
    private  String age;
    @Value("${version}")
    private  String version="開發環境";

    @RequestMapping("/test")
    public String test(){
        return "你好,我是"+name+",年齡:"+age+"歲。當前環境:"+version;
    }
}
依次啟動serviceCenter ,configService, lisiService ,開啟瀏覽器訪問:Http://localhost:8765/test,返回內容:
你好,我是lisi,年齡:18歲。當前環境:prod
這說明lisiService通過configService配置中心獲取到了遠端倉庫spingCloudConfig的配置檔案內容

