Python資料分析--Kaggle共享單車專案實戰
前言
上面一節我們介紹了一元線性迴歸和多元線性迴歸的原理, 又通過一個案例對多元線性迴歸模型進一步瞭解, 其中談到自變數之間存在高度相關, 容易產生多重共線性問題, 對於多重共線性問題的解決方法有: 刪除自變數, 改變資料形式, 新增正則化項, 逐步迴歸, 主成分分析等. 今天我們來看看其中的新增正則化項.
目錄
正文
新增正則化項, 是指在損失函式上新增正則化項, 而正則化項可分為兩種: 一種是L1正則化項, 另一種是L2正則化. 我們把帶有L2正則化項的迴歸模型稱為嶺迴歸, 帶有L1正則化項的迴歸稱為Lasso迴歸.
1. 嶺迴歸
引用百度百科定義.
嶺迴歸(英文名:ridge regression, Tikhonov regularization)是一種專用於共線性資料分析的有偏估計迴歸方法,實質上是一種改良的最小二乘估計法,通過放棄最小二乘法的無偏性,以損失部分資訊、降低精度為代價獲得迴歸係數更為符合實際、更可靠的迴歸方法,對病態資料的擬合要強於最小二乘法。
通過定義可以看出, 嶺迴歸是改良後的最小二乘法, 是有偏估計的迴歸方法, 即給損失函式加上一個正則化項, 也叫懲罰項(L2範數), 那麼嶺迴歸的損失函式表示為

其中, m是樣本量, n是特徵數,  是懲罰項引數(其取值大於0), 加懲罰項主要為了讓模型引數的取值不能過大. 當
 趨向於0, 而
 表示的是因變數隨著某一自變數改變一個單位而變化的數值(假設其他自變數均保持不變), 這時, 自變數之間的共線性對因變數的影響幾乎不存在, 故其能有效解決自變數之間的多重共線性問題, 同時也能防止過擬合.
2. Lasso迴歸
嶺迴歸的正則化項是對 求平方和, 既然能求平方也就能取絕對值, 而Lasso迴歸的L1範數正是對
 取絕對值, 故其損失函式可以表示為

當只有兩個自變數時, L1範數在二維上對應的圖形是矩形(頂點均在座標軸上, 即其中一個迴歸係數為0), 對於這樣的矩形來說其頂點更容易與同心橢圓(等值線)相交, 而相交的點則為最小損失函式的最優解. 也就是說Lasso會出現迴歸係數為0的情況. 對於L2範數來說則是圓形,其不會相交於座標軸上的點, 自然也就不會出現迴歸係數為0的情況. 當然多個自變數也是同樣的道理
3. 嶺迴歸和Lasso迴歸對比
相同點:
1. 嶺迴歸和Lasso迴歸均是加了正則化項的線性迴歸模型, 本質上它們都是線性迴歸模型.
2. 兩者均能在一定程度上解決多重共線性問題, 並且可以有效避免過擬合.
3. 迴歸係數均受正則化引數的影響, 均可以用圖形表示迴歸係數和正則化引數的關係, 並可以通過該圖形進行變數以及正則化引數的篩選.
不同點:
1. 嶺迴歸的迴歸係數均不為0, Lasso迴歸部分迴歸係數為0.
4. 實際案例應用
1. 資料來源及資料背景
資料來源: https://www.kaggle.com/c/bike-sharing-demand/data, 資料有訓練集和測試集, 在訓練集中包含10886個樣本以及12個欄位, 通過訓練集上自行車租賃資料對美國華盛頓自行車租賃需求進行預測.
2. 資料概覽
1. 讀取資料
import pandas as pd
df = pd.read_csv(r'D:\Data\bike.csv')
pd.set_option('display.max_rows',4 )
df

通過以上可以得知資料維度10886行X12列, 除了第一列其它均顯示為數值, 具體的格式還要進一步檢視, 對於各列的解釋也放入下一環節.
2. 檢視資料整體資訊
df.info()
<class 'pandas.core.frame.DataFrame'>
RangeIndex: 10886 entries, 0 to 10885
Data columns (total 12 columns):
datetime      10886 non-null object     #時間和日期
season        10886 non-null int64      #季節,  1 =春季,2 =夏季,3 =秋季,4 =冬季
holiday       10886 non-null int64      #是否是假期, 1=是, 0=否
workingday    10886 non-null int64      #是否是工作日, 1=是, 0=否
weather       10886 non-null int64      #天氣,1:晴朗,很少有云,部分多雲,部分多雲; 2:霧+多雲,霧+碎雲,霧+少雲,霧; 3:小雪,小雨+雷雨+散雲,小雨+散雲; 4:大雨+冰塊+雷暴+霧,雪+霧
temp          10886 non-null float64    #溫度
atemp         10886 non-null float64    #體感溫度
humidity      10886 non-null int64      #相對溼度
windspeed     10886 non-null float64    #風速
casual        10886 non-null int64      #未註冊使用者租賃數量
registered    10886 non-null int64      #註冊使用者租賃數量
count         10886 non-null int64      #所有使用者租賃總數
dtypes: float64(3), int64(8), object(1)
memory usage: 1020.6+ KB
除了datetime為字串型, 其他均為數值型, 且無缺失值.
3. 描述性統計
df.describe()
溫度, 體表溫度, 相對溼度, 風速均近似對稱分佈, 而非註冊使用者, 註冊使用者,以及總數均右邊分佈.

4. 偏態, 峰態
for i in range(5, 12):
    name = df.columns[i]
    print('{0}偏態係數為 {1}, 峰態係數為 {2}'.format(name, df[name].skew(), df[name].kurt()))
temp偏態係數為 0.003690844422472008, 峰態係數為 -0.9145302637630794
atemp偏態係數為 -0.10255951346908665, 峰態係數為 -0.8500756471754651
humidity偏態係數為 -0.08633518364548581, 峰態係數為 -0.7598175375208864
windspeed偏態係數為 0.5887665265853944, 峰態係數為 0.6301328693364932
casual偏態係數為 2.4957483979812567, 峰態係數為 7.551629305632764
registered偏態係數為 1.5248045868182296, 峰態係數為 2.6260809999210672
count偏態係數為 1.2420662117180776, 峰態係數為 1.3000929518398334
temp, atemp, humidity低度偏態, windspeed中度偏態, casual, registered, count高度偏態
temp, atemp, humidity為平峰分佈, windspeed,casual, registered, count為尖峰分佈.
3. 資料預處理
由於沒有缺失值, 不用處理缺失值, 看看有沒有重複值.
1. 檢查重複值
print('未去重: ', df.shape)
print('去重: ', df.drop_duplicates().shape)
未去重:  (10886, 12)
去重:  (10886, 12)
沒有重複項, 看看異常值.
2. 異常值
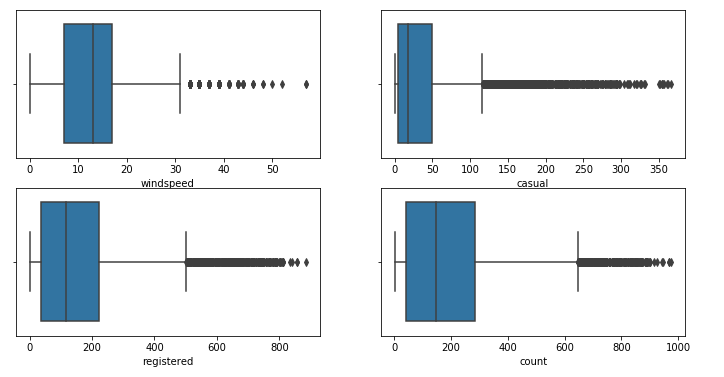
通過箱線圖檢視異常值
import seaborn as sns
import matplotlib.pyplot as plt
fig, axes = plt.subplots(nrows=2, ncols=2, figsize=(12, 6))
#繪製箱線圖
sns.boxplot(x="windspeed", data=df,ax=axes[0][0])
sns.boxplot(x='casual', data=df, ax=axes[0][1])
sns.boxplot(x='registered', data=df, ax=axes[1][0])
sns.boxplot(x='count', data=df, ax=axes[1][1])
plt.show()
租賃數量會受小時的影響, 比如說上班高峰期等, 故在這裡先不處理異常值.
3. 資料加工
轉換"時間和日期"的格式, 並提取出小時, 日, 月, 年.
#轉換格式, 並提取出小時, 星期幾, 月份
df['datetime'] = pd.to_datetime(df['datetime'])
df['hour'] = df.datetime.dt.hour
df['week'] = df.datetime.dt.dayofweek
df['month'] = df.datetime.dt.month
df['year_month'] = df.datetime.dt.strftime('%Y-%m')
df['date'] = df.datetime.dt.date
#刪除datetime
df.drop('datetime', axis = 1, inplace = True)
df

4. 特徵分析
1) 日期和總租賃數量
import matplotlib
#設定中文字型
font = {'family': 'SimHei'}
matplotlib.rc('font', **font)
#分別計算日期和月份中位數
group_date = df.groupby('date')['count'].median()
group_month = df.groupby('year_month')['count'].median()
group_month.index = pd.to_datetime(group_month.index)
plt.figure(figsize=(16,5))
plt.plot(group_date.index, group_date.values, '-', color = 'b', label = '每天租賃數量中位數', alpha=0.8)
plt.plot(group_month.index, group_month.values, '-o', color='orange', label = '每月租賃數量中位數')
plt.legend()
plt.show()
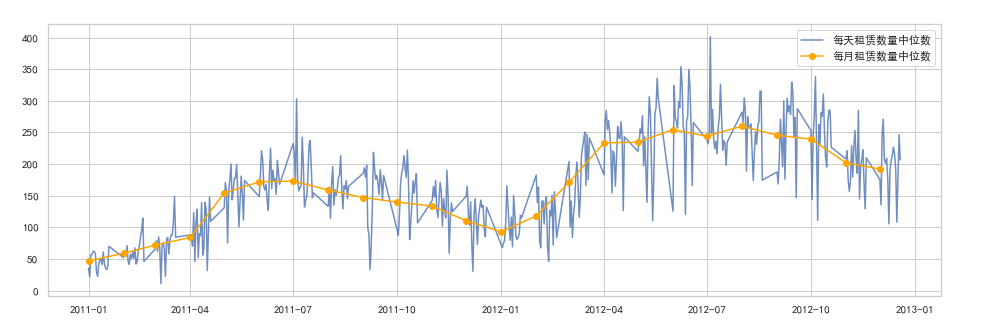
2012年相比2011年租賃數量有所增長, 且波動幅度相類似.
2) 月份和總租賃數量
import seaborn as sns
plt.figure(figsize=(10, 4))
sns.boxplot(x='month', y='count', data=df)
plt.show()
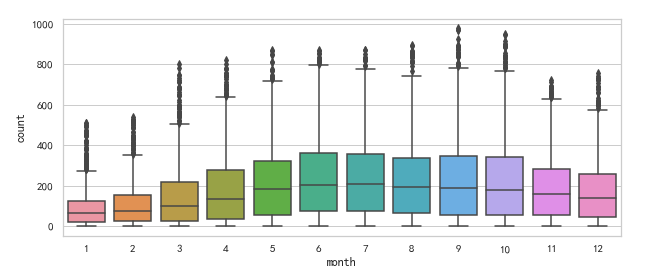
與上圖的波動幅度基本一致, 另外每個月均有不同程度的離群值.
3) 季節和總租賃數量
plt.figure(figsize=(8, 4))
sns.boxplot(x='season', y='count', data=df)
plt.show()
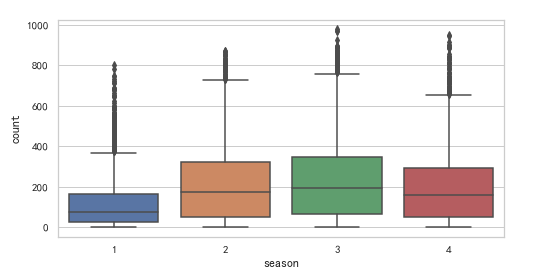
就中位數來說, 秋季是最多的, 春季最少且離群值較多.
4) 星期幾和租賃數量
fig, axes = plt.subplots(nrows=3, ncols=1, figsize=(12, 8))
sns.boxplot(x="week",y='casual' ,data=df,ax=axes[0])
sns.boxplot(x='week',y='registered', data=df, ax=axes[1])
sns.boxplot(x='week',y='count', data=df, ax=axes[2])
plt.show()
就中位數來說, 未註冊使用者週六和週日較多, 而註冊使用者則周內較多, 對應的總數也是周內較多, 且周內在總數的離群值較多(0代表週一, 6代表週日)

5) 節假日, 工作日和總租賃數量
fig, axes = plt.subplots(nrows=3, ncols=2, figsize=(9, 7))
sns.boxplot(x='holiday', y='casual', data=df, ax=axes[0][0])
sns.boxplot(x='holiday', y='registered', data=df, ax=axes[1][0])
sns.boxplot(x='holiday', y='count', data=df, ax=axes[2][0])
sns.boxplot(x='workingday', y='casual', data=df, ax=axes[0][1])
sns.boxplot(x='workingday', y='registered', data=df, ax=axes[1][1])
sns.boxplot(x='workingday', y='count', data=df, ax=axes[2][1])
plt.show()
未註冊使用者: 在節假日較多, 在工作日較少
註冊使用者: 在節假日較少, 在工作日較多
總的來說, 節假日租賃較少, 工作日租賃較多, 初步猜測多數未註冊使用者租賃自行車是用來非工作日出遊, 而多數註冊使用者則是工作日用來上班或者上學.

6) 小時和總租賃數量的關係

#繪製第一個子圖
plt.figure(1, figsize=(14, 8))
plt.subplot(221)
hour_casual = df[df.holiday==1].groupby('hour')['casual'].median()
hour_registered = df[df.holiday==1].groupby('hour')['registered'].median()
hour_count = df[df.holiday==1].groupby('hour')['count'].median()
plt.plot(hour_casual.index, hour_casual.values, '-', color='r', label='未註冊使用者')
plt.plot(hour_registered.index, hour_registered.values, '-', color='g', label='註冊使用者')
plt.plot(hour_count.index, hour_count.values, '-o', color='c', label='所有使用者')
plt.legend()
plt.xticks(hour_casual.index)
plt.title('未註冊使用者和註冊使用者在節假日自行車租賃情況')
#繪製第二個子圖
plt.subplot(222)
hour_casual = df[df.workingday==1].groupby('hour')['casual'].median()
hour_registered = df[df.workingday==1].groupby('hour')['registered'].median()
hour_count = df[df.workingday==1].groupby('hour')['count'].median()
plt.plot(hour_casual.index, hour_casual.values, '-', color='r', label='未註冊使用者')
plt.plot(hour_registered.index, hour_registered.values, '-', color='g', label='註冊使用者')
plt.plot(hour_count.index, hour_count.values, '-o', color='c', label='所有使用者')
plt.legend()
plt.title('未註冊使用者和註冊使用者在工作日自行車租賃情況')
plt.xticks(hour_casual.index)
#繪製第三個子圖
plt.subplot(212)
hour_casual = df.groupby('hour')['casual'].median()
hour_registered = df.groupby('hour')['registered'].median()
hour_count = df.groupby('hour')['count'].median()
plt.plot(hour_casual.index, hour_casual.values, '-', color='r', label='未註冊使用者')
plt.plot(hour_registered.index, hour_registered.values, '-', color='g', label='註冊使用者')
plt.plot(hour_count.index, hour_count.values, '-o', color='c', label='所有使用者')
plt.legend()
plt.title('未註冊使用者和註冊使用者自行車租賃情況')
plt.xticks(hour_casual.index)
plt.show()
檢視程式碼
在節假日, 未註冊使用者和註冊使用者走勢相接近, 不過未註冊使用者最高峰在14點, 而註冊使用者則是17點
在工作日, 註冊使用者呈現出雙峰走勢, 在8點和17點均為用車高峰期, 而這正是上下班或者上下學高峰期.
對於註冊使用者來說, 17點在節假日和工作日均為高峰期, 說明部分使用者在節假日可能未必休假.

7) 天氣和總租賃數量
fig, ax = plt.subplots(3, 1, figsize=(12, 6))
sns.boxplot(x='weather', y='casual', hue='workingday',data=df, ax=ax[0])
sns.boxplot(x='weather', y='registered',hue='workingday', data=df, ax=ax[1])
sns.boxplot(x='weather', y='count',hue='workingday', data=df, ax=ax[2])
就中位數而言未註冊使用者和註冊使用者均表現為: 在工作日和非工作日租賃數量均隨著天氣的惡劣而減少, 特別地, 當天氣為大雨大雪天(4)且非工作日均沒有自行車租賃.
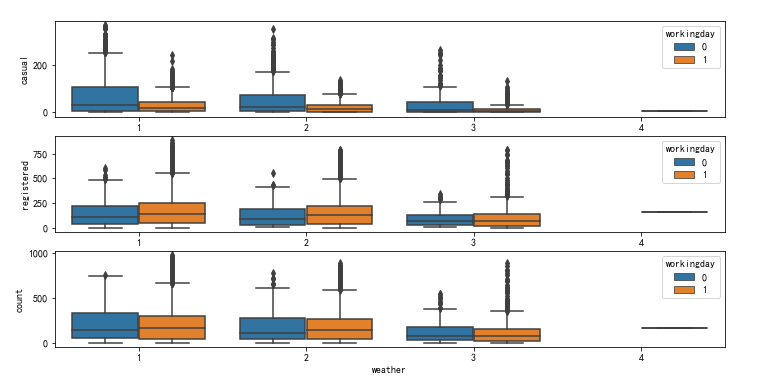
從圖上可以看出, 大雨大雪天只有一個數據, 我們看看原資料.
df[df.weather==4]
只有在2012年1月9日18時為大雨大雪天, 說明天氣是突然變化的, 部分使用者可能因為沒有看天氣預報而租賃自行車, 當然也有其他原因.

另外, 發現1月份是春季, 看看它的季節劃分規則.
sns.boxplot(x='season', y='month',data=df)
123為春季, 456為夏季, 789為秋季...
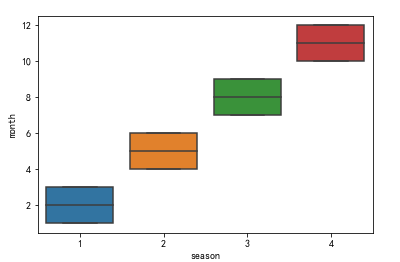
季節的劃分通常和緯度相關, 而這份資料是用來預測美國華盛頓的租賃數量, 且美國和我國的緯度基本一樣, 故按照345春節, 678夏季..這個規則來重新劃分.
import numpy as np
df['group_season'] = np.where((df.month <=5) & (df.month >=3), 1,
                        np.where((df.month <=8) & (df.month >=6), 2,
                                 np.where((df.month <=11) & (df.month >=9), 3, 4)))
fig, ax = plt.subplots(2, 1, figsize=(12, 6))
#繪製氣溫和季節箱線圖
sns.boxplot(x='season', y='temp',data=df, ax=ax[0])
sns.boxplot(x='group_season', y='temp',data=df, ax=ax[1])
第一個圖是調整之前的, 就中位數來說, 春季氣溫最低, 秋季氣溫最高
第二個圖是調整之後的, 就中位數來說, 冬季氣溫最低, 夏季氣溫最高
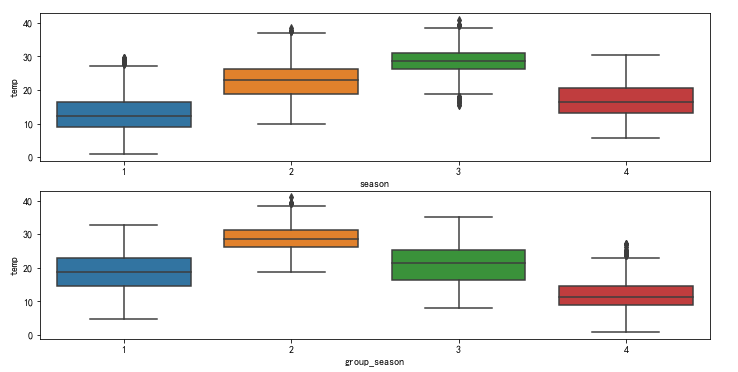
顯然第二張的圖的結果較符合常理, 故刪除另外那一列.
df.drop('season', axis=1, inplace=True)
df.shape
(10886, 16)
8) 其他變數和總租賃數量的關係
這裡我直接使用利用seaborn的pairplot繪製剩餘的溫度, 體感溫度, 相對溼度, 風速這四個連續變數與未註冊使用者和註冊使用者的關係在一張圖上.
sns.pairplot(df[['temp', 'atemp', 'humidity', 'windspeed', 'casual', 'registered', 'count']])
為了方便縱覽全域性, 我將圖片尺寸縮小, 如下圖所示. 縱軸從上往下依次是溫度, 體感溫度, 相對溼度, 風速, 未註冊使用者, 註冊使用者, 所有使用者, 橫軸從左往右是同樣的順序.
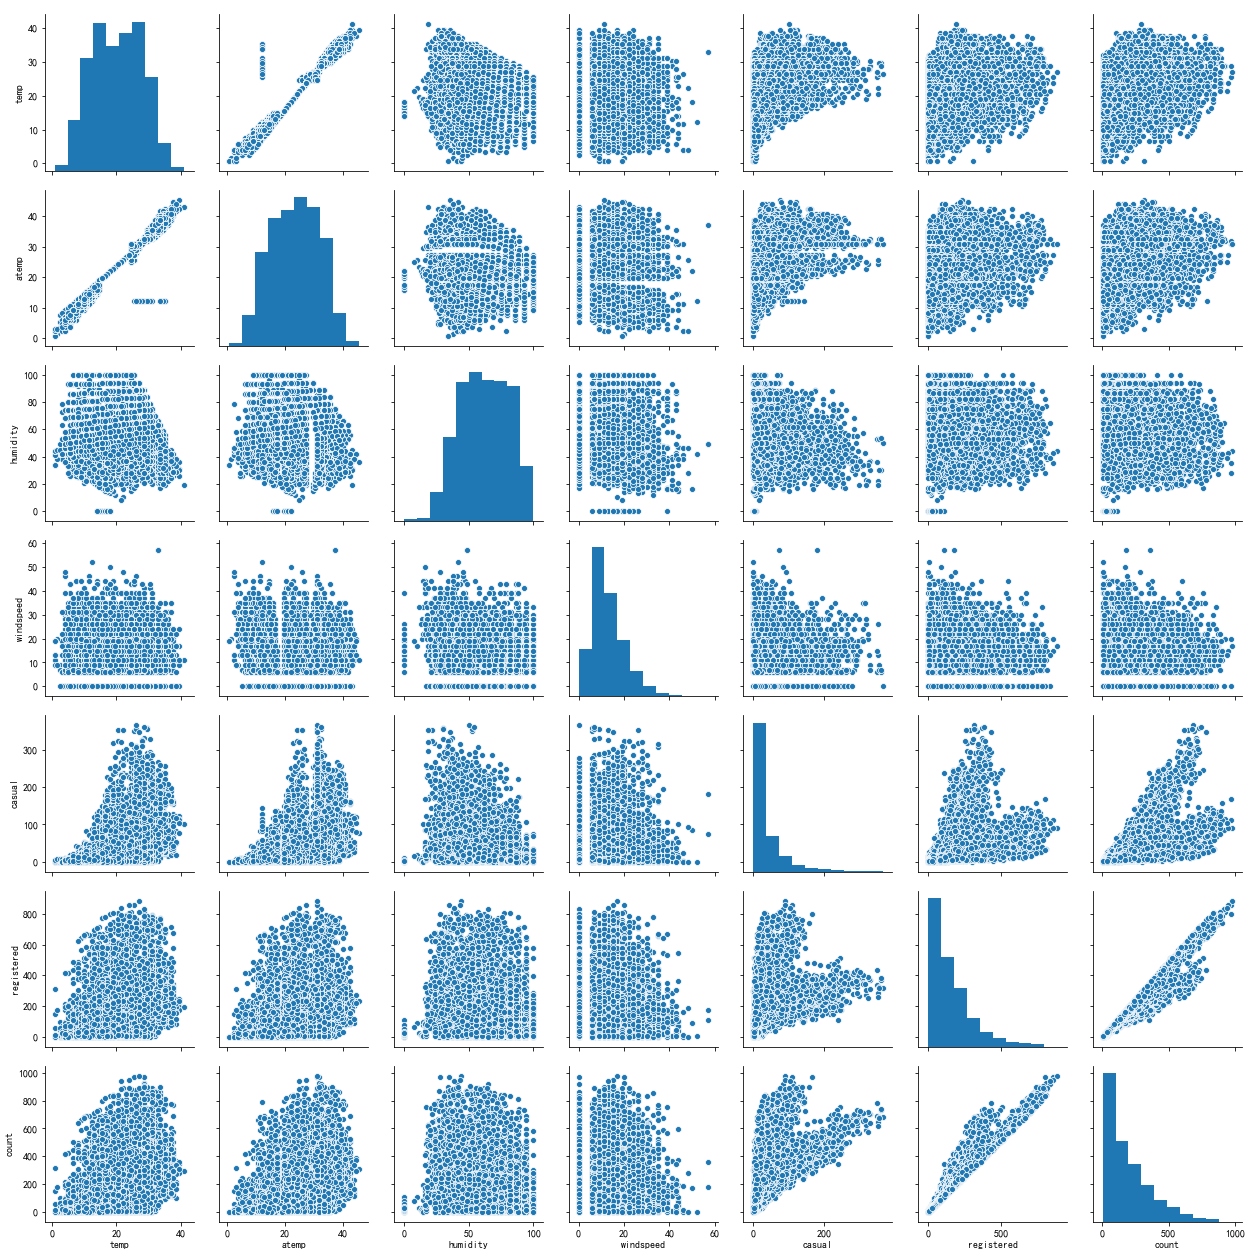
從圖上可以看出, 溫度和體感溫度分別與未註冊使用者, 註冊使用者, 所有使用者均有一定程度的正相關, 而相對溼度和風速與之呈現一定程度的負相關. 另外, 其他變數之間也有不同程度的相關關係.
另外, 第四列(風速)在散點圖中間有明顯的間隙. 需要揪出這一塊來看看.
df['windspeed']
0         0.0000
1         0.0000
2         0.0000
          ...
10883    15.0013
10884     6.0032
10885     8.9981
Name: windspeed, Length: 10886, dtype: float64
風速為0, 這明顯不合理, 把其當成缺失值來處理. 我這裡選擇的是向後填充.
df.loc[df.windspeed == 0, 'windspeed'] = np.nan
df.fillna(method='bfill', inplace=True)
df.windspeed.isnull().sum()
0
9) 相關矩陣
由於多個變數不滿足正態分佈, 對其進行對數變換.
#對數轉換
df['windspeed'] = np.log(df['windspeed'].apply(lambda x: x+1))
df['casual'] = np.log(df['casual'].apply(lambda x: x+1))
df['registered'] = np.log(df['registered'].apply(lambda x: x+1))
df['count'] = np.log(df['count'].apply(lambda x: x+1))
sns.pairplot(df[['windspeed', 'casual', 'registered', 'count']])

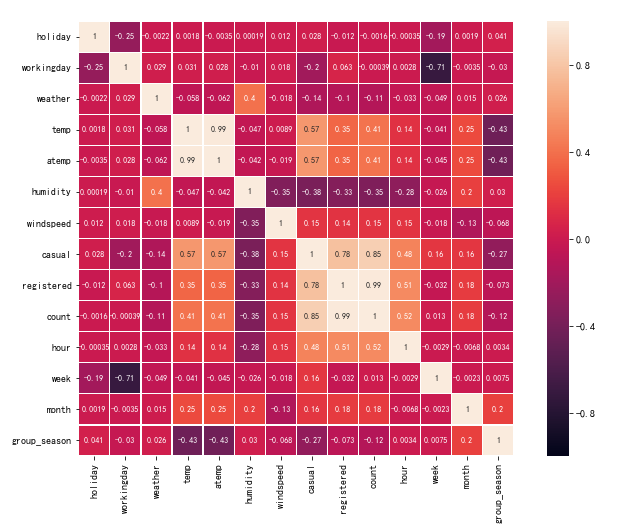
經過對數變換之後, 註冊使用者和所有使用者的租賃數量和正態還是相差較大, 故在計算相關係數時選擇spearman相關係數.
correlation = df.corr(method='spearman')
plt.figure(figsize=(12, 8))
#繪製熱力圖
sns.heatmap(correlation, linewidths=0.2, vmax=1, vmin=-1, linecolor='w',
            annot=True,annot_kws={'size':8},square=True)
均有不同程度的相關程度, 其中, temp和atemp高度相關, count和registered高度相關, 數值均達到0.99.
5. 迴歸模型
嶺迴歸和Lasso迴歸是加了正則化項的線性迴歸, 下面將分別構造兩個模型.
5.1 嶺迴歸
1. 劃分資料集
from sklearn.model_selection import train_test_split
#由於所有使用者的租賃數量是由未註冊使用者和註冊使用者相加而成, 故刪除.
df.drop(['casual','registered'], axis=1, inplace=True)
X = df.drop(['count'], axis=1)
y = df['count']
#劃分訓練集和測試集
X_train, X_test, y_train, y_test = train_test_split(X, y, test_size=0.2, random_state=1)
2. 模型訓練
from sklearn.linear_model import Ridge
#這裡的alpha指的是正則化項引數, 初始先設定為1.
rd = Ridge(alpha=1)
rd.fit(X_train, y_train)
print(rd.coef_)
print(rd.intercept_)
[ 0.00770067 -0.00034301  0.0039196   0.00818243  0.03635549 -0.01558927
  0.09080788  0.0971406   0.02791812  0.06114358 -0.00099811]
2.6840271343740754
通過前面我們知道, 正則化項引數對結果的影響較大, 下一步我們就通過嶺跡圖來選擇正則化引數.

#設定引數以及訓練模型
alphas = 10**np.linspace(-5, 10, 500)
betas = []
for alpha in alphas:
    rd = Ridge(alpha = alpha)
    rd.fit(X_train, y_train)
    betas.append(rd.coef_)
#繪製嶺跡圖
plt.figure(figsize=(8,6))
plt.plot(alphas, betas)
#對資料進行對數轉換, 便於觀察.
plt.xscale('log')
#新增網格線
plt.grid(True)
#座標軸適應資料量
plt.axis('tight')
plt.title(r'正則化項引數$\alpha$和迴歸係數$\beta$嶺跡圖')
plt.xlabel(r'$\alpha$')
plt.ylabel(r'$\beta$')
plt.show()
檢視程式碼
通過影象可以看出, 當alpha為107時所有變數嶺跡趨於穩定.按照嶺跡法應當取alpha=107.
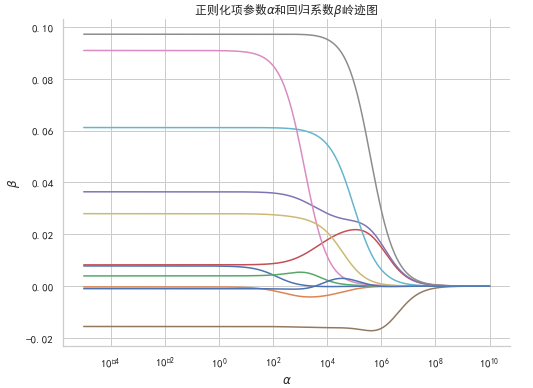
由於是通過肉眼觀察的, 其不一定是最佳, 採用另外一種方式: 交叉驗證的嶺迴歸.
from sklearn.linear_model import RidgeCV
from sklearn import metrics
rd_cv = RidgeCV(alphas=alphas, cv=10, scoring='r2')
rd_cv.fit(X_train, y_train)
rd_cv.alpha_
805.0291812295973
最後選出的最佳正則化項引數為805.03, 然後用這個引數進行模型訓練
rd = Ridge(alpha=805.0291812295973) #, fit_intercept=False
rd.fit(X_train, y_train)
print(rd.coef_)
print(rd.intercept_)
[ 0.00074612 -0.00382265  0.00532093  0.01100823  0.03375475 -0.01582157
  0.0584206   0.09708992  0.02639369  0.0604242  -0.00116086]
2.7977274604845856
4. 模型預測
from sklearn import metrics
from math import sqrt
#分別預測訓練資料和測試資料
y_train_pred = rd.predict(X_train)
y_test_pred = rd.predict(X_test)
#分別計算其均方根誤差和擬合優度
y_train_rmse = sqrt(metrics.mean_squared_error(y_train, y_train_pred))
y_train_score = rd.score(X_train, y_train)
y_test_rmse = sqrt(metrics.mean_squared_error(y_test, y_test_pred))
y_test_score = rd.score(X_test, y_test)
print('訓練集RMSE: {0}, 評分: {1}'.format(y_train_rmse, y_train_score))
print('測試集RMSE: {0}, 評分: {1}'.format(y_test_rmse, y_test_score))
訓練集RMSE: 1.0348076524200298, 評分: 0.46691272323469246
測試集RMSE: 1.0508046977499312, 評分: 0.45801571689420706
5.2 Lasso迴歸
1. 模型訓練

from sklearn.linear_model import Lasso
alphas = 10**np.linspace(-5, 10, 500)
betas = []
for alpha in alphas:
    Las = Lasso(alpha = alpha)
    Las.fit(X_train, y_train)
    betas.append(Las.coef_)
plt.figure(figsize=(8,6))
plt.plot(alphas, betas)
plt.xscale('log')
plt.grid(True)
plt.axis('tight')
plt.title(r'正則化項引數$\alpha$和迴歸係數$\beta$的Lasso圖')
plt.xlabel(r'$\alpha$')
plt.ylabel(r'$\beta$')
plt.show()
檢視程式碼
通過Lasso迴歸曲線, 可以看出大致在10附近所有變數趨於穩定

同樣採用交叉驗證選擇Lasso迴歸最優正則化項引數
from sklearn.linear_model import LassoCV
from sklearn import metrics
Las_cv = LassoCV(alphas=alphas, cv=10)
Las_cv.fit(X_train, y_train)
Las_cv.alpha_
0.005074705239490466
用這個引數重新訓練模型
Las = Lasso(alpha=0.005074705239490466) #, fit_intercept=False
Las.fit(X_train, y_train)
print(Las.coef_)
print(Las.intercept_)
[ 0.         -0.          0.          0.01001827  0.03467474 -0.01570339
  0.06202352  0.09721864  0.02632133  0.06032038 -0.        ]
2.7808303982442952
對比嶺迴歸可以發現, 這裡的迴歸係數中有0存在, 也就是捨棄了holiday, workingday, weather和group_season這四個自變數.
#用Lasso分別預測訓練集和測試集, 並計算均方根誤差和擬合優度
y_train_pred = Las.predict(X_train)
y_test_pred = Las.predict(X_test)
y_train_rmse = sqrt(metrics.mean_squared_error(y_train, y_train_pred))
y_train_score = Las.score(X_train, y_train)
y_test_rmse = sqrt(metrics.mean_squared_error(y_test, y_test_pred))
y_test_score = Las.score(X_test, y_test)
print('訓練集RMSE: {0}, 評分: {1}'.format(y_train_rmse, y_train_score))
print('測試集RMSE: {0}, 評分: {1}'.format(y_test_rmse, y_test_score))
訓練集RMSE: 1.0347988070045209, 評分: 0.4669218367318746
測試集RMSE: 1.050818996520012, 評分: 0.45800096674816204
最後, 再用傳統的線性迴歸進行預測, 從而對比三者之間的差異.
from sklearn.linear_model import LinearRegression
#訓練線性迴歸模型
LR = LinearRegression()
LR.fit(X_train, y_train)
print(LR.coef_)
print(LR.intercept_)
#分別預測訓練集和測試集, 並計算均方根誤差和擬合優度
y_train_pred = LR.predict(X_train)
y_test_pred = LR.predict(X_test)
y_train_rmse = sqrt(metrics.mean_squared_error(y_train, y_train_pred))
y_train_score = LR.score(X_train, y_train)
y_test_rmse = sqrt(metrics.mean_squared_error(y_test, y_test_pred))
y_test_score = LR.score(X_test, y_test)
print('訓練集RMSE: {0}, 評分: {1}'.format(y_train_rmse, y_train_score))
print('測試集RMSE: {0}, 評分: {1}'.format(y_test_rmse, y_test_score))
[ 0.00775915 -0.00032048  0.00391537  0.00817703  0.03636054 -0.01558878
  0.09087069  0.09714058  0.02792397  0.06114454 -0.00099731]
2.6837869701964014
訓練集RMSE: 1.0347173340121176, 評分: 0.46700577529675036
測試集RMSE: 1.0510323073614725, 評分: 0.45778089839236114
總結
就測試集和訓練集均方根誤差之差來說, 線性迴歸最大, 嶺迴歸最小, 另外迴歸在測試集的擬合優度最大, 總體來說, 嶺迴歸在此資料集上表現略優.
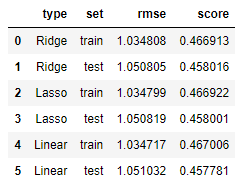
就這個評分來說, 以上模型還不是很好, 還需要學習其他模型, 比如決策樹, 隨機森林, 神經網路等.
宣告: 本文僅用作學習交流

