
ASP.NET Core的身份認證框架IdentityServer4(9)-使用OpenID Connect新增使用者認證
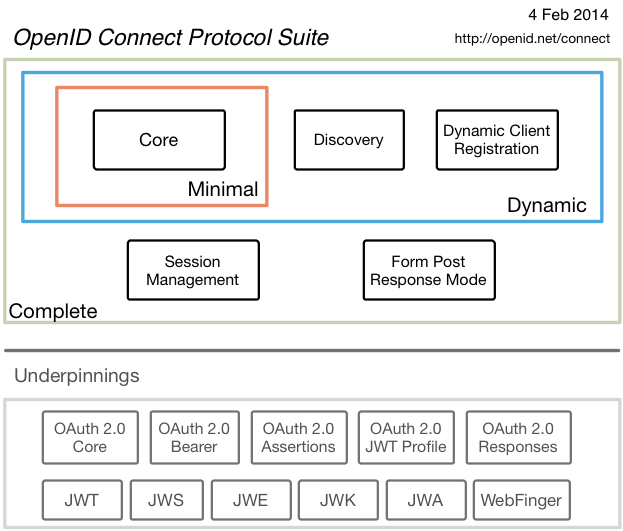
OpenID Connect
OpenID Connect 1.0是OAuth 2.0協議之上的一個簡單的身份層。 它允許客戶端基於授權伺服器執行的身份驗證來驗證終端使用者的身份,以及以可互操作和類似REST的方式獲取關於終端使用者的基本配置檔案資訊。
OpenID Connect允許所有型別的客戶端(包括基於Web的移動和JavaScript客戶端)請求和接收關於認證會話和終端使用者的資訊。 規範套件是可擴充套件的,允許參與者使用可選功能,例如身份資料的加密,OpenID提供商的發現和會話管理。
OpenID Connect 和 OAuth的關係
OpenID Connect 在OAuth2上構建了一個身份層,是一個基於OAuth2協議的身份認證標準協議。我們都知道OAuth2是一個授權協議,它無法提供完善的身份認證功能,OpenID Connect 使用OAuth2的授權伺服器來為第三方客戶端提供使用者的身份認證,並把對應的身份認證資訊傳遞給客戶端,且可以適用於各種型別的客戶端(比如服務端應用,移動APP,JS應用),且完全相容OAuth2,也就是說你搭建了一個OpenID Connect 的服務後,也可以當作一個OAuth2的服務來用。應用場景如圖
(摘自:http://www.cnblogs.com/linianhui/archive/2017/05/30/openid-connect-core.html)
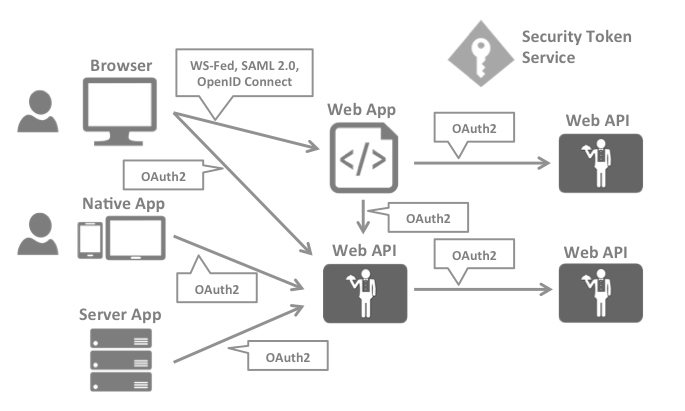
簡而言之,OpenID Connect是在OAuth2.0上進行的一個擴充套件協議,OpenID Connect=Identity +OAuth 2.0,OpenID Connect主要用於身份認證(Authentication),OAuth主要用於授權(Authorization)。
更深入瞭解OpenID Connect和OAuth,如果你準備使用IdentityServer4,十分推薦閱讀這幾篇文章:http://www.cnblogs.com/linianhui/category/929878.html 。
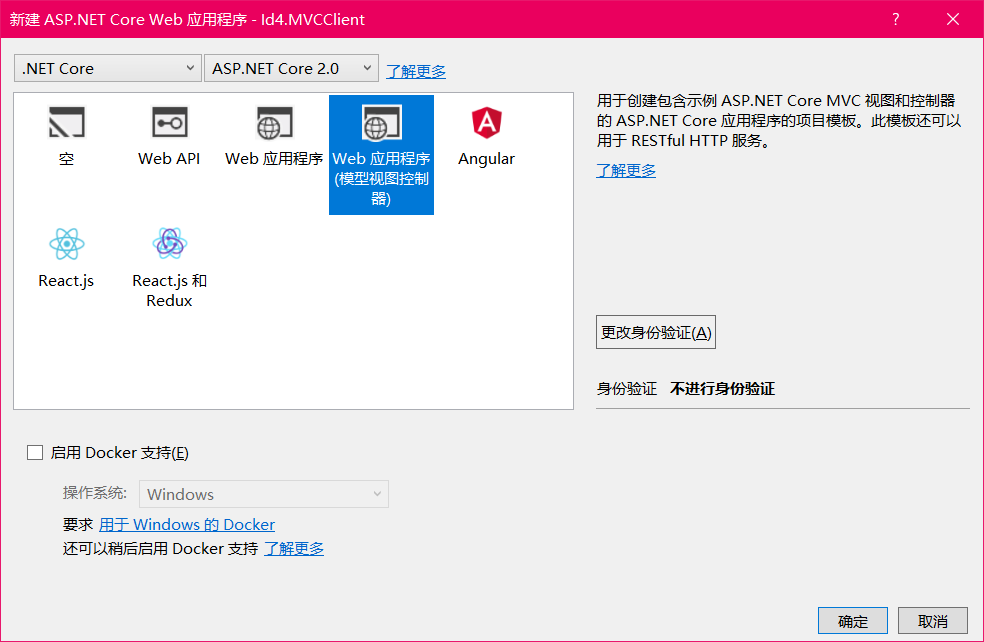
建立一個MVC客戶端
1.新建一個ASP.NET Core MVC應用程式
2.配置 OpenID Connect 認證
在類Startup的 ConfigureServices方法中新增以下程式碼:
public void ConfigureServices(IServiceCollection services)
{
    services.AddMvc();

    JwtSecurityTokenHandler.DefaultInboundClaimTypeMap.Clear();

    services.AddAuthentication(options =>
    {
        options.DefaultScheme = "Cookies";
        options.DefaultChallengeScheme = "oidc";
    })
    .AddCookie("Cookies")
    .AddOpenIdConnect("oidc", options =>
    {
        options.SignInScheme = "Cookies";

        options.Authority = "http://localhost:5000";
        options.RequireHttpsMetadata = false;

        options.ClientId = "mvc";
        options.SaveTokens = true;
    });
}AddAuthentication將認證服務新增到依賴注入容器中,使用Cookie作為驗證使用者的主要方法(通過"Cookies"作為 DefaultScheme)。
DefaultChallengeScheme 設定為"oidc"(OIDC是OpenID Connect的簡稱),因為當我們需要使用者登入時,我們將使用OpenID Connect方案。
然後我們使用AddCookie新增可以處理Cookie的處理程式。
最後,AddOpenIdConnect用於配置執行OpenID Connect協議的處理程式。Authority表示id4服務的地址。 然後我們通過ClientId識別該客戶端。SignInScheme 用於在OpenID Connect協議完成後使用cookie處理程式發出cookie。 而SaveTokens用於在Cookie中儲存IdentityServer中的令牌(稍後將需要)。
然後確保在每個請求上執行認證服務,在Startup中的Configure方法新增UseAuthentication:
public void Configure(IApplicationBuilder app, IHostingEnvironment env)
{
    if (env.IsDevelopment())
    {
        app.UseDeveloperExceptionPage();
    }
    else
    {
        app.UseExceptionHandler("/Home/Error");
    }

    app.UseAuthentication();

    app.UseStaticFiles();
    app.UseMvcWithDefaultRoute();
}
驗證中介軟體應該在MVC之前新增。
最後一步是觸發認證。為了進入HomeController,並在其中一個Action上新增特性[Authorize]
還要修改該Action的View以顯示使用者的資訊,例如:
<dl>
    @foreach (var claim in User.Claims)
    {
        <dt>@claim.Type</dt>
        <dd>@claim.Value</dd>
    }
</dl>
如果您現在使用瀏覽器訪問HomeController,將會導致重定向到IdentityServer,這將導致錯誤,因為MVC客戶端尚未註冊。
新增OpenID Connect Identity Scopes的支援
與OAuth 2.0類似,OpenID Connect也使用Scopes概念。 再次,Scopes代表您想要保護的客戶端希望訪問的內容。 與OAuth相反,OIDC中的範圍不代表API,而是代表使用者ID,姓名或電子郵件地址等身份資訊。
在Config.cs中新增如下程式碼:
public static IEnumerable<IdentityResource> GetIdentityResources()
{
    return new List<IdentityResource>
    {
        new IdentityResources.OpenId(),
        new IdentityResources.Profile(),
    };
}
所有標準Scopes及其相應的宣告都可以在OpenID Connect規範中找到。
然後,您需要將這些身份資源新增到Startup.cs中的IdentityServer配置中。使用AddInMemoryIdentityResources擴充套件方法呼叫AddIdentityServer():
public void ConfigureServices(IServiceCollection services)
{
    services.AddMvc();

    // configure identity server with in-memory stores, keys, clients and scopes
    services.AddIdentityServer()
        .AddDeveloperSigningCredential()
        .AddInMemoryIdentityResources(Config.GetIdentityResources())
        .AddInMemoryApiResources(Config.GetApiResources())
        .AddInMemoryClients(Config.GetClients())
        .AddTestUsers(Config.GetUsers());
}
為OpenID Connect implicit flow 新增客戶端
Implicit Flow指的是使用OAuth2的Implicit流程獲取Id Token和Access Token
最後一步是將MVC客戶端的配置新增到IdentityServer。
基於OpenID Connect的客戶端與我們迄今新增的OAuth 2.0客戶端非常相似。 但是由於OIDC中的流程始終是互動式的,我們需要在配置中新增一些重定向URL。
將以下內容新增到您的客戶端配置:
public static IEnumerable<Client> GetClients()
{
    return new List<Client>
    {
        // other clients omitted...

        // OpenID Connect implicit flow client (MVC)
        new Client
        {
            ClientId = "mvc",
            ClientName = "MVC Client",
            AllowedGrantTypes = GrantTypes.Implicit,

            // where to redirect to after login
            RedirectUris = { "http://localhost:5002/signin-oidc" },

            // where to redirect to after logout
            PostLogoutRedirectUris = { "http://localhost:5002/signout-callback-oidc" },

            AllowedScopes = new List<string>
            {
                IdentityServerConstants.StandardScopes.OpenId,
                IdentityServerConstants.StandardScopes.Profile
            }
        }
    };
}
測試客戶端
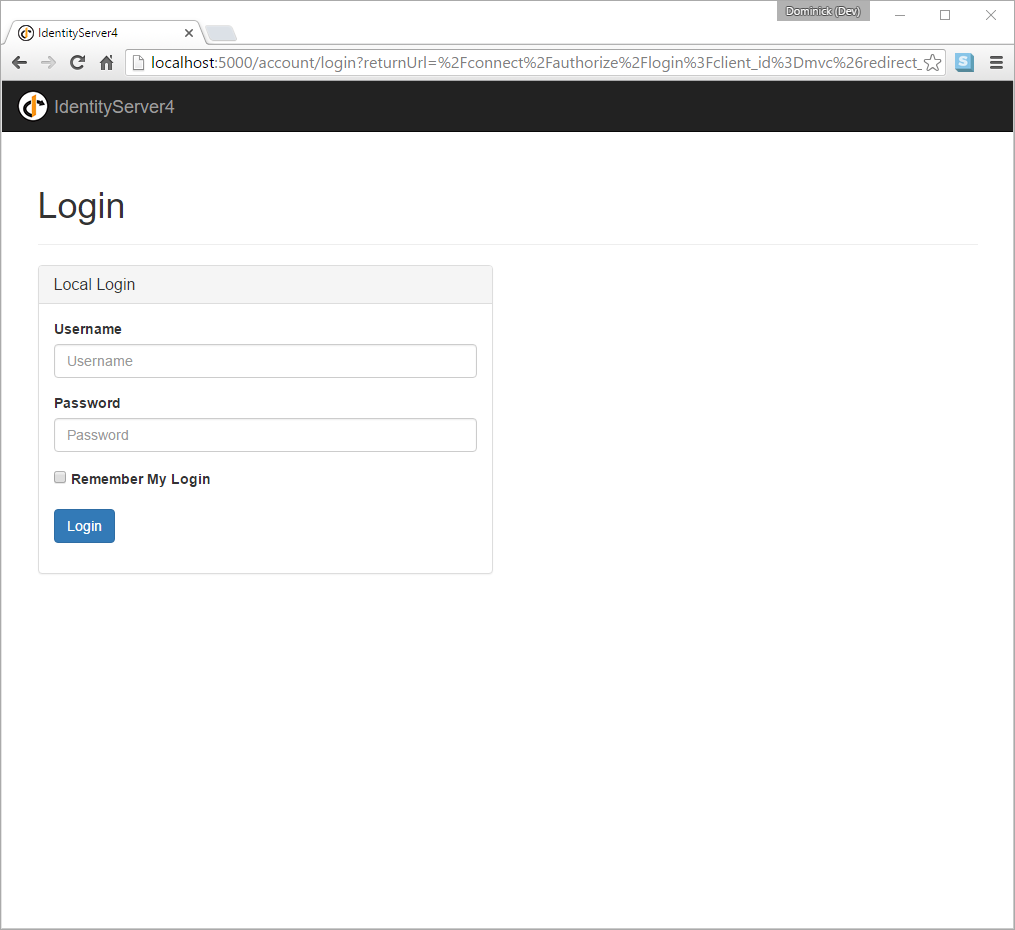
通過訪問受保護的Action來觸發身份驗證握手。 你應該看到重定向到IdentityServer的登入頁面。
成功登入後,使用者將看到同意畫面。 在這裡,使用者可以決定是否要將他的身份資訊釋出到客戶端應用程式。
可以使用客戶端物件上的RequireConsent屬性以每個客戶端為基礎關閉同意詢問。

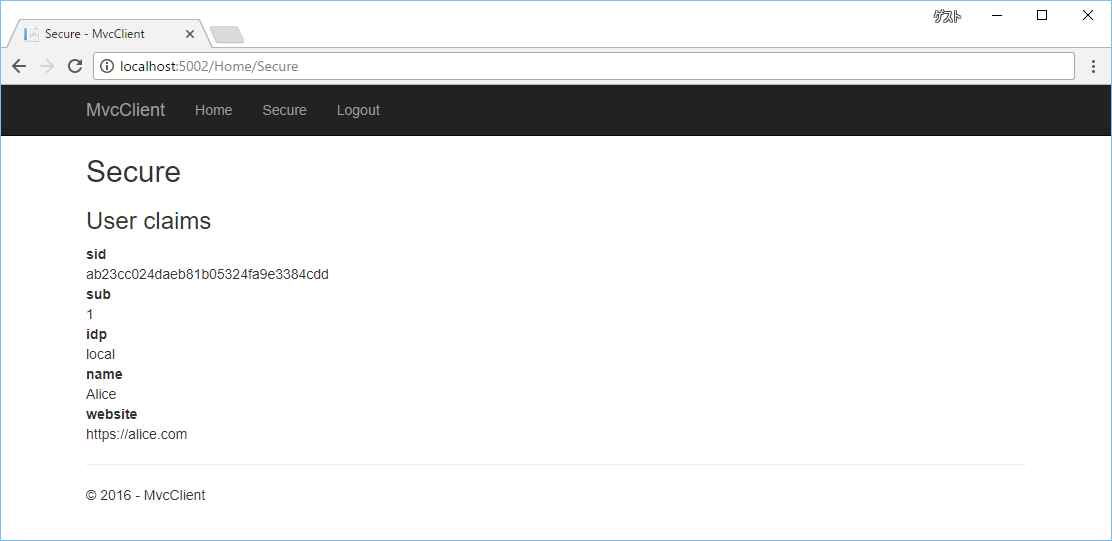
最後瀏覽器重定向到客戶端應用程式,該應用程式顯示了使用者的宣告。
在開發過程中,您有時可能會看到一個異常,說明令牌無法驗證。 這是因為簽名金鑰資訊是即時建立的,並且只儲存在記憶體中。 當客戶端和IdentityServer不同步時,會發生此異常。 只需在客戶端重複操作,下次元資料已經追上,一切都應該正常工作。
添加註銷
最後一步是給MVC客戶端添加註銷功能。
使用IdentityServer等身份驗證服務,僅清除本地應用程式Cookie是不夠的。 此外,您還需要往身份伺服器互動,以清除單點登入會話。
確切的協議步驟在OpenID Connect中介軟體內實現,只需將以下程式碼新增到某個控制器即可觸發登出:
public async Task Logout()
{
    await HttpContext.SignOutAsync("Cookies");
    await HttpContext.SignOutAsync("oidc");
}
這將清除本地cookie,然後重定向到IdentityServer。 IdentityServer將清除它的cookie,然後給使用者一個連結返回到MVC應用程式。
進一步實驗
如上所述,OpenID Connect中介軟體預設要求配置 profile scope。 這個scope還包括像名字或網站這樣的宣告。
讓我們將這些宣告新增到使用者,以便IdentityServer可以將它們放入身份令牌中:
public static List<TestUser> GetUsers()
{
    return new List<TestUser>
    {
        new TestUser
        {
            SubjectId = "1",
            Username = "alice",
            Password = "password",

            Claims = new []
            {
                new Claim("name", "Alice"),
                new Claim("website", "https://alice.com")
            }
        },
        new TestUser
        {
            SubjectId = "2",
            Username = "bob",
            Password = "password",

            Claims = new []
            {
                new Claim("name", "Bob"),
                new Claim("website", "https://bob.com")
            }
        }
    };
}
下一次您進行身份驗證時,你的宣告頁面現在將顯示額外的宣告。
OpenID Connect中介軟體上的Scope屬性是您配置哪些Scope將在身份驗證期間傳送到IdentityServer。
值得注意的是,對令牌中身份資訊的遍歷是一個擴充套件點 - IProfileService。因為我們正在使用 AddTestUser,所以預設使用的是 TestUserProfileService。你可以檢出這裡的原始碼來檢視它的工作原理。
地址
Demo下載地址:https://github.com/IdentityServer/IdentityServer4.Samples/tree/release/Quickstarts/3_ImplicitFlowAuthentication
參考官方文件:https://identityserver4.readthedocs.io/en/release/quickstarts/3_interactive_login.html
官方的Demo已經更新到最新的.NET Core 2.0 所以我不在單獨寫Demo 了,直接用的官方的。