pytorch求索(4): 跟著論文《 Attention is All You Need》一步一步實現Attention和Transformer
寫在前面
此篇文章是前橋大學大神復現的Attention,本人邊學邊翻譯,借花獻佛。跟著論文一步一步復現Attention和Transformer,敲完以後收貨非常大,加深了理解。如有問題,請留言指出。
import numpy as np
import torch
import torch.nn as nn
import torch.nn.functional as F
import math, copy, time
from torch.autograd import Variable
import matplotlib.pyplot as plt
import seaborn
seaborn. 模型架構
大多數competitive neural sequence transduction models都有encoder-decoder架構(參考論文)。本文中,encoder將符號表示的輸入序列 對映到一系列連續表示 。給定一個z,decoder一次產生一個符號表示的序列輸出 。對於每一步來說,模型都是自迴歸的(自迴歸介紹論文),在生成下一個時消耗先前生成的所有符號作為附加輸入。
class EncoderDecoder(nn.Module):
    """
    A stanard Encoder-Decoder architecture.Base fro this and many other models.
    """

    def __init__(self, encoder, decoder, src_embed, tgt_embed, generator):
        super(EncoderDecoder, self).__init__()
        self.encoder = encoder
        self.decoder = decoder
        self.src_embed = src_embed
        self.tgt_embed = tgt_embed
        self.generator = generator

    def forward(self, src, tgt, src_mask, tgt_mask):
        """ Take in and process masked src and target sequences. """
        return self.decode(self.encode(src, src_mask), src_mask, tgt, tgt_mask)

    def encode(self, src, src_mask):
        return self.encoder(self.src_embed(src), src_mask)

    def decode(self, memory, src_mask, tgt, tgt_mask):
        return self.decoder(self.tgt_embed(tgt), memory, src_mask, tgt_mask)
class Generator(nn.Module):
    """Define standard linear + softmax generation step."""
    def __init__(self, d_model, vocab):
        super(Generator, self).__init__()
        self.proj = nn.Linear(d_model, vocab)

    def forward(self, x):
        return F.log_softmax(self.proj(x), dim=-1)
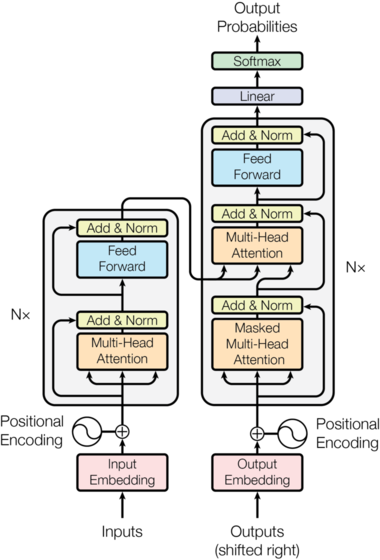
Transformer這種結構,在encoder和decoder中使用堆疊的self-attention和point-wise全連線層。如下圖的左邊和右邊所示:
Image(filename='images/ModelNet-21.png')

Encoder 和 Decoder Stacks
Encoder
編碼器由6個相同的layer堆疊而成
def clones(module, N):
    "Produce N identical layers."
    return nn.ModuleList([copy.deepcopy(module) for _ in range(N)])
class Encoder(nn.Module):
    "Core encoder is a stack of N layers"
    def __init__(self, layer, N):
        super(Encoder, self).__init__()
        self.layers = clones(layer, N)
        self.norm = LayerNorm(layer.size)

    def forward(self, x, mask):
        "Pass the input (and mask) through each layer in turn."
        for layer in self.layers:
            x = layer(x, mask)
        return self.norm(x)
這裡在兩個子層中都使用了殘差連線(參考論文),然後緊跟layer normalization(參考論文)
class LayerNorm(nn.Module):
    """ Construct a layernorm model (See citation for details)"""
    def __init__(self, features, eps=1e-6):
        super(LayerNorm, self).__init__()
        self.a_2 = nn.Parameter(torch.ones(features))
        self.b_2 = nn.Parameter(torch.zeros(features))
        self.eps = eps

    def forward(self, x):
        mean = x.mean(-1, keepdim=True)
        std = x.std(-1, keepdim=True)
        return self.a_2 * (x - mean) / (std + self.eps) + self.b_2
也就是說,每個子層的輸出是LayerNorm(x + Sublayer(x)),其中Sublayer(x)由子層實現。對於每一個子層,將其新增到子層輸入並進行規範化之前,使用了Dropout(參考論文)
為了方便殘差連線,模型中的所有子層和embedding層輸出維度都是512
class SublayerConnection(nn.Module):
    """
    A residual connection followed by a layer norm. Note for
    code simplicity the norm is first as opposed to last .
    """
    def __init__(self, size, dropout):
        super(SublayerConnection, self).__init__()
        self.norm = LayerNorm(size)
        self.dropout = nn.Dropout(dropout)

    def forward(self, x, sublayer):
        """Apply residual connection to any sublayer with the sanme size. """
        return x + self.dropout(sublayer(self.norm(x)))
每層有兩個子層。第一個子層是multi-head self-attention機制,第二層是一個簡單的position-wise全連線前饋神經網路。
class EncoderLayer(nn.Module):
    """Encoder is made up of self-attention and feed forward (defined below)"""
    def __init__(self, size, self_attn, feed_forward, dropout):
        super(EncoderLayer, self).__init__()
        self.self_attn = self_attn
        self.feed_forward = feed_forward
        self.sublayer = clones(SublayerConnection(size, dropout), 2)
        self.size = size

    def forward(self, x, mask):
        """Follow Figure 1 (left) for connection """
        x = self.sublayer[0](x, lambda x : self.self_attn(x, x, x, mask))
        return self.sublayer[1](x, self.feed_forward)
Decoder
Decoder由6個相同layer堆成
class Decoder(nn.Module):
    """Generic N layer decoder with masking """
    def __init__(self, layer, N):
        super(Decoder, self).__init__()
        self.layers = clones(layer, N)
        self.norm = LayerNorm(layer.size)

    def forward(self, x, memory, src_mask, tgt_mask):
        for layer in self.layers:
            x = layer(x, memory, src_mask, tgt_mask)
        return self.norm(x)
每個encoder層除了兩個子層外,還插入了第三個子層,即在encoder堆的輸出上上執行multi-head注意力作用的層。類似於encoder,在每一個子層後面使用殘差連線,並緊跟norm
class DecoderLayer(nn.Module):
    """Decoder is made of self-attn, src-attn, and feed forward (defined below)"""
    def __init__(self, size, self_attn, src_attn, feed_forward, dropout):
        super(DecoderLayer, self).__init__()
        self.size = size
        self.self_attn = self_attn
        self.src_attn = src_attn
        self.feed_forward = feed_forward
        self.sublayer = clones(SublayerConnection(size, dropout), 3)

    def forward(self, x, memory, src_mask, tgt_mask):
        """Follow Figure 1 (right) for connections"""
        m = memory
        x = self.sublayer[0](x, lambda x : self.self_attn(x, x, x, tgt_mask))
        x = self.sublayer[1](x, lambda x : self.src_attn(x, m, m, src_mask))
        return self.sublayer[2](x, self.feed_forward)
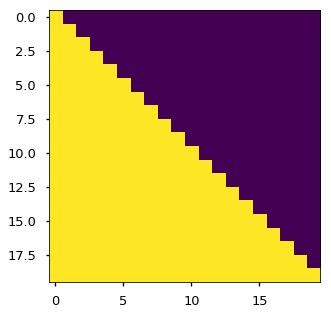
修改在decoder層堆中的self-atention 子層,防止位置關注後續位置。masking與使用一個position資訊偏移的輸出embedding相結合,確保對於position 的預測僅依賴於小於 的position的輸出
def subsequent_mask(size):
    """Mask out subsequent positions. """
    attn_shape = (1, size, size)
    subsequent_mask = np.triu(np.ones(attn_shape), k=1).astype('uint8')
    return torch.from_numpy(subsequent_mask) == 0
plt.figure(figsize=(5, 5))
plt.imshow(subsequent_mask(20)[0])
None

Attention
注意力功能可以看做將一個query和一組key-value對對映到一個output,其中query、keys、values和output都是向量(vector),輸出是values的加權和,其中權重可以通過將query和對應的key輸入到一個compatibility function來計算分配給每一個value的權重。
這裡的attention其實可以叫做“Scaled Dot-Product Attention”。輸入由 維度的queries和keys組成,values的維度是 。計算query和所有keys的點乘,然後除以 ,然後應用softmax函式來獲取值的權重。 起到調節作用,使得內積不至於太大(太大的話softmax後就非0即1了,不夠“soft”了)。
實際計算中,一次計算一組queries的注意力函式,將其組成一個矩陣
, 並且keys和values也分別組成矩陣
和
。此時,使用如下公式進行計算:
def attention(query, key, value, mask=None, dropout=None):
    """Compute 'Scaled Dot Product Attention ' """
    d_k = query.size(-1)
    scores = torch.matmul(query, key.transpose(-2, -1)) / math.sqrt(d_k) # matmul矩陣相乘
    if mask is not None:
        scores = scores.masked_fill(mask == 0, -1e9)
    p_attn = F.softmax(scores, dim = -1)
    if dropout is not None:
        p_attn = dropout(p_attn)
    return torch.matmul(p_attn, value), p_attn
最常用的兩種注意力實現機制包括: additive attention (cite), and dot-product (multiplicative) attention.
此處的實現是dot-product attention,不過多了
。additive attention計算函式使用一個但隱藏層的前饋神經網路。
這兩種實現機制在理論上覆雜度是相似的,但是dot-product attention速度更快和更節省空間,因為可以使用高度優化的矩陣乘法來實現。
對於小規模values兩種機制效能類差不多,但是對於大規模的values上,additive attention 效能優於 dot poduct。
原因分析:猜測可能是對於大規模values,內積會巨幅增長,將softmax函式推入有一個極小梯度的區域,造成效能下降(為了說明為什麼內積變大,假設
是獨立且平均值為0方差為1的隨機變數,那麼點乘
