
利用Python做物聯網!這專案好像要強其他專案很多!

一、基本結構
先看架構圖
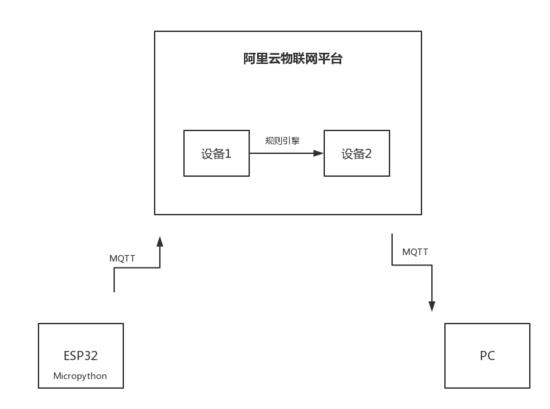
框架.png
二、裝置端接入
物聯網終端是用的ESP32,是一款自帶藍芽和Wifi的微控制器。利用它可以直接接入網際網路,無需其他模組。當然你可以將現在流行的NB-Iot模組來聯網,不過需要自己寫一下驅動程式。我買的模組是支援micropython開發的,在淘寶上可以搜尋到,用起來很方便。有時間我會補上這一塊的初步教程。

ESP32模組.jpg
進群:960410445 獲取專案地址!
ESP32 上的程式碼如下:
from umqtt.simple import MQTTClient
import usocket as socket
import time
import wifi
wifi.connect()
#Demo_01
ProductKey = "*********"#使用你自己的
ClientId = "1234|securemode=3,signmethod=hmacsha1|"
DeviceName = "Demo_01"
DeviceSecret = "*******************************"#使用你自己的
strBroker = ProductKey + ".iot-as-mqtt.cn-shanghai.aliyuncs.com"
Brokerport = 1883
user_name = "Demo_01&*********"#使用你自己的
user_password = "**********************************************"#使用你自己的
print("clientid:",ClientId,"
","Broker:",strBroker,"
","User Name:",user_name,"
","Password:",user_password,"
")
def connect():
 client = MQTTClient(client_id = ClientId,server= strBroker,port=Brokerport,user=user_name, password=user_password,keepalive=60)
 #please make sure keepalive value is not 0

 client.connect()
 temperature =25.00
 while temperature < 30:
 temperature += 0.5

 send_mseg = '{"params": {"IndoorTemperature": %s},"method": "thing.event.property.post"}' % (temperature)
 client.publish(topic="/sys/*************/Demo_01/thing/event/property/post", msg=send_mseg,qos=1, retain=False)#*號處為product id

 time.sleep(3)
 while True:
 pass
 #client.disconnect()
有幾點需要說明:
1.程式碼中的wifi.connect()函式需要自己編寫,網上能搜到類似的,也可以打賞私信我所要原始碼。
2.阿里雲物聯網平臺的接入需要進行三元組認證,會根據一定的規則生成登入名和密碼,這個網上資訊還是比較全面的。
3.向阿里雲物聯網平臺釋出訊息的格式一定要按照程式碼中所寫,網上很多程式碼,但是對這一塊的描述都不清楚。
- Micropython使用的umqtt.simple庫,一定要設定keepalive時間,否則無法連線。這一點我是摸索了好久,最終通過檢視庫的原始碼才發現的問題。
三、雲端設定
在雲端建立一個高階產品,並建立兩個裝置,以供ESP32 和PC連線。
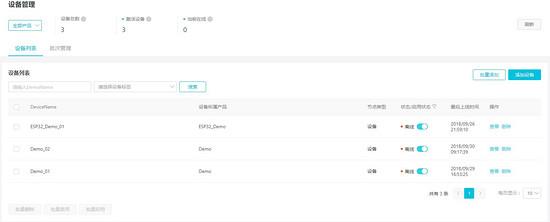
device.JPG
需要在產品中定義一下功能。
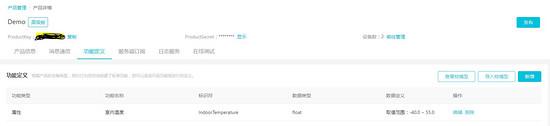
device_define.JPG
雲端和裝置端都建立好了之後,可以檢視裝置執行狀態看到資料上傳
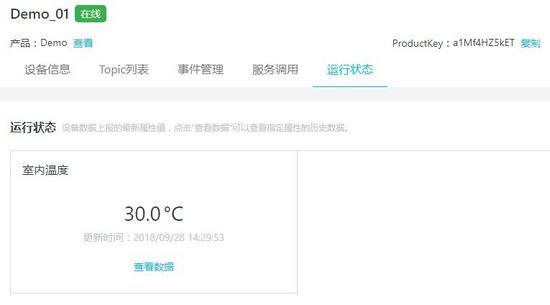
雲端資料檢視.JPG
這是檢視資料記錄得到的結果
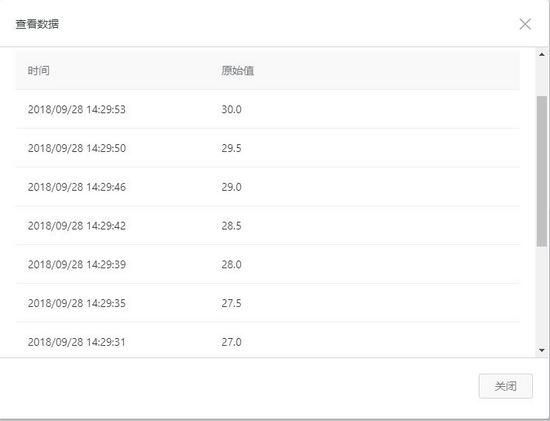
雲端資料記錄.JPG
當你看到正確的資料之後,就說明你的成功接入物聯網並上傳了資料。
接下來就是最重要的部分——設定是使用規則引擎來進行資料轉發,將裝置demo_01的資料轉發到demo_02。這一步的語法很重要,雖然有官網有詳細教程,但是當時還是搞了好久才完全正確。
規則查詢語句:
SELECT items.IndoorTemperature.value as IndoorTemperature FROM "/sys/use-your-productkey-here/Demo_01/thing/event/property/post" WHERE items.IndoorTemperature.value > 0
四、PC端接入
PC 端使用python模擬MQTT裝置登陸阿里雲訂閱訊息就行了,只要裝好python很快就可以實現,網上也有很多程式碼。程式碼的很大一部分就是在做三元組認證,可以將這部分稍微修改一下來計算ESP32 登陸時所需的
PC端python程式碼如下:
#!/usr/bin/python2
# coding=utf-8
import datetime
import time
import hmac
import hashlib
import math
try:
 import paho.mqtt.client as mqtt
except ImportError:
 print("MQTT client not find. Please install as follow:")
 print("pip install paho-mqtt")
# 設定連線資訊
#Demo_02
ProductKey = "*********"#使用你自己的
ClientId = "2234" # 自定義clientId
DeviceName = "Demo_02"
DeviceSecret ="************************************8**"#使用你自己的
# 獲取時間戳(當前時間毫秒值)
us = math.modf(time.time())[0]
ms = int(round(us * 1000))
timestamp = str(ms)
# 計算密碼(簽名值)
def calculation_sign(signmethod):
 data = "".join(("clientId", ClientId, "deviceName", DeviceName,
 "productKey", ProductKey, "timestamp", timestamp))
 if "hmacsha1" == signmethod:
 # ret = hmac.new(bytes(DeviceSecret),
 # bytes(data), hashlib.sha1).hexdigest()
 ret = hmac.new(bytes(DeviceSecret, encoding="utf-8"),
 bytes(data, encoding="utf-8"),
 hashlib.sha1).hexdigest()
 elif "hmacmd5" == signmethod:
 # ret = hmac.new(bytes(DeviceSecret, encoding="utf-8"),
 # bytes(data, encoding="utf-8"), hashlib.md5).hexdigest()
 ret = hmac.new(bytes(DeviceSecret, encoding="utf-8"),
 bytes(data, encoding="utf-8"),
 hashlib.md5).hexdigest()
 else:
 raise ValueError
 return ret
# ======================================================
strBroker = ProductKey + ".iot-as-mqtt.cn-shanghai.aliyuncs.com"
port = 1883
client_id = "".join((ClientId,
 "|securemode=3",
 ",signmethod=", "hmacsha1",
 ",timestamp=", timestamp,
 "|"))
username = "".join((DeviceName, "&", ProductKey))
password = calculation_sign("hmacsha1")
print("="*60)
print(strBroker)
print("client_id:", client_id)
print("username:", username)
print("password:", password)
print("="*60)
# 成功連線後的操作
def on_connect(client, userdata, flags, rc):
 print("OnConnetc, rc: " + str(rc))
# 成功釋出訊息的操作
def on_publish(client, msg, rc):
 if rc == 0:
 print("publish success, msg = " + msg)
# 成功訂閱訊息的操作
def on_subscribe(mqttc, obj, mid, granted_qos):
 print("Subscribed: " + str(mid) + " " + str(granted_qos))
def on_log(mqttc, obj, level, string):
 print("Log:" + string)
def on_message(mqttc, obj, msg):
 curtime = datetime.datetime.now()
 strcurtime = curtime.strftime("%Y-%m-%d %H:%M:%S")
 print(strcurtime + ": " + msg.topic + " " + str(msg.qos) + " " + str(msg.payload))
 on_exec(str(msg.payload))
def on_exec(strcmd):
 print("Exec:", strcmd)
 strExec = strcmd
if __name__ == '__main__':
 mqttc = mqtt.Client(client_id)
 mqttc.username_pw_set(username, password)
 mqttc.on_message = on_message
 mqttc.on_connect = on_connect
 mqttc.on_publish = on_publish
 mqttc.on_subscribe = on_subscribe
 mqttc.on_log = on_log
 mqttc.connect(strBroker, port, 120)
 # mqttc.loop_start()
 time.sleep(1)
 temperature =27.55
 mqttc.subscribe("/sys/************/Demo_02/thing/service/property/set", qos=1) # 換成自己的
 #send_mseg = '{"pm_25": %s,"area":"%s","time":"%s"}' % (0, 0, datetime.datetime.now())
 #send_mseg = '{"id": "1234", "version": "1.0","params": {"IndoorTemperature": %s},"method": "thing.event.property.post"}'%(temperature)
 send_mseg = '{"params": {"IndoorTemperature": %s},"method": "thing.event.property.post"}' % (temperature)
 print('send_mseg is : ',send_mseg)
 mqttc.loop_forever()
五、總結
工作之餘瞭解了一下物聯網的發展,看到有意思的東西打算學一下,剛好看到了microPython,震驚之餘,決心做點小東西玩玩。
這套框架全部使用python實現,比我瞭解到的絕大多數物聯網方案要簡單太多,雖然有些開發首先,但是用來實現一些簡單設計應該是不成問題的,只要你會python,這套系統可以很快構建。當然python也是非常好學的,長期使用C語言的人根本不需要什麼學習就可以上手。