
Setting Up Object Persistence with 6D.ai
Setting Up Object Persistence with 6D.ai
How To Make a Sample App with the 6D SDK
Welcome to the 6D SDK. One of the primary features of the 6D SDK is Persistence — meaning that content left by a user in a location is retrievable across app sessions and devices.
We put together this step-by-step guide to help those new to 6D get familiar with the process and required components for relocalization and persistence capabilities on our platform.
In this tutorial, we will make a sample app with a standard Unity sphere that persists in a certain location — demonstrating 6D’s relocalization and persistence capabilities.
We will go through setting up the project first, then we will create a simple AR app where we can place the sphere into the world. Lastly, we will add in functionality from the 6D SDK that will enable persistence across app sessions.
Set Up the Project
Before you start, please download the 6D SDK unity package from the 6D Developer Dashboard (https://dashboard.6d.ai/)
Please note, the following information is key to building your project. The project will not build successfully otherwise.
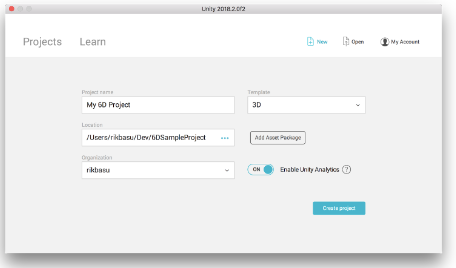
- Open Unity and start a new project. Make sure Templateis set to 3D.

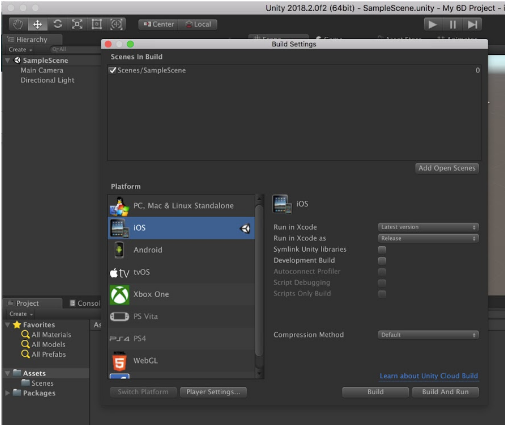
2. After creating the project, go to File > Build Settings, select iOS as your platform, and click the Switch Platform button.

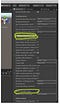
3. Still within the Build Settings window, click the Player Settings button. This will bring up a list of options within the Inspector window on the right. Several options within the Inspector must be adjusted.
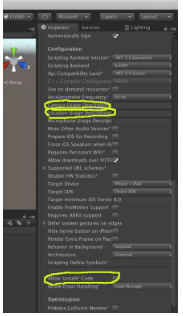
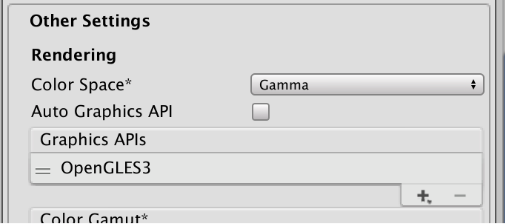
4. In the ‘Rendering’ section, uncheck the Auto Graphics API option. Use the Graphics APIs parameter to add OpenGLES3 using the plus icon, and then delete Metal using the minus icon. The result should look like this:

5. In the ‘Configuration’ section, find Camera Usage Description and Location Usage Description. We cannot leave these blank, so type something into both of the corresponding text fields. The result should look like this:

6. Also in the ‘Configuration’ section, select the Allow ‘unsafe’ Code option. The result should look like this:

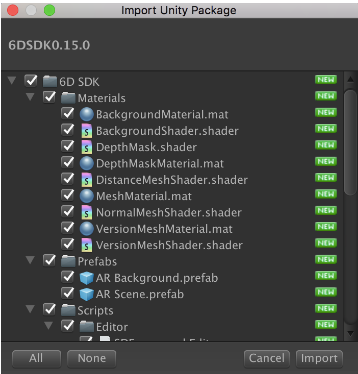
7. Go to Assets > Import Package > Custom Package and find where you saved the 6D SDK .unitypackage we downloaded earlier. Make sure all components are selected, then click the Import button.

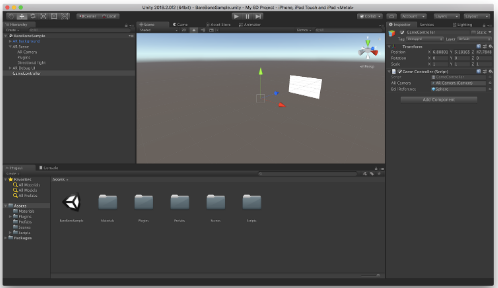
8. Remove the Main Camera and Directional Light objects from the Hierarchy.
9. Finally, go into the Assets/6D SDK/Prefabs directory and drag the AR Background prefab and the AR Scene prefab to the GameObject Hierarchy.
You now have the necessary files and prefabs for a new project using the 6D SDK. Your screen should look similar to the image below:


Make a UI
A UI is necessary for buttons and icons, so let’s create one! Begin by creating a new Canvas GameObject [GameObject>UI>Canvas], and name it AR Debug UI.
- Select the AR Debug UI object, go to the Inspector, and in the ‘Canvas Scaler’ section change the UI Scale Mode to Scale with Screen Size.
- In that same section, change the Reference Resolution to 2436 by 1125 (this is the resolution of the iphone X).
- Also in that same section, change the Screen Match Mode to Shrink.
- Add a Canvas Renderer component. [Add Component button > Rendering > Canvas Renderer]
Add in App Functionality
Now that we have our bare bone project and UI, we can begin constructing a functional app. We will start with a simple app that allows the user to spawn an object into the world by tapping on the screen. We will need two scripts for this functionality, and we have one of them already.
- A game controller script, which allows us to actually place and save a sphere in the real world. We will create this script first.
- An SDK controller script which interacts with the 6D API. We already have this script in the bare bone project, it is included in the AR Scene prefab.
Part I: Placing an Object into the AR Scene
- First, we need to create the object that we will have the user spawn. In this example, we will use a simple sphere prefab: a) Create a sphere in the scene. [GameObject>3DObject>Sphere]b) Drag the sphere object from the scene and drop it into the prefab folder.c) Now delete the sphere that is in the scene.d) Click on the prefab sphere you made. In the ‘Transform’ section of the inspector, change the sphere’s Scale to 0.2 for all axes.
- Next, we need to create a script that will handle placing the object. Create an empty object [GameObject>Empty] and call it GameController.
- Select the GameController object, and add a new script as a component. [Add Component button > New Script].
- Name the new script GameController. The new script GameController.cs will automatically be saved to the Assets folder of your project.
- Open GameController.cs in your favorite text editor and paste this code:
using System.Collections;using System.Collections.Generic;using UnityEngine;using UnityEngine.EventSystems;
public class GameController : MonoBehaviour {public Camera ARCamera;
public GameObject ballReference;
private List<GameObject> balls;
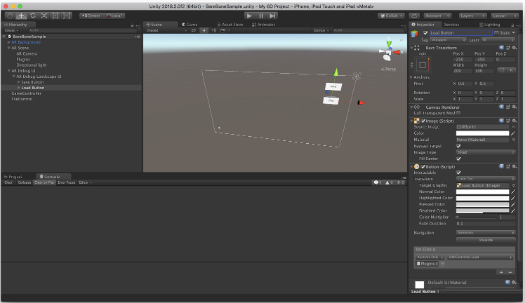
void Start() { balls = new List<GameObject>(); }void Update() { if (Input.touchCount > 0) { Touch touch = Input.GetTouch(0); LaunchBall(touch); } }void LaunchBall(Touch touch) { if (EventSystem.current.currentSelectedGameObject == null && touch.phase == TouchPhase.Began) { Vector3 position = new Vector3(Input.mousePosition.x, Input.mousePosition.y, .5f); position = ARCamera.ScreenToWorldPoint(position); GameObject ball = Instantiate(ballReference, position, ballReference.transform.rotation); balls.Add(ball); } }}6. After adding this code and saving, go back to the Unity Engine, and select the GameController object. In the Inspector, you will notice that some new values are available for the GameController script: Ball Reference and AR Camera. Drag the sphere from the prefab folder into the empty field next to Ball Reference.
7. Drag the ARCamera from our scene into the the empty field next to AR Camera.
You should have something like this:

8. Save this project and build it. Instructions on building a 6D application can be found here.
9. If your build was successful, you should now have a simple app that places a sphere half a meter in front of you if you tap the screen. Great! We learned how to place an object in AR.
The next step is to add in some persistence via the 6D SDK.
Part II: Implement Object Persistence
Now, let’s persist this content across sessions. We will need to modify the GameController script, and we will also need to add a script called FileControl. The file control script allows us to save and load the actual data of the spheres location in the world in a csv file.
Open GameController.cs, and replace the code you have with this:
using System.Collections;using System.Collections.Generic;using UnityEngine;using UnityEngine.EventSystems;using System.Runtime.InteropServices;using System.Text;using System.IO;using SixDegrees;
public class GameController : MonoBehaviour{#if UNITY_IOS [DllImport("__Internal")] public static extern void GetAPIKey(StringBuilder apiKey, int bufferSize);#else public static void GetAPIKey(StringBuilder apiKey, int bufferSize) { }#endif public Camera ARCamera;public GameObject ballReference;
public FileControl fileControl;
public SDKController sdkController;
private List<GameObject> balls;
private static string apiKey = "";
private string filename;
void Start() { balls = new List<GameObject>(); sdkController.OnSaveSucceededEvent += SaveCSV; sdkController.OnLoadSucceededEvent += RetrieveFile; }void Update() { if (Input.touchCount > 0) { Touch touch = Input.GetTouch(0); LaunchBall(touch); } }void LaunchBall(Touch touch) { if (EventSystem.current.currentSelectedGameObject == null && touch.phase == TouchPhase.Began) { Vector3 position = new Vector3(Input.mousePosition.x, Input.mousePosition.y, .5f); position = ARCamera.ScreenToWorldPoint(position); GameObject ball = Instantiate(ballReference, position, ballReference.transform.rotation); balls.Add(ball); } }private void GetFilename() { if (string.IsNullOrEmpty(apiKey)) { StringBuilder sb = new StringBuilder(32); GetAPIKey(sb, 32); apiKey = sb.ToString(); }if (string.IsNullOrEmpty(apiKey)) { Debug.Log("API Key cannot be found"); filename = ""; }if (string.IsNullOrEmpty(SDPlugin.LocationID)) { Debug.Log("Location ID is missing"); filename = ""; }filename = apiKey + "-" + SDPlugin.LocationID; }
public void SaveCSV() { GetFilename(); if (string.IsNullOrEmpty(filename)) { Debug.Log("Error evaluating the filename, will not save content CSV"); return; } string filePath = GetPath(); StreamWriter writer = new StreamWriter(filePath); writer.WriteLine(balls.Count); for (int i = 0; i < balls.Count; i++) { writer.WriteLine(balls[i].transform.position.x + "," + balls[i].transform.position.y + "," + balls[i].transform.position.z); } writer.Flush(); writer.Close(); StartCoroutine(fileControl.UploadFileCoroutine(filename)); }public void ReadTextFile(string csv) { StringReader reader = new StringReader(csv); string line = reader.ReadLine(); int ballCount = int.Parse(line); for (int i = 0; i < ballCount; i++) { line = reader.ReadLine(); string[] parts = line.Split(','); Vector3 ballPosition = new Vector3(); ballPosition.x = float.Parse(parts[0]); ballPosition.y = float.Parse(parts[1]); ballPosition.z = float.Parse(parts[2]); GameObject ball = Instantiate(ballReference, ballPosition, ballReference.transform.rotation); balls.Add(ball); } reader.Close(); }public string GetPath() { return Application.persistentDataPath + "/" + SDPlugin.LocationID + ".csv"; }public void RetrieveFile() { GetFilename(); if (string.IsNullOrEmpty(filename)) { Debug.Log("Error evaluating the filename, will not load content CSV"); return; } StartCoroutine(fileControl.GetTextCoroutine(filename)); }}Create the FileControl Script
You might see some errors pop up, but that’s because we don’t have a FileControl object or script yet. Similar to what we did with the GameController script, we are going to create the FileControl script:
- Create an empty object [GameObject>Empty] and call it FileControl.
- Select the FileControl object, and add a new script as a component. [Add Component button > New Script].
- Name the new script FileControl. The new script FileControl.cs will automatically be saved to the Assets folder of your project.
- Open FileControl.cs in your favorite text editor and paste this code:
using System.Collections;using UnityEngine;using UnityEngine.Networking;
public class FileControl : MonoBehaviour{public GameController gameController;
public IEnumerator GetTextCoroutine(string locID) { string fullDownloadURL = downloadURL + locID + ".csv"; UnityWebRequest www = UnityWebRequest.Get(fullDownloadURL); yield return www.SendWebRequest();public IEnumerator UploadFileCoroutine(string filename) { string localFileName = gameController.GetPath(); string fullUploadURL = uploadURL + filename + ".csv"; WWW localFile = new WWW("file:///" + localFileName); yield return localFile;if (localFile.error == null) { Debug.Log("Loaded file successfully"); } else { Debug.Log("Open file error: " + localFile.error); yield break; }WWWForm postForm = new WWWForm(); postForm.AddBinaryData("Datafile", localFile.bytes, localFileName, "text/plain"); WWW upload = new WWW(fullUploadURL, postForm); yield return upload; if (upload.error == null) { Debug.Log("upload done :" + upload.text); } else { Debug.Log("Error during upload: " + upload.error); } yield return null; }}Configure the Scene
Now that the FileControl object and script are created, we can configure the scene:
- Select the FileControl object in the Hierarchy.
- In the Inspector, find the empty field next to Game Controller anddrag your GameController object into it.
- Select the GameController object in the Hierarchy.
- In the Inspector, find the empty field next to File Control and drag your FileControl object into it.
- Find the empty field next to SDK Controller, and drag the AR Scene object into it.
- We also need to create a small script that will verify your 6D SDK API key. Using your favorite text editor, create a file named GetAPI.mm in your Assets/plugins/ios folder with the following text:
extern "C" { void GetAPIKey(char* apiKey, int bufferSize) { NSString* plistFile = [[NSBundle mainBundle] pathForResource:@"SixDegreesSDK" ofType:@"plist"]; if (plistFile) { NSDictionary *plistDict = [NSDictionary dictionaryWithContentsOfFile:plistFile]; if (plistDict) { id dictApiKey = [plistDict valueForKey:@"SIXDEGREES_API_KEY"]; if (dictApiKey && [dictApiKey isKindOfClass:[NSString class]]) { strcpy(apiKey, [dictApiKey UTF8String]); } } } }}Save and Load Buttons
We need buttons to enable a user to save their session, and load up the map/content from a previous session:
- First we need to add two child buttons to AR Debug UI. Right click on the AR Debug UI object, and select UI > Button. Rename the button ‘Save Button’. Repeat this procedure to create a ‘Load Button’.
- Resize and position the buttons. Click on a button, and within the ‘Rect Transform’ section of the Inspector make the width 200, and height 100.
- Within that same section, change the Pos X and Pos Y values to whatever you prefer. For this example, we will place the Save Button at -250x, and -150y, and the Load Button at -250x, and -350y.
- Now we need to make sure the buttons do something. Select the Save Button object, and within the Inspector find the On Click () parameter within the ‘Button(Script)’ section. Click the plus button to add an OnClick() callback for the Save Button.
- Drag the AR Scene object from the Hierarchy into the empty field.
- Change the function from No Function to SDKController > Save ().
- Repeat steps 4–6 for the Load Button, but make sure to change the function from No Function to SDKController > Load () instead.
- Finally, we need to make sure the buttons have the proper text on them. Expand the Save Button object in the Hierarchy, and click on the Text object. In the ‘Text(Script)’ section of the Inspector, type a suitable label for the save button.
- Repeat step 8 for the Load Button object.
You should have something that looks like this:

Build the App
You can now save the project and build the app! The walkthrough for building a 6D application can be found here. Once the app is built, it should have the following capabilities:
- The user can place spheres into the world with a tap on the screen.
- Clicking on the save button will save the map and the position of those spheres.
- The app will ‘remember’ the location of the spheres across sessions. Try closing the app and opening it again. Once re-opened, press the Load button. It may take a few seconds, but your app should recognize the environment, relocalize, and spawn the spheres from your last app session in the place that you left them.
Congrats! You have successfully built an app where objects can be placed into the AR scene with basic persistence.
Please post on the developer Slack with any questions and comments. We are looking forward to seeing what you build.