
Building your own Design Pattern
Few details of MVVM:
- The view here is a UIKit independent implementation. The view controller itself can be treated as the view component.
- There’s complete isolation of the Model and the View, which makes them loosely coupled with one another.
- The View Model invokes all changes to the model and listens to any changes that the Model makes behind the scenes.
- The View and View Model interact via bindings, so any change in the Model notifies the View Model, which in turn updates the View.
- This clearly helps break the massive controller of MVC, with the View and View Model now sharing responsibilities of updating UI and the coordination between components, respectively.
Discussion:
As we saw earlier, while MVC works for small contained components, it fails to meet the requirements of an evolving and growing product. Adding new code to an MVC system is difficult without breaking existing parts. Debugging issues in an MVC system can be time consuming, and sometimes can lead you clueless, as your controller is taking care of a million things at the same time.
While MVVM was great in taking care of some of those concerns, we thought there was still scope for some more modularity, some more scalability. We could do better! We could break these components into further subcomponents. The idea was to evolve the architecture in such a way that more and more components became reusable. It should be easier to replace one component without affecting the whole system.
So we went through these and a few more design patterns like VIPER, RIBs, evaluated their advantages/disadvantages, and compared them with our use case. We went through the common limiting factors encountered while scaling our systems. The final pattern we came up with was a hybrid version of the MVC and MVVM patterns.
Hybrid MVC and MVVM pattern
The following diagram shows the various components and their interaction within this pattern:

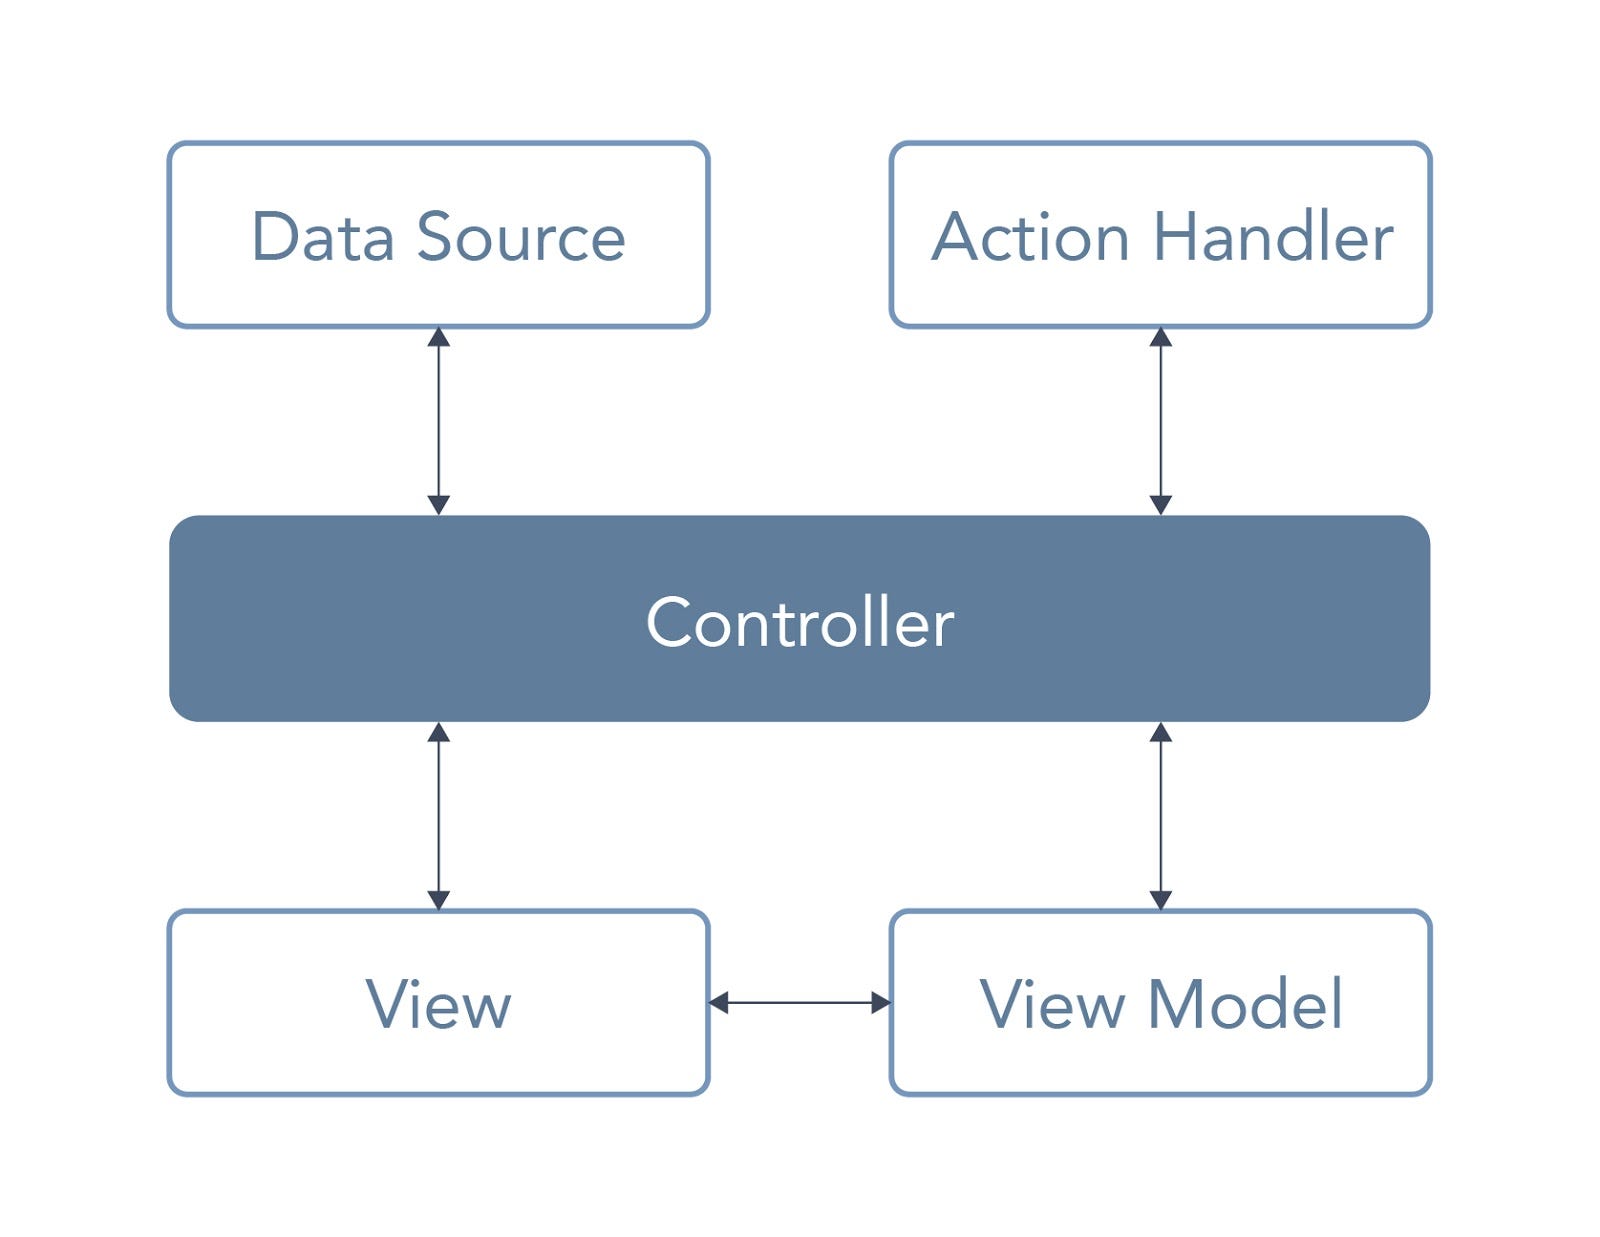
Let’s go over the functionalities of each of these:
- Data Source — The Data Source is responsible for providing data to the entire system. This can be any generic class conforming to a protocol that is used by the Controller to ask for data. The data can be stored internally in any way. All that detail is internal to the implementation of Data Source. Conforming to a protocol ensures that we can replace the data source implementation without affecting any other component. All we need is for the new class to conform to the data source protocol, and we won’t have to change any other aspect. Given the Controller owns the Data Source, any changes in the underlying data are conveyed to the Controller that can then initiate appropriate action for it.
- Controller — The controller is at the centre of it all though much of its responsibility is to coordinate other items to enable them to function together. Usually this is a View Controller subclass, which is initialised with a Data Source object. Suppose we have to implement a chat screen, which shows all messages and has ability to send messages. The main chat view controller will act as the Controller. The table view to show all messages would be a part of the chat view controller. The initialisation would look something like this:
- View — The independent UI components can be separated out in a separate View layer. The Controller instantiates and holds references to them.The View is passed as a View Model object that the View uses to populate itself. In case of our example, the cells of the table View can be initiated with this pattern, where we pass them a View model object to populate with:
- View Model — The View Model is instantiated by the Controller for the independent View components that need not be part of the Controller class. Identifying such View-View Model components can help keep your Controller light and code modular. The View Model is initialised with a Model object that contains all information needed by the view to populate itself. The other important aspect to it is that we don’t expose class names anywhere, we only expose id<some_protocol> type of objects. This makes it easier to replace these components without affecting any other components:
- Action Handler — The view reports all user actions taken on it back to the Controller. In order to keep the Controller independent of the business logic behind all such user actions, we place all this logic in a separate component called Action Handler. This component gets the information regarding the type of action (say single touch, long press etc.) from the Controller, and applies all business logic to handle that event:
It is important here to note that while the Action Handler has all the logic to execute in response to any user action, it doesn’t actually perform any UI operations itself. Any UI operation, be it adding/removing a subview, or pushing/presenting any other View Controller should only be done by the Controller. As we can see in the above snippet, the Action Handler returns a Response Model object. This object contains all information about the kind of UI task that needs to be performed:
Based on the value of the action type, the Controller picks the appropriate UIView or UIViewController from the Response Model object and performs necessary operations on it. Thus, there is a clear separation of responsibility between the Controller and the Action Handler.
Conclusion:
This hybrid design pattern offers us multiple advantages over other patterns. When we applied it in app
- Our Controller classes have become very light weight, with its only responsibility being that of connecting all other components together. This has improved the testability of this component
- The Data Source kept the implementation of how data is stored abstracted, and this could be changed at any later point of time without affecting other components
- The Views/ View Model become reusable as they were only identified by adhering to a protocol
- Unit Testing becomes easier and could be done only for classes with a business logic in them.
- Most if-else checks in the code were minimised by using factory pattern to link different components.
- The readability of the code increased, helping other developers understand what’s going on in your features :)
Impact at Hike:
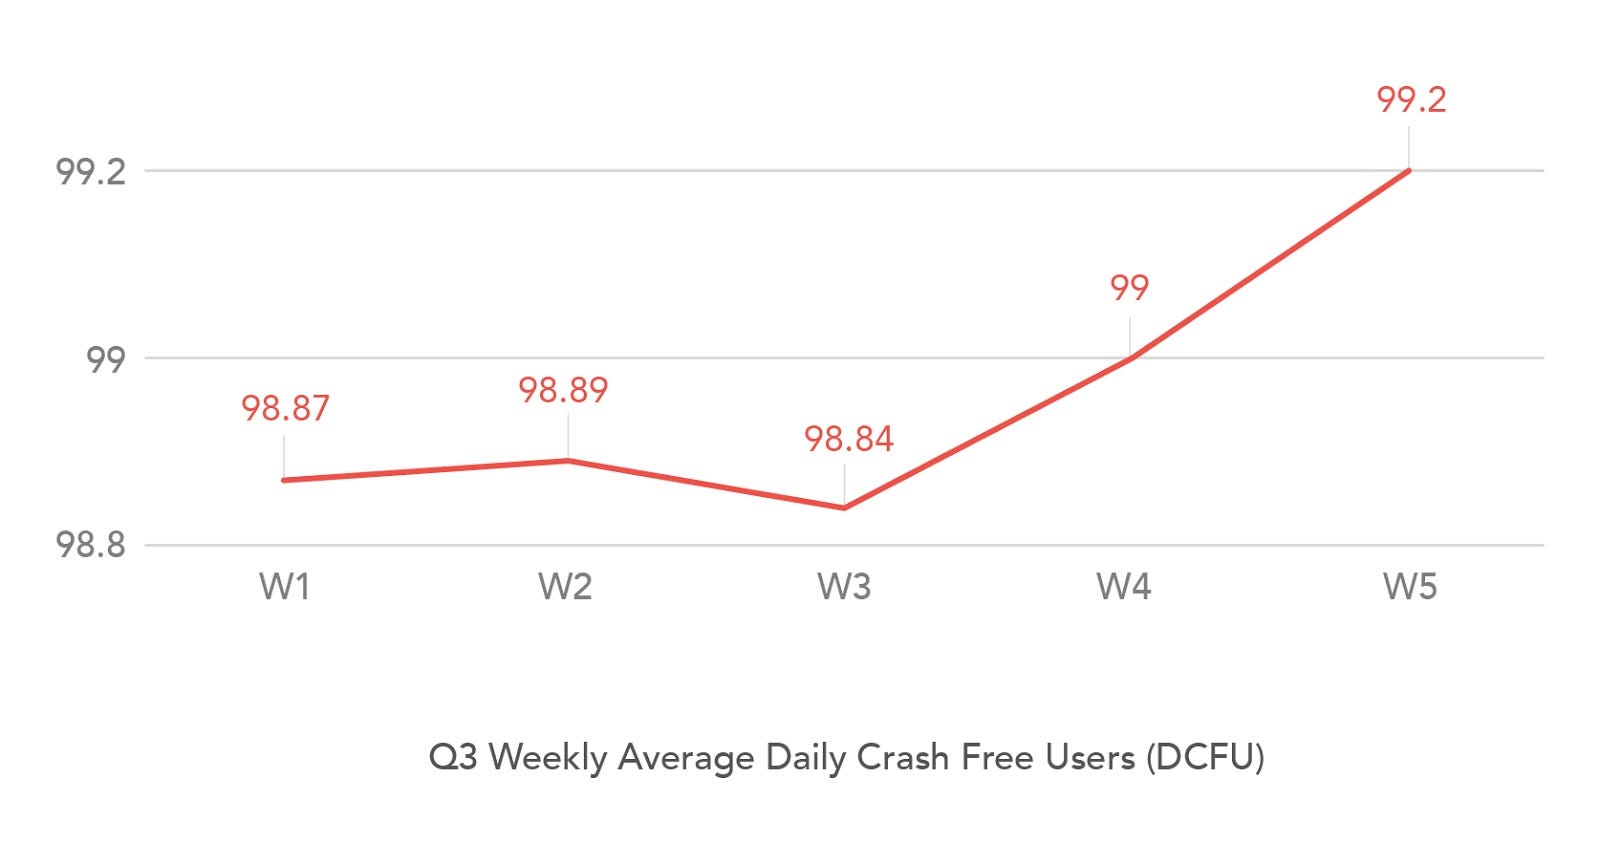
- The architecture helped us improve the overall app stability. We started implementing it at one place at a time. We began with chat, and this helped us make chat more robust and easy to work upon. For instance, here’s how our app stability grew over time:

- We were able to experiment internally with different versions of chat, as it was easy to just plug and play different components. This helped us make decisions faster.
Key takeaways:
- The decision of choosing a design pattern will go a long way with you. Make sure you give enough thought to it
- There are enough patterns out there, but you don’t have to necessarily choose from them. Feel free to come up with your own version based on your requirements