
"Fragment"-Android面試必問"精華技能點"彙總
阿新 • • 發佈:2018-12-30
Fragment技能點彙總總結:
目錄:
一.Fragment跟Activity如何傳值?
一.getActivity()
- 1.從Fragment獲取Ativity的資訊
- 2.就可以呼叫Ativity的方法了
二.setArguments(Bundle)
- 在Ativity獲取Fragment的例項和方法
過程和程式碼如下:
1.獲取管理者
FragmentManager fragmentManager = getFragmentManager();2.找到fragment
Fragment fragment = fragmentManager.findFragmentByTag(tag);
Fragment fragment = fragmentManager.findFragmentById(id);
3.一般直接管理物件.獲取事物(替換佈局,frgmentXX).提交.
- 可呼叫fragment的setArguments(bundle)把資料繫結到Fragment中.
- 為什麼官方推薦 Fragment.setArguments(Bundle bundle)這種方式來傳遞引數,而不推薦通過構造方法直接來傳遞引數呢? 請看以下兩個例子:
案例一:通過fragment構造傳給Activity
public class FramentTestActivity extends ActionBarActivity {
@Override
protected void onCreate 結果: 能正常顯示
當橫屏後:得到的值為null
案例二:換成setArguments(bundle)傳遞值
public class FramentTest2Activity extends ActionBarActivity {

        @Override
        protected void onCreate(Bundle savedInstanceState) {
  super.onCreate(savedInstanceState);
             setContentView(R.layout. activity_main);

  if (savedInstanceState == null) {
        getSupportFragmentManager().beginTransaction()
         .add(R.id. container, TestFragment.newInstance("param")).commit();
             }

       }

        public static class TestFragment extends Fragment {

  private static final String ARG = "arg";

  public TestFragment() {
        Log. i("INFO", "TestFragment non-parameter constructor" );
             }

  public static Fragment newInstance(String arg){
        TestFragment fragment = new TestFragment();
        Bundle bundle = new Bundle();
        bundle.putString( ARG, arg);
        fragment.setArguments(bundle);
         return fragment;
             }

  @Override
  public View onCreateView(LayoutInflater inflater, ViewGroup container,
               Bundle savedInstanceState) {
        View rootView = inflater.inflate(R.layout. fragment_main, container,
          false);
        TextView tv = (TextView) rootView.findViewById(R.id. tv);
        tv.setText(getArguments().getString( ARG));
         return rootView;
             }
       }

}
不論橫屏還是豎屏都會得到值
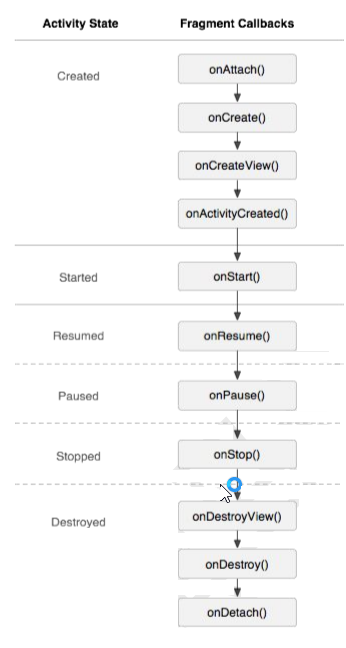
二.描述Fragment的生命週期
一.生命週期圖:
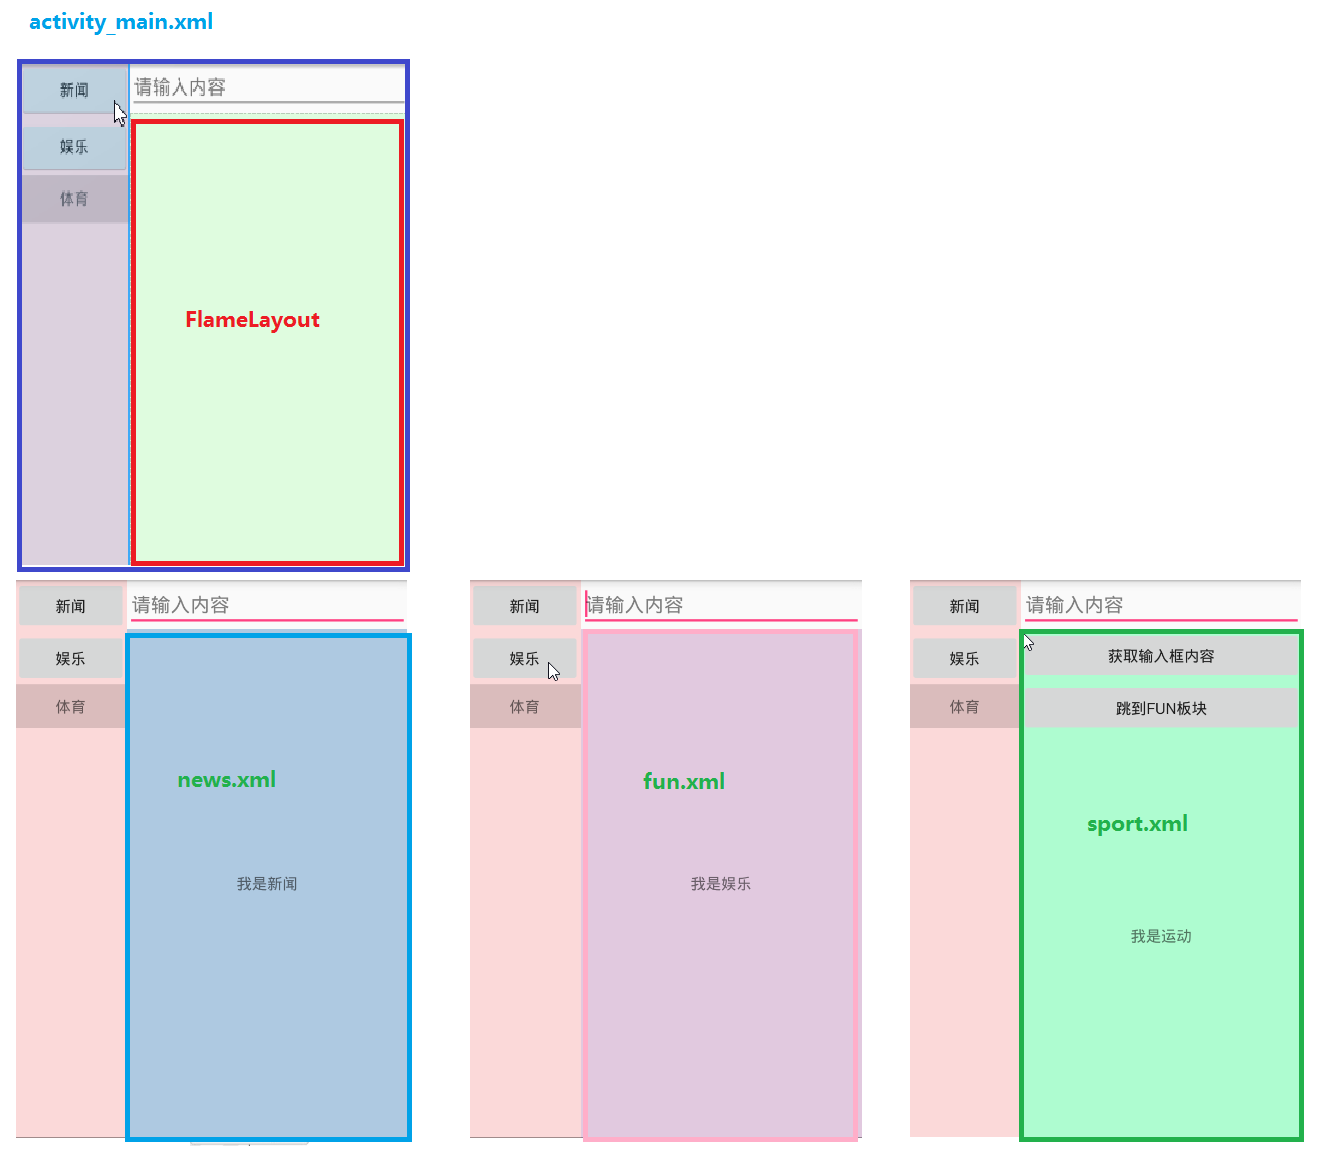
二.需求
- 1.螢幕分左右邊,左邊2/5是點選列表,右邊是:上輸入框,下文字框
- 2.最後一個內容fragment,多了個點選按鈕.並能獲取Activity裡的輸入框資訊.
- 3.效果圖如下圖1,2,3
三.程式碼:
佈局:
activity_main.xml
<?xml version="1.0" encoding="utf-8"?>
<LinearLayout
    xmlns:android="http://schemas.android.com/apk/res/android"
    android:layout_width="match_parent"
    android:layout_height="match_parent"
    android:orientation="horizontal"
    >

    <LinearLayout
        android:layout_width="0dp"
        android:layout_height="match_parent"
        android:layout_weight="2"
        android:background="#22ff0000"
        android:orientation="vertical">

        <Button
            android:id="@+id/bt_news"
            android:layout_width="match_parent"
            android:layout_height="wrap_content"
            android:text="新聞"/>

        <Button
            android:id="@+id/bt_fun"
            android:layout_width="match_parent"
            android:layout_height="wrap_content"
            android:text="娛樂"/>

        <TextView
            android:id="@+id/tv_sport"
            android:layout_width="match_parent"
            android:layout_height="40dp"
            android:background="#22000000"
            android:gravity="center"
            android:text="體育"/>


    </LinearLayout>

<LinearLayout
    android:orientation="vertical"
    android:layout_width="0dp"
    android:layout_weight="5"

    android:layout_height="match_parent">
    <EditText

        android:id="@+id/et_info"
        android:layout_width="match_parent"
        android:hint="請輸入內容"
        android:layout_height="wrap_content"/>
    <FrameLayout
        android:id="@+id/fl_content"
        android:background="#2200ff00"
        android:layout_width="match_parent"
        android:layout_height="match_parent">

    </FrameLayout>
</LinearLayout>

</LinearLayout>
fragment_fun.xml
<?xml version="1.0" encoding="utf-8"?>
<LinearLayout xmlns:android="http://schemas.android.com/apk/res/android"
              android:layout_width="match_parent"
              android:orientation="vertical"
              android:layout_height="match_parent">
    <TextView
        android:background="#33ff00f7"
        android:gravity="center"
        android:text="我是娛樂"
        android:layout_width="match_parent"
        android:layout_height="match_parent"/>
</LinearLayout>
fragment_news.xml
android:background="#330000ff"
android:text="我是新聞"
fragment_sport.xml
<Button
    android:onClick="getInfo"
    android:id="@+id/bt_getInfo"
    android:text="獲取輸入框內容"
    android:layout_width="match_parent"
    android:layout_height="wrap_content"/>
<Button
    android:onClick="goFun"
    android:id="@+id/bt_goFun"
    android:text="跳到Fun板塊"
    android:layout_width="match_parent"
    android:layout_height="wrap_content"/>
<TextView
    android:gravity="center"
    android:text="我是運動"
    android:layout_width="match_parent"
    android:layout_height="match_parent"/>
Java程式碼:
(分類寫)
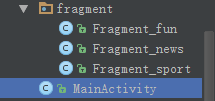
Fragment_fun.java
public class Fragment_fun extends Fragment {
    //1.固定
    @Override
    public void onAttach(Context context) {
        Log.d("abce", "onAttach");
        super.onAttach(context);
    }
    //2.建立
    @Override
    public void onCreate(Bundle savedInstanceState) {
        Log.d("abce", "onCreate");


        super.onCreate(savedInstanceState);
    }
    //3.建立View
    @Nullable
    @Override
    public View onCreateView(LayoutInflater inflater, ViewGroup container, Bundle savedInstanceState) {
        Log.d("abce", "onCreateView");
        //填充佈局進來
        return inflater.inflate(R.layout.fragment_fun,null);
    }
    //4.建立活動介面
    @Override
    public void onActivityCreated(Bundle savedInstanceState) {
        Log.d("abce", "onActivityCreated");

        super.onActivityCreated(savedInstanceState);
    }

    @Override
    public void onDestroyView() {
        Log.d("abce", "onDestroyView");

        super.onDestroyView();
    }

    @Override
    public void onDestroy() {
        Log.d("abce", "onDestroy");

        super.onDestroy();
    }

    @Override
    public void onDetach() {
        Log.d("abce", "onDetach");

        super.onDetach();
    }
}
Fragment_news.java
@Override
public View onCreateView(LayoutInflater inflater, ViewGroup container, Bundle savedInstanceState) {
    Log.d("abce", "onCreateView");
    //填充佈局
    return inflater.inflate(R.layout.fragment_news,null);
}
Fragment_sport.java
@Override
public View onCreateView(LayoutInflater inflater, ViewGroup container, Bundle savedInstanceState) {
    Log.d("abce", "onCreateView");
    View view =inflater.inflate(R.layout.fragment_sport,null);
    mBt_getInfo = (Button) view.findViewById(R.id.bt_getInfo);
    mBt_getInfo.setOnClickListener(new View.OnClickListener() {
        @Override
        public void onClick(View v) {
            //通過getActivity()方法獲取到繫結的Activity物件
            EditText et = (EditText) getActivity().findViewById(R.id.et_info);
            String str = et.getText().toString().trim();
            if (TextUtils.isEmpty(str)) {
                Toast.makeText(getActivity(), "null", Toast.LENGTH_SHORT).show();
                return;
            }
            Toast.makeText(getActivity(),"獲取到的資訊是"+str,Toast.LENGTH_SHORT).show();
        }
    });
    Button goA = (Button) view.findViewById(R.id.bt_goFun);
    goA.setOnClickListener(new View.OnClickListener() {
        @Override
        public void onClick(View v) {
            getFragmentManager().beginTransaction().replace(R.id.fl_content, new Fragment_fun()).commit();
        }
    });
    return view;
}
MainActivity.java
public class MainActivity extends AppCompatActivity implements View.OnClickListener {

    private Button mBt_news;
    private Button mBt_fun;
    private TextView mTv_sport;
    private FragmentTransaction mFt;
    private FragmentManager mFm;

    @Override
    protected void onCreate(Bundle savedInstanceState) {
        super.onCreate(savedInstanceState);
        setContentView(R.layout.activity_main);
        init();
        initView();
    }

    private void init() {
        // 獲取管理物件
        mFm = getFragmentManager();
        // 獲取事物
        mFt = mFm.beginTransaction();
        // 開始的時候馬上替換,幀佈局先放new模組;
        mFt.replace(R.id.fl_content, new Fragment_news());
        // 提交
        mFt.commit();

    }

    private void initView() {
        mBt_news = (Button) findViewById(R.id.bt_news);
        mBt_fun = (Button) findViewById(R.id.bt_fun);
        mTv_sport = (TextView) findViewById(R.id.tv_sport);

        mBt_news.setOnClickListener(this);
        mBt_fun.setOnClickListener(this);
        mTv_sport.setOnClickListener(this);
    }

    /**
     * 各個板塊的點選事件: 每點選一個,建立一個: 1.管理 2.事務 3.事務替換內容 4.提交
     */
    @Override
    public void onClick(View v) {
        switch (v.getId()) {
        case R.id.bt_news:
            getFragmentManager().beginTransaction().replace(R.id.fl_content, new Fragment_news()).commit();
            break;
        case R.id.bt_fun:
            getFragmentManager().beginTransaction().replace(R.id.fl_content, new Fragment_fun()).commit();
            break;
        case R.id.tv_sport:
            getFragmentManager().beginTransaction().replace(R.id.fl_content, new Fragment_sport()).commit();
            break;
        }
    }
}
三.Fragment的replace和add方法的區別
- 嚴格意義上講不是fragment的方法,而是管理者的方法
- 常用:比如RadioGroup切換Fragment(每個Fragment都是一個獨立的功能模組)
兩者比較和注意點:
- 1.add的時候可以把Fragment 一層層新增到FrameLayout上面,而replace是刪掉其他並替換
- 2.一個FrameLayout只能新增一個Fragment種類,多次新增會報異常,replace則隨便替換
- 替換(上一個fragment會->destroyView和destroy,新的Fragmetnon:三個Create(crete+view+activity)->onStart->onResume)
- 3.因FrameLayout容器對每個Fragment只能新增一次,所以到達到效果可用fragment的hide和show方法結合.
四.Fragment如何實現類似Activity的壓棧和出棧效果?
- 內部維持的是雙向連結串列結構
- 該結構可記錄我們每次的add和replace我們的Fragment;
- 當我們點選back按鈕會自動幫我們實現退棧按鈕