
GAN學習總結三-Pytorch實現利用GAN進行MNIST手寫數字生成
阿新 • • 發佈:2018-12-31
GAN學習總結三-Pytorch實現利用GAN進行MNIST手寫數字生成
前面兩篇部落格分別介紹了GAN的基本概念和理論推導,理論聯絡實際,本節從程式碼的角度理解GAN網路的實現及相關細節,加深自己的理解.
整個實現過程如下:
匯入相關庫
import torch
from torch import nn
from torch.autograd import Variable
import torchvision.transforms as tfs
from torch.utils.data import DataLoader, sampler
from class ChunkSampler(sampler.Sampler): # 定義一個取樣的函式
"""Samples elements sequentially from some offset.
Arguments:
num_samples: # of desired datapoints
start: offset where we should start selecting from
"""
def __init__(self, num_samples, start=0):
self.num_samples = num_samples
self.start = start
def __iter__(self):
return iter(range(self.start, self.start + self.num_samples))
def __len__(self):
return self.num_samples
NUM_TRAIN = 50000
NUM_VAL = 5000
NOISE_DIM = 96
batch_size = 128
train_set = MNIST('mnist', train=True, download=True, transform=preprocess_img)
train_data = DataLoader(train_set, batch_size=batch_size, sampler=ChunkSampler(NUM_TRAIN, 0))
val_set = MNIST('mnist', train=True, download=True, transform=preprocess_img)
val_data = DataLoader(val_set, batch_size=batch_size, sampler=ChunkSampler(NUM_VAL, NUM_TRAIN))
imgs = deprocess_img(train_data.__iter__().next()[0].view(batch_size, 784)).numpy().squeeze() # 視覺化圖片效果
show_images(imgs)


定義卷積判別網路
class build_dc_classifier(nn.Module):
    def __init__(self):
        super(build_dc_classifier, self).__init__()
        self.conv = nn.Sequential(
            nn.Conv2d(1, 32, 5, 1),
            nn.LeakyReLU(0.01),
            nn.MaxPool2d(2, 2),
            nn.Conv2d(32, 64, 5, 1),
            nn.LeakyReLU(0.01),
            nn.MaxPool2d(2, 2)
        )
        self.fc = nn.Sequential(
            nn.Linear(1024, 1024),
            nn.LeakyReLU(0.01),
            nn.Linear(1024, 1)
        )

    def forward(self, x):
        x = self.conv(x)
        x = x.view(x.shape[0], -1)
        x = self.fc(x)
        return x
定義卷積生成網路
class build_dc_generator(nn.Module):
    def __init__(self, noise_dim=NOISE_DIM):
        super(build_dc_generator, self).__init__()
        self.fc = nn.Sequential(
            nn.Linear(noise_dim, 1024),
            nn.ReLU(True),
            nn.BatchNorm1d(1024),
            nn.Linear(1024, 7 * 7 * 128),
            nn.ReLU(True),
            nn.BatchNorm1d(7 * 7 * 128)
        )

        self.conv = nn.Sequential(
            nn.ConvTranspose2d(128, 64, 4, 2, padding=1),
            nn.ReLU(True),
            nn.BatchNorm2d(64),
            nn.ConvTranspose2d(64, 1, 4, 2, padding=1),
            nn.Tanh()
        )

    def forward(self, x):
        x = self.fc(x)
        x = x.view(x.shape[0], 128, 7, 7) # reshape 通道是 128,大小是 7x7
        x = self.conv(x)
        return x
定義損失函式
判別網路的損失函式公式為:
生成網路的損失函式公式為:
bce_loss = nn.BCEWithLogitsLoss()

def discriminator_loss(logits_real, logits_fake): # 判別器的 loss
    size = logits_real.shape[0]
    true_labels = Variable(torch.ones(size, 1)).float().cuda()
    false_labels = Variable(torch.zeros(size, 1)).float().cuda()
    loss = bce_loss(logits_real, true_labels) + bce_loss(logits_fake, false_labels)
    return loss

def generator_loss(logits_fake): # 生成器的 loss
    size = logits_fake.shape[0]
    true_labels = Variable(torch.ones(size, 1)).float().cuda()
    loss = bce_loss(logits_fake, true_labels)
    return loss
定義優化器
# 使用 adam 來進行訓練,學習率是 3e-4, beta1 是 0.5, beta2 是 0.999
def get_optimizer(net):
    optimizer = torch.optim.Adam(net.parameters(), lr=3e-4, betas=(0.5, 0.999))
    return optimizer
定義訓練函式
def train_dc_gan(D_net, G_net, D_optimizer, G_optimizer, discriminator_loss, generator_loss, show_every=250,
                noise_size=96, num_epochs=10):
    iter_count = 0
    for epoch in range(num_epochs):
        for x, _ in train_data:
            bs = x.shape[0]
            # 判別網路
            real_data = Variable(x).cuda() # 真實資料
            logits_real = D_net(real_data) # 判別網路得分

            sample_noise = (torch.rand(bs, noise_size) - 0.5) / 0.5 # -1 ~ 1 的均勻分佈
            g_fake_seed = Variable(sample_noise).cuda()
            fake_images = G_net(g_fake_seed) # 生成的假的資料
            logits_fake = D_net(fake_images) # 判別網路得分

            d_total_error = discriminator_loss(logits_real, logits_fake) # 判別器的 loss
            D_optimizer.zero_grad()
            d_total_error.backward()
            D_optimizer.step() # 優化判別網路

            # 生成網路
            g_fake_seed = Variable(sample_noise).cuda()
            fake_images = G_net(g_fake_seed) # 生成的假的資料

            gen_logits_fake = D_net(fake_images)
            g_error = generator_loss(gen_logits_fake) # 生成網路的 loss
            G_optimizer.zero_grad()
            g_error.backward()
            G_optimizer.step() # 優化生成網路

            if (iter_count % show_every == 0):
                print('Iter: {}, D: {:.4}, G:{:.4}'.format(iter_count, d_total_error.data[0], g_error.data[0]))
                imgs_numpy = deprocess_img(fake_images.data.cpu().numpy())
                show_images(imgs_numpy[0:16])
                plt.show()
                print()
            iter_count += 1
開始訓練:
D_DC = build_dc_classifier().cuda()
G_DC = build_dc_generator().cuda()

D_DC_optim = get_optimizer(D_DC)
G_DC_optim = get_optimizer(G_DC)

train_dc_gan(D_DC, G_DC, D_DC_optim, G_DC_optim, discriminator_loss, generator_loss, num_epochs=20)
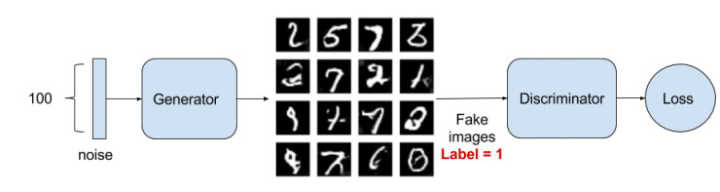
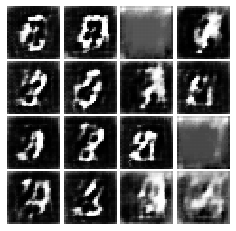
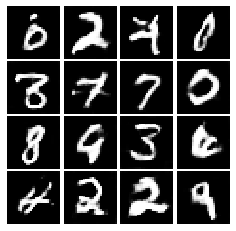
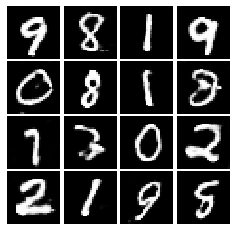
訓練過程中生成結果如下,剛開始影象模糊,後面影象越來越清晰:
參考:
https://github.com/L1aoXingyu/code-of-learn-deep-learning-with-pytorch